Using Peat Moss in Hydroponic Culture
There are several different types of media available for hydroponic culture and from these peat moss is one of the most popular due to its low cost and high availability in some countries. This media is made up of decaying mosses and is used mainly in drop irrigation systems of both a recirculating and non-recirculating nature. However the organic nature of the media provides several important challenges to the hydroponic grower which – when not controlled – can lead to important problems associated with nutrient availability, inhibiting plant growth. Today we are going to talk about the characteristics of peat moss as well as how we can amend this media to make it suitable for hydroponic cultivation.
–
–
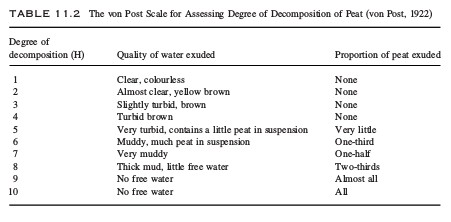
Peat’s main characteristic is its organic nature. Since it is made up of decaying organic matter this means that the chemical nature of the media will change depending on the degree of decomposition of the media and also depending on the particular moss species that were used to produce the peat moss. You can know the degree of decomposition of a peat moss sample by using a simple procedure. Place a handful of wet peat in your hand and then squeeze it, the result – how the exuded water looks and whether peat is squeezed between your fingers – will tell you all about your peat. The von Post scale – developed in the 1920s – will then allow you to tell how decomposed your media is in a scale from H1 to H10.
Highly decomposed peat will tend to remain more chemically stable as the organic decomposition process has already been carried out. For this reason you want to buy what is commonly known as “black peat” (H7-H10) where microbial activity has already dialed down and the peat moss more closely approaches what we would call an “inert media”. This however does not mean that Peat moss is chemically inert at this point as it does contain as a significant amount of substances that can affect your nutrient solution.
One main characteristic of peat is that it’s acidic. This means that the pH of untreated peat will usually be between 3 and 4.5, too low for use in hydroponic applications. Peat is generally amended with calcium carbonate (lime) to make its pH go up and remain there but this process can be ineffective if the peat can still decompose very significantly (if you buy peat with decomposition < H7). This also contributes high amounts of Ca into the media which might lead to nutritional problems if Ca is also applied normally in solution. To alleviate these issues peat is also sometimes treated with lime/dolomite mixtures so that the counter-ions are both Mg and Ca. Alternatively – but more expensively – this problem can be solved by using phosphate buffer solutions that are run through the peat for a significant period of time. A potassium monobasic/dibasic phosphate buffer at a pH of 6.5 with a 100 mM concentration can buffer the peat moss. For this the buffer needs to be applied until the run-off pH out of the peat comes out unchanged. Then tap water should be applied to remove the K/P from the media. Note that this will only work for black peat that’s already gone through most of the decomposition process as lighter peats will simply decompose further and acidify the media again.
–
–
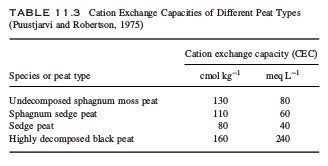
However if all you can get is already treated peat moss then you should run nutrient solution through your peat for a while before putting your plants in to ensure that the peat’s cation exchange capacity has already balanced with your nutrient solution’s composition, this will also help remove nutrients applied to the peat that deviate the nutrient concentrations from what we want within the media. Peat can have a significant cation exchange capacity as showed in the table above – even more so for black peat – so a commercial source of peat may exchange a significant amount of nutrients with your solution. Peat is also not very good at retaining anions so the media will be unable to supply any N or P which will be leached very easily from the media. This inability to retain anions basically means that they will only be available when the plant is watered, reason why you should take care to correctly monitor moisture in your media to maximize your productivity.
For hydroponics it is therefore best to find untreated black peat and treat it yourself. If this is not possible then try to find unfertilized black peat – which has had only lime but no other nutrients added to it – and then use that. A great characteristic of peat moss for hydroponics is that its nutritional content is low – allowing great control over the nutrients added through the composition of the nutrient solution – but this advantage is eliminated when the peat moss is filled up with fertilizers by companies that produce it for non-hydroponic purposes.
If you’re using black peat also make sure to check how the peat behaves when watered, if the peat compacts too much you might want to add some perlite to your peat to increase the aeration of the media and prevent excessive compacting from happening. Add perlite until you get the desired balance between aeration and moisture retention. This is not necessary with all black peat sources but it can often be required.