What is the ideal nutrient solution temperature in hydroponics?

One of the simplest variables that can make a substantial difference in crop yields in hydroponics is the temperature of the nutrient solution. Nutrient absorption by plants is mainly controlled by chemical processes within their roots and the efficacy of these processes is determined in an important part by the temperature the roots are subjected to. Since plants don’t have a mechanism for active temperature regulation they just react to changes in temperature in order to best adapt to the environment that surrounds them. Today I will be talking about the optimum solution temperature in hydroponics, what influences this value and what factors we must consider when deciding what temperature to use in our hydroponic system.

Solution temperature affects several important variables. Oxygen solubility changes as a function of temperature – decreasing as temperature increases – so as you increase the temperature the availability of oxygen to plant roots starts decreasing. As you increase temperature however the speed of the chemical reactions in plant roots increases, so there is an increase in respiration rates as temperature increases. The ideal temperature is therefore always a compromise between this decrease in oxygen availability and the increase in metabolic rate that is given by higher temperatures. For almost all commercially grown plant species optimum solution temperatures will be in the 15-30°C (59-86F) range due to this reason.

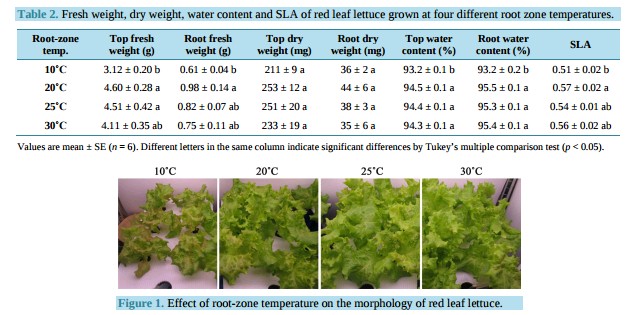
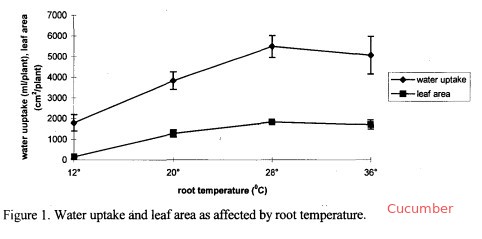
However there is no rule of thumb for optimum solution temperature selection in hydroponics. It should be clear that since different plants evolved across different conditions some of them perform better at lower temperatures and some others do better at higher temperatures. We know for example that the optimum nutrient solution temperature for potatoes is in the 20-25°C range (see here) while the optimum temperature for plants like cucumbers is higher, at 28°C (see here). For some plants like onions the best solution temperature can actually be a bit higher, even in the 26-30°C range (see here). Others like lettuce and baby leaf crops actually prefer much lower temperatures, with optimum results near 20°C (see here and here).

It is then clear that picking a random number between 15-30°C is not enough, a careful study of the plant specie being grown has to be carried out in order to select an adequate temperature. It is also important to note that higher temperature choices do not come without problems. We know for example that pythium and other infections are associated with increases in temperature since pathogen metabolism is also enhanced under warmer conditions (see here and here). This shows how even though the optimum temperature for tropical flowering plants is usually in the 25-30°C range, it is usually not common to see optimum results at these temperatures due to the potentially higher prevalence of diseases. This is most probably why growers usually go with a lower temperature in the 20-25°C to avoid risking diseases at a higher temperature.

If you want to try higher temperatures it is therefore better to go with sterile type hydroponic systems where microbes don’t play an important role and to implement measures – such as silicate additions to the nutrient solution, UV filtration and constant oxygenation – to ensure that disease prevalence is as low as possible. Also avoid adding any source of organic carbon (like sugars) as these can play an important role in feeding incoming pathogens. Big gains can be obtained with a better solution temperature control, provided that diseases are controlled and a temperature adequate for the plant being grown is selected.


Are High Pressure Sodium (HPS) Lamps better than LEDs?

Growers who use artificial lighting usually prefer high pressure sodium (HPS) lamps to do the job. Not only do HPS lamps have a very high photon flux but compared to metal halide (MH) lamps they have a much more prominent red spectral component and therefore a significantly larger dose of photosynthetically active radiation (PAR) per watt. However during recent years light emitting diode (LED) lamps have become much more efficient and have started to compete for the artificial lighting domain. However is there any advantage to using LED lights over HPS lamps? Are HPS lamps always going to be the winners? Today we are going to look at the science comparing HPS and LED lamps to see if there is currently a winner between the two.

The above graph shows you the PAR spectra. Basically this tells you which wavelengths of light are most prominently absorbed by plants. From this diagram it is clear that plants have peak absorptions around the blue and red parts of the spectra while the green section of the spectra is absorbed much less intensely and instead reflected (the reason why most plants look green). Ideally we would want lamps that have peaks in the regions of the spectra where the PAR peaks as well and we would like to have the highest peak in the red which is the region where we get the most efficient photons for the photosynthesis process.

In HPS lamps our spectra is basically fixed by the nature of the light source while in LED lamps we can tune the light source a lot. This is one of the reasons why there is such confusion when comparing HPS and LED lamps. Since LED lamps can be tuned so much it isn’t surprising that there are a large variety of cases where growers have experienced worse results from LED lamps compared with their HPS counterparts. With HPS lamps you basically buy one 1000 W lamp and you’re done while with LED lamps things such as the color distribution of the diodes being used and the focusing elements they have installed can make a tremendous different.

Checkout this study comparing LED and HPS lights to grow lettuce and radishes. The picture above shows you the results they had with HPS lamps compared with 3 different experiments using different LED distributions. A person running setups 2 or 4 would have thought that LEDs are worse than HPS lights while someone using setup 1 would have concluded that LED lamps are simply much better. This is why some growers will tell you that LED lamps are the greatest thing on earth while others will tell you they are never as good as HPS — they simply have used different lamps. Notice that in setup 3 a complete breakdown of the photosynthetic process happened.

In the above experiment growers used 4 LED types, 455nm, 640nm, 660nm and 735nm LEDs in a roughly 10:120:10:1 ratio. In setup 2 the 640nm LED intensity was reduced by a factor of 1.5, in the setup 3 the 735nm component was changed to nighttime only and in setup 4 the 735nm LED was changed to only two hours during nighttime. You can see how the decision to change a light source that contributed less than 2% of the total light flux to nighttime had a very important effect. This is because the 735nm wavelength has a circadian rhythm effect that can substantially change how the plant responds. Just turning on 2% of the LEDs at the wrong time completely turned around the results.

With the above it is not surprising that we find contradictory evidence in the scientific literature. Articles like this paper on cucumbers find that HPS provides better growing efficiency compared to LED lamps in line with other articles like this one on lettuce. However we should bear in mind that the LED lamps used are always different and the fact that a LED array provides worse results compared to HPS does not mean that this is true for all LED lamps overall. Since LED lamps can be tuned so much it is almost certain that for a given plant specie you will always find an LED combination that gives you at least the same results as an HPS lamp.

Nonetheless the power savings from LED lamps also need to be considered. In experiments where comparable photon fluxes are used LED lamps tend to provide savings of at least 30-40% in terms of power consumed from the lamps only while these savings can reach even higher values when considering the additional cooling needs of HPS lamps (that are often much lower for LED lamps).

Per the above LED lamps are definitely worth considering as a replacement for HPS lamps. However you need to properly build your LED lamps such that the photon flux and spectral composition does provide you with results that can surpass those of regular HPS. Building a lamp that is underpowered or that has an inappropriate spectral composition can indeed cause you to get results inferior to those of HPS lamps. This is most probably the reason why so many growers are so reluctant to move to this type of solutions when using either only artificial or supplemental artificial lighting.


Five dos and don’ts for automated pH control in hydroponics

The pH is one of the most important variables to control in hydroponic culture as it plays a key role in the availability of different ions and their absorption dynamics. Although most growers control pH manually it is often desirable to implement automatic pH control so that you can ensure that your solution always stays within an optimum range. This is especially true in recirculating systems where correcting the pH of the solution after it goes through the plants’ roots is necessary. Today I want to share with you five dos and don’ts when implementing automated pH control in hydroponic culture.

Do test your pH meter frequently with a buffer solution.  In hydroponics pH meters can lose calibration rather quickly as a consequence of being immersed in a nutrient solution that is at a lower ionic concentration than what’s ideal for most glass electrodes. This means that testing your pH meter with a buffer solution often – every week is ideal – is necessary in order to ensure that you are getting accurate readings. If the reading is not accurate you can then recalibrate the meter.

Do recondition your pH meter every month. In line with the above and in other to increase the life of a pH meter and each calibration it’s necessary to immerse the pH electrodes in a pH 4 or 7 buffer solution every month – for at least 2-3 hours – to ensure that the ionic content of the electrode is restored and the glass membrane’s responsiveness remains accurate. If you do this your electrode will be happier and you will need to calibrate less frequently. If an electrode is covered in biofilm the putting it in a hot bleach solution for half an hour before the buffer immersion is also necessary.

Do use electrodes designed for constant immersion. Regular pH electrodes – including those sold with some automated pH controllers – are not meant to be immersed the whole time and therefore get damaged and lose calibration much more quickly when used in this manner. To get best results use pH electrodes that are fabricated with long term immersion in mind. I wrote a blog post about these electrodes and why they are different than traditional pH electrodes.

Do place your electrode as far as possible from your pH changing inputs. When using a pH controller you should place the pH probe as far away as possible from the place where your pH up/down solutions will enter the hydroponic system. This is so that your pH electrode can get a slow change in pH as the pH up/down is mixed with the entire reservoir. Placing the probe close to the inputs will cause very erratic changes in the pH that do not really reflect the effect of the addition across the entire reservoir.

Do have addition limits in your controllers. Allowing a pH controller to add as much substance as needed to correct the pH can be a very bad thing to do. This is because several things can go wrong – pH probe losing calibration, controller getting damaged, electrical noise etc- that can cause unnecessary levels of addition that can kill an entire crop. Always have controllers where maximum additions per unit of time can be specified so that the possibility of this happening is minimized.

Don’t rely on a single pH probe. Although single probe controllers are the most common they can also be the most dangerous. A pH probe can get damaged, it can lose calibration or it can give erratic readings due to other reasons (for example electrical interference from other things in the reservoir). Therefore it’s always best to use two-probe controllers where readings are always verified across the two probes to ensure that the reading the controller is getting is accurate. If you have a commercial enterprise then this is a must, you wouldn’t want to lose an entire crop due to a bad pH probe adding a ton of acid/base to your solution.

Don’t aim for a specific pH value. A pH controller should not aim for a specific value of pH but to maintain pH within an adequate range. Usually the best way for a controller to act is to have a range with high/low thresholds where the controller will act to take the pH to the middle of the range when these thresholds are exceeded. For example a controller can be told to maintain pH in the 5.6-6.4 region and then it will act whenever the pH reaches 5.6 or 6.4 to take it back to 6 when any one of these two thresholds is breached. However if the pH is at 6.4 and the controller drops it to 5.8 it will not try to then bring the pH up (because it’s above the lower threshold).

Don’t place your pH probes near pumps or other electrical equipment in reservoirs. A pH probe takes an electrical measurement and is therefore prone to electrical interference. Having a pH probe close to other electrical equipment – especially those that draw significant current – can cause those wires to induce currents in the pH probe wires and generate all sorts of issues with pH readings. Always place pH probes away from pumps and ensure the pH probe and pump wires are never tangled together.

Don’t use very concentrated acid/base input solutions. A pH controller will be doing very fine control over a small pH range so it won’t need a very large amount of acid/base to do this job. Using very concentrated acid/base can cause the pH controller to completely overshoot its targets and cause it to either cause the system to get into an undesirable state – for example a very low pH if the controller can only add acid – or enter a loop where acid additions are followed by base additions in an endless cycle. Usually you want your acid/base mixtures to be concentrated enough to shift the pH over their addition volume but not much more than that. Strong acids/bases in the 10-20% concentration range are usually more than enough for this job.

Don’t ignore your controller’s data. A pH controller will do its job – control pH within a range – but it will not tell you whether your system is doing ok or not from a plant-health perspective. How often your pH controller has to add acid/base and how much acid/base it’s using to perform its job are important pieces of information that you need to take into account in order to ensure that your system is working properly. Remember that pH controlling substances often also contribute nutrients – like phosphorous or potassium – so it’s important to keep all these additions in check.

Of course pH control is no simple task and different pH controllers will have different advantages and disadvantages. However doing what you can to ensure proper maintenance – cleaning, conditioning electrodes, having proper placement, etc – can go a long way in ensuring that your setup behaves as ideally as possible. If you can then I would advice you build your own controllers using things like arduinos, raspberry pi computers and robust immersion pH probes so that you can have an optimum setup that can deliver all the advantages of pH control with as few disadvantages as possible. I’ll write about building your own pH controller in a future post.


Using triacontanol to increase yields in hydroponics

Usually additives used in hydroponics need to be added in rather large quantities to obtain palpable results. Molecules like salicylic acid – which we have discussed before – need to be used in concentrations in the order of 10-4 to 10-2 M to obtain a significant effect. This means that you need to use quantities in the order of 20-150ppm of most additives in order to see a significant result. However there is a molecule called 1-triacontanol that can generate very significant results with only a fraction of that concentration. Today we will talk about this substance, what it does, how to use it and why it’s such a desirable tool in your hydroponic additive arsenal. Many of the things I will talk about in this article are derived from this 2011 review on triacontanol (make sure you read that for a deeper insight into why this molecule works).

Triacontanol is a very long fatty alcohol. Each molecule has 30 carbon atoms linked in a linear structure which makes this molecule extremely hydrophobic and hence very hard to dissolve in something like water. Using triacontanol therefore involves dissolving this molecule in something other than water –  for example Tween 20, chloroform, methanol – before adding water in order to prepare an emulsion for use in either root applications or foliar feeding. Most research using triacontanol has used foliar feeding as this is the easiest way to control the application of the molecule and also how it seems to have the largest effect.

The effects of this molecule are not short of miraculous. Triacontanol is usually applied in concentrations on the order of 10-7 to 10-9 M, which means it is used from around 0.01 to 1 ppm. This means that we use about 1000 times less triacontanol than other additives in order to obtain a meaningful result. The table below shows some of the effects that triacontanol has showed in peer reviewed studies, with plant height, weight and yields increasing across a variety of different species, from tomatoes to japanese mint. Papers on other plants besides those on the chart have also been published, for example triacontanol has showed to significantly increase yields in lettuce crops (here).  Some studies have also found that the effect of triacontanol can also be enhanced through the use of magnesium or in conjunction with other hormones (here).

With such an impressive array of effects and such a low expected toxicity – due to its very low solubility – it’s definitely one of the best additives to use to get production gains in hydroponic crops. This also makes it one of the most commonly used substances in commercially available grow enhancers. Nonetheless since it’s used in such a small quantity it’s very easy for someone to buy a small amount of triacontanol and use it for years before running out. You can buy small amounts of triacontanol as a powder (there are several reputable sellers on ebay) and you can then prepare your own concentrated triacontanol solution in Tween 20 – not water – that will last you for ages. A liter of 2000ppm solution of triacontanol will last you for 1000-2000 liters of foliar spray. You cannot get more economical than that.

The optimum application rate and frequency for triacontanol varies across different species but if you want to take an initial guess use a foliar application of a 0.5 ppm solution every week. There is usually a sweet spot for concentration – after that you start to see a decrease in results compared to the highest point – so you want to start below a 1 ppm application rate. For some crops repeated applications might be unnecessary – with just one or two applications giving most of the effect through the entire crop cycle – while for others you do want to apply every week. How you initially dissolve the triacontanol to make your concentrated solution is also important with Tween 20 being the most ecologically friendly – although not the easiest – option.


Salicylic acid and its positive effect in hydroponics

When looking for ways to increase crop yields we usually want something that is safe for the environment, safe for us and able to give us a substantial bang for our buck. From the multitude of additives that have been researched during the past 30 years one simple organic molecule seems to fit all the requirements very well: salicylic acid. Today we are going to talk about why this additive is so interesting for use in hydroponic culture, the results it has shown in peer reviewed publications and how we can use it to increase our crop yields. For those of you interested in this molecule I would also recommend reading this 2010 review which contains a much more detailed look into the scientific literature surrounding salicylic acid research in higher plants.

Salicylic acid is a simple organic molecule with the structure showed above. We have known for a long time that plants produce it and we knew almost right from the start that it played a key role in plants’ response to diseases and stress (see here for some early insights from Tobacco cultivation). Salicylic acid is used as a signaling molecule in plants (a.k.a hormone), moving from stressed organs to non-stressed ones as the plant is attacked. However its role is much more complex, having functions related with chloroplast creation, inhibition of fruit ripening and many other important processes.

After learning that this was an interesting molecule it wasn’t long before people started studying whether exogenous applications provided any benefit. We have learned that it enhances dry mass and leaf area in corn and soybean (here), that it can enhance germination in wheat (here), the oil content in basil (here), the carbohydrate content in maize, etc. There are also several studies pointing to improvement in root development – even from foliar applications (here) – suggesting that this hormone is able to increase plant productivity through several different mechanisms. The incidence of diseases can also be reduced dramatically by salicylic acid applications (here).

We also know this molecule has important effects on the flowering process. It can induce earlier flowering in plants and can often cause larger fruit settings in some plants (like papaya (here)). Most importantly foliar spraying of tomato and cucumber plants with salicylic acid has showed important increases in yields (here). It is therefore clear that exogenous applications of salicylic acid can have many important benefits in crop production and this is therefore an important candidate to consider for enhancing crop production.

But how do we apply it? Most commonly this molecule is applied in foliar feeding regimes, although in some cases it is also applied directly in hydroponic solutions. Most commonly concentrations in the order of 10-5 -10-4 M are used since it has been showed across a few studies that negative effects start to show up when the concentration level reaches 1mM. This means that regular doses will be around 1-100 ppm with the lowest spectrum of dosage being preferred if the effect on the particular plant is unknown. The solubility of salicylic acid is 2.48g/L at 25°C so concentrated solutions of up to around 20-30x can be prepared without issues to make it easier to apply on plants. The preparation of more concentrated solutions requires some tricks but it certainly can be done.

Salicylic acid also has the advantage of being a very safe molecule so it can be applied without a lot of worry in order to experiment with its effects. For testing on new plants foliar applications of 20-30ppm would be most common, with applications usually carried out once every 5-10 days. The frequency of application as well as the best concentration to use will of course depend on the particular plant you’re growing. There are also several other molecules that can be used with salicylic acid to enhance its effect on some plants, but this will be the focus of a future post.

Finally it is also worth noting that salicylic acid is not aspirin (aspirin is acetylsalicylic acid, a related yet different molecule) so if you want to experiment with this additive you should buy salicylic acid instead of just “dumping some aspirin” into your foliar or hydroponic nutrient solution.