Five important things to consider when doing foliar spraying

Foliar spraying is a true and tested way to increase yields and prevent issues in plant culture. Both soil and hydroponic growers have used foliar fertilizer applications to increase yields and prevent problems due to nutrient deficiencies during the past 50 years. However there is a lot of mystery and confusion surrounding foliar fertilizer applications, reason why this technique is often applied incorrectly or sub-optimally. Today I want to talk about 5 key pieces of information to consider when doing foliar fertilization so that you can be more successful when applying it to improve your crop results and reduce deficiency problems. If you want to learn more about these factors I suggest you read the following reviews on foliar feeding (here, here and here). Second table in this post was taken from this study on wheat.

Image result for foliar spray

Foliar fertilization is not root fertilization. A usual problem when doing foliar fertilization is to think that the same products can be used for leaves and roots. When you want to increase your crop yields using foliar fertilization you should definitely not use the same products and concentrations you use for soil. There are for example some chemical substances that you would never want to apply to the roots that have actually shown to give better outcomes in leaves. A good example is calcium chloride which is a huge mistake in root fertilizers but a great choice when doing foliar fertilization.

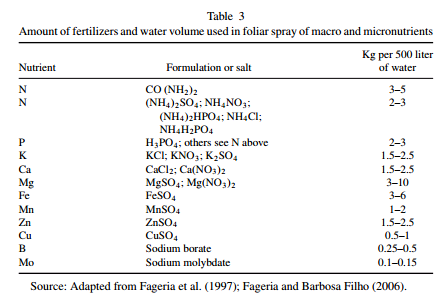
Foliar fertilizers should generally be much more concentrated. When people apply foliar fertilization they usually apply much lower concentrations because they are afraid of burning leaves. Although this can certainly happen if the foliar fertilizer is badly designed research has shown that the best results are obtained with much higher concentrations than what you generally use for the roots. For example when you apply an iron foliar fertilization regime you generally use a concentration of 500-1200 ppm of Fe while in root applications you only very rarely go beyond 4-5 (most commonly 1-3 ppm). Usually concentrations in foliar fertilizers will be much higher and if the fertilizer is correctly designed this will give much better results. The graph below (taken from the first review linked above), shows some of the most commonly used fertilizer concentrations.

Surfactants are very important (don’t use dish washing soap!). Leaf coverage is very important in foliar applications because you want the fertilizer to be evenly spread across the entire leaf not “clumped” into drops due to surface tension. Many people have trouble with nutrient burn due to bad fertilizer design that causes inadequate leaf coverage. However all surfactants are not created equal and ionic fertilizers are very undesirable for this task due to their interaction with leaf tissue and fertilizers. Due to this reason you should NOT use something like dish washer liquid soap but a proper non-ionic surfactant like a polysorbate. The surfactant will be a very important part of your foliar fertilizer formulation.

Timing is also critical. The time when you do your foliar sprays applications is also very important for optimal results. In general you want the leaf stomata to be open and the vapor pressure deficit to be lower so the best time to do foliar spraying is usually during the afternoon after temperatures have dropped significantly. For most time zones this usually means sometime after 3PM. Doing foliar applications sooner can lead to much larger stress due to a higher vapor pressure deficit – risking burns as well – while doing it later leads to less efficient absorption due to the stomata being closed. If applying the spray at this time is not possible then early morning often works as well. Make sure you measure your daily temperature/humidity fluctuations to ensure you don’t do foliar sprays at a high VPD.

Image result for foliar spray yield

Couple adequate additives for yield increases. Research has shown that while nutrient foliar spraying can enhance yields significantly under sub-optimal root feeding conditions if the root concentrations are already optimal – as in a well managed hydroponic crop – it is hard for simple nutrient foliar spraying to provide a lot of benefit. However there are several biostimulants that are poorly absorbed through the root zone that can give you much better results when used as foliar sprays. Additives like salicylic acid and triacontanol can make sure that your nutrient foliar spray gives you maximum additional benefits.

As you can see there is a lot to the design of an adequate foliar spray. You must consider that the substances you use need to be fit to the purpose – not necessarily the same as for root applications! – and that your concentrations, surfactants, additives and application times are adequate. Now that you are aware of these factors you should take them into account when designing your next round of foliar spraying for your crops.


Creating a robust pH/EC monitor for hydroponics using Atlas probes and an Arduino

A few months ago I talked about how you could build a simple sensor station for your hydroponic projects using an arduino (see here). However this small project used the relatively cheap – but I have found not very robust – pH/EC probes and boards from gravity which makes it a poorer choice for a more professional project aiming to constantly monitor the pH/EC of a production hydroponic setup. Today I am going to tell you how you can build a dedicated pH/EC monitor using the robust pH probes from Atlas, which also have several important advantages we will be discussing within this post. I would also like to point out that Atlas is not paying me anything to write this post, I write just because of my experience using their probes.

The pH/EC probes from gravity have several problems when looking for a robust sensing setup. The first issue they have is that the probes are not rated for constant immersion, so they are damaged if you place them within solution the whole time which is probably what you want to do within a production hydroponic setup. The second issue is that the boards require cable connections to the Arduino which introduces a significant amount of noise that can causes problems with measurements. Due to poor isolation there can also be issues with the gravity boards when measuring EC/pH at the same time. To overcome these issues we can use probes and boards from atlas which have the advantage of having no cable connections to the Arduino – connections are through pins directly – plus the probes are rated for constant immersion and are much more robust. These are the things we would need to build this project:

As you notice this sensor project is much more expensive than the sensor station I had discussed before, with a price tag of around 490 USD (not including shipping). However when looking for a robust setup you definitely should favor the additional expense as this will likely be paid off with much longer service times.

When you get the pH/EC kits the first thing you want to do is change your EZO boards (the small circuit boards that come with them) to i2C mode so that you can use them with your mini tentacle shield. To do this follow the instructions here, follow the instructions in the “Manually switch between UART and I2C” section, use female jumpers to make this process easier. Note that you can use your LCD shield analogue 5V and ground pins when you need power within the process.

//Libraries
#include <U8glib.h>
#include <stdio.h>
#include <Wire.h>
#include <Arduino.h>

#define TOTAL_CIRCUITS 2  

///---- variables for pH/EC tentacle shield ------- //

#define TOTAL_CIRCUITS 2   

char sensordata[30];                  
byte sensor_bytes_received = 0;       

byte code = 0;                        
byte in_char = 0;  
int channel_ids[] = {99, 100} ;                   
   
// ------------------------------------------------ //    

// EC values // CHANGE THESE PARAMETERS FOR EC PROBE CALIBRATION
#define EC_PARAM_A 0.00754256

//pH values // CHANGE THESE PARAMETERS FOR PH PROBE CALIBRATION
#define PH_PARAM_A 1.0
#define PH_PARAM_B 0.0

#define XCOL_SET 55
#define XCOL_SET2 65
#define XCOL_SET_UNITS 85

//--------------------------

U8GLIB_NHD_C12864 u8g(13, 11, 10, 9, 8);   
float pH, EC;

//--------------------------

void draw() {
  u8g.setFont(u8g_font_04b_03); 
  
  u8g.drawStr(0,11,"pH:");
  u8g.setPrintPos(XCOL_SET,11);
  u8g.print(pH);
  
  u8g.drawStr(0,21,"EC:");
  u8g.setPrintPos(XCOL_SET,21);
  u8g.print(EC);
  u8g.drawStr( XCOL_SET_UNITS,21,"mS/cm" );
  
}

void read_tentacle_shield(){

  for (int channel = 0; channel < TOTAL_CIRCUITS; channel++) {      
  
    Wire.beginTransmission(channel_ids[channel]);     
    Wire.write('r');                         
    Wire.endTransmission();                       
    
    delay(1000); 

    sensor_bytes_received = 0;                        
    memset(sensordata, 0, sizeof(sensordata));        

    Wire.requestFrom(channel_ids[channel], 48, 1);    
    code = Wire.read();

    while (Wire.available()) {         
      in_char = Wire.read();           

      if (in_char == 0) {               
        Wire.endTransmission();         
        break;                          
      }
      else {
        sensordata[sensor_bytes_received] = in_char;      
        sensor_bytes_received++;
      }
    }
    
    if (code == 1){
      if (channel == 0){
        pH = atof(sensordata);
        pH = pH*PH_PARAM_A + PH_PARAM_B;
      }
      if (channel == 1){
        EC = atof(sensordata);
        EC = EC*EC_PARAM_A;
      }    
    }
  }
  
}

void setup()
{
    pinMode(13,OUTPUT);  
    Serial.begin(9600);
    u8g.setContrast(0);
    u8g.setRot180(); 
}

void loop()
{
 
  digitalWrite(13, HIGH);       
  delay(800);
  digitalWrite(13, LOW);   
    
  read_tentacle_shield();

  u8g.firstPage();
    do  {
      draw();
    } 
      while( u8g.nextPage() );          
      
}

Once you have changed the EZO boards to i2C you can now plug everything into the arduino and upload the code into your arduino. Plug the EZO boards into the mini tentacle shield and then plug that shield into the arduino. You’ll notice that the EZO boards make it impossible to plug the LCD screen directly on top – as the EZO circuits make the shield too tall – so you should use stackable headers to extend the connections so that you can plug the LCD screen on top without any problems. Make sure you download and install the U8glib library in your arduino IDE before uploading the code.

As with the previous code you’ll notice there are variables called PH_PARAM_A, PH_PARAM_B and EC_PARAM_A within the beginning of the code that you should change in order to calibrate your probes. Follow the instructions about calibration I gave in the previous post in order to figure this out. Using the calibration solutions that come with your kits you’ll be able to perform this calibration procedure. Whenever you want to calibrate your probes you should reset these variables to their original values, reupload the code and retake measurements.

Following this guide you will have a very robust sensor setup using very high quality probes. These probes are also coupled with a board that has no wire connections with the arduino, offering very high quality readings with very small amounts of noise. Additionally the LCD shield opens up the possibility to add more sensors to your station so that you can monitor, temperature, humidity, and carbon dioxide potentially from a single place.


Comparing the conductivity of two different solutions

Conductivity is perhaps the most misunderstood and erroneously used measurement in hydroponic culture. This has a lot to do with conductivity also being called a “totally dissolved solid” (TDS) measurement and the conductivity scale being expressed in “ppm” units, concentration units which only cause confusion in this area. Today I want to talk about an important consequence of this confusion that happens when you try to compare the conductivity of different nutrient solutions. I’ll talk about a recent case I encountered and how it generated significant problems due to a natural misunderstanding of how conductivity works.

A grower wanted to run a side by side trial of two nutrient formulations using identical growing conditions. This grower then decided that the best way to do this was to ensure that the conductivity and pH of the two solutions were identical after preparing the nutrient solutions, then they would both be equivalent in terms of their strength and differences in results would be entirely due to the differences in ionic ratios between both of them. The media was the same, the environment was the same and plant genetics were the same.

However there was a small problem with this thinking. The same conductivity across two different solutions is not the same thing. You might think that using a conductivity of 2.0 mS/cm across two different nutrient solutions might mean that their “strength” is the same, but in reality the strength of a solution – as per what a plant really experiences – is determined by its osmotic pressure and osmotic pressure – although proportional to conductivity within the same solution – cannot be extrapolated when the composition of the solution changes. This confusion is further expanded when people see the conductivity numbers in ppm because the expression in mg/L makes them think there is the same “amount of stuff” in the two solutions. This is not the case.

All the ppm does is tell you that your solution has the same conductivity as a reference with that ppm concentration (commonly NaCl or KCl) but it tells you nothing about how many dissolved solids are really present within your nutrient solution. Given that non-conductive substances also affect the osmotic pressure of a solution it can happen that a nutrient solution with the same conductivity as another one in reality has a lot more dissolved solids, making it far more concentrated in real terms compared to the other one.

In the above mentioned particular case one solution had a chelating agent that effectively made a significant number of ions neutral in charge (effectively making them non-conductive) reducing the measured conductivity by around 20% at the same osmotic pressure as the other solution. So while the grower was feeding the two solutions at the exact same conductivity, the second solution was around 20% more concentrated in real terms – osmotic pressure terms – compared to the other one. Plants responded very negatively to this – as the conductivity was already quite high – so the grower erroneously assumed that this was due to the ionic ratios instead of it simply being due to an error in judging concentrations. The second solution was a lot stronger in real terms, although the conductivity was the same.

When comparing two nutrient solutions you should therefore resort to measurements different than conductivity because the conductivity of two different solutions with different ion compositions cannot be compared, the same level of conductivity will result in two completely different osmotic pressure values. Their strengths will not be the same. If you want to compare two different solutions at the same real strength then you need to use an osmometer to determine this point and sadly osmometers are neither cheap nor practical to use.

However another possibility is to simply compare at a constant concentration of a given element. Have a lab analysis of the two fertilizers made – remember you cannot trust labels to give you the real composition values – calculate how much of a given element, for example N, is present at a given application rate and then dial in the other fertilizer to match that N concentration. The osmotic pressures will probably be different but at least under this sort of A/B test you will be comparing apples to apples in the sense that the only variable will be the N:X ionic ratios between the two solutions. Total strengths will differ but this will be due to differences in ionic ratios, which is probably what you want to test.


Controlling aphids in a hydroponic crop. Part 1.

Without a doubt aphids are one of the most common pests affecting crops worldwide. There are both root and leaf aphids, the former which generally live only around plant roots – producing winged offspring only to infest new plants – while the later live generally in plant stems, leaves and – when infestations are bad enough – even within plant flowers and fruits. Today we are going to talk about several alternatives to deal with aphids, from traditional insecticides to more natural alternatives such as biocontrol options. We are not going to discuss mechanical options here – we’ll leave that to part two – as we’ll focus only on chemical and biological control within this first part.

There is one clear winner when controlling aphids. At the present time nothing will beat neonicotinoids in fighting aphids as these insecticides are very effective against a wide range of sucking insects (which are insects that suck material out of plant tissues). Originally made during the mid 1980’s and massively popularized during the 1990’s (see here) insecticides like imidacloprid have been huge winners in the fight against aphids. They are applied via soil applications – no need for foliar applications – where they are absorbed by the roots and effectively make plant tissue completely toxic for aphids, affecting their nervous system.

However everything is not rosy with insecticides like imidacloprid. Neonicotinoids affect beneficial insect populations – bees in particular (see here) – so they are not good for the environment in general. As a secondary problem they also remain within plants for a really long time so they should only be used when plants are a significant time away from harvest (at least 60 days is usually recommended). When using on edible crops make sure you get a formulation that has been specifically designed for this purpose (like this one). However some legislations require no imidacloprid to be present in plant tissue meant for human consumption so it is important to check with regulatory guidelines regarding its use. There are several studies showing how imidacloprid can accumulate in fruits and flowers (see here for an example in maize, here for an example in tomatoes).

Perhaps we can resort to less damaging alternatives but still control aphids effectively. Predatory insect applications don’t work very well (another post about this coming soon!). But one of the best alternatives I have found so far is to use Lecanicillium Lecanii – and other Lecanicillium species – as a parasitic fungus to attach the aphids. Not only are they effective in attacking aphids but they can also be used as a two-for-one control against powdery mildew and other pathogens as well (see herehere and here). I have had a few recent experiences with customers that have had good success using such fungi to control aphids in several crop types, including parsley and tomatoes. I have had great personal success in parsley, basil and mint plants. These two are the products that I have seen used containing this fungi (here and here). Image below taken from this paper and first image in this post taken from this paper.

There are also some naturally occurring insecticides that can be used, such as neem oil based products. The problem with these insecticides is that they do work – sort of- depending on the plant and aphid specie you are trying to tackle (see here). Generally 0.2-0.5% emulsions of the oil are effective against aphid populations with such application generally killing most aphids when they work (see here and here). Although neem oil applications shouldn’t be considered as a stand-alone solution they can provide a strong head-start when dealing with aphid infestations since they can kill a large portion of the population – if they are susceptible – without harming beneficial insects that might be predating on the aphids already. Last image in this post taken from this paper.

For root aphids the option to use beneficial nematodes also exists. These worms enter the insect bodies and feed on their internal fluids, killing them in the process. However in contrast with fungal spores nematodes do actively seek their pray, so they will hunt the aphids down within the media while a fungal spore needs to meet the aphids randomly. Single nematode species like Heterorhabditis bacteriophora can attack aphids although combinations using other nematode species are usually more effective since different nematodes usually attack different species with different efficiencies (see here). Mortality rates when using nematodes are usually at most around 80% so they need to be effectively used in combination with other methods to provide effective control.

As you can see there are several options for aphid control in your crops. Although using synthetic insecticides like imidiacloprid might be the most effective alternative there are in fact other options that can also be used successfully if the use of a neonicotinoid is not desired. Application of Lecanicillium species has shown to be most effective in peer reviewed studies while nematode and neem applications can help compliment this approach and provide a defense against other insects and pathogens. On the next post in this series we’ll talk a bit more about additional aphid control using mechanical means that are neither chemical nor biological.