Arduino hydroponics, how to build a sensor station with an online dashboard
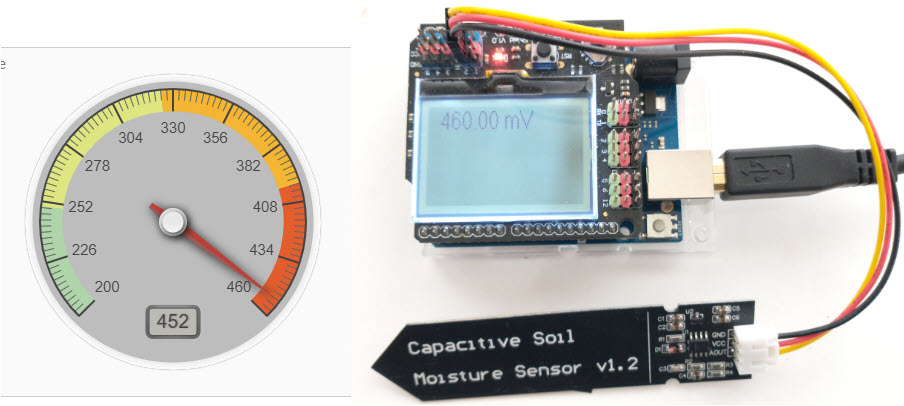
In a previous post about Arduino hydroponics, I talked about some of the simplest projects you could build with Arduinos. We also talked about how you could steadily advance towards more complex projects, if you started with the right boards and shields. In this post, I am going to show you how to build a simple sensor station that measures media moisture and is also connected to a free dashboard platform (flespi). The Arduino will take and display readings from the sensor and transmit them over the internet, where we will be able to monitor them using a custom-made dashboard. This project requires no proto-boards or soldering skills.

The idea of this project is to provide you with a simple start to the world of Arduino hydroponics and IoT interfacing. Although the project is quite simple, you can use it as a base to build on. You can add more sensors, improve the display, create more complicated dashboards, etc.
What you will need
For this build, we are going to use an Arduino Wifi Rev2 and an LCD shield from DFRobot. For our sensor, we are going to be using these low-cost capacitive moisture sensors. This sample project uses only one sensor, but you can connect up to five sensors to the LCD shield. Since this project is going to be connected to the internet, it requires access to an internet-connected WiFi network.
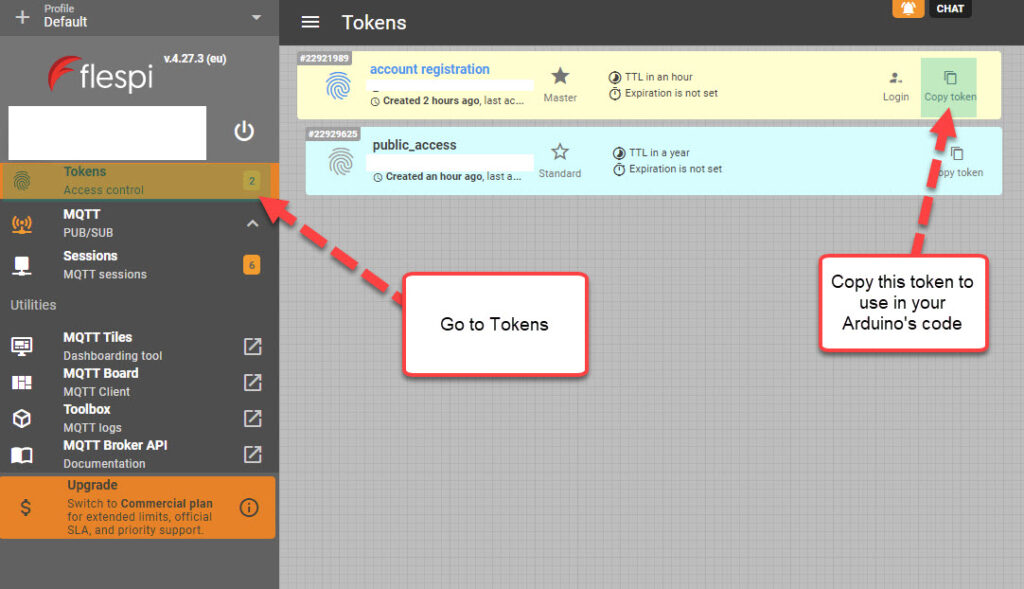
Additionally, you will also need a free flespi account. Go to the flespi page and create an account before you continue with the project. You should select the MQTT option when creating your account since the project uses the MQTT protocol for transmission. After logging into your account, copy the token shown on the “Tokens” page, as you will need it to set up the code.
Libraries and code
This project uses the U8g2, ArduinoMQTTClient and WiFiNINA libraries. You should install them before attempting to run the code. The code below is all you need for the project. Make sure you edit the code to input your WiFi SSID, password, and Flespi token, before uploading it to your Arduino. This also assumes you will connect the moisture sensor to the analogue 2 port of your Arduino. You should change the ANALOG_PORT variable to point to the correct port if needed.
#include <Arduino.h>
#include <U8g2lib.h>
#include <WiFiNINA.h>
#include <ArduinoMqttClient.h>
#include <SPI.h>

#define SECRET_SSID "enter your wifi ssid here"
#define SECRET_PASS "enter your password here"
#define FLESPI_TOKEN "enter your flespi token here"
#define ANALOG_PORT  A2

#define MQTT_BROKER    "mqtt.flespi.io"
#define MQTT_PORT      1883

U8G2_ST7565_NHD_C12864_F_4W_SW_SPI u8g2(U8G2_R0, /* clock=*/ 13, /* data=*/ 11, /* cs=*/ 10, /* dc=*/ 9, /* reset=*/ 8);
float capacitance;
WiFiClient wifiClient;
MqttClient mqttClient(wifiClient);

// checks connection to wifi network and flespi MQTT server
void check_connection()
{
  if (!mqttClient.connected()) {
    WiFi.end();
    WiFi.begin(SECRET_SSID, SECRET_PASS);
    delay(10000);
    mqttClient.setUsernamePassword(FLESPI_TOKEN, "");
    if (!mqttClient.connect(MQTT_BROKER, MQTT_PORT)) {
      Serial.print("MQTT connection failed! Error code = ");
      Serial.println(mqttClient.connectError());
      delay(100);
    }
  }
}

void setup() {
  pinMode(LED_BUILTIN, OUTPUT);
  pinMode(4, OUTPUT);
  Serial.begin(9600);
  analogReference(DEFAULT);
  check_connection();
}

void loop() {

  String moisture_string;
  check_connection();

  // read moisture sensor, since this is a wifiRev2 we need to set the reference to VDD
  analogReference(VDD);
  capacitance = analogRead(ANALOG_PORT);

  // form the string we will display on the Arduino LCD screen
  moisture_string = String(capacitance) + " mV";
  Serial.println(moisture_string);

  // send moisture sensor reading to flespi
  mqttClient.beginMessage("MOISTURE1");
  mqttClient.print(capacitance);
  mqttClient.endMessage();

  // the LCD screen only works if I reinitialize it on every loop
  // I also need to reset the analogReference for it to properly work
  analogReference(DEFAULT);
  u8g2.begin();
  u8g2.setFont(u8g2_font_crox3h_tf);
  u8g2.clearBuffer();          // clear the internal memory
  u8g2.drawStr(10,15,moisture_string.c_str());  // write something to the internal memory
  u8g2.sendBuffer();          // transfer internal memory to the display

  delay(5000);

}
Your Arduino should now connect to the internet, take a reading from the moisture sensor, display it on the LCD shield and send it to flespi for recording. Note that the display of the data on the LCD shield is quite rudimentary. This is because I didn’t optimize the font or play too much with the interface. However, this code should provide you with a good template if you want to refine the display.
Configure Flespi
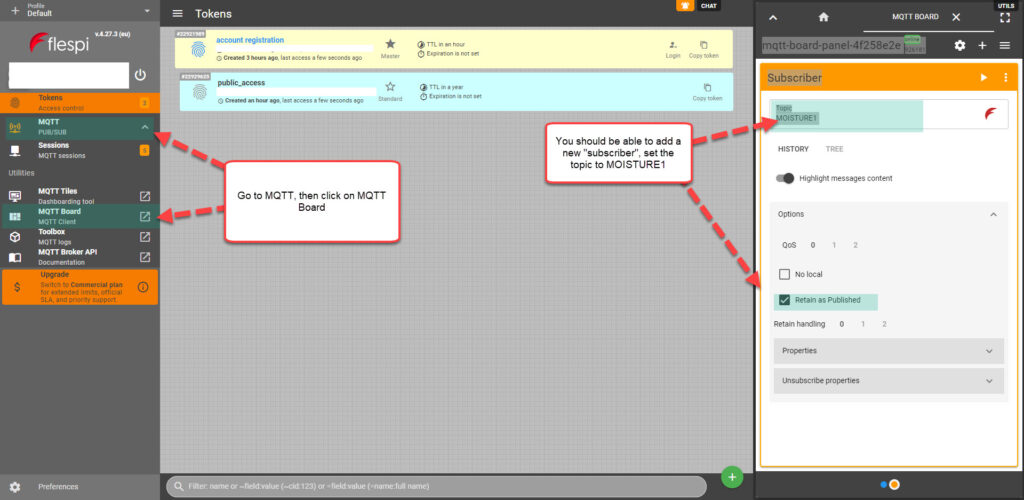
The next step is to configure flespi to record and display our readings. First, click the MQTT option to the left and then go into the “MQTT Board” (click the button, no the arrow that opens up a new page). Here, you will be able to add a new subscriber. A “subscriber” is an instance that listens to MQTT messages being published and “MOISTURE1” is the topic that our Arduino will be publishing messages to. If you want to publish data for multiple sensors, you should give each sensor its own topic, then add one flespi subscriber for each sensor.
Create the Dashboard
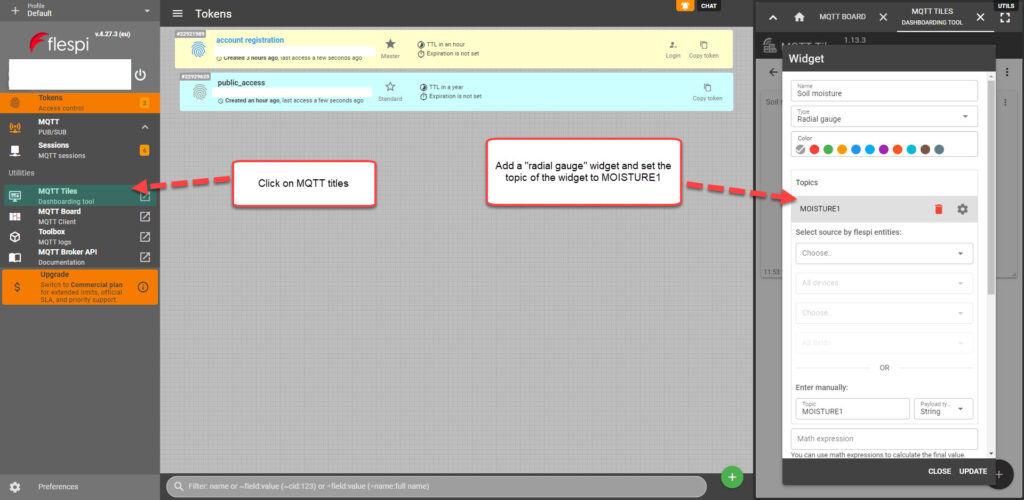
The last step, is to use the “MQTT Titles” menu to create a dashboard. I added a gauge widget to a new dashboard, and then set the topic of it to MOISTURE1, so that its data is updated with our MQTT messages. I set the minimum value to 200; the maximum value to 460; and the low, mid, and high levels to 250, 325, and 400 respectively.
After you finish creating the dashboard, you can then use the “Get link” button, which looks like a link from a chain next to your dashboard’s title. You will need to create an additional token in the “Tokens” menu so that you can use it for the sharing of the dashboard. After you generate the link, it should be publicly available for anyone who is interested. This is the link to the dashboard I created.
Conclusion
You can create a simple and expandable sensor station using an Arduino Wifi Rev2, a capacitive moisture sensor, and an LCD shield. This station can be connected to the internet via Wifi and send its data to flespi, which allows us to create free online dashboards. You can expand on this sensor station by adding more moisture sensors or any other Gravity shield compatible sensors, such as a BME280 sensor for temperature, humidity, and atmospheric pressure readings.


