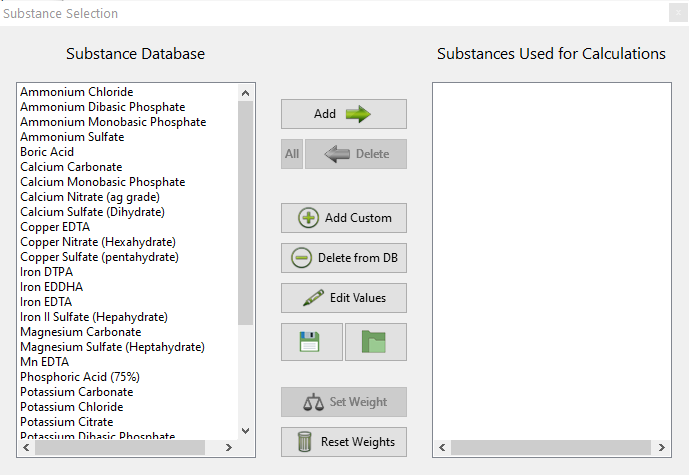
Nutrient problems and foliar sprays
Nutrient related issues are common in hydroponic crops. They can happen due to a large variety of issues, including pH drifting, EC drifting, lack of proper nutrient ratios, humidity issues, temperature issues and root damage. The fact that an issue is of a nutritional nature will be evident within a leaf tissue analysis, but its correction by changing the nutrient solution’s composition might not be evident, since transport problems imply that a deficiency in tissue might happen for a wide variety of reasons different than the concentration in the nutrient solution being “too low” (read more here). In today’s post I will talk a bit about why the quickest path to recovery might actually be to perform foliar sprays instead of only attempting to change the chemistry of the nutrient solution.

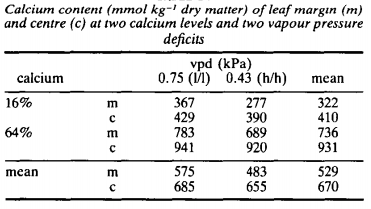
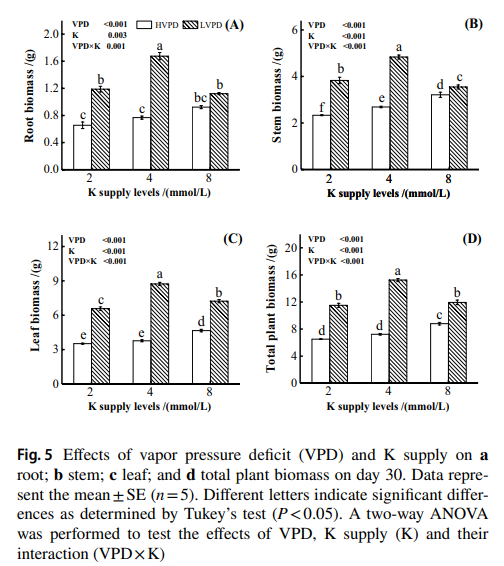
Let’s first talk a bit about nutrient transport in plants. A foliar analysis might be showing you a low level of an element like K in tissue, but this does not necessarily mean that the plant doesn’t have enough access to K in the nutrient solution. All we know from a foliar analysis is that K has not been able to go into the leaves, but this doesn’t automatically mean that K in solution is too low. This problem can happen if the temperature of the room is too high and the relative humidity is too low – very high VPD conditions – in which calcium and magnesium will be uptaken very aggressively and the plant will be deprived of potassium significantly. You can see this in studies like this one where it is clearly shown that the concentration of potassium in tissue is proportional to VPD more aggressively than to K concentration in nutrient solution.
The real fix to a problem like the problem above would be to lower the VPD of the environment – by reducing temperature or increasing relative humidity, depending on what’s wrong – but choosing to just increase the amount of K in the nutrient solution would only lead to a minor response from the plant (because that’s not the problem in this case). If the grower makes an assumption and that assumption is wrong, then significant time would have been lost in the fixing of the problem and the leaf tissue analysis will reflect very limited progress.
This is where foliar spraying comes into play. In order to “hedge our bets” in the fixing of a nutritional problem, we might want to increase the supply of the nutrient available to plant leaves by applying that nutrient to leaves directly while we figure out what is wrong with the environment or the nutrient solution. This will alleviate the issue because we will be delivering the nutrient directly to leaf tissue, regardless of what the actual root cause of the problem creating the blockage in nutrient transport is. That way, if we are wrong about the fix, we will already have made some progress in fixing the problem by delivering the nutrient that we’re failing to transport where it is more strongly required.
Granted, there are a couple of caveats here. The first is that we must have leaf tissue analysis so that we are sure about what needs to be applied (no guessing). The second is that we still need to look into what the root cause is and solve the issue, otherwise the foliar spraying will eventually reach a limit and be unable to completely get the plants back to full health. Think of the foliar sprays as the CPR you can give your plants while the ambulance is on the way, the plants won’t be able to survive from the CPR forever, but it will help them stay alive while the true solution for the problem arrives.
To design a foliar spray to alleviate a deficiency, first read my post about some important considerations when using this technique. Second, make sure you start with lower concentrations, to prevent further stressing plants that might already be subjected to a significant degree of stress. Third, make sure you test the foliar spray on a small group of plants so that you know what the response of the plants will be before applying to the entire crop. Under some circumstances using this method might cause additional issues, so it’s important to make sure the plants can take the spray before subjecting a larger number of plants to it. When doing a foliar spray to alleviate a deficiency I suggest carrying it out only once a week initially and moving to two times per week if necessary until the root cause is fixed and the applications can be stopped.
If you are currently facing a nutrient deficiency problem and would like my help in formulating a foliar fertilizer for your specific case feel free to use the contact form or book an hour of consultation time so that we can further discuss your issue and help you fix your crop’s condition.