Average yields per acre of hydroponic crops
I constantly talk about yield in hydroponics and how a variety of different techniques, additives and methodologies can be used to make plants more productive. However, what is the average yield you can expect in a hydroponic crop for a given plant specie? Where have these yields been measured and what can you expect your crop to yield? On this blog post I will discuss the literature around average yields in hydroponics, the problems with the expectation of average yield per acre and some of the things you need to consider when trying to consider a hypothetical growing situation. You will see that getting an expectation of how much your crop will produce is not simple and depends on a complicated mixture of variables.

There are multiple literature sources of expected yields in hydroponics, many of them coming from outside the peer reviewed literature. The above table shows you one example from a book published in 1998 by Howard Resh. However if you look at the seventh edition of this book (published in 2013), you will not find the table above anywhere within it. I do not know why this table was removed from the book, but it might be related with problems with the data used to obtain the above yields, or those yields not being realistic expectations for average hydroponic setups. This does not mean in any way that the book is bad – I consider it an excellent introduction to hydroponic growing – but it does show that reducing yield expectations to simple tables can be problematic.
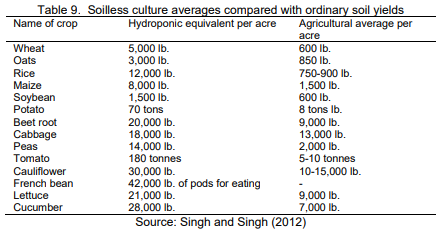
Below you can see another table – taken from a review article written in 2012 – which took it from an article published in the proceedings of a conference that was held in India in 2012. These proceedings are practically impossible to find online – at least I couldn’t despite my best efforts – so it is extremely hard to know where the data actually comes from. However we can see that there are large similarities between these and the numbers published by Howard Resh in the 1998 book, suggesting that these two tables actually have the same source. This table seems to have become widely used as a way to show how superior hydroponics can be when compared to soil, but the original source I can trace it to – the Howard Resh book – actually got rid of it, and people who use it in the scientific literature now quote either the reviews that quote the Indian conference proceedings or the proceedings directly. This makes me very suspicious of these values as the actual data where these values was drawn from seems impossible to get to.This can happen in scientific literature, where some widely quoted values become almost “memes”, where circular references are created and the original source of the data becomes extremely hard to actually find.
So what are some actual yields in tons per acre per year for crops, as per current scientific literature that shows where the actual data came from? The answer is not very simple! Let’s consider the case of tomatoes. The best information I could find on the subject was gathered in 2002 – almost 20 years ago – from greenhouse hydroponic growers in the United States at both small and large scales (1, 2). The yields for highly sophisticated large scale greenhouses that can do tomato growing during the entire year is 235-308 tons per acre per year, while for growers that can only do one crop a year – due to proper lack of climate/light control – the average yield per acre per year is around 50-60% of that. Here we can already see how technology can introduce a difference of around 2x in the results, just because of the amount that is expected to be produced. More recent data from Pakistan in 2018 (3) puts the average yield for hydroponic greenhouse tomatoes at 65.5 tons per acre, vs around 4.07 in the open field. This is a difference of around 5x with the reported yields in the US in 2002, just because of fundamental differences in growing practices and technology. I have in fact personally been at lower technology hydroponic crops that have achieved only slightly better yields than soil, with yields in the 12-15 ton per acre per year range.
For other plants accurate yield per acre per year information is even harder to find. I couldn’t find scientific literature showing values – with data from actual crops – for the yields of other common hydroponic crops such as lettuce, strawberries and cucumbers. The reason might be related with the high variance in the results obtained by different growers under different circumstances. As we saw in the case of tomato producers above, things like the actual variety being grown, the climate control technology available and the actual location of the crops can play a big role in determining what the actual yields will look like.
The above implies a very substantial risk for people who want to develop hydroponic crops under unknown conditions. Creating a business plan can be very hard if you do not know how much product the business will yield. If you’re in this position then I advice you do not use any of the values commonly thrown around the internet as guidance, most of the time these are highly inflated and reflect the potential results of the most ideal hydroponic setups, rather than the average. The best guide for yields will be to look at growers that are harvesting the same crop under similar conditions in your area. If this is unavailable then the cheapest way to get this information is to actually carry out a small scale trial to see how much product you can expect.
If you are pressed to do some worst-case estimates then use the values from soil in the area where you’re in as a base expectation. A hydroponic crop is always likely to do significantly better than soil, but working with soil-like production values will allow you to control your costs in a much tighter fashion if realistic expectations cannot be created either through the experience of other hydroponic growers under similar conditions or small scale experimental setups.