How to prepare pH 4 and 7 buffers from scratch without using a pH meter
I wrote a post in the past about how you could prepare pH buffers in order to calibrate your pH meter if you happen to already have a calibrated pH probe. This can generate decent results if the initial calibration of the probe is excellent and the sensitivity of the probe is high. This however might not be a possibility for some people – given that their pH probe might not be calibrated to start with – so in today’s post I am going to tell you how you can prepare your own pH 4 and 7 buffers without having any other tools but a scale, distilled water and some raw salts. This tutorial will be made assuming you’re preparing 500mL of each buffer but feel free to scale this up or down as you wish (these buffers are meant to give you a total 0.1M buffer concentration). Note that pH depends on temperature, these buffers are meant to give pH values of 4 and 7 at 25C.
To prepare these buffers you will need the following materials:
Two clean glass bottles to prepare and store the buffers. (I would recommend these, but any clean glass containers would do)
Follow these steps to prepare the pH 4 buffer:
Weight exactly 5.259g of potassium citrate and transfer that amount to the glass bottle
Weight exactly 6.309g of citric acid and transfer the solid to the same glass bottle
Fill the bottle to around 250mL using distilled water
Mix the solids using a glass rod or any other inert mixing utensil until fully dissolved
Fill the bottle to 500mL using distilled water.
Label the flask clearly so that you know this is the pH 4 buffer
Follow these steps to prepare the pH 7 buffer:
Weight exactly 3.369g of potassium dibasic phosphate and transfer that amount to the second glass bottle
Weight exactly 4.172g of potassium monobasic phosphate and transfer the solid to the same glass bottle
Fill the bottle to around 250mL using distilled water
Mix the solids using a glass rod or any other inert mixing utensil until fully dissolved
Fill the bottle to 500mL using distilled water.
Label the flask clearly so that you know this is the pH 7 buffer
The above should provide you with pH 4 and 7 buffer solutions that should be relatively precise. The exact volume of the solution is not critical, as the volume only has a strong effect on the buffering capacity but not on the final pH, especially at relatively high buffering strengths. However, if you want to have more precision use 500mL volumetric flasks to prepare the solutions. The error in these buffers will depend on the purity of the salts used – which is why higher purity food grade salts are recommended above – as well as in the accuracy of the weighting and transferring processes. In order to obtain a higher accuracy you would need to purchase more expensive analytical grade salts and also use volumetric flasks to prepare the solutions, so that you can prepare them at the exact concentration intended.
Another limitation of the above buffers is that they do not contain any sort of preservative and they are both prepared with food grade substances that can attract fungi and bacteria. For this reason the above buffers will probably not last for a significant amount of time and should probably be discarded within a couple of weeks. However the chemicals used here are very cheap so – with the amounts purchased above – you should be able to prepare as much buffering solution as you might need. Note that the solutions can also be frozen in order to increase their shelf life, although keep in mind that since pH depends on temperature you will need to wait for them to reach room temperature before taking a reading.
It is also worth mentioning that these buffers will both be completely transparent, since they are prepared without any dies in order to give the maximum possible accuracy in the pH. However you can add a very small amount of food coloring to each one to provide a distinct color without causing a significant change in the pH, less than half a drop should be enough to give your solutions a distinct hue.
I would advice you do a pH check with a pH meter calibrated using a normal commercial solution the first time you prepare these solutions. This is just to be sure that you followed the procedure correctly and the resulting buffer is of the intended quality. Once you do this you should be able to create as much buffer as you desire without any problems. Leave a comment with your experience!
Why TDS is NOT equal to Total Dissolved Solids in hydroponics
Electrical conductivity is a very commonly used measurement in hydroponics, yet a very poorly understood one. I have written several posts about conductivity in the past (1,2,3) and today I want to talk about the use of the term “Total Dissolved Solids” and the poor usage of the unit “ppm” in order to express a measurement of electrical conductivity. In this article I will walk you through why this term exists in the first place and why its use in hydroponics is terribly misleading for growers.
Conductivity as a function of NaCl concentration (taken from here)
Conductivity is just a measure of how easy it is for an electrical charge to go from one electrode of a certain area to another. It’s generally expressed in mS/cm, which is a measurement of conductance (the opposite of resistance) and area (the area of the electrode). How in the world do we get from this to a measurement like “ppm”, which measures the concentration of something in mg/L? What does a measurement of 500 ppm even mean? What is it that we are expressing a concentration of?
The answer lies in the practical uses of conductivity and a simplification to make the evaluation of water sources easier. Conductivity is generally linearly proportional to the amount of a pure salt dissolved in solution at low concentrations. For a pure salt like table salt (NaCl) the higher the concentration of the salt in solution the higher the conductivity (you can see this in the image above). People working on water quality realized that they generally dealt with similar salt combinations (Mg and Ca carbonates and possibly some Na and K chlorides) so they decided to use some standard salt mixtures (say KCl, NaCl or some mixture of Ca/Mg/K/Na salts) and then use conductivity as a proxy for the concentration of these things that are actually in solution. So the “ppm” that your EC meter reads is just the equivalent conductivity of some standard. A meter reading 500 ppm in conductivity is telling you “your solution has the same conductivity as a solution of the standard at 500 ppm”. The “standard” can change – as mentioned before – which is why there are several different TDS scales. One meter might be telling you it’s the same conductivity as a solution of KCl with that concentration, while another might be in NaCl.
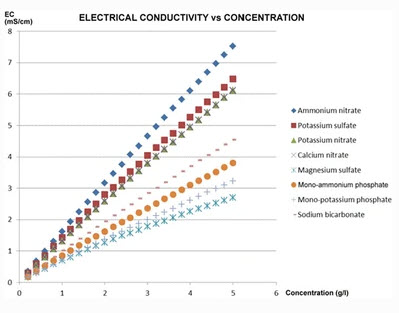
Conductivity curves of different salts used in hydroponics (taken from this article)
The above is very useful when you’re measuring things that tend to be similar but this becomes a complete nightmare when the composition of what you’re measuring can change substantially. In hydroponics you have a wide variety of different salts, all with very different conductivity values at different concentrations. Look at the graph above, which shows the conductivity as a function of concentration for 8 different salts commonly used in hydroponic culture. If you prepare three solutions, one with 1000 ppm solution of potassium sulfate, another with 1000 ppm of monopotassium phosphate and another with 1000 ppm of ammonium nitrate and measure them with your conductivity meter they would all give very different results. The meter might be close to 0.95mS/cm for the monopotassium phosphate, but it might read almost 1.5 mS/cm for the potassium sulfate. Both solutions have 1000 ppm of “total dissolved solids” but the conductivity meter is telling you one has 500 ppm and the other almost 800 ppm, none of them even close. This is because “total dissolved solids”, as used in water quality measurements, is a meaningless measurement in hydroponics as it relates to the actual ppm values of things dissolved.
This is the main reason why you should never compare the EC values of nutrients that contain different ratios of salts, because they are simply not the same. One nutrient might give you 100 ppm of potassium at some EC level, while another might give you 200 ppm. Thinking that having the same EC level means that both are at the same “strength” is a big mistake, since this is never going to be the case when two nutrient solutions are mixed with different ratios of nutrients. This is also why comparing vegetative and bloom formulation EC values is not correct. A solution in veg might contain a lot more of nitrates while a solution in bloom might contain more phosphates. As we saw above this might mean that a solution of the “same strength” might actually have a significantly lower measured EC value.
Since the TDS measurement is not telling you anything about “total dissolved solids” in hydroponics, you should avoid using it to avoid confusion. This is important since nutrient concentrations are usually expressed in ppm as well, ppm of actual nutrients dissolved in solutions. Instead use the normal conductivity measurements of your meter in conductance per area. You should also take care to only use EC values to talk about comparative strength when you’re talking about a formulation where the ratios of nutrients remain the same. If that’s not the case, then you should not talk in comparative terms between the two solutions as this might deviate a lot from reality.
My advice is to not think in EC terms to begin with, but to think about nutrient concentrations, prepare solutions that match the concentrations you want and then use the EC of those solutions as references to know whether they are prepared correctly or not. The conductivity should be a measurement used for confirmation but not as a guiding principle. For example the aim should be to “prepare a solution containing 150 ppm of N and an K:N ratio of 1.2” not to “prepare a solution with an EC of 1.2 mS/cm”.
Understanding the carbonic acid/bicarbonate buffer in hydroponics
I have written several articles before about pH and it’s importance in hydroponic culture (1, 2, 3, 4). However I have yet to write a detailed explanation of one of the most important buffering systems in hydroponics, which is the carbonic acid/bicarbonate buffer. This buffer is significantly more complicated than the simpler buffer created using phosphoric acid species, as it not only relies on ions present in solution but also on the partial pressure of carbon dioxide in the atmosphere. In this article I will attempt to explain this buffering system in detail, shining some light into the limitations of this buffer and how changing different key variables can fundamentally affect the way it works in hydroponics.
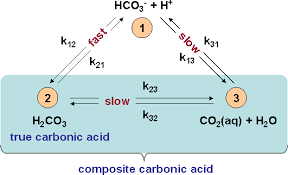
Chemical reactions involved in the carbonic acid/bicarbonate buffer. Taken from here.
A buffer is nothing more than a pair of chemical species in solution that are present at a certain pH, that can react with additional H3O+ or OH- ions that are introduced into the solution. Since these ions control the value of pH, anything that prevents their concentration from changing will keep the pH stable. Distilled water, for example, has absolutely no buffering capacity since within it there is nothing that can react with incoming H3O+ or OH– ions that are added to the solution. Distilled water should therefore have a pH of 7.0, it does not because we live in an environment where an acid can always be generated from the air. This acid – carbonic acid – is generated in water whenever it’s put into contact with a carbon dioxide containing atmosphere. This makes distilled water have a pH of around 5.6.
To be able to calculate the pH we need to consider all the chemical equilibrium reactions that happen, these are summarized here and in the image above. We must consider that carbon dioxide will dissolve in water to always satisfy Henry’s law, that dissolved carbon dioxide will be in equilibrium with carbonic acid, that carbonic acid can dissociate into a H3O+ ion and a bicarbonate ion and that a bicarbonate ion can further dissociate into an additional H3O+ ion and a carbonate ion. To solve all of this we must also consider that charge neutrality must be preserved, meaning that the sum of all molar charges of all positive ions must be equal to the molar charges of all negative ions. To carry out these calculations I routinely use the freely available Maxima software. Below you can see the code I use to solve this system in Maxima (constants are taken from here):
This is the solution obtained for the molar concentrations (rounded for clarity):
oh = 4.21*10^-9co3 = 4.68*10^-11
hco3 = 2.36*10^-6h2co3 = 2.24*10^-8
h = 2.37*10^-6
After executing this code you will get several different possible solutions, but the only one that interests us is the one where the H3O+ (h) concentration is a positive number (this solution is showed above). We can then use the pH function to calculate the value of pH for this H30+ concentration, which gives us a value of 5.62, this matches the real measurement of a distilled water solution at 25C under a 387ppm carbon dioxide atmosphere. Note that the amount of none dissociated acid in solution is very small. Taken to mass, the concentration of carbonic acid is 0.00138 ppm. However the concentration of bicarbonate is significantly greater, at 3.6 times the concentration of undissociated carbonic acid. This explains why the pH drops so much, since a significant amount of the generated carbonic acid ends up dissociating and contributing H3O+ ions to the solution. This also shows you how little acid is needed to drop the pH of an unbuffered solution.
To create the buffer with the biggest possible strength we would need to add enough strong base to shift the pH to the point where the pH equals the pKa (which is just -Log(equilibrium constant)) of the joint reactions created from the reaction of carbon dioxide with water to create carbonic acid and the subsequent dissociation of this acid into bicarbonate and H3O+. This point is at 6.3 under atmospheric conditions at 25C. This can be achieved with the code below:
This is the solution obtained for the molar concentrations(rounded for clarity):
oh = 1.99*10^-8co3 = 1.04*10^-9
hco3 = 1.11*10^-5h2co3 = 2.24*10^-8
base = 1.07*10^-5
The pH here is set to 6.3 and we can see that to get there we would need to add a base at a concentration of 1.07*10-5.0. If this base was KOH this would imply adding it at a rate of 0.6 ppm. We can see how the pH changes as a function of adding base or acid from this point. If at this point we decided to double the addition of strong base we would get to 6.57, tripling it would take us to 6.73 and adding 10 times more base would take us to 7.25. The buffer is indeed resisting the increase in pH by basically drawing CO2 from the air to react with the incoming base as base is added to the solution. However you might notice that under equilibrium conditions the buffering capacity of this system is very low. Just 6 ppm of a KOH equivalent strong base addition can strongly affect the pH – taking it from 5.6 to 7.25 – so how can the carbonic acid/bicarbonate buffer be effective at all in hydroponics?
The answer is in the first image in this post. The equilibrium reaction between carbonic acid and water plus carbon dioxide in water (k23/k32) is fundamentally slow. We can take advantage of this by generating larger amounts of carbonate species in solution through the use of exogenous carbonate or bicarbonate additions and then setting the pH at a lower value to generate more carbonic acid, this acid will then take some significant time to reach equilibrium. This is the reason why using tap water with a significantly high alkalinity can provide a surprisingly stronger buffer than what would be expected at equilibrium and it also has some interesting consequences in the use of nutrient solutions.
Let’s consider a case where there is no decomposition of carbonic acid – let’s suppose it’s extremely slow – and say we add 100 ppm of potassium carbonate into a solution and then set the pH back to 5.8 using phosphoric acid. In this case the predominant reactions in solution would be the dissociation of dihydrogen phosphate to hydrogen phosphate and H3O+ and the carbonic acid dissociation discussed before. In order to properly consider this case we must also introduce two additional equations, mainly the mass balance equations for the phosphate and carbonate species, since this time we are assuming no carbon dioxide is ever lost to the atmosphere. Note that I have changed the equilibrium constant for the carbonic acid reaction here to 10-6.3 where carbonic acid is now “apparent carbonic acid”. You can see the equation system and solution below:
This is the solution obtained for the molar concentrations(rounded for clarity):
hco3 = 1.72*10^-4h2co3 = 5.50*10^-4
h2po4 = 0.00118
hpo4 = 4.64*10^-5h = 1.60*10^-6
The final pH of this solution is very close to 5.8 and the concentration of P is 47.9 ppm with K at 38.10 ppm. Notice however that apparent carbonic acid has a concentration of 5.50*10-4 M, which implies that the system is not at equilibrium since this amount is significantly larger than what we would expect from Henry’s law. If we reduce the concentration of carbonic acid to half then the pH will increase to 6.01, as we would expect from extracting an acid from the solution. The implication is that – with time – the pH of this solution is going to slowly increase, as carbonic acid decomposes and the solution reaches an equilibrium with the atmospheric carbon dioxide level. This is also why nutrient solutions that are prepared with tap water high in carbonates and then aerated will tend to show a rapid increase in pH – even if the solution is not fed to plants – as the reaching of equilibrium is accelerated by the agitation of the solution and the contact with air (that allows CO2 in solution to escape).
As soon as the above solution is prepared it offers a substantially superior buffering capacity when compared with a solution containing only phosphates. This is why water with high alkalinity tends to provide better pH stability in drain to waste type systems when compared with solutions prepared with RO water. This water contains a significant amount of carbonates that are turned into carbonic acid and bicarbonate as soon as the pH is lowered to the pH range used in hydroponics. As long as the solution is used quicker than the carbonic acid decomposes, there will be a substantial increase in pH stability.
If you are using RO water or water with low alkalinity to prepare your solutions you can obtain a similar effect by adding 100-200 ppm of potassium carbonate before you start preparing the nutrient solution, you can similarly use bicarbonate but I would recommend using potassium carbonate, as it is cheaper. It would also be advisable to use the solution as fast as possible, since time will cause the solution to reach equilibrium and the pH to increase. This effect will take much longer if the CO2 concentration is higher – which is true for setups that use enriched CO2 – or if the temperature is lower, which increases the solubility of CO2.
Hydroponics nutrients and microgreens
One of the most important goals in microgreens is to maximize the amount of weight gained by shoots from seed to harvest. Since the entire upper body of the plant is harvested and plants are sold by weight, maximizing the weight gain is vital in order to obtain the highest possible margins in a crop cycle. Hydroponically cultured microgreens offer the grower an unprecedented control over the microgreens’ nutrition, with the ability to tightly control nutritional parameters in order to maximize this weight. In this article we are going to take a look into the scientific literature surrounding microgreens and what we know about maximizing their yield and quality using nutrient solutions. I will use the table below to reference different articles in the literature.
Published articles talking about hydroponic nutrients and microgreen yield or quality
Despite the overwhelming growth in the microgreen industry during the past 10 years, the amount of research looking into microgreen nutrition has been surprisingly limited, with only a handful of papers looking at the relationship between nutrition and yields or quality. Paper one contains a comparison between microgreens grown in either compost, sterile water or a solution using a 0.4% FloraGro Advanced Nutrient solution (4mL/L). The results show clear weight benefits from using hydroponic nutrients, with the weight being markedly higher (mean of 24.64g vs 21.01g) between the sterile and hydroponic treatments. However the concentration of different minerals was actually lowest in the plants using a hydroponic nutrient.
Table taken from article number three
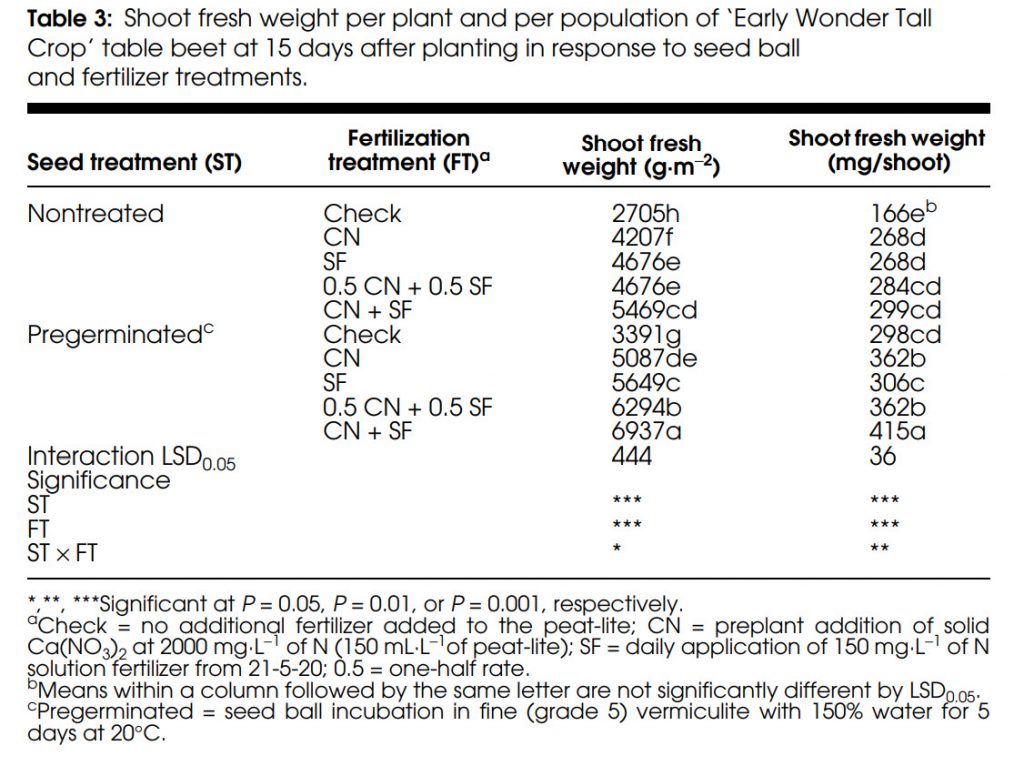
Papers three and four look at different forms of Ca nutrition – either Ca chloride or Ca nitrate – and different ways to apply this treatment to see if it makes a difference in microgreen production. Paper three, shows a statistically significant gain in weight when using calcium nitrate, either applied into the media pre-cultivation or applied within a nutrient solution. The best results were found when both treatments were carried out and represented an increase of more than double in terms of weight over the control. The fact that paper four fails to show a consistent increase in yields using Ca chloride, suggests that this has to do mainly with the nutritional contribution of the nitrate and not the calcium ions.
Paper two is rather interesting, as it looks into different nutrient solution strengths (either 0, 50 or 100%) using a solution published for hydroponic forage. The results – in the table below – clearly show that there is a strong weight gain as the nutrient solution concentration increases, again showing that at a full strength solution there is an expected increase of more than 2x in the final weight. However this comes – in agreement with paper one – at the potential expense of nutritional value. The paper shows a significant decrease in carotenoid concentration when nutrient solution strength increases, which the paper hypothesis is caused by high nutrient concentrations slowing down plant metabolism. This hypothesis is however hard to reconcile with the larger and heavier plants.
Table taken from article number two
Article five is also an interesting example of the use of microgreens to carry out antioxidant supplementation. Sodium selenate was used to prepare a solution to treat basil seeds and the resulting microgreens were found to be fortified with selenium. This might be an interesting way to incorporate mineral micro nutrients into microgreens and therefore increase their presence within our diet. However there is also the potential to hyperaccumulate these nutrients, so experiments of this kind should not be done with adequate care and lab analysis to ensure proper doses of these micro nutrients.
From all of the above it seems quite clear that the research of hydroponic nutrients in microgreen production is in its very early infancy. So far only a handful of research papers have been published on the subject and the conclusions so far seem to be that hydroponic nutrient solutions – in a couple of different forms – tend to significantly increase microgreen production weights. However it is also clear that there is a strong interaction with the nutritional value of the microgreens and using nutrients can in fact lead to decreases in the nutritional value, despite the significant weight gain from the process.
The echoes of the above can be seen in a wide variety of anecdotal experiences on youtube channels and forums. Growers running side by side experiments seem to have found the same phenomena (see this video for an example), where adding nutrients increases yields significantly but at the expense of some of the flavor – and potentially nutritional – characteristics of the microgreens. Some growers have therefore chosen to avoid nutrients – to preserve flavor qualities – while others have chosen to use nutrients because of the increases in marketable appearance and yield.
There is a lot of research to be done on the subject. It would certainly be interesting to find out if we could somehow have the best of both worlds.
Is my water source good for hydroponics?
Before starting your hydroponic project it is important to know whether your local water source can actually be used to water plants. Not all water sources are compatible with plants and some require special adaptations to the nutrient solution in order to become viable. In this post I will talk about the things that can make a water source unsuitable for hydroponics and the sort of modifications that would be required to make these water sources work with plants. The main points in the post are summarized in the diagram below.
Diagram to figure out if your water can or cannot be used in hydroponics
Tap and well water sources can contain different substances characteristic of the natural environment where the water originated. Water that goes through rocky formations containing a lot of limestone will contain high amounts of calcium and carbonates, while water that goes through dolomitic rock will contain significant amounts of magnesium as well. Water that contains high amounts of Ca or Mg is not necessarily problematic and can be dealt with by adapting the nutrient solution to account for these ions, you can read more about hard water and its use in hydroponics by reading my previous post on the subject. These water sources usually need a significant amount of acid to reach the 5.5-6.5 range, so accounting for the nutrient contribution of the acid in the nutrient formulation is also fundamental.
The most problematic water sources will contain high amounts of either sodium or chlorides, two ions that we cannot deal with easily in hydroponics and that can be specially bad for plants. You can read more about sodium in hydroponics here, and chlorides and hydroponics here. Sodium concentrations below 200 ppm can be manageable, but any higher concentrations will invariably lead to issues in hydroponics. Chlorides are even more harmful with the threshold for problems at just 50 ppm. Iron can be similarly problematic as sources that contain high amounts of Fe can be incompatible with plants and the Fe can be difficult to remove. This is why the first step in analyzing a water source should always be an analysis including Na, Cl and Fe. If the values are too high then this water source will require reverse osmosis to be usable.
If Na, Cl and Fe are within limits then we can ask the question of whether this water source is approved for human consumption. If it is then we know that the amounts of heavy metals within it should be low, as well as the amount of other ions, such as nitrate and ammonium. If the water has not been approved by a utility company for human consumption then we need to do heavy metal and nitrate/ammonium analysis to figure out if this is actually safe to use. In some cases well water sources can be perfectly fine to grow plants but the products might be contaminated with heavy metals that make them unsuitable for human consumption.
If a water source is within limits for all of the above then we should take into consideration whether we need custom formulations or whether we can get away with using commercially available hydroponic products “as is”. For sources that have relatively low amounts of Fe, Ca and Mg this is usually a possibility but for sources that have quantities of Fe above 2.5 ppm, Ca above 10 ppm or Mg above 5 ppm, it is advisable to go with a custom formulation that can account for the amount of minerals already present within the water. This can still mean using commercially prepared fertilizers only that the mixing ratios and schedules need to be adapted to manage what is already present in the water, so significant deviations from the manufacturer suggestions are to be expected.
Another important point is that none of the above accounts for potential biological activity within the water, which can be a big source of problems in plant culture. For this reason always make sure to run the water through carbon filtration and have in-line UV filters to ensure that no bacteria, viruses or fungal spores get to your plants through your water source.
A guide to different pH down options in hydroponics
The control of pH in hydroponic nutrient solutions is important. Plants will tend to increase the pH of solutions in most cases – as nitrate uptake tends to dominate over the uptake of other ions – so most growers will tend to use pH down much more than they use pH up. While most growers prefer to use concentrated strong acids, there are a wide variety of different choices available that can achieve different outcomes at different cost levels. In this post I want to talk about different pH down options in hydroponics, along with some of their advantages and disadvantages.
Hydrangeas change color as a response to different pH values in soil
The first group of pH down chemicals are strong acids. These are technically acids with very low pKa values, meaning they react instantly with water to generate at least one mole of hydronium for each mole of added acid. They offer the strongest ability to drop pH per unit of volume, which makes them more cost effective. However the fact that they often need to be diluted to make the pH addition process practical – because of how much the concentrated forms can change pH – can make their use more difficult than other forms of pH down. These are the most common options:
Phosphoric acid (from 20 to 85% pure): This acid doubles as a plant nutrient, meaning plants will be affected by the phosphorus added. It is commonly used in food – so food grade phosphoric acid can be bought cheaply – it also has additional deprotonations with strong buffering at a pH value of 7.2 with buffering capacity against bases getting stronger as the pH goes down all the way to 6.2. This is the most commonly used acid by hydroponic growers.
Sulfuric acid (from 20 to 98% pure): This acid is commonly used in car batteries and offers the largest pH dropping ability per unit of volume among all the strong acids. It is however important to use food grade sulfuric acid in hydroponics as normal battery acid can include some metallic impurities – from the fabrication process of sulfuric acid – that might negatively affect a hydroponic crop. Food grade sulfuric acid is safe to use in hydroponics. A big advantage is that plants are quite insensitive to sulfate ions – the nutrient provided by sulfuric acid – so adding sulfuric acid does not really affect the nutrient profile being fed to the plants. Note however that most battery acid products in developed countries are also ok, as the quality of these acids demands the metallic impurities (more commonly iron) to be quite low. If in doubt, you can do a lab test of the sulfuric acid to see if any impurities are present.
Nitric acid (from 30-72% pure): This acid also provides nitrate ions to plants, so it also contributes to a solution’s nutrient profile. It is however more expensive than both phosphoric and sulfuric acids and more heavily regulated due to its potential use in the fabrication of explosives. The acid itself is also a strong oxidant, so storage and spillage problems are significantly worse than with phosphoric and sulfuric acid. Although this acid can be used in hydroponics, it is generally not used by most growers due to the above issues.
Diagram showing the dissociation of a strong vs a weak acid
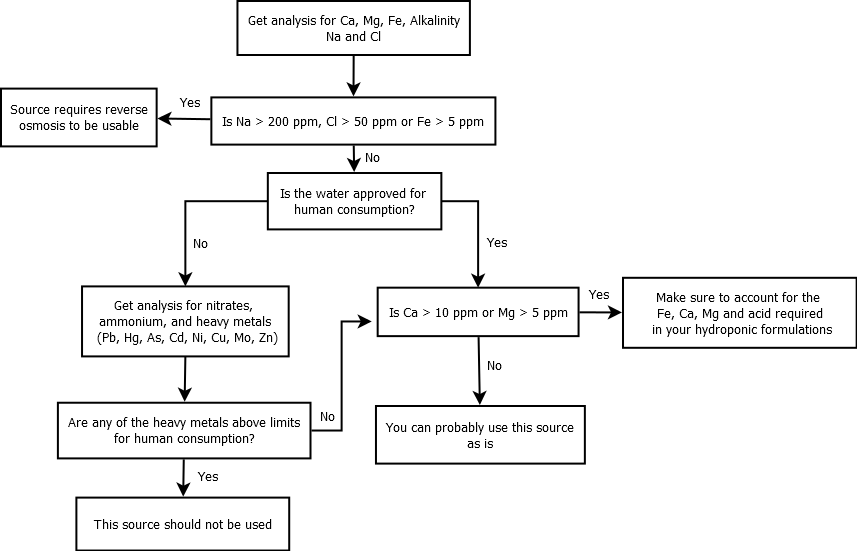
The second group of pH down chemicals are weak acids. These are acids that do not generate at least one mole of hydronium ions per mole of acid when put in solution, but do provide a pH down effect as some hydronium ions are generated. This means that larger additions will be needed to cause the same effect but at the same time their handling is usually much safer than for strong acids. Here are some options that could be used as a pH down.
Common food grade organic acids (citric acid, acetic acid, etc): Organic acids are a very low cost way to lower the pH of a hydroponic solution as many of these are available off the shelf in super markets in food grade qualities. The main issue with organic acids – which anyone who has used them has probably experimented – is that the effect of the acids does not seem to hold (pH goes up quickly after the acid is added and the solution comes into contact with plants). This is actually caused by the fact that plants and microbes can actually use the conjugated bases of these ions nutritionally, causing an increase in pH when they do so. The initial addition of say, citric acid, will drop the pH – generating citrate ions in the process – these will then be absorbed by microbes and plants, increasing the pH again rapidly. The use of these acids is therefore not recommended in hydroponics.
Monopotassium phosphate (MKP): This salt contains the first conjugate base of phosphoric acid and is therefore way less acidic than it’s full on acid partner. Since it’s a solid its addition is way easier to control compared to the acid and it can also be handled safely with minimal precautions. It provides both potassium and phosphorous to a solution – both important nutrients – and therefore needs to be used carefully when used as a pH down agent (as it significantly affects the nutrient profile of the solution). Since it adds both a cation that helps counter pH increases by plants and phosphate species it provides a double buffering effect against future pH increases. It is a very common ingredients of commercial pH down solutions for this reason.
Monoammonium phosphate (MAP): Similar to the above, except for the fact that this salt adds nitrogen as ammonium, which is a nitrogen form plants are very sensitive to. Plants will uptake ammonium preferentially over any other cation, so MAP provides a very strong buffering effect against nitrate absorption, with potential problems if too much is used (although this depends on the plant species being grown). When MAP is used as a pH down its addition therefore needs to be carefully controlled in order to avoid excess usage. Due to the presence of this powerful ammonium buffer, MAP is generally very effective at preventing future increases in pH, although this might be at the expense of yields or quality depending on the crop.
Potassium bisulfate: This salt contains the first conjugate base of sulfuric acid and is therefore a powerful tool to decrease the pH of a solution. The resulting sulfate ions provide no chemical buffering effect, so the only buffering effect in terms of plant absorption comes from the addition of potassium ions, which can help mitigate nitrate absorption. This salt is also considerably expensive compared with the two above – which are commonly used fertilizers – and is therefore seldom used in hydroponics.
Which is the best pH down solution? It depends on the characteristics of the growing system. Generally a pH down solution needs to be easy to administer, cheap and provide some increase in buffering capacity overtime – to make additions less frequent – so the pH down product or combination of products that best fits this bill will depend on which of the above characteristics is more important for each particular user.
People who use drain-to-waste systems usually go for stronger acids, since they only adjust pH once before watering and then forget about the solution. This means that additional buffering capacity in the solution is probably not going to be very important and cost is likely the most important driving factor. If injectors are used then the strong acids are often diluted to the concentration that makes the most sense for them and most commonly either phosphoric or sulfuric acids are used.
For growers in recirculating systems options that adjust pH with some added buffering capacity are often preferred, because the same solution is constantly subjected to interactions with the plants. In this case it’s usually preferred to create a mixture of strong and weak buffering agents so that both quick decreases in pH and some increased protection from further increases can be given to the solution. In automated control systems using something like a concentrated MKP solution is preferable over any sort of solution containing phosphoric acid, as issues from control failures are less likely to be catastrophic.
Microgreen production at home: Getting the materials
Microgreens are plants that are harvested for consumption during the seedling stage, normally a week or two after a seed has been germinated. They can be one of the most nutritionally dense plant foods out there, given that they contain a lot of the nutrition already present in seeds plus phytonutrients derived from the beginning of the plant growing process (see here).
For these reasons and the fact that they can be grown in small amounts of space, all year round, I have decided to do a small home microgreen project in order to produce a relatively large amount of microgreens for home consumption. Since I have no experience creating setups of this type – I have worked in hydroponic forage productions but never microgreens for human consumption – I decided to look for the best possible setup and in the end decided to base this project on the setup described in this youtube video, following some of the advice given by this microgreen grower. Note that I do not know if any of the financial claims in this video are true or even likely to be true, I just liked the growing setup configuration.
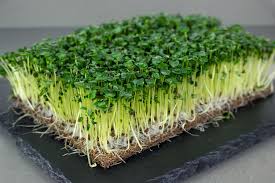
I intend to produce microgreens like these
Using my own experience in hydroponics I then went for the materials that I thought best matched what was given in the video and ended up with the following list:
Styrofoam covers for trays (these you can definitely get cheaper, but these are the best compromise I could find on amazon, they are used in the dark phase of the germination process)
Rack to place the trays in (there might be cheaper ones but I needed something aesthetic as it will be visible in my apartment)
These are all the materials – besides water and hydrogen peroxide – that should be required to reproduce the basic setup I want to recreate. With this setup I will be able to grow 5 18×24″ racks at the same time, which is a lot of microgreens for home consumption. My plan is to experiment with broccoli seeds first – which are relatively cheap and easy to germinate – then move onto other plants that might be more expensive and difficult to germinate. Broccoli plants should germinate in 1-2 days and should be completely ready for eating in around 7 days. This can be a big difference compared with something like oregano which might take 6 days to germinate and then an additional 7-10 days to be ready for consumption. You can use a reference graph with the production times of different microgreens here.
I also have significant experience with enhancing germination, so this setup will provide me with the ideal conditions to test different germination treatments on the plants. Hopefully I will be able to cover those in this blog. This project might also be the perfect opportunity to start a youtube channel so that you guys can experience the entire setup first-hand.
Nutrient solution conductivity estimates in Hydrobuddy
People who use Hydrobuddy can be confused by its conductivity estimates, especially because its values can often mismatch the readings of conductivity meters in real life. This confusion can stem from a lack of understanding of how these values are calculated and the approximations and assumptions that are made in the process. In this post I want to talk about theoretically calculating conductivity, what the meters read and why Hydrobuddy’s estimations can deviate from actual measurements.
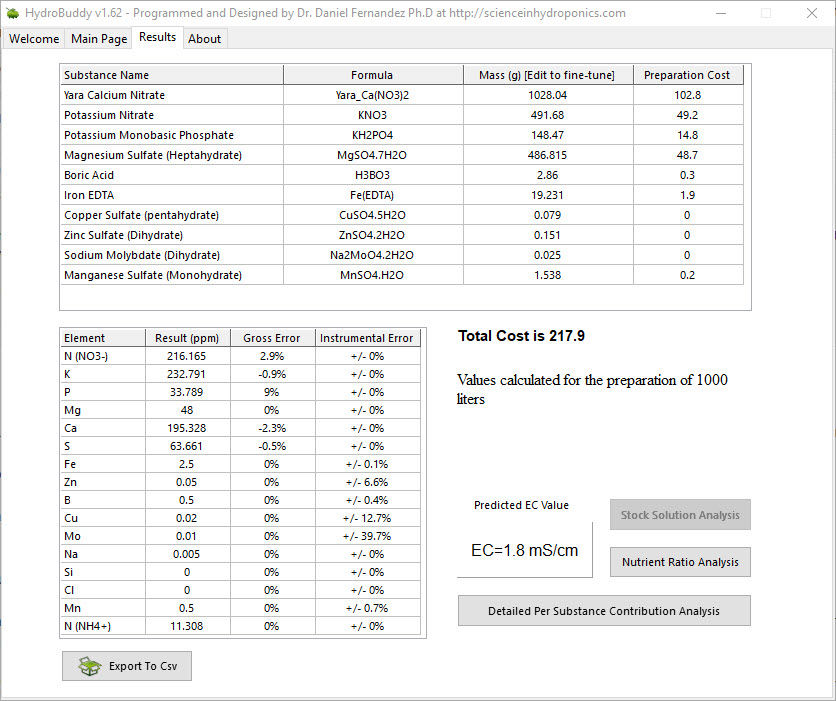
Standard Hoagland solution calculation using HydroBuddy with a set of basic chemicals.
The images above show the use of HydroBuddy for the calculation of a standard Hoagland solution for a 1000L reservoir. The Hoagland solution’s recipe is expressed as a series of elemental concentrations, all of them in parts per million (ppm) units. The results show that the final conductivity of this solution should be 1.8 mS/cm but in reality the conductivity of a freshly prepared full strength Hoagland solution will be closed to 2.5mS/cm. You will notice that HydroBuddy failed to properly calculate this value by an important margin, missing the mark by almost 30%. But how does HydroBuddy calculate this value in the first place?
Conductivity cannot be calculated by using the amount of dissolved solids in terms of mass because charges are transported per ion and not per gram of substance. To perform a conductivity calculation we first need to convert our elemental values to molar quantities and then associate these values with the limiting molar conductivity of each ion, because each ion can transport charge differently (you can find the values HydroBuddy uses in the table available in this article). This basically means we’re finding out how many ions we have of each kind and multiplying that amount by the amount each ion can usually transport if it were by itself in solution. The sum is the first estimate in the calculation of conductivity.
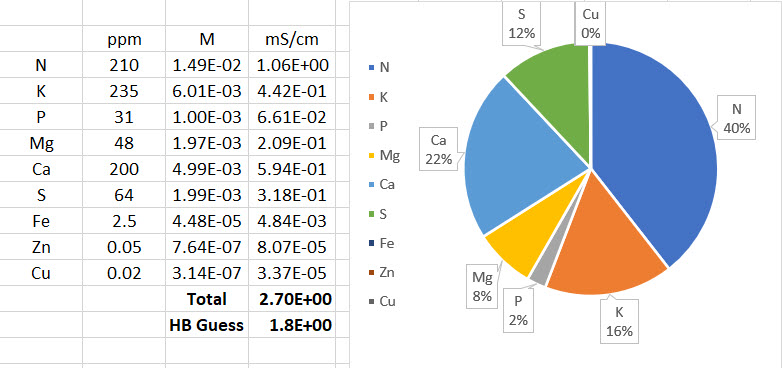
Conductivity calculations carried out by HydroBuddy, also showing conductivity contributions per ion. This is done by converting ppm quantities to moles, then multiplying by limiting molar conductivity values here.
The image above shows the result of these calculations for an example with a perfectly prepared Hoagland solution. You can see that the estimate from limiting molar conductivity is initially 2.7 ms/cm – much closer to the expected 2.5 mS/cm – but then HydroBuddy makes an additional adjustment that lowers this down to 1.8 mS/cm. This is done because limiting molar conductivity values make the assumption of infinite dilution – what the ion conducts if it were all by itself in solution – but in reality the presence of other ions can decrease the actual conductivity things have in solution. HydroBuddy accounts for this very bluntly, by multiplying the result by 0.66, in effect assuming that the measured value of conductivity will be 66% of the value calculated from the limiting molar conductivity values. This is of course wrong in many cases, because the reduction in activity due to the presence of other ions is not as strong. However it can also be correct in many cases, primarily depending on the substances that are used to prepare the formulations and the ratios between the different nutrients.
In my experience HydroBuddy tends to heavily underestimate the conductivity of solutions that receive most of their conductivity from nitrates, as this example, but it tends to do much better when there are large contributions from sulfate ions. When I first coded HydroBuddy all my experiments were being done with much more sulfate heavy solutions, so the correction parameter value I ended up using for the program ended up being a bad compromise for solutions that deviated significantly from this composition. With enough data it might be possible to come up with a more advanced solution to conductivity estimations in the future that can adjust for non-linear relationships in the conductivity and activity relationships of different ions in solution.
If your measured conductivity deviates from the conductivity calculated in HydroBuddy you should not worry about it, as HydroBuddy’s values is meant to be only a rough estimate to give you an idea of what the conductivity might be like but, because of its simplicity, cannot provide a more accurate value at the moment. The most important thing is to ensure that all the salts, weights and volumes were adequately measured in order to arrive at the desired solution.
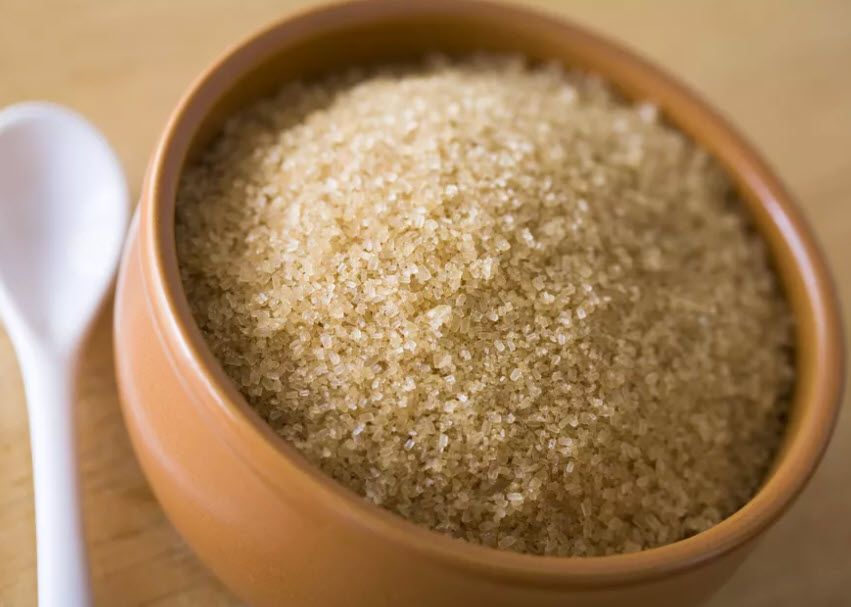
Sugars in hydroponic nutrient solutions
Carbohydrates are an integral part of plants. They produce them from carbon dioxide, requiring no additional external carbon inputs for the process. However, since plants can absorb molecules through their leaves and roots, it is perhaps natural to wonder whether they could also get carbohydrates through the roots and avoid some of the stress they go through in order to produce these molecules from scratch. If plants can uptake sugar and we feed them sugars then will we get fruits with more sugars and bigger plants? It’s an interesting question that I will try to answer within this post, looking at the potential use of simple sugars within hydroponic nutrient solutions.
Simple table sucrose
Although the above idea sounds straightforward, it hardly has any interest in the scientific literature or the commercial hydroponic industry. You will find no significant number of research papers studying the use of sugars – simple or complex – in hydroponic nutrient solutions and very few studies looking at sugar uptake and the interactions of in-vitro plant tissue with simple sugars. This lack of interest and use is no accident, it comes from an already established understanding of plant physiology and the realization that it is not cost effective, useful or needed to add sugars to nutrient solutions.
Let us start with what we know about the subject. We know that plants exude very significant amount of sugars through their root systems and we also know that they can re-uptake some of these sugars through their roots (see here). From this paper it seems that maize plants could uptake up to 10% of the sugars they exude back into their root systems, which implies that some exogenous sugar application could find its way into plant roots. Even worse, transporting this sugar up to the shoots is extremely inefficient, with only 0.6% of the sugar making it up the plant. This tells us that most of the sugar is wasted in terms of plant usage, a large majority never makes it into the plant and the little amount that makes it actually never goes up the plant. Plants are simply not built to transport sugars in this manner, they evolved to transport sugars down to roots and to fruits.
But what about the roots? Given that the plant tissue that would be in direct contact with the sugar is the roots, it is logical to think about positive effects affecting them primarily. We have some studies about the influence of sugar solutions in seedlings (like this one) which does show that sugars can stimulate the growth of new root tissue in very small plants. However in large plants most of the sugar content in the roots will come from transport from the higher parts of the plant and the local sugar concentration will be low. Seedlings can likely benefit from sugars in the roots because leaves are producing very little at this time but larger plants are unlikely to benefit from this effect.
There is however one effect that sugars have that is very clear, they feed the rhizosphere around the plant’s roots. Although plants try to care about this themselves – by exuding an important amount of sugars and organic acids – an exogenous sugar addition would most likely boost the amount of microbes around plant roots (both good and bad ones). The profile of sugars and acids exuded by plants is most likely tuned by evolution to match the microbes that are most beneficial to it and an unintended and negative effect of sugars is to boost all microbe populations at the same time, regardless of whether they are good or bad for the plant. This also increases oxygen demand around roots – because aerobic microbes will want to oxidize these sugars – reducing the amount of oxygen available to plant roots. For this reason, any application of a sugar to a nutrient solution requires the inoculation of the desired microbes beforehand, to ensure no bad actors take hold. It also requires the use of a media with very high aeration, to prevent problems caused by oxygen deprivation.
Sadly there aren’t any peer reviewed papers – at least that I could find – investigating the effect of exogenous sugars on the yields of any plant specie in a hydroponic environment. Given our understanding of plant physiology, any positive effects related with anecdotal use of sugars are most likely related with positive effects in the rhizosphere that are linked with improved production of substances that elicit plant growth in the root zone by favorable microbes. This is mainly because it is already well established that transport of sugars within plants from the roots to the shoots is incredibly inefficient, so any contribution of the roots to sugar uptake will be completely dwarfed by the actual production of sugars from carbon dioxide in the upper parts of the plant. It is not surprising that no one seems to want to do a peer reviewed study of a phenomenon whose outcome is already largely predictable from the accepted scientific literature.
If you’re interested in the use of sugars in hydroponics, it is probably more fruitful to focus on microbe inoculations instead. Sugars themselves are bound to provide no benefit if they are not coupled with a proper microbe population and, even then, you might actually have all the benefits without any sugar applications as the microbes can be selected and fed by plant root exudates themselves in mature plants although sugars might provide some benefits in jump starting these populations, particularly in younger plants. Also, bear in mind that there is also a very high risk of stimulating bad microbes with the use of sugars, especially if oxygenation is not very high.
Controlling pH in hydroponics using only electricity
The ability of plants to assimilate nutrients changes as a function of pH. This makes maintaining the pH of nutrient solutions within an acceptable range – most commonly 5.8 to 6.2 – one of the most important tasks in a hydroponic crop. This is commonly done with the addition of strong acids or bases to decrease or increase the pH when it drifts away from the intended value. This requires either manual monitoring with careful addition of these substances or automated processes using pumps to ensure the pH always remains at the correct value. However both of these methods lack fine control, require a lot of maintenance and monitoring and can lead to costly mistakes. Today I want to discuss an alternative method that relies on a completely different idea to control pH, the idea that we can oxidize or reduce water using electricity to achieve changes in pH. Yes, you can change pH using literally only electricity.
A modern anion exchange membrane. Fundamental to the idea of an electricty-only pH control system
Let’s start by discussing pH and talking about how it is changes. The pH of a solution is calculated as -Log(|H+|) where |H+| is the molar concentration of H+ ions in solution. In water, the dissociation constant 1×10-14 (at 25C), always needs to be respected, so we always know that the product of |H+| and |OH–| needs to give us this number. When you add acids you increase |H+| conversely |OH–| decreases and the pH goes down, when you add bases |OH-| increases, |H+| decreases and the pH goes up. In simpler terms everything you need to decrease pH is a source of H+ and everything you need to increase pH is a source of OH–.
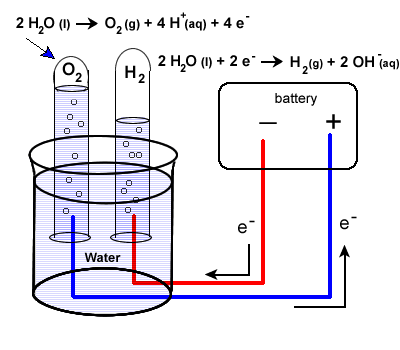
This is where electrochemisty gives us the simplest solution we could hope for. Water can be oxidized or reduced. When you run a current through water – above the minimum required voltage – water splits into hydrogen and oxygen molecules. In the image below you can see how the water oxidation reaction generates H+ ions while the reaction on the right generates OH- ions. When you do this in a single cell – as shown below – the H+ ions generated at the anode react with the OH- ions generated at the cathode and the pH of the solution remains neutral while oxygen is produced at the anode and hydrogen is produced at the cathode.
The image above shows the half reactions involved in the oxidation (left) and reduction (right) of water.
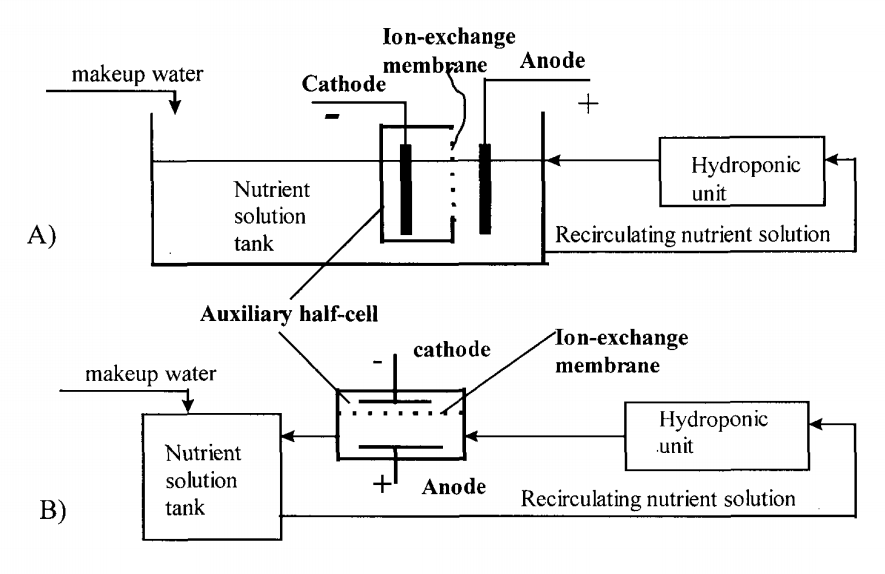
However, we can take advantage of ion exchange membranes to separate these two processes, allowing us to control where each reaction happens and where the acid or base is generated (preventing them from just mixing and neutralizing). As a matter of fact, all we need is to have an electrode in our nutrient solution and another electrode in an auxiliary cell, separated from our nutrient solution by an ion exchange membrane. This concept is actually not new and was already proposed in a 1998 paper to control pH in hydroponic systems. Although it was never tried in a production system, all the concepts were validated and were shown to perform adequately in test solutions.
Image taken from this paper, which discussed the topic of electrochemical pH control in hydroponic systems at length.
One of the big challenges of this setup is that the cathode side involves hydrogen gas evolution – which could be dangerous – but can be completely avoided by replacing the cathode’s half reaction with much more benign chemistry. As an example – also suggested in the paper above – you can replace the cathode half-cell with a copper sulfate solution with a copper electrode, with an anion exchange membrane. This would allow you to have your reduction reaction be the reduction of copper onto a copper place, which is a very tame reaction. Since the membrane only exchanges anions you would only have sulfate go to your nutrient solution, which is a benign anion in hydroponic culture. This of course means that your half-cell electrode and solution would need to be replaced with time, but this is completely independent from the control process (much more like refilling a tank of gas). The anode would only evolve oxygen in your nutrient solution, which is a potentially beneficial side effect.
Using a copper sulfate half-cell would however limit the control system to lower pH but this is not a problem since this is the most commonly used operation in hydroponics (very rarely do people have to increase the pH of their solutions). If a proper venting system or catalytic recombination system is used on the cathode side you could also go with the simple water oxidation/reduction route and be able to increase or decrease the pH using basically, pure electricity.
I am definitely planning to build one of this setups in the future. Coupled with modern sensors and micro controllers this could make it extremely easy to maintain very fine control over the pH of the solution, compensating – in real time – all the changes in pH carried out by plants without the risk of heavily over or under compensating (as it happens when you use acid/base additions).


