Selenium in hydroponic culture
The element selenium (Se) is not commonly used in hydroponic culture – as it’s not necessary for plant life – but the fact that it’s necessary for human life has meant that plant enrichment with selenium and its effects have been studied in hydroponics. Its effects however, are more than just an increase in Se concentration in plants. In today’s post we’ll talk about Se and what its effects in plant growth are according to some of the published literature.
Different studies can use different forms of Se, so it’s important to find out whether a study uses a source of Se cations, like Se chloride or a source of Se anions, like sodium selenate. If you want to reproduce the results you will need to match the exact source used, as using a different source can lead up to completely different results. Most studies focusing on Se use it in concentrations around 0.1 to 0.5ppm, although some studies do go as far as 5-10ppm, especially when studying the effects of the salts where Se is present as a cation.
Although most studies related to Se focus on the fortification of fruits, many studies also measure yield and plant quality related parameters in order to obtain as much information as possible. In this study of Se used in tomato plants there was a substantial enrichment of Se and a delayed ripening but there were no substantial effect on plant growth. However post-harvest characteristics of fruits were significantly improved by Se. Other studies on tomatoes, like this one, have however found improvements in yields when using Se.
Other studies like this one on curly endive or this one using Se nanoparticles in pomegranate, do show significant improvements in plant characteristics from using Se. In the pomegranate study, an 1.35 fold increase in the number of fruits was achieved, a very impressive mark given the characteristics of the treatment.
Selenium can also be a defense against temperature and salt stress. This article on peppers shows that an application of foliar selenium can help reduce flower drop rates and other adverse effects of temperature stress in these plants. This article on wheat seedlings, shows that selenium can also be protective against salt induced stress, preserving root growth under these adverse conditions.
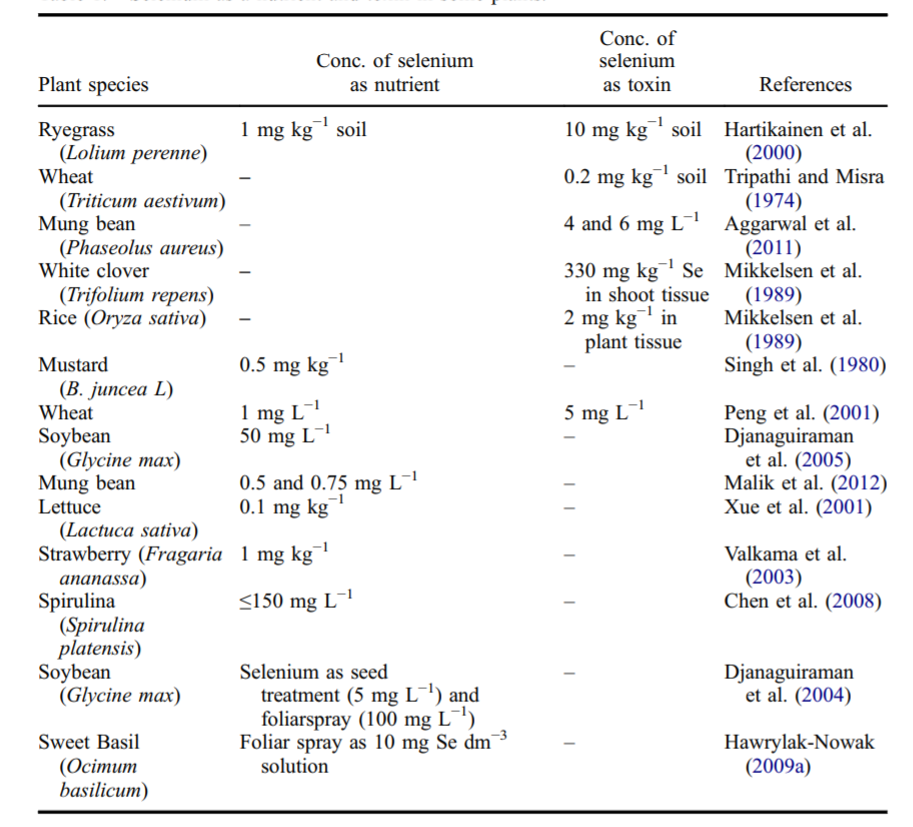
It is also worth considering that Se can also become toxic to plants at anything but low concentrations. This review, which goes significantly into the articles that had been published up until 2014, goes deeply into this particular issue. The table above is particularly useful, as it shows the ranges of applications and toxicities for some plants. It is within the conclusions of the above review – as we have seen in the articles shown before as well – that Se can be used as an effective additive, stress protector and growth promoter when used in adequate amounts and forms (remember, cationic and anionic forms are different!), while it can become toxic and damaging if used without care.