What is the effect of amino acids in hydroponics?
It is very common for hydroponic nutrient manufacturers to add amino acids to their products. They often mention significant benefits that range from strengthening plants to greatly increasing yields or product quality but they rarely mention any peer reviewed evidence studying these effects. Today we are going to look at the use of amino acid applications in hydroponic culture and the effects that amino acids have been shown to have when used in a variety of different crop types. We will see some of the benefits and the problems that they have shown to cause as well and we’ll discuss whether it is actually worth it to apply them in a hydroponic nutrient solution.
–

–
Amino acids – which I am going to use here to refer to L-alpha amino acids – are basically organic molecules that are used as the basic block for protein construction in all life forms. Plants are able to synthesize all the amino acids they need internally while in the case of animals many of these amino acids need to come from other animal or vegetable sources. However since amino acids can be added to nutrient solutions and plants can absorb them (see here) it is interesting to wonder what the effects they might have.
There are two ways in which amino acids can affect a hydroponic crop. They may be absorbed and used directly by the plant or they may create a chelate with a metal ion and affect that metal’s absorption. It is very difficult to separate both effects – except when specific metal absorption studies are carried out – so the effect on yields is generally a combination of these two. The specific amino acids used and their proportion are also critical to these effects as both plant absorption and the stability of metal chelates depend on the exact structure of the amino acids in solution.
There is significant evidence that amino acid applications reduce nitrate assimilation (see here, here and here) this is not surprising given that amino acids compete with nitrate in the nitrogen cycle and may be more readily assimilated by plants. This seems to be especially the case if nitrate concentrations are low and the plants are N deprived. The effect is most important for glutamine, not surprising as glutamate synthesis is basically the mechanism used for ammonium incorporation by plants.
–

–
There is also evidence that amino acids can help plants under stress conditions. For example strawberries in autotoxic conditions – meaning that they have made a nutrient solution toxic after a lot of recirculation – benefited greatly from an amino acid cocktail application (here) and Canola plants have shown to have increased yields under saline conditions with proline applications (here). Plants under heavy metal stress can also benefit from the presence of amino acid, for example rice seedling have shown to benefit from amino acid applications under cadmium stress (here).
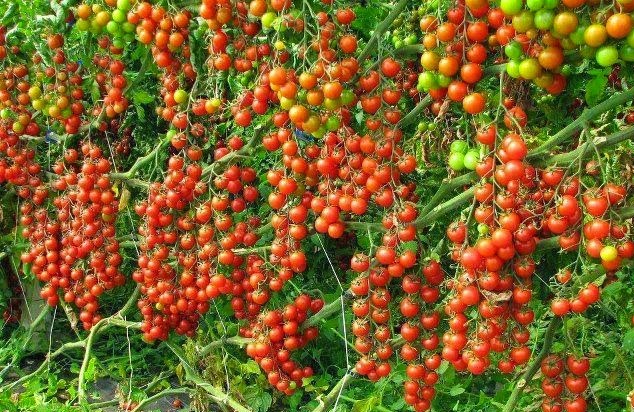
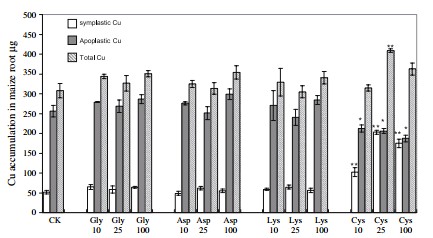
There are also limited studies in the use of amino acids as metal chelates in hydroponics. A 2012 study (here) compared different Fe chelates with Fe EDTA and showed that some of these chelates work better than the traditional EDTA chelate in Fe absorption. Fe glycine showed the best absorption across roots and shoots plus the best yields in tomatoes (second image in this post). This shows that Fe glycine may be a good candidate for the replacement of Fe EDTA in hydroponic solutions. Another study (here) also compared different Cu containing amino acid chelates and found that cysteine may be effectively used for Cu fertilization and phytoremediation.
Is it worth it to apply amino acids in hydroponics? This may depend on the exact conditions the plants are facing. While amino acids have proved beneficial for the assimilation of specific nutrients – like Fe and Cu – or the alleviation of some stress conditions (salinity, autotoxicity), there isn’t any strong evidence suggesting wide range beneficial effects under normal plant growing conditions, especially if these are close to ideal. In normal hydroponic solutions introducing large amounts of amino acids may even have significant negative effects due to their effect on ion absorption and N metabolism. Further evidence is required before general recommendations for exogenous amino acid applications can be made.
This doesn’t mean that amino acids might not be beneficial under normal conditions, just that we have no evidence yet showing which amino acid profiles might work best for which plants and under what concentrations and we do know that there can be potentially harmful effects if these parameters are not studied carefully.