The Best Outdoor Hydroponic System. A Simple Way to Grow Large Amounts of Food
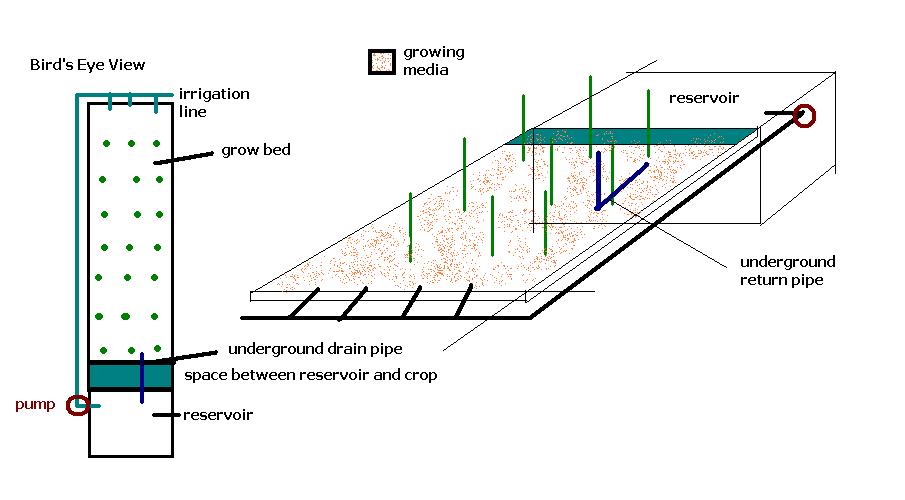
How do you build a scalable system that can be used on the outdoors with minimal problems due to uncontrolled environmental conditions ? The easiest thing I could think of was a simple continuous flow system which used the ground itself as a place to put the plants. This system uses no NFT channels, no large amounts of PVC pipes and absolutely no complex engineering. The system – shown on the drawing below – is simply a channel which is dug on the ground of about 2 meters wide by 25 cm deep. The nutrient reservoir can be a tank burried in the ground or a reservoir made from bricks and tiles out of another hole dug on the ground depending on the actual volume needs of the crop. The hydroponic system uses a PVC line connected to a pump to irrigate the system at the top and a small decline in the slope of the channel allows the solution to return to the tank through an underground pipe shown in dark blue. The channel is filled with a nutrient media that has adequate drainage and the nutrient solution is fed continuously through the irrigation system. Of course, when the channel is dug on the ground the soil has to be covered with a polyethylene sheet to prevent the solution to drain into the soil.
– –
–
This system allows you to grow a wide variety of crops, from tomatoes to lettuce heads. The system can be used to grow plants of various sizes and nutritional needs since the media and continuous flow irrigation provides great oxygenation as well as a cheap alternative to more complex systems such as NFT or PVC pipe systems. The system is also absolutely scalable, it can be built from a few square meters to a full plot size commercial cultivation facility without significantly changing the principle of operation. Since the surface area of the system is also large, and all nutrient solution is returned to a central reservoir, rain volume can be accurately determined and nutrients can be added or changed to make up for this effect of external environmental conditions.
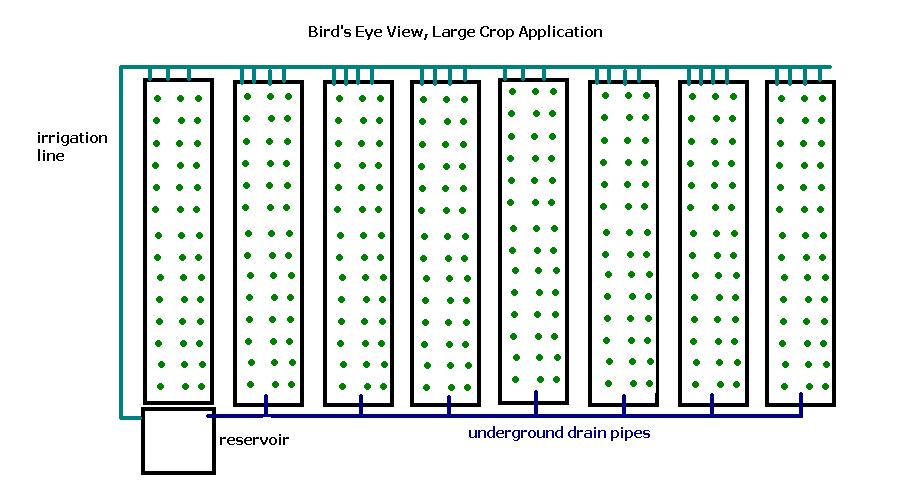
The image shown below shows you how the system can be expanded to a full plot system without any modification of the fundamental working principle. The only things that need to be bought to start this system are a tank, a shovel, a polyethylene sheet as large as the channel requires, PVC pipes for the irrigation system and returns pipes, media, nutrients and seed. Since there is no greenhouse, no gutters, no polymer channels and no expensive irrigation equipment, the system is very simple and effective at growing plants at a large or small scale under outdoor conditions. It is also perfect for people who want to start a small hydroponic business and then expand it as they want to increase their production, since adding channels is easy and requires almost no changes (besides perhaps having larger pumps and increasing reservoir size once this is required).
– –
–
In the end I believe that this system summarizes everything that I wanted to achieve with an outdoor hydroponic system. It is able to control and measure the effect and added volume of rain, allows the growth of a large variety of plants and provides us with a cheap and scalable solution to small and large scale commercial growing. Definitely there will be some problems that will probably have to be solved once larger applications start to develop but certainly I can say right now that this idea seems to be the largest, cheapest and most scalable solution for outdoor hydroponic growing available online :o).