Humic acids in hydroponics: What is their effect?

Plants and microorganisms affect the substrates in which they grow in many ways. If you start growing plants in an inert substrate – with nutrient applications of course – you will notice that the substrate’s chemical composition will start to change with time and it will start to get enriched in carbon containing substances. As plants and microorganisms grow, thrive and die, some of the chemicals that made up their cells end up enriching the substrate they grow on. This process – whereby organic materials from living organisms become part of a substrate – is what generates the soils around us. One of the most prevalent class of components in this organic material, is what we call humic acids.

Humic substance chemical properties.

Humic acid is not a single substance but a wide range of substances that are created as a product of plant and microorganism decomposition. This is why you often hear people talk about “humic acids” instead of simply “humic acid”. They are called “acids” because the humic substances contain molecules that have groups that resemble those found in phenol and vinegar. They are also differentiated from fulvic acids in the fact that they are only soluble at basic pH values while fulvic acids are generally small enough molecules to be soluble across most of the pH spectrum. Since humic acids are a very important component of enriched soils and can be used in soiless culture, people have started using them as supplements in soiless and pure hydroponic culture.

When talking about the effects of humic acids it is worth mentioning that since we’re talking about a group of molecules – not a single substance – effects are generally dependent on the source of the humic acid used. For example you can find a study on tomatoes here where two different sources of humic acids – from peat and leonardite – were used to grow tomatoes. The study shows a clear difference between both with the first only stimulating root growth while the second stimulated both roots and shoots. However in both cases there was an increased iron availability to plants, although the mechanism for this was not established.

Tomato plants inoculated with root rot at different humic acid application rates

In plants like gerberas humic acids applied at 1000 ppm can offer increases in harvested flowers of up to 52% (see here), somewhat positive effects can also be seen in tomatoes across the literature with most studies showing increases in yields and mineral contents (see here), reports of positive effects on gladiolus have also been published (here). Since the 1990s there has been a somewhat established understanding of some general beneficial effects for humic acid applications, it is well established that they can prevent and eliminate micro nutrient deficiencies due to their abilities to increase their availability(see here). The literature is also quite consistent in that the largest effects are often seen on root growth rather than on shoot growth or mass. There are however some types of humic acids that have showed higher increases of shoot mass, for example in an article studying humic substances derived from municipal waste on barley this was the observed effect. For some plants however – despite these beneficial effects – increases in yields in hydroponic culture are not evident (see here and here). A look at the effect of a humic acid source on several different plant species can be found here.

Effect of humic acid, bacteria and lactate applications on tomato plants.

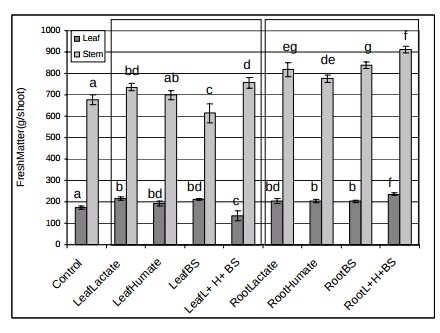
It is worth noting that humic acid applications are also not limited to the root zone. Since humic acids can enhance the absorption of some nutrients they can also be applied in foliar sprays. Experiments on strawberries (here) showed that an application of 1.5-3ppm of humic acids led to an increase in the quantitative and qualitative properties of the fruits.  Combinations of humic acids with other biostimulants are also common. For example a combinations of lactate, humate and beneficial bacteria was tested on tomatoes (here) but the experiments showed that the effect could be stimulating or inhibiting depending on the particular conditions, even though most combinations were beneficial.

With the high variability between humic substance origins, application rates and effects it is very hard to say whether humic acid applications will definitely help your crops in terms of yields. For almost all humic acid sources it is probably warranted that micronutrient absorption will be somewhat augmented due to their ability to chelate these nutrients, but only if the nutrients are not efficiently chelated already. This sole ability might lead to crop improvements if deficiencies are present but improvements in yields will strongly depend on humic acid substance origin and particular properties. However humic acids do seem to lead to general product quality improvements and since negative effects are rare there seems to be no harm in carrying out field tests to determine if their use is worth it for your particular crop.


Phosphorous toxicity and concentration in higher plants

If you search the web for symptoms of nutrient toxicities you will often find clear pictures and descriptions for most elements. Feed a plant too much nitrogen and it will grow leggy and weak, with dark leaves and long stems, feed it too much boron and you will see yellowing and tissue necrosis. However you will struggle to find descriptions for toxicity symptoms for potassium (K) or phosphorous (P). Is there really no P or K toxicity? Why are they no pictures or clear ideas of how these problems look? Today I am going to talk a bit about P toxicity and why it’s so difficult to reach levels where plants react very negatively to ions from the phosphate family. Images posted were taken from articles cited within this post.

You will often find websites that talk about P toxicity as saying that it is rare or that what it causes is mainly problems with other elements. In general increases in P concentration can cause problems with other elements particularly because the solubility of dihydrogen phosphate salts (H2PO4), salts that form with the ionic form of phosphate that’s mainly present around the pH values used in hydroponics (5.5-6.5) can be very insoluble. You will struggle to find solubility values for heavy metal dihydrogen phosphates, but Fe, Zn and Cu dihydrogen phosphates can be reasonably presumed to be poorly soluble. However calcium dihydrogen phosphate has a solubility of 20g/L at 25°C and is therefore very soluble, so no problems with Ca due to having a lot of phosphorous (this salt is also known as mono calcium phosphate).

The solubility of Ca dihydrogen phosphate is in fact very important because rock phosphate – tricalcium phosphate – is one of the main sources of phosphorous in soil and it dissolves to form protonated phosphate species at the pH usually created around plant roots. This means that many plants evolved with very large occasional concentrations of dihydrogen phosphate around them and therefore they generated mechanisms to down-regulate the uptake of phosphorous from really high concentrations.

There is strong evidence about the above. In fact plants that evolved in phosphorous-poor soils did not evolve mechanisms for down-regulation and do exhibit P toxicity even at moderate concentrations of this element. A few plants native to Australia exhibit this behavior, you can read more about this here. Due to this fact many plants can be cultured in media that is amended with fertilizers that generate large local concentrations of phosphorous when watered without showing any strongly negative effects. Note however that plants will eliminate these down-regulation mechanisms significantly if they are in a P deficient media and if you feed them P rapidly you can cause P toxicity just because the plant couldn’t react fast enough to the large increase in P concentration. See for example this study using P deficient Barley which accumulated toxic levels of P upon supplementation although this did not happen when the plants were constantly exposed to high P levels.

In hydroponics we do see excess of P manifest itself as deficiencies of other elements because of the solubility issues for heavy metal acid phosphates mentioned above. Several studies show the strong link between P concentration and the availability of some micro-elements. For example this paper shows the relationship between P and Zn and how the relationship corresponds with Zn phosphate precipitation in the roots. However if heavy metals are properly chelated we in fact don’t see these problems. I have made experiments with plants – basil and mint – cultivated in 600 ppm of P where I have failed to see any significant problems although I have failed to find any papers that describe experiments under such extreme P concentrations.

Is more P always better then? Studies in tomatoes show better responses to salinity at higher P concentrations (for example here). Although the highest concentration tested here is 61 ppm (2mM) which is higher than but still close to what is generally used in hydroponic culture of tomato plants (30-50 ppm). Tabasco pepper has also been found to grow better under higher P concentrations (see here). A study varying P concentration in hob marjoram found lower essential oil concentrations at higher P levels, although these levels are around 60 ppm as well. Lettuce on the other hand shows increases of sesquiterpene lactones at high P levels (see here). There are a few publications about P toxicity in higher plants – notably this one about tomatoes – where problems caused by P are generally associated with the previously mentioned micronutrient issues and P concentrations in leaf tissue above 1%.

In summary P toxicity depends heavily on plant type and its ability to regulate P uptake, it is also most likely heavily dependent on micronutrient concentration and the strength and stability of the chelating agents used to prevent the precipitation of heavy metal phosphates. There are no studies I could find with P under very high concentrations (>=20mM) using chelated heavy metal sources so this is an interesting topic for research for anyone interested in exploring the limits of P uptake.


What is the effect of amino acids in hydroponics?

It is very common for hydroponic nutrient manufacturers to add amino acids to their products. They often mention significant benefits that range from strengthening plants to greatly increasing yields or product quality but they rarely mention any peer reviewed evidence studying these effects. Today we are going to look at the use of amino acid applications in hydroponic culture and the effects that amino acids have been shown to have when used in a variety of different crop types. We will see some of the benefits and the problems that they have shown to cause as well and we’ll discuss whether it is actually worth it to apply them in a hydroponic nutrient solution.

Amino acids – which I am going to use here to refer to L-alpha amino acids – are basically organic molecules that are used as the basic block for protein construction in all life forms. Plants are able to synthesize all the amino acids they need internally while in the case of animals many of these amino acids need to come from other animal or vegetable sources. However since amino acids can be added to nutrient solutions and plants can absorb them (see here) it is interesting to wonder what the effects they might have.

There are two ways in which amino acids can affect a hydroponic crop. They may be absorbed and used directly by the plant or they may create a chelate with a metal ion and affect that metal’s absorption. It is very difficult to separate both effects – except when specific metal absorption studies are carried out – so the effect on yields is generally a combination of these two. The specific amino acids used and their proportion are also critical to these effects as both plant absorption and the stability of metal chelates depend on the exact structure of the amino acids in solution.

There is significant evidence that amino acid applications reduce nitrate assimilation (see here, here and here) this is not surprising given that amino acids compete with nitrate in the nitrogen cycle and may be more readily assimilated by plants. This seems to be especially the case if nitrate concentrations are low and the plants are N deprived. The effect is most important for glutamine, not surprising as glutamate synthesis is basically the mechanism used for ammonium incorporation by plants.

There is also evidence that amino acids can help plants under stress conditions. For example strawberries in autotoxic conditions – meaning that they have made a nutrient solution toxic after a lot of recirculation – benefited greatly from an amino acid cocktail application (here) and Canola plants have shown to have increased yields under saline conditions with proline applications (here). Plants under heavy metal stress can also benefit from the presence of amino acid, for example rice seedling have shown to benefit from amino acid applications under cadmium stress (here).

There are also limited studies in the use of amino acids as metal chelates in hydroponics. A 2012 study (here) compared different Fe chelates with Fe EDTA and showed that some of these chelates work better than the traditional EDTA chelate in Fe absorption. Fe glycine showed the best absorption across roots and shoots plus the best yields in tomatoes (second image in this post). This shows that Fe glycine may be a good candidate for the replacement of Fe EDTA in hydroponic solutions.  Another study (here) also compared different Cu containing amino acid chelates and found that cysteine may be effectively used for Cu fertilization and phytoremediation.

Is it worth it to apply amino acids in hydroponics? This may depend on the exact conditions the plants are facing. While amino acids have proved beneficial for the assimilation of specific nutrients – like Fe and Cu – or the alleviation of some stress conditions (salinity, autotoxicity), there isn’t any strong evidence suggesting wide range beneficial effects under normal plant growing conditions, especially if these are close to ideal. In normal hydroponic solutions introducing large amounts of amino acids may even have significant negative effects due to their effect on ion absorption and N metabolism. Further evidence is required before general recommendations for exogenous amino acid applications can be made.

This doesn’t mean that amino acids might not be beneficial under normal conditions, just that we have no evidence yet showing which amino acid profiles might work best for which plants and under what concentrations and we do know that there can be potentially harmful effects if these parameters are not studied carefully.


Instrument Precision : Its Importance in the Preparation of Hydroponic Nutrient Solutions

One of the most overlooked aspects when preparing hydroponic nutrient solutions is the actual precision of the instruments used to measure the salt or liquid reagent additions. People who are not familiarized with the preparation of solutions usually underestimate the importance of this aspect of solution making – both concentrated and final – which is absolutely vital for the accurate and reliable preparation of solutions. On today’s post I will attempt to explain the concept of instrument precision, the errors caused by this fact and how they are calculated by HydroBuddy to give us an idea of how dependent our calculations are upon our instruments. After reading this article you will be able to know if the instruments you are using for your solution preparation needs are adequate or what you need to do in order to ensure that the preparation of your solutions remains reasonably accurate.

What is instrument precision ? This point is best illustrated by a practical example. Imagine that you are using a ruler to measure the length of a simple pencil. A common ruler (in metric units) generally has large divisions (in centimeters) and smaller divisions (in millimeters), when you measure the pencil you will note that the length of the pencil will be between two of the finest divisions – or very close to one – but you will not be able to determine the measurement beyond this accuracy. For example if the measurement of the pencil is between the 2.3cm and the 2.4 cm line you can say that the pencil measures 2.35 +/- 0.05cm this means that we can be absolutely sure that the pencil has a measurement between 2.3 and 2.4 cm but our instrument does not allow us to “see” any further. In this example the three digits of the measurement are called “significant figures” while the last one is called the “measure of uncertainty” since it is a value we can only be certain about within a certain threshold.

When you measure your hydroponic solutions you need to use instruments to weight your salts or liquid fertilizers and you also need to measure the volume of your solutions (either concentrated or final). When you weight your salts your scale will have some uncertainty (usually represented as the point value of the last digit) so for example if your scale displays a weight for a salt of 5.50g the actual measurement is 5.50+/- 0.01g as – in analogy with the pencil example – the scale cannot determine the latest digit beyond a certain threshold.  The problem with this is that if your salt’s weight is in the vicinity of the scales last digit your uncertainty will be a big magnitude of what you want to weight. For example, if you want to weight 0.05g of a salt with the above scale the uncertainty of instrument will be +/- 0.01g so you will effectively have an instrumental error of +/- 20% of the salt’s mass, meaning that your final concentration will probably be VERY deviated from what you intend to measure.

Another important factor is the precision of your volume measuring gear since errors add up as you continue the preparation. If you can measure the volume of your reservoir with a precision of +/- 1L the you need to prepare at least 100L such that the error you get from the measurement of your nutrient solution’s volume is not greater than 1%, however if you are preparing a concentrated nutrient solution (for 10L for example) you will need to use a more precise method of measuring volume, an instrument with a precision of at least +/- 0.1L. If you are uncertain of what the precision of your volume instruments are then you need to look at their graduation, the precision of a volume measuring instrument can usually be approximated to half its finest graduation. If you are measuring volume -for a concentrate solution for example – with a cup that has a line every 100mL then your precision is +/- 50mL (or +/- 0.05L).

The above picture shows you where you can change the precision of the instruments used within HydroBuddy so that the program can calculate the error caused by your instruments in your preparation. Some people may have noted that when calculating “direct additions” there is no instrumental error while when calculating concentrated solutions there is, this is associated with the precision in volume since when straight additions are made the amount of volume that needs to be measured is MUCH higher while for concentrated solutions a much more precise volume instrument is required (depending on solution volume) since the volume is lower.

If you get very large instrumental errors (for the calculations you are doing) then there are several things you can do to correct them. The first is to prepare large amounts of concentrated solutions since the amount of salts weight will be much larger. Preparing 20L of a concentrated solution with a 1:200 concentration factor will allow most people to weight their salts in a scale with a 0.01g precision while other solutions -such as using the direct addition methodology with concentrated micro and Fe solutions – are also possible. In the end you need to take very good care of instrumental errors and take them into account since they will determine the final accuracy of your nutrient solutions. For macro nutrients the errors shouldn’t be above 0.05% while for micro nutrients such as Mo and Cu, errors as high as 20% can be tolerated since higher precision would require the use of much higher purity salts since these elements are also possibly contained as impurities within other salts (meaning that salt purity becomes a higher factor than instrumental error below 20%).


Understanding Reagent Purity and Its Importance in Hydroponics

When making hydroponic nutrient solutions one of the most important concepts we need to understand is “reagent purity” and how this affects the overall quality and composition of our hydroponic nutrient solutions. People who have not been academically trained in science usually do not have a very good understanding of this concept and its implications and how they need to take it into account when doing their hydroponic formula calculations. HydroBuddy – my free hydroponic nutrient calculator – allows the user to specify the purity of all the reagents used in the preparation of nutrient solutions so that accurate and adequate calculations are done. What does purity mean ? How do you determine the purity of the reagents you want to use ? What does a 100% purity mean ? Keep reading the following few paragraphs to find out.

What is reagent purity ? Imagine that you have 80g of a pure substance – table salt for example – and you mix it up with 20g of sand. The original salt – which was pure – was 100% table salt  while the new resulting mixture is only 80% table salt. This degree of presence of a given “pure substance” with a defined composition within a mixture is what we call the “purity” of a reagent. The objective of purity is to know how much of what you are buying actually fits the chemical composition of what you intend to buy and how much is “other stuff”. The nature of impurities -what is different than what you intend to buy – is different depending on the fabrication process and intent of the reagent you want to use. The nature and amount of these impurities may sometimes be very important while other times it can simply be neglected.

People who are not familiar with this concept generally get confused when people start to talk about the composition ratios of pure substances. For example iron EDDHA is an iron complex which contains about 7% iron. This does not mean that EDDHA is only 7% “pure” but it means that within this pure substance iron accounts for 7% of the weight. The purity of the reagent does not have ANYTHING to do with the composition of the pure substance you intend to get – the iron EDDHA in the above example – but it refers to other things that might be present with what you intend to buy due to the fabrication process. So for example you can can buy Iron EDDHA 7% with a purity of 98% which means that from every 100g, 98g are iron EDDHA with a 7% iron content while 2g are made up of other substances with undetermined composition.

In hydroponics we want to provide our plants with the correct amount of nutrients and for this reason we must make sure that we provide what our formulation demands as a minimum. For this reason when preparing hydroponic nutrient solutions we must always use salts with purity levels above 95% with levels above 98% being better. Salts that are 98% pure aren’t very expensive while the purer grades – used for the biochemical and fine chemical industries – are generally several orders of magnitude more expensive. While you can get a calcium nitrate ammonium double salt with a purity of 98% for just a few dollars per kilogram a single kilogram of this chemical at a 99.999% purity (which is often considered analytical grade) would cost around one thousand dollars. This difference in cost arises because as a salt becomes purer, eliminating the small impurities becomes harder and harder. Salts for which extremely high purity levels are achievable (such as NaCl which can be purified to almost 100%) are known in chemistry as “primary standards” because their composition is known to an extremely high degree.

When preparing hydroponic solutions we should not be worried that much about getting very expensive reagents as the impurities we get and the errors we have in our composition are not bound to affect our plants significantly, however we should take them into account so that we know exactly how much of what we know is pure is being added. So even though a reagent may have a purity of 98%, taking into account this will allow us to add enough so that we are certain that at least certain concentration levels are achieved. Of course, using a 100% purity for the reagents is not bound to increase tremendous error if the actual value of the purity of the salts is unknown but making sure that the purity is above 95 or better 98% is always something that should be done to ensure that high quality preparations are being done. You should also understand that the impurities within your salts might actually be insoluble so some small fractions of the salts may remain undissolved when concentrated nutrient solutions are prepared.


Making Isotonic Solutions For Draining : Preparing Your Own – and better – Clearex

When growing hydroponic products it is common in the industry to do a final treatment before picking up the crop in which nutrients are removed from the hydroponic solutions. While in most cases this is achieved by passing RO water through the system it is true that passing water with a very low osmotic pressure can make the plants absorb larger amounts of water than what we would ideally want, disturbing the osmotic equilibrium established by the roots with the nutrient solution. An approach that has been used to solve this problem is the use of isotonic cleaning solutions – such as Clearex – which drain the hydroponic media from nutrients without subjecting the roots to the stress of an hypo-tonic solution (such as RO or distilled water).
On today’s article I will teach you what the Clearex solution is supposed to achieve and how you can make your own (or even a better) solution to solve this final draining problem. First of all, removing nutrient from a hydroponic solutions is not so hard. Simply by running RO water through your system after draining the original solution you will remove most nutrients since these salts – contrary to what some companies tell you – are readily soluble and easily leave the media and roots when washed with RO water. The small problem when using RO water is that it is hypo-tonic with the roots, meaning that water will go into the roots to attempt to “lower” the concentration of the solutes within the plant’s cells.


Depending on what you want to achieve with this final draining solution you may have a problem when using such an hypo-tonic solution. In crops where there is fruit production, using such a solution can cause problems such as the rupture of fruits’ skin due to the higher rate of water absorption that takes place when plants are placed in a hypo-tonic media. In order to avoid these problems the best thing is to use an isotonic solution which has an osmotic pressure similar to the original nutrient solution.

Clearex achieves this simply by combining a few sugars to a concentration of about 4-6% in order to get to the point where the osmotic pressure of both solutions is similar. Getting regular table sugar an dissolving it in a ratio of 50g per liter of solution will achieve very similar results as those obtained with Clearex. However using sugars like this can have additional problems since sugars stimulate the development of fungi and bacteria within the root zones of the hydroponic plants.

In my opinion it would be possible to achieve better results by using an isotonic solution with a combination of salts and sugars in such a way that non-nutrient salts are used to provide an ionic content to the draining solution. Using a combination of NaCl, Sucrose and Sodium Hydrogen Carbonate to achieve a more balanced solution may provide better results when doing this type of draining procedures. Of course, this is based purely on my anecdotal evidence and an adequately controlled study would be needed to say anything conclusive for a particular plant specie.

In the end making these solutions is extremely simple and buying Clearex or such other solutions made for this purpose is an obvious waste of money. If you have obtained good results with solutions like these then you can simply make your own with simple sugars while it is possible that you could obtain results just as good as those by using RO water if your crop is not sensitive to hypo-tonic conditions. If you want to experiment a bit I would recommend using a solution with about 150 mg/L NaCl, 100 mg/L NaHCO3 (sodium bicarbonate) and 10g/L of glucose. Let me know if you get better, worse or similar results :o) (note that this is NOT a straight solution but a concentrated additive that should be used until the desired EC levels are reached)


Completely Passive, Non-Recirculating Hydroponic Systems : Yes, Its Possible

Generally when we think about growing plants hydroponically we think about complex setups with water pumps, air pumps, artificial lights, environmental control and greenhouses. However, it has been shown through many controlled experiments and experiences that hydroponics can be made in a much less fancy way, so simple in fact that pumps and other such appliances that consume electricity can be effectively and totally eliminated from the growing system without the need to lose a significant amount of crop quality or yield. On today’s article I want to discuss some of these extremely simple setups and how you too can effectively and efficiently grow a hydroponic crop with low cost and absolutely no usage of electrical power.
Traditionally hydroponic systems – especially in developed countries – have been extremely dependent on electricity to make them work properly. Water pumps are used to carry fresh nutrient solution towards the plants and air pumps are used to keep the nutrient solution saturated with oxygen. However the truth is that such complicated setups are actually NOT necessary for successful hydroponic growth if adequate system design is actually made. People in less developed areas of the world such as South America, China and India have been experimenting with completely passive hydroponic setups to replace the more traditional energy intensive hydroponic growth and they have done tremendous progress to achieve this goal.

Many of you are probably already thinking about all the possible problems this might have. You might be thinking that this might work for small plants – like lettuce and some herbs – but never for nutrient hungry plants such as tomatoes, pumpkins, watermelons, etc. The fact is that these entirely passive non-recirculating systems work for ALL of these plants, providing adequate growing conditions and high yields typical of hydroponic systems. Right now it is not a matter of opinion or discussion if it can be done as MANY studies and controlled experiments already show this is a reality. You can see some clear examples here, here and here.

The questions now becomes, how is this possible and how can you do it ? The answers are pretty simple. Passive hydroponics without any electricity can be done for large or small plants given that the following conditions are met :

  • Enough space for roots is available
  • Enough nutrient solution is available for all the crop’s life (or it is replenished)
  • Enough oxygen is available for the plant’s roots
If this three conditions are met you will be able to build a passive hydroponic growing system that needs NO air or water pumps to give a good yield. How can you make such a system ? The systems that have given the best results up until now are those that follow a very simple design scheme. The plant is put in an absorbent nutrient media and placed to float or stand just above the initial nutrient solution level. The level of nutrient solution slowly falls down in the beginning (due to evaporation) and then quickly as the plants start to absorb water and nutrients. As the level of nutrient solution lowers the plant roots become exposed to layers of air from which they can absorb oxygen, allowing them to effectively absorb nutrients from the below stagnant solution without those roots dying.

Most people believe that if roots are submerged in an unaearated solution they will die but this is only true if the whole root system is submerged. If a good part of the system is given an “air buffer” from which to absorb oxygen and this space remains humid, the result is a system that can absorb nutrients from the unaerated solution and oxygen from the air buffer zone. This has in fact been shown to work in many cases (you can follow the links mentioned before for some examples).


For big plants such as cucumbers and tomatoes you would want to use a container filled with solid media to support the whole plant with the initial nutrient level being just a few inches below the surface while for smaller crops a “fixed top” idea might work much better. In the above image you can see both systems and how they evolve as the crops grow. For larger crops you might also want to replenish some solution every month so that the crops can get all the water and minerals they need if the actual container is not large enough to hold all the water the plant would use through its whole life cycle.

Without a doubt passive hydroponic systems like these ones will become extremely important in future world agriculture (especially in developing countries) since they are able to give us many of the wonderful advantages of hydroponics without the problem of complex electronic equipment, water, air pumps or an inherent dependency in the electric grid (which is not available everywhere in rural third world countries). Hopefully this information will also be useful for those looking to establish some passive and effortless hydroponic gardens to have fresh crops year round :o).


Improving Seed Germination : The Science of Seed Priming

When we want to produce large amounts of plants or simply when we want to start our gardens fast and get the most out of our purchases improving seed germination becomes a large priority. One of the largest concerns of world agriculture as well as the home grower is the decrease in germination time and increase in germination percentage since both of these factors can bring great benefits. Some seeds – especially some flowers and herbs – are often quite difficult to germinate and using certain techniques to increase the rate and speed in which they sprout has been the focus of a large amount of scientific research. On today’s article I will be discussing the use of priming to decrease germination time, especially what priming is, what types are available and which ones you can use to decrease the germination time of those very difficult seeds.
To understand the concept of priming we first need a good grasp at the general concept of seed germination. A seed is a dormant embryo which carries within it the potential for a new plant’s life. The seed is alive, yet has a very slow metabolic rate due to the low mobility of substances within the embryo’s cells. This low metabolic rate allows the seed to remain alive, yet survive extremely long periods of time (some seeds can survive even hundreds of years) before actually sprouting into new plants.

Germination – which is the process in which we awaken the embryo – increases seed metabolism and toggles the massive reproduction that causes a new plant to grow. The main mechanism that triggers this process is simply liquid water. When water gets into the embryo and hydrates its cells, it speeds up metabolism and allows the process of cell division and growth to rapidly increase. However it is not always this simple to start this process since several impairments – both chemical and physical – can exist for successful germination.

Priming is simply a process done prior to conventional seed germination which allows the inhibiting mechanism to be broken and the metabolic speed increase to begin. There are several types of priming that can be done. A seed can be submerged in simple water (hydropriming), it can be soaked in a solution of a simple salt (halopriming) or it can be set in a non-ionic solution with high osmotic pressure (osmopriming). It is not entirely well established why one technique might work better than another but certainly some species tend to respond much more efficiently to one or another.


In general, priming offers the opportunity to almost always germinate seeds at much higher speeds without detrimental effects in germination percentages. For example, a two day treatment of parsley seeds with a PEG 6000 (PolyEthyleneGlycol) solution can reduce germination times substantially, from a few weeks to just a few days. Other seeds such as coriander might also benefit from similar treatments with PEG or with treatments with NaCl solutions. In general if you are looking to test priming on some difficult seeds you own you can try three small experiments to know which one works best for your particular seed variety and germination conditions. Do one experiment in which the seeds are simply soaked in water for 24 hours, another in which seeds are placed in a 200mg/L NaCl solution and another one in which the plants are submerged in a PEG 6000 20% solution, then let the seeds air-dry after the treatments. After comparing the results of these experiments with a control with no priming you will be able to see which priming technique is better for you and most effectively increases your seed germination rates.

To sum it up priming your seeds is a very efficient technique to increase the speed of germination without sacrificing germination rates. This methods are not very useful for seeds such as lettuce or tomato – which germinate easily – but they are invaluable for plants such as parsley, coriander or carrots which are generally much harder to germinate. If you have some seeds that have been giving you a hard time or seem to take ages to germinate then setting up some priming experiments might be the best thing to do.


Building Your Own High-Power LED Grow Lights for Hydroponics

You will often hear in the world of hydroponic growing that Light emitting diode (LED) lights simply do not work as well as the traditional HPS (high pressure sodium) or Tungsten Halide lamps when growing large plants. The truth is that this belief is centered around the fact that most of the commercially available LED fixtures are built with low-power cascade LEDs that simply do not give your plants enough light intensity to grow properly. The fact that people do not know how to distinguish one from the other, coupled with the problems of getting a genuine, high power LED lamp makes the use of LED fixtures in hydroponics limited and almost never considered a serious option for modern growers. On today’s post I want to talk a little bit about how you can build your OWN high power LED lamp and how this way you can get a cheap, low-energy, highly-efficient device to make your plants grow.

The first thing you need to consider here is the amount of LEDs you will be using (the amount you will require for your plants) and the power supply you will need to feed those little hungry fellows. From my experience I can tell you that the lumens measurement of high power LEDs does not give you an accurate estimation of how many you need since LEDs have a highly centered light spectrum that is more accurately measure in micro Einsteins (the appropiate measurement unit for these devices). In this case I advice an empirical measurement of 5, 3W high power LEDs for each plant you wish to grow and 1 blue LED for every 10 red LEDs. (below you can see a picture of one of my LEDs, the LED was dimmed to get a better picture)

The second thing you want to do is buy the LEDs, just google red or blue 3W high power LED on ebay and you will find several chinese or US providers who will sell you these great artifacts for a small price. When you get your LEDs make sure you buy at least 3-5 more than what you will need since these LEDs are sensitive and they will burn easily if you wire them incorrectly. Since the power requirements of these LEDs are also pretty high they will get VERY hot (however much cooler than traditional lamps) and they will need to be mounted on aluminimum rails with at least one 6 inch fan for each 5 LEDs (or a BIG rail than can dissipate all the heat).

The next part – which is the most difficult – is the building of the power supply and voltage regulator side of the device. You can use a laptop supply to power up some LEDs but you need to calculate their power requirements so that you know how many you can power up for the power supply you will be using. A very good guide I used to create my LED assembly can be found here. Of course you should change the setup and LED number to fit your needs but the tutorial shows you exactly how you can choose the power supply, calculate LED needs and build the voltage regulator with a simple electronic circuit.

Finally, after I finished I hooked the power supply of my LEDs to a regular appliance timer which sets them on and off at certain times of the day. Making sure that my basil plants get enough light for their growth even when I am not at home. It is very worth noting that before I installed this LED fixture my basil plants were extremely leggy, etiolated and just dying. A few days after the LEDs where in place they started to grow like crazy :o) Do you have any questions, comments or suggestions ? Have you also built your own LED fixture ? Leave a comment below !


Growing a Hydroponic Garden Without a pH or EC meter

So you have decided you want to start a hydroponic garden but you do not want to use a pH or an EC meter. It is fairly common for people to feel this way when they are starting their own hydroponic gardening due to several reasons. Maybe you are not very familiar with the technical side of hydroponics, you don’t want to get into all that stuff in the beggining or perhaps pH/EC meters are terribly hard to get or expensive where you live. Does this mean that without a pH and EC meter you won’t be able to run a successful hydroponic venture ? No. On today’s post I am going to talk to you about how you can grow hydroponic crops without a pH or EC meter and yet get good results, sometimes even better than people using all those technical gizmos :o).

As a chemist I think like a scientist and part of this way of thinking is the controlling of variables. I like to control pH and EC because I feel that this allows me to have a record of what is happening within my nutrient solution, without these measurements I would be “blind”, so to speak. However when I was beginning my major I started my first hydroponic ventures with absolutely no control over pH or EC. I didn’t do this because the cost of an EC/pH meter where I lived was prohibitive so I said, “what the hell” and went for it. I have to say that I got some very satisfying tomato crops after having some significant failures due to both rookie mistakes and disease. I managed to get full, 2 meter high tomato plants filled with delicious vibrant tomatoes and this happened without ever checking my pH or EC.

How did I manage to do this ? After time went by and I got an EC/pH meter, I started to monitor how my crop evolved with time to know what I should or should not do to improve my corp’s yields. I found out that the pH of my crop increased steadily – and sometimes came near 8 – before I usually changed my nutrient solution. The EC oscillated widely but my reposition of the initial “level” of solution with water was enough to keep the EC at a good level. So if you want to be successful with hydroponic crops, it is not absolutely vital for you to have a pH or an EC meter, you just need to follow some simple guidelines to have a wonderful hydroponic crop.

1. Have one gallon of nutrient solution per plant. Having this volume of solution in your reservoir per plants allows you to have enough nutrients so that each plant will take a significant amount of time to absorb them. Having less solution is troublesome since your EC will change wildly and your nutrient solution changes will have to be more frequent. A one gallon per plant rule of thumb seems to be the best choice.

2. Add fresh water to recover the initial level of your solution . This is one of the easiest things to do. By adding fresh water -without any nutrients- to top off your reservoir to its initial level you will keep the EC near its initial value for the whole time. This simple technique ensures that your EC remains within rational levels and your plants stress-free.

3. Change your solution every 4 weeks. After 4 weeks, in a hydroponics system where there is one gallon per plant and the solution is continuously topped off (at least once a day) you will find that your plants have used about 40% of the nutrients at most (this is what I got from full production tomato plants and an atomic emission analysis of the nutrient solution). This means that your solution is now deprived of nutrients and it is time to use the solution to water your soil-garden and prepare everything again.

With this simple guidelines, anyone will be able to grow a hydroponic garden without using a pH or an EC meter. Of course, in the beginning you may find some problems while you find the adequate level of nutrients your plants need (if you do not prepare them yourself) but after a few trial and error runs you will be able to grow full hydroponics gardens without having to constantly monitor either pH or EC. Certainly, better results are achievable when you are monitoring these variables but it is possible to grow a beautiful hydroponics crop without the slightest monitoring of these aspects of a hydroponic nutrient solutions. People usually underestimate the ability of plants to adapt to changing conditions, something that they are able to do beautifully if you only follow the above advice. Do you have any advice or suggestions to help people grow without an EC or pH meter ? Feel free to leave a comment :o)