Keeping plants short: Why is it important?

Plants have evolved to grow vertically – to reach more sunlight – and horizontally – to increase their surface area and capture more sunlight. However, vertical growth is almost always undesirable because of the many problems it can generate. With this article I am starting a series of posts about “keeping plants short” which will cover a lot of the practical methods that have been developed in order to stop and modulate the vertical growth of plants. In this first post I want to look at the reasons why keeping plants short is desirable in almost all plant species and growing conditions and give you some hints about the methods that I will be discussing in future posts about the practical actions we can take to keep our plants small, yet highly productive. So why is it important to keep plants short?

A picture of severe lodging in cereal crops (taken from this article)

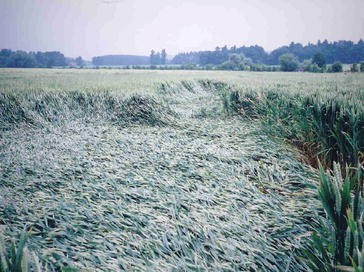
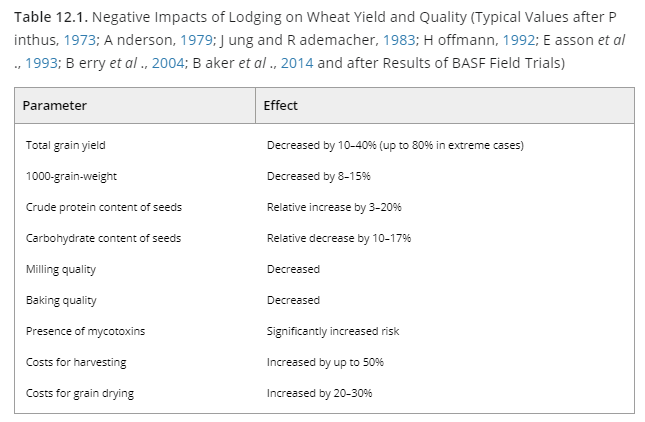
Lodging prevention. Mechanical stability is very important when growing plants. Tall plants are mechanically less stable because the upper parts of the plant can apply a lot of leverage to the base of the plant. If enough weight is accumulated and force is applied – through wind for example – the plant can easily break or the stem be displaced for the vertical position, leading to huge losses in the crop. Plants that are shorter are naturally more resistant to lodging because there is less mechanical advantage to apply leverage on the base of the plant, the plant is therefore less likely to move from its vertical position, even if some force is applied.

Ease of harvesting. The taller a crop, the more inconvenient it is to harvest the product. For fruiting crops it becomes more inconvenient to pick fruits from higher positions while for crops like potatoes more material from above the ground needs to be removed. This difficulty to harvest the fruits is the main reason why some perennial crops, like African palm, become unproductive. At some point in time the fruits are so far up that it is no longer feasible to mechanically harvest them. In hydroponic crops like tomatoes the height of the plant is limited by the mechanical constraints of the greenhouse, if a plant is shorter and more trusses per meter can be grown, then this immediately leads to an increase in potential productivity.

Lodging in wheat heavily affects yields and quality. Taken from this review.

Ease of transport. When a plant is shorter, the movement of nutrients and water from the roots to the leaves is easier, as the distance is smaller. Plants that are shorter need to fight gravity less and will therefore be able to transport nutrients more efficiently to their fruiting bodies. This is why the first flowers of all plants are usually the most productive – because they are the closest to the root system – and why the further away you go from the ground the smaller and smaller the fruits tend to become. Having short crops means that the top fruits and flowers will receive a higher degree of nutrition than they would if the crop was taller.

More homogeneity. Related with the above, when plants are shorter the distribution of nutrients among the plant is better because leaves, flowers and roots are all in closer proximity. Taller plants with larger inter-nodal distances will tend to have more distance between leaves and fruits, which will decrease homogeneity as the difference in light irradiation and root-to-leave transport between the nodes will be greater. A plant with the same number of leaves and flowers with lower inter-nodal distances will have much more homogeneous products for this reason.

The above are some of the most important reasons why it is usually desirable to have plants that are short. However, we do not want plants that are just short, but we want plants that are short but preserve the same yield as taller plants. This means we must get creative and use solutions that can manipulate the plants to give us the best of both worlds. There are a potential array of solutions to this problem. For example we can attempt to directly interfere with the chemistry of stem elongation (synthetic gibberellin inhibitors), to indirectly interfere with the chemistry by trying to stimulate other processes, to do genetic selection of plants that are naturally shorter, to provide mechanical stimulation to prevent elongation, to change light characteristics to inhibit elongation or to use day/night manipulations to achieve this same goal. We will explore many of these potential solutions within subsequent posts.


Using calcium sulfate in hydroponics

Calcium is a very important element in plant nutrition and can be supplied to plants through a wide variety of different salts. However, only a handful of these resources are significantly water soluble, usually narrowing the choice of calcium to either calcium nitrate, calcium chloride or more elaborate sources, such as calcium EDTA. Today I am going to talk about a less commonly used resource in hydroponics – calcium sulfate – which can fill a very important gap in calcium supplementation in hydroponic crops, particularly when Ca nutrition wants to be addressed as independently as possible and the addition of substances that interact heavily with plants wants to be avoided.

Gypsum / Calcium Sulfate
Calcium sulfate dihydrate (gypsum)

There are some important reasons why you don’t hear too much about calcium sulfate in hydroponics. Some websites actually recommend heavily against using this substance in hydroponic nutrient solutions. Why is this the case? The core issue is calcium sulfate’s solubility, with this substance traditionally considered “insoluble” in chemistry. However all substances are soluble to one or another degree – even if to an extremely small degree – but calcium sulfate is actually at the very border of what is considered a soluble substance in regular aqueous chemistry.

At 20C (68F), calcium sulfate dihydrate – the form most commonly available – has a solubility of around 2.4 g/L. In practice this means that you can have up to around 550 ppm of Ca in solution from calcium sulfate dihydrate before you observe any precipitation happening. This is way more than the normal 150-250 ppm of Ca that are used in final hydroponic nutrient solutions that are fed to plants. You could supply the entire plant requirement for calcium using calcium sulfate without ever observing any precipitate in solution. At the normal temperature range that hydroponic nutrient solutions are kept, the solubility of calcium sulfate is just not an issue. To add 10 ppm of Ca from calcium sulfate you need to add around 0.043g/L (0.163g/gal). You should however avoid using calcium sulfate for the preparation of solutions for foliar sprays as it will tend to form precipitates when the foliar spray dries on leaves, the leaves will then be covered with a thin film of gypsum, which is counterproductive.

Calcium sulfate has a great advantage over other ways to supplement calcium in that the anion in the salt – sulfate – does not contribute as significantly to plant nutrition. Other sources, such as calcium chloride or calcium nitrate, will add counter ions that will heavily interact with the plant in other ways, which might sometimes be an undesirable effect if all we want to address is the concentration of calcium ions. Other sources such as Ca EDTA might even add other cations – such as sodium – which we would generally want to avoid. Calcium sulfate will also have a negligible effect in the pH of the solution, unlike other substances – like calcium carbonate – which will have a significant effect in the pH of the solution.

Solubility (g per 100mL) of calcium sulfate as a function of temperature for different crystalline forms (see more here)

A key consideration with calcium sulfate is also that its dissolution kinetics are slow. It takes a significant amount of time for a given amount of calcium sulfate to dissolve in water, even if the thermodynamics favor the dissolution of the salt at the temperature your water is at. For this reason it is very important to only use calcium sulfate sources that are extremely fine and are graded for irrigation. This is sometimes known as “solution grade” gypsum. I advice you get a small amount of the gypsum source you want to use and test how long it takes to dissolve 0.05g in one liter of water. This will give you an idea of how long you will need to wait to dissolve the calcium sulfate at the intended temperature. Constant agitation helps with this process.

An important caveat with calcium sulfate is that its relatively low solubility compared with other fertilizers means that it cannot be used to prepare concentrated nutrient solutions. This means that you will not be able to prepare a calcium sulfate stock solution or use calcium sulfate in the preparation of A and B solutions. As a matter of fact the formation of calcium sulfate is one of the main reasons why concentrated nutrient solutions usually come in two or more parts, to keep calcium and sulfate ions apart while they are in concentrated form. Calcium sulfate should only be added to the final nutrient solution and adequate considerations about temperature and dissolution time need to be taken into account.


Average yields per acre of hydroponic crops

I constantly talk about yield in hydroponics and how a variety of different techniques, additives and methodologies can be used to make plants more productive. However, what is the average yield you can expect in a hydroponic crop for a given plant specie? Where have these yields been measured and what can you expect your crop to yield? On this blog post I will discuss the literature around average yields in hydroponics, the problems with the expectation of average yield per acre and some of the things you need to consider when trying to consider a hypothetical growing situation. You will see that getting an expectation of how much your crop will produce is not simple and depends on a complicated mixture of variables.

1 -Soiled and Hydroponic Yields (Source: Resh, 1998) 
Average yields per acre in hydroponic versus soil according to Howard Resh (1998, “Hydroponics food production”). I could not determine the actual source of hydroponic crop data used to get the above values or their veracity.

There are multiple literature sources of expected yields in hydroponics, many of them coming from outside the peer reviewed literature. The above table shows you one example from a book published in 1998 by Howard Resh. However if you look at the seventh edition of this book (published in 2013), you will not find the table above anywhere within it. I do not know why this table was removed from the book, but it might be related with problems with the data used to obtain the above yields, or those yields not being realistic expectations for average hydroponic setups. This does not mean in any way that the book is bad – I consider it an excellent introduction to hydroponic growing – but it does show that reducing yield expectations to simple tables can be problematic.

Below you can see another table – taken from a review article written in 2012 – which took it from an article published in the proceedings of a conference that was held in India in 2012. These proceedings are practically impossible to find online – at least I couldn’t despite my best efforts – so it is extremely hard to know where the data actually comes from. However we can see that there are large similarities between these and the numbers published by Howard Resh in the 1998 book, suggesting that these two tables actually have the same source. This table seems to have become widely used as a way to show how superior hydroponics can be when compared to soil, but the original source I can trace it to – the Howard Resh book – actually got rid of it, and people who use it in the scientific literature now quote either the reviews that quote the Indian conference proceedings or the proceedings directly. This makes me very suspicious of these values as the actual data where these values was drawn from seems impossible to get to.This can happen in scientific literature, where some widely quoted values become almost “memes”, where circular references are created and the original source of the data becomes extremely hard to actually find.

Taken from this review article. The data source for these values is also not known.

So what are some actual yields in tons per acre per year for crops, as per current scientific literature that shows where the actual data came from? The answer is not very simple! Let’s consider the case of tomatoes. The best information I could find on the subject was gathered in 2002 – almost 20 years ago – from greenhouse hydroponic growers in the United States at both small and large scales (1, 2). The yields for highly sophisticated large scale greenhouses that can do tomato growing during the entire year is 235-308 tons per acre per year, while for growers that can only do one crop a year – due to proper lack of climate/light control – the average yield per acre per year is around 50-60% of that. Here we can already see how technology can introduce a difference of around 2x in the results, just because of the amount that is expected to be produced. More recent data from Pakistan in 2018 (3) puts the average yield for hydroponic greenhouse tomatoes at 65.5 tons per acre, vs around 4.07 in the open field. This is a difference of around 5x with the reported yields in the US in 2002, just because of fundamental differences in growing practices and technology. I have in fact personally been at lower technology hydroponic crops that have achieved only slightly better yields than soil, with yields in the 12-15 ton per acre per year range.

For other plants accurate yield per acre per year information is even harder to find. I couldn’t find scientific literature showing values – with data from actual crops – for the yields of other common hydroponic crops such as lettuce, strawberries and cucumbers. The reason might be related with the high variance in the results obtained by different growers under different circumstances. As we saw in the case of tomato producers above, things like the actual variety being grown, the climate control technology available and the actual location of the crops can play a big role in determining what the actual yields will look like.

The above implies a very substantial risk for people who want to develop hydroponic crops under unknown conditions. Creating a business plan can be very hard if you do not know how much product the business will yield. If you’re in this position then I advice you do not use any of the values commonly thrown around the internet as guidance, most of the time these are highly inflated and reflect the potential results of the most ideal hydroponic setups, rather than the average. The best guide for yields will be to look at growers that are harvesting the same crop under similar conditions in your area. If this is unavailable then the cheapest way to get this information is to actually carry out a small scale trial to see how much product you can expect.

If you are pressed to do some worst-case estimates then use the values from soil in the area where you’re in as a base expectation. A hydroponic crop is always likely to do significantly better than soil, but working with soil-like production values will allow you to control your costs in a much tighter fashion if realistic expectations cannot be created either through the experience of other hydroponic growers under similar conditions or small scale experimental setups.


Three ways to judge the quality of powdered hydroponic nutrient products

Commercial hydroponic nutrients are often available as liquid concentrates. These offer a very reproducible experience for the user, with very high homogeneity and easiness of application. However, one big drawback of liquid concentrates is the fact that they contain a significantly large amount of water, meaning that shipping them is often very expensive. The solution to this is to create solid state fertilizers, where a mix of raw salts is shipped, and a concentrated stock solution or final hydroponic nutrient solution is prepared by the user. However, solid preparations have some important issues that liquid concentrates do not have that can significantly affect the quality of the nutrition received by the plants and the reproduciblity of their results. In this blog post, we will talk about what makes a good premixed solid fertilizer and thee ways in which you can judge the quality of one.

This is a poor quality commercial hydroponic nutrient mix. As you can see there are different coarse salts that have been barely mixed (some look like rice grains, others like sugar crystals). There is no proper fine grade mixing of the salts, therefore the standard deviation of the composition of different random samples will be large.

Homogeneity of the product. Having a very finely mixed fertilizer is extremely important because hydroponic fertilizers can contain nutrients with differences in composition of even more than 3 orders of magnitude. A fertilizer might contain 10% of its mass as nitrogen but only 0.01% of its mass as iron. For that fertilizer to work effectively, any random sample draw from it must contain as close as possible to the composition on the label. However, if the fertilizer is not well mixed a random draw might deviate very strongly from the intended composition. This means that one day you might be preparing a batch of solution using a 20%N 0.001%Fe fertilizer and the next day you might be preparing one that is 10% N and 0.5% Fe.

A good quality solid fertilizer product should have a homogeneous look to it. You should be unable to determine the constituent salts from one another in the fertilizer mix. If you notice different types of solids within the product – such as pellets mixed with crystals – or any other sign that the preparation is not homogeneous then this means that the fertilizer is just a very simple mix of the raw salts, meaning that the components may separate relatively easily as a function of time through differences in their properties (such as density). Sometimes a fertilizer might be finely ground, well mixed and then pelleted – which is acceptable – but if this is the case the fertilizers should contain only pellets and all of them should have the same look to them.

If you want to really tell if the fertilizer is of good quality you can take random samples from different parts of the fertilizer – punch different holes in a sealed bag and sample from different sections of it – and send them for lab analysis. The standard deviation of the composition of the different samples will tell you how good the fertilizer is. Good solid fertilizers will have a standard deviation below 5% in analyzed samples.

Stability of the product. A good solid fertilizer product will be stable through time, since it will be formulated with salts that are as close as possible to the lowest thermodynamic state of the mixture of ions being made. Inexperienced people who venture into the fabrication of solid fertilizers will often mix salts that are used in liquid concentrates that can react when put together in solid form. These reactions often happen with a release of water that can change the weight of the fertilizer as it evaporates from the product or can cause very significant caking problems in the mixture as a function of time. In the worst cases, some substances that are hard to put back into solution might form, making the final use of the fertilizer difficult.

You can tell if a fertilizer is reacting if there are changes in the mass of the fertilizer as a function of time or if the appearance or physical properties of the fertilizer change. Are the colors changing? Is the texture changing? All of these things can point to on-going reactions in the fertilizer mixture that can be indicative of problems with the formulation. A good formulation should change as little as possible through time.

Yara fertiliser technology | Yara United States
Caking of a fertilizer product due to a reaction with atmospheric water

Easiness of dissolution. Premixed solid fertilizers for hydroponics need to be prepared to be as easy as possible to dissolve in their final application. This can be problematic depending on the inputs used, but adequate additives need to be put in to ensure that the products will not have a very hard time getting back into solution. This involves adding adequate wetting agents as well as ensuring that chemical reactions that alter solubility do not happen within the final product.

When dissolving raw fertilizers most of the product should go into solution, however – depending on the purity and source of the chemicals used – some insoluble portions might remain. A manufacturer might make the choice of using inputs that are directly mined instead of chemically purified – using for example OMRI grade magnesium sulfate – this will create a product that has more insoluble materials compared to a product that uses more thoroughly refined magnesium sulfate. Whether this is acceptable or not will depend on the type of application required and what the priorities of the grower are, for example MRI compliance might be more important than having better solubility.

As you can see, although solid premixed fertilizers can provide significant savings in terms of shipping over liquid concentrated fertilizers, they can do so at the cost of reproducibility and quality problems.To avoid these problems I recommend you ensure the fertilizer you choose to use has been properly blended to produce low deviations in sampling, has been formulated with thermodynamic stability in mind and has been formulated considering proper solubility in the final application.


How to control algae in a hydroponic crop

Microscopic algae can be a very annoying problem in a hydroponic crop. As photosynthetic organisms they can cover all exposed surfaces that get wet with hydroponic nutrient solution and can cause a wide variety of different issues for the grower. They can also be hard to control, reason why some growers simply choose to ignore them and learn to “live with them” as a fundamental part of their hydroponic setup. In today’s article we’ll talk about some of the reasons why microscopic algae are a problem that has to be dealt with, what the different options to solve the problem are and which of these options can be the most effective.

Typical microscopic algae found in hydroponic nutrient solutions

Besides the unpleasant look of algae covered growing media, these microscopic organisms can cause some important problems in your hydroponic crop. They can deprive hydroponic solutions from some nutrients, generate substances that can hinder plant growth, serve as food for some insects (like fungus gnats) and also serve as food for other microscopic pathogens. For more information about algae and their effects you can read this paper that studied some of the effects of algae in hydroponic crops or this white paper that explains some of the main issues associated with algae in hydroponics. This paper also studies nutritional and pH effects in more depth.

The first barrier of defense against algae is to avoid them, cover surfaces that are exposed to light and nutrient solution with opaque covers and ensure that all surfaces are properly sanitized before hydroponic crops are started. Granted this is a limited solution in scope – as places like the top of media are not easy to cover – but it can provide some protection compared to a crop where no attention is paid to surfaces at all.

To deal with surfaces that have algae in them is an entirely different matter. Algae are not easy to get rid of. This paper goes through multiple potential treatments to get rid of algae, including the use of fungicides, insecticides and algicides and finds that these substances are either not effective, only preventive in nature or actually phytotoxic at the concentration at which they are effective. Hydrogen peroxide is suggested as a potential solution to deal with algae, but hydrogen peroxide also causes significant stress in plant roots and its application is bound to have only limited success, with the algae coming back to recolonize – often more strongly – once the applications are finished. This paper evaluates hydrogen peroxide use even further and also shows some of the potential problems that can happen when using it to control algae and insects.

Image from this article showing plants treated with IBA (a) and plants not treated with it. You can notice the complete absence of algae in the growing media

Thankfully all hope is not lost. Around 20 years ago, experimentation started on the use of some indole derivatives – the same used to stimulate rooting in rooting gel formulations – to control algae populations. This article shows that an application of 3-(3-indolyl)butanoic acid (also known as IBA or Indole-3-butyric acid) at 10 ppm can very effectively control algae populations. The image above shows how the IBA treatment was very effective at reducing all algae growth in the media, even when nutrient solution was directly wetting the media with direct access to light. This is great news since IBA is non-phytotoxic and can therefore be used without having to cause any damage to the plants (unlike peroxide does). There is also additional evidence from independent researchers in Japan showing the effectiveness of IBA for the same purpose (see this article). Additionally there might even be some positive effects of IBA applications in crop yields, as it is shown in this paper where experiments with IBA applications were done on bell pepper. This is not terribly surprising given that the effects of IBA to stimulate root growth are very well known.

Note that although the above articles use IBA as a consistent application during the entire crop, there is little peer reviewed use of IBA applications in plants during their entire crop cycle. To avoid any potentially unknown effects – such as substantial changes in essential oil or product characteristics – it is important to test the effect in the particular plant you are growing and initially apply it only as needed to control any algae growth that might appear. Some areas might also forbid the application of substances like IBA – which is a recognized Plant Growth Regulator (PGR) – so make sure you can also use this in your crop before you even consider it for this application. This 2009 proposal to allow IBA usage in organic food production and handling goes a lot deeper into IBA, its use in plants and its potential effects.


Can you use regular soil fertilizers in hydroponics?

If you have just started your journey into hydroponics you’re probably wondering why you need to spend your money in hydroponic specific nutrients when there are so many cheaply available soil fertilizers sold out there. Certainly there are all plant food and there must be some way you can use all these cheap soil fertilizers to create a suitable replacement to feed your hydroponic crop. In this post I want to explain some of the key differences between hydroponic and soil fertilizers, when soil fertilizers can be used in hydroponics, how they can be used and when it is definitely a bad idea to try to use them.

Some slow release soil fertilizer being added to plants

To understand the difference between soil and hydroponic fertilizers we must first understand the difference between both growing setups. In hydroponics we try to grow plants in sterile and chemically neutral supporting media where all the nutrients are expected to be provided by the nutrient solution while in soil the media is not intended to be inert – it contains organic matter, minerals that can dissolve and living microbes – and we expect some of these to provide nutrition to our plants. Fertilizers for soil are intended to aid this process – provide material for microbes to process and supplement some of the lacking elements in the soil – while hydroponic fertilizers intend to provide all required nutrition in the forms that are mostly favorable for plants. Fertilizers for soil are often also meant to be applied once or very occasionally, while fertilizers for hydroponics are expected to be fed to the plant very frequently.

In chemistry terms, this means that fertilizers for soil will tend to contain forms of nitrogen that can be processed slowly by microbes in soil – urea and ammonium salts – while hydroponic fertilizers contain mostly nitrate salts. It is rare for soil fertilizers sold to home growers to contain large amounts of nitrates because these are easily washed aware by rain, are strong pollutants of underwater ground sources and are only shortly available for plants due to their high mobility in soil. However ammonium and urea are a terrible idea in hydroponics since ammonium fed frequently strongly acidifies the media and plants supplied their nitrogen only from ammonium in solution will tend to show toxicity issues quickly. Soil fertilizers rely on bacteria to convert this ammonium and urea to nitrate in a slow process, hydroponic fertilizers do not, they contain nitrate which is the final form of nitrogen that plants prefer for healthy growth.

Comparison between a couple of typical water soluble soil (left) and hydroponic (right) fertilizer labels.

The image above shows you a comparison between the labels for a water soluble soil and hydroponic fertilizer. In terms of NPK they both seem to be similar fertilizers, but the hydroponic fertilizer will have most of its nitrogen as nitrate while the other fertilizer has most of its nitrogen as urea. There are some other differences, mainly that the amount of phosphorous in the soil fertilizer is more than double that of the hydroponic fertilizer, which is also common given that phosphate is fixed rapidly in soil and therefore a higher excess is often added to ensure plants get enough supply. At an application of 1g/L the soil fertilizer would provide 75+ ppm of phosphorous while the hydroponic one would provide around 35. Also note that none of these two fertilizers would be enough to provide total plant nutrition since they both lack a source of Ca, which is commonly provided via a separate product in both cases.

So can any soil products be useful in hydroponics? Yes. First you need to completely avoid products that contain N mainly as urea or ammonium. Useful products to get for your hydroponic grow will be fully water soluble and will either contain nitrogen solely as nitrate or no nitrogen at all. A very coarse DIY formula can usually be put together using something like a micro nutrient containing 0-10-10 bloom fertilizer (which contains no nitrogen) coupled with a source of nitrate, like agricultural grade calcium nitrate. You can use Hydrobuddy – my open source hydroponic nutrient calculator – to figure out the nutrient contributions of each one of the products you decide to get or have easily available and create an acceptable formulation from their use. The program also contains a long list of readily available raw salts that you can use to make your own fertilizer formulations from scratch if you wish to do so.

In the end, soil products for home growers are not designed for hydroponics use and should therefore be avoided except as a last resort if raw salts or hydroponic specific nutrients cannot be purchased. If you’re interested in saving money, learning how to prepare your own fertilizers from raw salts will always be the best and cheapest option, provided you have the time and desire to learn how to do it properly.


Accurately preparing large quantities of concentrated hydroponic nutrients

When preparing concentrated solutions for hydroponics it is important to have a reproducible process that always generates the exact same results. If this is not done, you’ll obtain different nutrient concentrations between different batches and the concentrated nutrient additions to create the final nutrient solutions will yield inconsistent results. To address the potential variability of the concentrated solution manufacturing process we need to understand the different sources of error present and come up with ways to modify the process to generate more reproducible results. In this blog post I will talk about the largest source of error when preparing larger batches of concentrated nutrient solutions and how this error can be greatly reduced in order to obtain both more precise and accurate results.

Picture of a type A 250mL volumetric flask.

The process of preparing hydroponic concentrated solutions involves two steps. First, you dissolve raw fertilizer salts into some volume of distilled or RO water and then you take this volume of solution to a desired final volume of solution using the same source of water. In a small scale setup this process is very simple to carry out, since we can just weight and dissolve all our salts in some fraction of the desired final volume and then use a precise instrument to measure total volume – most typically a volumetric flask – to take our solution to the final desired volume. For example if we desire to prepare 250 mL of concentrated nutrient solution and we use a well calibrated scale with +/- 0.001g of precision and an A grade volumetric flask with a precision of +/- 0.3mL, the error we expect to get from a 500mg salt will be +/- 4.77 ppm with a 99% confidence. Since the concentration of this salt in the concentrated solution is 2000 ppm, we get a final result of 2000 +/- 4.77 ppm. If both instruments are calibrated this is a very precise and accurate result.

When we move to larger amounts of solution we usually get better on the side of mass. This is because we can still get scales that weight with +/-0.1g precision even at weights exceeding 50kg, so our error as a fraction of the total measurement remain in the 0.01% to 1% region pretty easily. However things get way worse in terms of volume. If you are preparing 100 gallons of nutrient solution – around 378 liters – you will be able to weight the salts precisely and accurately but when it comes to measuring final volumes of solution, you are not going to be very lucky. The volume marks in tanks are widely inaccurate and are not even standardized to any level of significant precision or accuracy plus accurately measuring whether water is at a given level in a tank is a very error prone process because of how wide the tank area is.

Although we don’t usually have a way to adequately measure final volume, we do have a way to measure volume going into a tank in the form of flow meters, which can give us significant accuracy and precision. However, to be able to properly use the flow meter – know how much volume we need to actually get to the final volume we want – we must obtain information from a precise and accurate low scale process. To do this you can carry out the following steps:

  • Get a precise and accurate scale (calibrated and at least +/- 0.001g in precision)
  • Get a scale that can weight up to 500g that can measure with at least +/- 0.1g precision (if the one above does not).
  • Get a 250 mL type A volumetric flask (should be around +/- 0.3 mL in precision).
  • Get a 250mL beaker
  • Get a plastic lab washing bottle and fill it with distilled water
  • Calculate the salts you would need to dissolve to arrive at your desired concentrations at a 250mL final volume of concentrated solution
  • Weight those salts and put them in a beaker, take note of all the exact weights added.
  • Weight the dry, empty volumetric flask
  • Add approximately half the volume of distilled water to the beaker and dissolve the salts
  • Transfer to the volumetric flask, use the washing flask to fill the volumetric flask up to the calibration line (bottom of water meniscus is touching the line when viewed at eye level).
  • Weight the flask with the solution
  • Calculate the weight of water (weight of flask with solution – weight of flask – sum of weight of salts)

If the procedure above was carried out between 10-25C (50-77F) we can approximate the density of water to 1.0g/mL with little error (around 0.003g/mL). This means that we know the volume of water that was required to get to the desired final volume and we can then transfer this volume to our preparation procedure when we use a large tank. If the volume of water required for the preparation of the 250mL solution was just 230mL, then we can assume that the volume required to prepare 100 gallons will be 92 gallons, as the salts, when proportionately scaled, will take up the same volume and will require the same amount of water proportionately to reach the final desired volume.

When this type of procedure is done and an accurate and precise flowmeter is used, we can usually achieve concentration values at large scales that will be in the 0.1-1.0% error range, which is way better than anything that can be achieved by just using lines in tanks or procedures that use flow meters but ignore what the actual amount of water added needs to be in order to reach the desired concentration (many people achieve the salts take up no volume, which is a mistake). Having low errors in concentrated solutions means there will be less variability in final nutrient solution composition and therefore more reproducibility in crops.


Plant Growth Promoting Rhizobacteria (PGPR) in hydroponics

Plants did not evolve in an isolated environment but with a wide variety of different microbes. Through their evolution, plants prospered more in the presence of certain microbes and therefore evolved traits to attract and nurture them. In turn these microbes were also selected to create even deeper mutualistic relationships with plants. Specifically, the bacteria from this group that facilitate and improve plant growth are known as Plant Growth Promoting Rhizobacteria (PGPR) and have been an extensive subject of plant research during the past 40 years. In this article I am going to talk about their use in hydroponic culture and the evidence we have about their growth promoting effects in the absence of soil.

Effect of PGPR of the genus Bacillus in soil, taken from this paper

The positive effects of PGPR in general are well established. These two (1, 2) literature reviews address the subject in depth and cite a lot of the research that has been done around PGPR for crops in general, although none of these two reviews address their use in hydroponics specifically. What we know from all these literature is that the positive effects of PGPR are mostly attributed to three different phenomena. The first is an increase in nutrient availability for the plant, mainly through making some nutrients that are inaccessible to the plant accessible (mostly N and P), the second is through the release of phytohormones – chemical substances that stimulate plant responses – that prompt plants to develop more tissue in several different ways, and the third is that these bacterial colonies provide defenses against pathogens that could be attacking the plant if they were not present. Many different species that show these effects have been identified – some even specific to single plant species – but from those species those from the genus Bacillus, Agrobacterium and Pseudomonas have been the most widely studied and shown to be effective.

We also know from the research that the application of PGPR is not trivial and exactly how plants are inoculated with them plays an important role in the improvements they might show. Inoculation can be done in seeds, cuttings, transplants or through the entire growing/flowering periods. You can use both root and/or foliar applications, different concentrations of bacteria and different additives can also be given to try to make the inoculation steps more successful. These bacteria can also use oxygen in solutions, so using too much can also starve roots of important oxygen and cause strong negative effects before any positive effects can be seen, using too little means the bacteria die without being able to form a stable colony. The table below gives you an idea about how complex the entire application universe can be and the sort of effects that have been observed in field/greenhouse trials in soil for a wide variety of plants. The reviews cited above contain a lot of additional references, make sure to read them if you’re interested in a wider view of the available literature on the subject.

Table showing the effects of different PGPR applications using different techniques across different plants. Taken from this review.

As you can see the effects under these conditions have been very positive, with sometimes highly significant increases in root/shoot weights and fruit/flower yields. However soil itself is not a perfect media and plants grown in soil are also not subjected to ideal nutrition. Since one of the main benefits of PGPR is to increase nutrient availability, some of these benefits might be partially or even completely negated when moving onto hydroponic culture, where we seek to provide plants with an ideal environment. Research of PGPR in hydroponics is not very common though, as hydroponic growing has traditionally made a big deal about sterility, as growers mostly want to prevent pathogens from getting into their crops.

Ref Plant PGPR Yield Link
1 Tomato Pseudomonas fluorescens, Pseudomonas putida 10%+ https://www.actahort.org/books/952/952_98.htm
2 Tomato Pseudomonas fluorescens 13%+  https://www.sciencedirect.com/science/article/abs/pii/003807179390038D
3 Tomato Pseudomonas putida, Serratia marcescens, Pseudomonas fluorescens, Bacillus spp 18-37%+ https://www.actahort.org/books/807/807_68.htm
4 Cucumber Pseudomonas putida, Serratia marcescens, Bacillus spp., Pseudomonas fluorescens 78-121% https://www.sciencedirect.com/science/article/abs/pii/S0304423813000198
5 Tomato Bacillus amyloliquefaciens 8% https://dialnet.unirioja.es/servlet/articulo?codigo=2740834
References of some trials using PGPR carried out in hydroponic conditions

Thankfully there have been some people who have led the way into the world of PGPR in hydroponic research so we have started to see some positive evidence of their use, even under hydroponic growing conditions. The above table shows you 5 references for papers that have studied PGPR in hydroponics – mainly in tomato plants – where it has been pretty well established that applications of bacteria of the genus Pseudomonas can increase yields in the order of at least 10%+. Some studies, like 3 and 4, show that significantly more gains are possible for different combinations of bacteria or application methods. I couldn’t find a lot of additional studies in this direction, but the above studies start to show that the use of these bacteria in hydroponics can be positive.

A lot of questions still remain though. If these bacteria are benefiting plants because of the introduction of plant growth regulators (PGR) in solution, then we might ask if the direct exogenous applications of these PGRs is not a better way to obtain and control the benefits without the need to maintain a live population of bacteria in a mutualistic relationship with plant roots. Research has indeed shown that the exogenous application of many PGRs can enhance the yields of different plants. Do we apply PGRs or do we keep a culture of bacteria in our media? Can we do both and obtain even better results? Sadly right now there are no answers to the above questions and a lot of additional research is needed before we even get close.

For now the research on PGPR is telling us that these bacteria work amazingly well in soil and can also provide substantial benefits for some plants in hydroponic culture under certain conditions. We know that the bacteria from the genus Pseudomonas and Bacillus are the most interesting candidates to study in hydroponics and we know some of the inoculation techniques that have worked. If you want to experiment with them in your hydroponic crops, make sure you take the above information into account. The right choice of bacteria, concentration, inoculation method and additives can make a big difference in the results you get.


Why do NPK labels express P and K as oxides?

If you have had any contact with the fertilizer world you have probably noticed that fertilizer labels contain N-P-K values on their front and back labels, denoting the chemical composition of nitrogen, phosphorus and potassium available within the product. However you will soon learn that while N is elemental composition – the actual percent of the fertilizer by weight that is nitrogen – P and K are expressed in more confusing terms, mainly the oxides K2O and P2O5. Why do we keep expressing these elements as oxides? Is there any actual reason why expressing them as oxides would be better? What’s the point? In today’s post we’ll talk about fertilizer and fertilizer analysis, we’ll talk about why P, K and other elements are expressed as oxides and why this continues to be the case.

Nitrogen, phoshprous and potassium are the elements represented in the N-P-K, although P and K are expressed as oxides and not pure elemental forms

I have heard people talk about the expression of K as K2O and P as P2O5 as a consequence of K and P not being actually present in their elemental forms in the fertilizers but as other substances. The argument being that it is preferred to express these elements as their available forms, instead of their elemental forms. However this argument has many problems. The first is that K2O and P2O5 are also not present within the fertilizer, as these two are also very reactive forms of these elements. Potassium in particular is always present as K+ ions, reason why it would make more sense to express it as elemental potassium and P is actually present most commonly as either H2PO4-2 or HPO4, all of these pretty far away from the phosphorus pentoxide form that the label describes it as (P2O5 is not phosphate). Nitrogen is also not present as elemental N, but it is present most frequently as either NO3 or NH4+ ions (although urea and amminoacids are also common forms of N in non-hydroponic fertilizers).

Why is N expressed as elemental N and K and P are not? The reason has to do with the way that these elements were quantified in the past when doing chemical analysis. Before we had access to modern techniques – such as inductively coupled plasma mass spectrometry – the elements were quantified using more complicated analysis procedures. The nitrogen was usually quantified using methods such as Kjeldahl nitrogen analysis because it would become volatile when the sample was burned, while the other elements were quantified from a calcined sample, meaning the sample was exposed to high temperatures to eliminate all water and carbon within it before the analysis. This ash would contain all non-volatile elements and when determining K and P from these ashes you could sometimes actually quantify K2O and P2O5. From an analytical chemistry perspective, it made sense to express all non-volatile elements as oxides, because the concentration of these oxides was what you were actually measuring in the lab after you calcined the sample. This practice was very common in inorganic chemistry in general, because analysis of many non-volatile elements tended to follow a similar path. The above is certainly an over-simplification, you can read more about analytical methods used in the early days of fertilizers here, if you do so pay special attention to the references in that paper.

In the past knowing the composition of fertilizers expressed in this way made sense, as labs could basically eliminate an additional conversion step when reporting and comparing results. Note that in those days – 1930-1950 – there were no pocket calculators and everything needed to be calculated entirely by hand, so saving calculation steps was considered less trivial than it is right now as someone would actually need to make all those conversions using pen and paper. If you have to analyse 30 fertilizer samples in your lab then you would rather report a number closer to the one you directly measured instead of having to do 30 additional calculations by hand to get to another number. Since all labs were measuring these elements in similar ways, everyone agreed that it made sense for fertilizer labels to be N-K2O-P2O5.

We no longer do things this way, as the methods and tools available to the analytical chemist have changed through time, but we keep this trend of reporting things in this manner in order to have coherence with past NPK labels. We have measured NPK in this manner for almost a century – the era of modern fertilizers starts in the early 1930s – so it would be a nightmare to change since it would become difficult to know when looking back which values were expressed as K2O and P2O5 and which ones as actual elemental P and K if the change was made.

So expressing K and P as K2O and P2O5 makes little sense in the modern world. We do it because we inherited this from the birth of the fertilizer era and we do it because making the conversion in these times is trivial and maintains coherence with all our previous reports of fertilizer compositions. However it is important to realize that K2O and P2O5 are not the actual forms that these elements have in fertilizers and that we simply express them this way through mathematical operations. Just image you’re saying: “If the K present in this fertilizer was actually all K2O, then it would be x% of the mass of the fertilizer”.


HydroBuddy has now been updated to v1.70: New features and modifications

My free and open source hydroponic nutrient calculator has been available since 2010, going through many iterations and changes through the years. The latest version as of May-24-2020 is now 1.70, which you can download here. This new release implements some important updates and modifications. In this post I will write about these, the reason why they have been made and the features that I am implementing for the next version of the software.

New substance selection screen in HydroBuddy v1.70

Most changes in this version have been done in the “Substance Selection” section of the program, which is accessible through the button of the same name in the “Main Page” tab. This is the “heart” of the program as this is where users decide what raw inputs they want to use and where they can manage the library of inputs that are actually available for calculations. In previous versions a very wide library of inputs was available by default, including many inputs that were rarely of any practical use in hydroponics and were there for illustrative purposes. A good example of this is a salt like “Calcium Nitrate (Tetrahydrate)” which is very rarely used by hydroponic growers as commercial “Calcium Nitrate” is actually a calcium ammonium nitrate salt that is very different in chemistry and composition to pure calcium nitrate tetrahydrate.

To solve the problem mentioned above I have completely rebuilt the substance database to include only commercially available raw fertilizers that make sense and are actually used in common situations in hydroponics. This included adding a lot of different metal chelates and salts that were previously ignored but are now part of the HydroBuddy default database.

Another issue I wanted to address was the confusion some users have about where to buy these chemicals and potentially get some revenue to support the development of the software at no additional cost to the user. For this reason I have added manually selected links to all the raw fertilizers that are included with the DB so that users who want to buy small quantities of those can also support the software when they do so.

HydroBuddy v1.7 contains clickable substance names in the result tab that take you to amazon affiliate links that sell the products mentioned at no additional cost to the user.

The “Substances Used” tab has also been enhanced with a new “Save/Load” functionality that enables users to save or load lists of substances used to avoid the hassle of having to go through and select substances whenever they want to prepare a certain solution. This has also been very annoying for me in the past as having to go through different sets of inputs used for different purposes can be a very time consuming exercise. With this new feature all I have to do is save one list for each one of my needs and a single click of the “Load” button can easily change a list of 5+ inputs without the need for any tedious and – mistake prone – manual changing. Another small manual enhancement has been the addition of a small “All” button next to the “Delete” button, which allows you to delete all the substances present in the “Substances Used for Calculations” list.

Another change in this version was a decision to go with a 32 bit compiler in Windows in order to ensure that the variables for this operating system are all 32 bit. This will enable users who are using both 32 and 64 bit operating systems to use the software without problems. This was an issue in the past as many uses still use old 32 bit systems and they were having problems having to manually compile Hydrobuddy in some of their old machines. Sadly I still do not own a Mac, so HydroBuddy has yet to be available as a download for MacOSX and the software will need to be individually compiled by all of those who wish to use it in their MacOSX setups.

One of the features that is lacking most now is an ability to import databases from previous versions, as each time the software is updated users haven’t been able to take advantage from previous custom databases built using the software due to problems with compatibility across releases (new DB fields being added, edited, etc). For the next version of the software I am working on a DB importing feature that should eliminate this issue so that users can benefit from the latest HydroBuddy releases without having to tediously add all their old substances to the new release.

With all the above said, I hope you enjoy this new version of the software. If you have any suggestions or comments about the above please feel free to leave your comments in this post!