Controlling pH in hydroponics using only electricity

The ability of plants to assimilate nutrients changes as a function of pH. This makes maintaining the pH of nutrient solutions within an acceptable range – most commonly 5.8 to 6.2 – one of the most important tasks in a hydroponic crop. This is commonly done with the addition of strong acids or bases to decrease or increase the pH when it drifts away from the intended value. This requires either manual monitoring with careful addition of these substances or automated processes using pumps to ensure the pH always remains at the correct value. However both of these methods lack fine control, require a lot of maintenance and monitoring and can lead to costly mistakes. Today I want to discuss an alternative method that relies on a completely different idea to control pH, the idea that we can oxidize or reduce water using electricity to achieve changes in pH. Yes, you can change pH using literally only electricity.

A modern anion exchange membrane. Fundamental to the idea of an electricty-only pH control system

Let’s start by discussing pH and talking about how it is changes. The pH of a solution is calculated as -Log(|H+|) where |H+| is the molar concentration of H+ ions in solution. In water, the dissociation constant 1×10-14 (at 25C), always needs to be respected, so we always know that the product of |H+| and |OH| needs to give us this number. When you add acids you increase |H+| conversely |OH| decreases and the pH goes down, when you add bases |OH-| increases, |H+| decreases and the pH goes up. In simpler terms everything you need to decrease pH is a source of H+ and everything you need to increase pH is a source of OH.

This is where electrochemisty gives us the simplest solution we could hope for. Water can be oxidized or reduced. When you run a current through water – above the minimum required voltage – water splits into hydrogen and oxygen molecules. In the image below you can see how the water oxidation reaction generates H+ ions while the reaction on the right generates OH- ions. When you do this in a single cell – as shown below – the H+ ions generated at the anode react with the OH- ions generated at the cathode and the pH of the solution remains neutral while oxygen is produced at the anode and hydrogen is produced at the cathode.

<img src="https://scienceinhydroponics.com/wp-content/uploads/2020/04/electrolysis_water.gif" alt="Electrolytic Cells  cell > 0  cell < 0  G
The image above shows the half reactions involved in the oxidation (left) and reduction (right) of water.

However, we can take advantage of ion exchange membranes to separate these two processes, allowing us to control where each reaction happens and where the acid or base is generated (preventing them from just mixing and neutralizing). As a matter of fact, all we need is to have an electrode in our nutrient solution and another electrode in an auxiliary cell, separated from our nutrient solution by an ion exchange membrane. This concept is actually not new and was already proposed in a 1998 paper to control pH in hydroponic systems. Although it was never tried in a production system, all the concepts were validated and were shown to perform adequately in test solutions.

Image taken from this paper, which discussed the topic of electrochemical pH control in hydroponic systems at length.

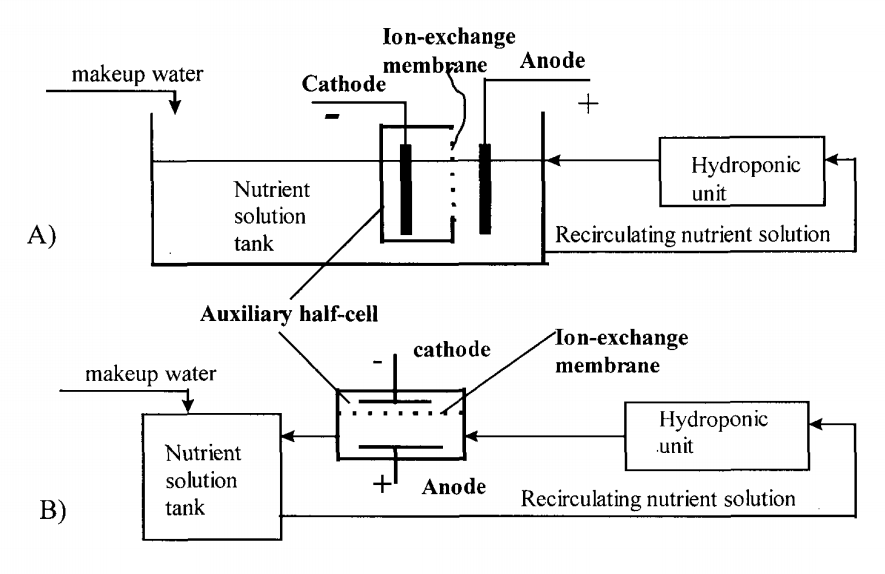
One of the big challenges of this setup is that the cathode side involves hydrogen gas evolution – which could be dangerous – but can be completely avoided by replacing the cathode’s half reaction with much more benign chemistry. As an example – also suggested in the paper above – you can replace the cathode half-cell with a copper sulfate solution with a copper electrode, with an anion exchange membrane. This would allow you to have your reduction reaction be the reduction of copper onto a copper place, which is a very tame reaction. Since the membrane only exchanges anions you would only have sulfate go to your nutrient solution, which is a benign anion in hydroponic culture. This of course means that your half-cell electrode and solution would need to be replaced with time, but this is completely independent from the control process (much more like refilling a tank of gas). The anode would only evolve oxygen in your nutrient solution, which is a potentially beneficial side effect.

Using a copper sulfate half-cell would however limit the control system to lower pH but this is not a problem since this is the most commonly used operation in hydroponics (very rarely do people have to increase the pH of their solutions). If a proper venting system or catalytic recombination system is used on the cathode side you could also go with the simple water oxidation/reduction route and be able to increase or decrease the pH using basically, pure electricity.

I am definitely planning to build one of this setups in the future. Coupled with modern sensors and micro controllers this could make it extremely easy to maintain very fine control over the pH of the solution, compensating – in real time – all the changes in pH carried out by plants without the risk of heavily over or under compensating (as it happens when you use acid/base additions).


Maximizing essential oil yields: A look into nutrient concentrations

Essential oils are the main reason why several plant species are currently cultivated. These oils have a wide variety of uses either in the food industry or as precursors to more complex products in the chemical industry. Modifying nutrient solutions to maximize oil yields in hydroponic setups is therefore an important task. However, there are sadly no clear guidelines about how this can be achieved. In today’s post I wanted to create a small literature review of different research papers that have been published around the modification of nutrient solutions to maximize essential oil production and see if we can draw some conclusions that should apply to plants that produce them.

The variety of plants that produce essential oils is nothing but amazing. From plants where mainly the leaves are harvested – such as mint and basil – to plants where the flowers are used – such as roses – to plants where the seeds are used, like coriander. The wide variety of oil sources and plant species implies that the universe of potential research is immense, with every potential nutrient modification in every plant giving a potentially different optimal measurement. However, plants share some important characteristics – like photosynthesis and root absorption of nutrients – plus essential oils within different plants can share components produced using similar chemical pathways. For this reason, a look into the research universe of nutrient solution optimization for essential oil production is likely to serve as a base to guide us in the optimization of a solution for a particular plant.

Plant Optimal (ppm) Link to reference
Mint 195-225 N , 178-218 K https://www.actahort.org/books/853/853_18.htm
Sweet Basil 180 Ca https://www.cabdirect.org/cabdirect/abstract/20013048426
Costmary 200 N, 200 K https://pubag.nal.usda.gov/catalog/732179
Mint <= 276 K http://www.scielo.br/scielo.php?pid=s0103-84782007000400006&script=sci_arttext
Chrysanthemum 159 Ca https://pdfs.semanticscholar.org/13ea/999605458e65d9023dadbabca48464a5fa70.pdf
Chrysanthemum 43 N (NH4) https://tinyurl.com/vqupwvf
Lavender 300 K https://scielo.conicyt.cl/scielo.php?pid=S0718-95162017005000023&script=sci_arttext&tlng=en
Rose Geranium 207 K http://ir.cut.ac.za/handle/11462/189
Rose Geranium 110 S, >= 68 P https://www.tandfonline.com/doi/full/10.1080/02571862.2012.744108
Spearmint 200 N https://www.sciencedirect.com/science/article/abs/pii/S2214786117300633
Lavender 200 N, 50 P https://www.sciencedirect.com/science/article/abs/pii/S0926669015306567
Mint 414 K https://sistemas.uft.edu.br/periodicos/index.php/JBB/article/view/601
Spearmint 50-70 P https://www.sciencedirect.com/science/article/pii/S0308814618317862
Marjoram >= 36 Mg https://www.actahort.org/books/548/548_57.htm
Salvia 150 N https://pubs.acs.org/doi/abs/10.1021/jf030308k
Dill 300 N https://www.actahort.org/books/936/936_22.htm
Summary of different papers addressing essential oil yield optimization in hydroponic setups by varying one or several nutrient concentration values.

In the table above I summarize the research I found concerning the optimization of some mineral nutrient in the hydroponic production of a plant, specifically to maximize the essential oil yield. All of these studies optimized the nutrient within a given range and a >= or <= sign is used whenever the optimal value found is at the top or bottom of the range respectively. When more than one nutrient was optimized in the paper, I give you the values for both nutrients so that you can glimpse the optimal. Whenever the researchers suggest an optimal range instead of a value within their research this is also included as a range. I tried to find papers representing all macro nutrients but studies optimizing some elements were hard to find (Mg for example). Although I tried to include as many species as possible some species are just more commonly studied, as they are commercially more relevant (like mint and basil).

From these research results we can immediately see some clear trends. From all the studies there is no result where optimal total nitrogen concentration is below 150 ppm and 3 out of the 4 studies I found, agree that the optimal N concentration is at 200 ppm. In the case of K all studies agree that K should be at least 200 ppm, but I did find a study on mint that got a value of 414 ppm, far larger than the value found in other studies for the same specie. This is not an uncommon discrepancy in hydroponics – optimal yields being mixed in a wide range above 200 ppm of K – which can be caused by other issues that can affect K absorption, such as the concentration of other important cations (like Ca and Mg) in the studies.

I was only able to find two studies that focused on Ca and both agree about optimal values between 150 and 180 ppm, although they address two completely different plant species (basil and chrysanthemum). In the case of Mg I found only one study and its conclusion was mainly that you want to have more than 36 ppm of Mg in solution. This is not surprising as Mg is rarely a growth limiting element in hydroponics and usually growth will not be limited to it unless its supply is very low compared to the supply of other nutrients (which is very rarely the case).

In the case of P, it’s not surprising that most papers that addressed this nutrient studied plants where the essential oils are mainly in the flowers (rose and lavender), as phosphorous is a nutrient commonly associated with flowering. In the case of rose the best value in the study was sadly the upper limit and in the case of lavender the optimal value reached was 50 ppm. In this case we can therefore probably only say that both studies share having an optimal result of >= 50 ppm but it’s hard to provide an upper bound for this. A study addressing P in spearmint also finds optimal P to be within exactly this range at 50-70 ppm.

Element ppm
N 200
P 60
K 200
Ca 160
Mg 45
A base “guess’ formulation for a plant producing essential oils

With these results in mind, we can sketch a base solution for a plant where essential oil production is being targeted.. An obvious guess would be to start with a solution with the concentration profile showed above. In this case we target N and K at 200 with an N:K ratio of 1 and we keep Ca at 160, making the K:Ca 1.25 (which is surprisingly close to the optimal value discussed in my Ca post). We leave P at 60 – the middle of the 50-70 range – and we keep Mg at 45, which is > 38 and is a value commonly used in regular hydroponic solutions. The above will certainly not be the best solution for any single plant a priori, but it might provide a good base to start optimizing from if the objective is essential oil production.


How to make your growing more systematic

The aim of every grower should be to improve their results with every new crop cycle. This is strongly facilitated by practices that make growing more systematic as problems become easier to spot and solutions become more obvious. However, having a systematic growing approach is not trivial as it requires a substantial amount of effort that might not pay off right away but across months or even years of implementation. In today’s post I want to talk about what makes a growing process systematic and how you too can implement several techniques to improve and enhance your chances of producing better and better end products each year.

Systematic growing is all about information. How things are done might appear obvious when they are being done but as time passes the exact things that were done might be forgotten. For example if might be clear to you that at this moment you are doing three irrigation cycles per day of a certain volume per plant, but this might change in the future – perhaps you changed your irrigation at one point to adjust to higher temperatures – and the fact that irrigation was different is now lost in time. This happens all the time with all sorts of growing practices and it’s especially exacerbated when there are rotations in personnel. A grower who learned anecdotally to do or avoid certain things might leave a company without that company ever knowing that those things were actually integral to the growing process. For this reason systematic growing is all about preserving and using all sorts of information. These are some of the actual steps you can take to make this a reality.

A specific person should be in charge of this. Keeping a proper record of all information and ensuring there is coherence in the on-going recording processes and the processes that are done – as you will read below – is a full-time job. A company that truly wants to be systematic in cultivation requires a single person to dedicate all their time to this. Trying to put this in charge of the people who grow or the people who do administration is a mistake, since this is not a set of side-tasks, it is basically an entire full-time job.

Standard operating procedures should be a must. A standard operating procedure is a document that contains the steps you need to follow to perform a certain task in a crop. For example, the task of performing irrigation should be documented in a way that is always clear, up to date and that could be followed by someone who is completely new to the organization. The easiest place to start is usually to record a video of the person doing what they are doing, having them explain what is being done. At the very least this establishes a recorded process of what was done at a point in time and serves as a starting base to create a document. However keeping these things up-to-date and accessible is something that should be a top-priority.

Log as much sensor information as possible. Sensor readings are precious data that tells you a lot about the crop environment and what might be going right or wrong at each single point in time. Performing manual sensor readings and recordings is not a sustainable practice – as records can easily be lost and measurements can change depending on the person making them – so automated systems for the recording of all important sensor readings should be in place. A central database system that records all of this information is going to be key to the later access and easy use of this information.

Create expectations and see if they are met. When the two points above are put together you suddenly have a way to create expectations from procedures and then evaluate – using your sensor data – whether things that were supposed to happen actually did happen. I have seen several cases in crops when an important piece of equipment – a humidifier on a timer for example – fails to perform and there is really no awareness about anything being wrong up until there were real consequences and plant losses due to the problem. Procedures establish expectations that mean certain things should happen in the real world and having the sensors to monitor whether those things are happening or not is extremely important. These readings can also be monitored in real-time when things are working normally and the expectation can be programmed so that users are alerted when something that should be happening is actually not happening.

Log all information about crop cycles and plants. Growers will often fail to log information that relates to crop cycles and plants in a way that is systematic. It is important to log which varieties of plants are grown, where they were exactly and what the results for each one of these different plant varieties were at the end of the crop cycle. People who do this generally have an ability to distinguish varieties that work better in their growing setup, which can be a huge boost for selection and productivity.

Schedule and log lab tests every crop cycle. Lab tests for leaf tissue and media are not only important when things are going bad but they are very important when things are going right because they create an important baseline to measure against. A company that never performs tissue analysis will have a harder time figuring out why things are not working as expected if they don’t have some expectation of how things should work out when everything is working as normal. Testing leaves and media every crop cycle – even at different stages – offers growers the ability to establish a baseline, catch problems early and fix problems more quickly if they appear.

Have an environment for testing changes. A big and common mistake is to try to enact changes in a crop without previously testing the effect in a more controlled environment. Big changes carry big risks so it is important to test these changes in small testing setups before trying to bring them to a large growing operation. When testing changes it is also important to control the amount of variance that will be introduced into the crop since introducing a large amount of changes at once can lead to an inability to say what the problem was if anything at all goes wrong.

A company that complies with all the above will be on its way to fast improvements and fewer problems. A business with a single person dedicated to ensuring all the operating procedures exist and are up to date, all sensor and plant data is recorded properly, all tissue tests are logged and scheduled and all sensor readings are acting within expectations according to the procedures will have a huge advantage over a company that does not handle itself systematically.


The media exchange solution test: A better measurement of media effects in hydroponics

In the traditional hydroponic paradigm we want media to be as chemically inert as possible. The ideal media in this view would absorb no nutrients, give off no nutrients and would not decompose or react with the nutrient solution in any way. However none of the commonly available media sources comply with these properties, reason why we must be vigilant and properly adjust the media we use to fit the needs of our hydroponic setup. In this article I am going to talk about the idea of using a direct comparison test of the nutrient solution against the media, to understand the effect the media will have when exposed to the target nutrients and how this can help us adjust our solutions to better play with the selected growing medium.

Different types of growing media

First, let us understand how the media interacts with a hydroponic solution. The media can do all of the following things:

  • Dissolve into the solution (this is what happens if your media is something like sand or limestone). In this case the media is chemically reacting with the nutrient solution, therefore media is being irreversibly lost in the process. This can happen very fast, with something like limestone, or very slowly, with something like sand.
  • React and take something away from the solution. In this case the media can use ions within the solution to perform reactions that create new substances that are insoluble. For example if you have media containing large amounts of rock phosphate this phosphate can cause the precipitation of heavy metal phosphates.
  • Release ions in exchangeable locations into the media. This is different than dissolving because the media is not getting destroyed in the process but it is emptying “storage sites” that contain some ions that prefer the solution instead of these sites. This process is fundamentally reversible and – under the proper conditions – these sites could be replenished with the same or different ions.
  • Take ions into exchangeable locations in the media. This is the opposite of the process above. In this case the media will receive some ions into “storage sites” because these ions prefer the media to the hydroponic solution. The solution will therefore be depleted of these ions because they are being stored within the media.

Of most interest to us are the third and fourth points above, this is generally understood as the “exchange capacity” of the media. This determines how many and which nutrients the media can store. Different media can have storage sites with different affinities and in hydroponic setups we generally want to aim for the minimum energy state of these storage sites as they relate to our nutrient solution. Media that is already in equilibrium with the nutrient solution will tend not to change it while media that is far away from equilibrium with the solution will change it strongly towards the equilibrium point.

Think about coco coir, a commonly used media in hydroponics that can have a wide variety of different ion exchange capacity values and a lot of different ions initially in its “storage sites” due to the differences in sourcing materials and treatments done by different companies. Coco coir initially contains high amounts of potassium and sodium ions, but some companies treat it with Ca nitrate, which changes all these “storage sites” to contain Ca instead. These two sources of coco would interact very differently with our nutrient solution. In the first case the coir would exchange a lot of its potassium for Ca and Mg ions in solution – because these ions have higher affinity for the “storage sites” – while in the second case a little Ca would be exchanged for other ions (because all ions are in equilibrium with all the storage sites). The changes to the solution are very different and totally different approaches in nutrient composition changes are required.

Traditional soil tests could provide some answer to us, they would definitely show the ions that could be exchanged to be different in both cases. But they tell us little about the equilibrium position of the media against our target nutrient solution. To make things more realistic we can actually do a test where we pass our actual nutrient solution through a column of media that is exactly what we’re going to run it through in real life (with no plants of course). We then collect the input and output solution and run lab analysis of both of these solutions. We can then compare the results and see how much the media is actually changing the composition of our input solution and we can then make some decision to adjust. Such a test would proceed as follows:

  1. Prepare the strongest final solution that will be used in the growing process. (for example the solution that is used at the peak of fruit generation in a tomato crop)
  2. Take a sample of this starting solution to send for chemical analysis.
  3. Pack a burette with a column of media as high as the containers the plants will be in.
  4. Fill the burette with the nutrient solution.
  5. Run as much solution as required to collect a sample of equal volume to the first one.
  6. Send both samples for analysis.

The difference in nutrients between both solution will show us what we should initially be doing to maintain a consistent composition of the nutrient solution, given the interaction with the media. If the interaction is too strong it can also tell us that we shouldn’t be using this media without previously treating it to ensure the imbalances do not happen. For example media like biochar can have an extremely high affinity for metal chelates and nitrogen compounds, if we ran our solution through the media and it turns out that it soaked up almost all of our iron and ammonium, we wouldn’t want to just add more nitrate and heavy metals but we would like to pretreat the media with a concentrated solution and then repeat the test to ensure that the media is at a level of activity that we can correct for.

A given media source that is acceptable should not strongly affect the nutrient solution. Any media that does this in the media exchange test requires correction so that the ability to take elements from the nutrient solution is reduced. The test will tell you exactly what the media is finding most appetizing and the treatment options will then be substantially easier to plan. A coco coir that shows it soaks up almost all the Ca will need to be treated with a Ca nitrate solution and a biochar that absorbs a lot of ammonium will need to be treated with an ammonium sulfate solution. These are some cheap pretreatments that will save a lot of heartache within a hydroponic setup and will make the ongoing growing process substantially easier to manage.

This is one of the simplest and cheapest tests that can be done to address media effects. However it is by no means comprehensive in that it does not show us other important media properties that might be crucial for selection. It is important to consider that this test gives us only a glimpse of the chemical properties and the interactions with the actual nutrient solution we intend to use. Other media specific analysis and more complicated media run-off tests can be necessary to address the full extent of the interactions through an entire crop cycle.


Using biochar in hydroponics to improve yields

The media used in hydroponic crops can vary widely around the world depending on what’s cheaper and more easily available in large quantities. In the United States, coco coir, peat moss and perlite tend to be favored while other regions might prefer media like rice husk, sand or vermiculite. However there is an entire type of media that is available in significant quantities almost any place where plants are grown, that is rarely used: biochars. These are produced from the controlled burning of plant materials and offer a myriad of potential benefits not commonly available with the other media types. Furthermore, biochar – combined with other media – can actually provide significantly better results in hydroponic culture. In this post I’ll talk about biochars, their properties and walk you through some of the evidence showing how they can substantially improve yields.

Biochar material generated from a previous crop cycle

First let’s talk about the properties of biochars. Since they are the result of burning plant material, their chemical and physical properties will be inherited from the parent plant material and the nature of the burning process (temperature, speed, oxygen availability, etc). The table below shows the properties of biochars from 3 different plant sources coming from the exact same process. Although all of the biochars are basic, their cation exchance capacity (CEC) and EC values can vary very substantially. The CEC is substantially lower than that of a media like coco coir (which can be in the 40-60 range in terms of cmol/kg) but the density of the media is much higher with biochar around 80-320kg/m^3 while coir is way less dense at only 80-100 kg/m^3. This means that the volumetric exchange capacity of biochar is around the same as coir but can be much larger depending on the specific source of biochar. Note that the initial pH of biochar can vary very widely, from around 5 to 10, depending on the temperature used to make the biochar (see second image below). These two tables show you how the properties can vary both due to the process and the plant material used.

The table above was taken from this article (https://www.ncbi.nlm.nih.gov/pubmed/28618279)

Biochar is not commonly used by itself but as an amendment to improve the properties of other media. Evidence across several different plant studies shows that biochar amendments systemically increase the yields in hydroponic crops. The first image below – taken from a study on cherry tomatoes – shows how a 5% amendment of biochar in coco peat was able to significantly increase the diameter of fruits produced. The second image – from a study on peppers – shows how the addition of the same 5% amendment of a “nutrient poor” biochar in coco coir produced very substantial increases in biomass over controls. There are several other studies that show improvements due to the use of biochar amendments, either under normal or stressed conditions (2, 3, 4, 5, 6, 7). From the evidence it seems to be clear that biochars can provide substantial benefits to hydroponic crop production. This is further cemented in this review about the use of biochar in container plants, which goes into additional evidence about the matter (plus some problems I’ll also address later in this article).

Image taken from this article
Image above taken from this study on peppers

But why does biochar work? There are currently three hypothesis that could explain the benefits available from biochar. The first is that it has a higher affinity for plant root exudates and other toxic substances that harm plant growth. By removing these substances, the biochar that is within the media ensures that the roots are always in a less toxic environment. The second hypothesis is that biochar provides a more welcoming environment for beneficial microbes, because of its chemical nature and pore structure, that facilitates the creation of beneficial symbioses that are harder to maintain in other media. The third is that the biochar has higher affinity for some nutrients, particularly nitrogen, enabling the plants to maintain a steadier supply of nutrients between irrigation cycles (this chemical behavior is well documented, see here). Potentially getting these three benefits makes biochar one of the most obvious improvements to hydroponic crops. A potential 20%+ improvement in yields could be realized in this case, if results from the literature translate into your crop.

However there are also problems with the use of biochar in hydroponics that should not be overlooked. In particular there is the problem of consistency and quality of chemical and physical properties. Since biochar properties depend so much on the creation process and sourcing material, it is quite easy to get a biochar that is detrimental instead of beneficial to plant growth. The second problem is the potential availability of toxic substances within the biochar that might harm your plants or make your products heavily toxic. Biochar source materials can be contaminated with heavy metals and toxic organic compounds can be generated within the high temperature process. It is therefore vital to ensure that the biochar you use contains neither of these issues.

Ensuring that the EC, pH , CEC and mineral properties of the biochar are aligned with the ones that provide the most benefit in the literature is a good place to start but ongoing quality controls are also necessary to ensure that the supplier has not changed the source or chemical process in a way that’s detrimental. Producing your own biochar – since the equipment to do so is fairly simple – can also be a good possibility, given that a lot of plant material can also be wasted in crop cycles and this material could then be recycled as media for the next crop.


Six things to consider when running experiments in hydroponics

Two different growing facilities are never exactly the same. Fine tuning nutrient solutions, irrigation cycles and environmental conditions is therefore fundamental to achieve the best possible outcomes under different growing conditions. This naturally requires experimentation, which is not trivial to carry out. Today I am going to talk about five important things you need to consider when carrying out experiments that will help you maximize what you learn from them and avoid running experiments where no valuable information will be obtained.

The number of plants. Any experiment relies heavily on sample size in order to generate data that can lead to valid conclusions. A small sample size will have an inherently larger variability due to randomness that will make any conclusions naturally weaker. The smaller the studied effect is expected to be, the larger the sample size that will be required. Some things can be studied with a small number of samples – say just 5 plants – while others require very large number (+100 plants). For example if I’m trying to determine whether a 5000ppm concentration of Na will kill plants I can just do that with a small group, while if I’m trying to determine the effect of several different levels of Na on plant growth, then I’ll need a large group, properly divided among different treatments.

The number of variations. Related with the above, the success of an experiment also depends on what we’re changing and by how much. The simplest form of experimentation (A/B testing) tries to determine whether there is a difference when changing one single thing from one state to another but this form of experimentation can be heavily impractical since we want to get as much information as possible per crop cycle per plant available for experimentation. This means we need to design experiments where several variations are tried yet statistically relevant conclusions can be reached. If you don’t know how to do this, A/B testing is a safe bet, but it will take you longer to gain information.

Always have a control. Whenever you run an experiment, an adequate control must always exist. There must always be a hydroponic crop that is run side-by-side the experiments you’re running in which the variables you’re experimenting on are not being touched. A control needs to always be present – a result in the past cannot be used as a control – since the control must experiment all random influences that the plants that you’re currently experimenting on are facing.

Collect as much data as you can. Plants do not grow fast, so experiments are extremely valuable and their data should not be wasted. Whenever you’re running an experiment make sure you measure all possible outputs that might be of interest. You want to measure time to maturity, yields by weight, shoot weight, root weight, yield quality, leaf area, leaf composition, etc. Any variable that might be of importance to the success of your crop should be measured, because otherwise you’re wasting information you already have and obtained through your experimentation. I cannot tell you how many times I’ve seen people regret not having measured everything they could when they carried out expensive or long experiments.

Image result for experiment hydroponics control
Control (left) vs variation (right) for an experiment testing the effects of Cadmium in plant morphology

Be careful about differences with controls. The only difference between your control and your experiment should be the variable(s) you want to study. If something else is different then it will be a confounding variable for your study and you might wrongfully assign an effect to a variable while the real effect came from something completely different. A classic problem is a localized difference in VPD caused by differences in air-circulation between locations. A plant under a higher VPD will show things like higher Ca in tissue, which you might mistake as being caused by the variable under study.

Blind experimentation is VERY important. Ideally the people carrying a study should be double-blind to it. If you’re measuring the effect of potassium in solution and you’re running a set of plants under 200ppm and another with 400 ppm, then the person preparing the solutions should not know which tank feeds which set of plants and the person measuring the yields and the plant weights should not know either. Only in the end – after all data is collected and the experiment is executed – should the true nature of what went where be revealed. Blindness is extremely important because otherwise people might introduce biases into the study, for example the grower might be predisposed to thinking that higher K is better, so he will care more for those plants because of confirmation bias. These effects can be dramatic, we should care about blindness specially because of all the ways that not being blind can ruin a study that we cannot think of!

The above is only a short list of things I consider important to take into account when carrying out experiments with plants. It’s certainly not an exhaustive or advanced list – just a list of basic pointers – but I believe these can be extremely useful for anyone trying to improve their current hydroponic crops or anyone currently carrying their own hydroponic experiments.


Why you should optimize your nutrient solution for your particular setup

In hydroponics, most plant nourishment is delivered through the use of a nutrient solution. This solution is prepared from raw fertilizer inputs by the grower – or a fertilizer company – and should contain adequate mineral ratios to maximize plant growth. However, although basic solutions can successfully grow crops under a wide variety of conditions, large increases in yields are possible with the optimization of the nutrient solution for each particular setup. Today’s article talks about why this is important and why a one-size-fits-all solution simply does not exist in hydroponic culture.

A nutrient solution is, generally, a very complicated mixture of different substances. All solutions should contain all mineral elements that are necessary for plant growth, which means that every solution contains at least 13 variables that a grower can change in order to improve their crop yields. You may think that every plant species has a magic set of variables that provide the best results but – in reality – this does not happen because plant/nutrient dynamics depend on the growing environment as well.

Since nutrients in solution are absorbed through plant roots, the root environment plays a huge role in determining how nutrients get absorbed by plants. The root environment depends on the media being used, the temperature and the way that water cycles in and out of the media. Nutrients are not absorbed in the same manner in a crop where watering is done once every 12 hours compared with a crop where constant dripping over the media is maintained. The nutrient solution also interacts with the media with time and different things can buildup depending on the frequency of the waterings, how well oxygenated the nutrient solution is and how the nutrient solution interacts with the specific media being used.

The outside environment also plays a huge role, due to the way that mineral transport is tied to water transport within plants. An environment with a high vapor pressure deficit will increase water transport through the plant, which will significantly increase Ca transport, while a higher moisture environment will hinder Ca transport and increase the transport of other minerals. The amount of air movement around the canopy, the concentration of carbon dioxide and the amount of temperature variation also play a huge role in determining what nutrient ratios will work best for a particular growing setup.

Sadly, no two growers ever have the exact same root and outside environment conditions. The optimal solution for a grower using coco coir in a high VPD environment will be very different from the solution used by someone using rockwool under low VPD, even if both people are growing the exact same plant. For this reason, performing a proper optimization of the nutrient solution is fundamental to increase nutrient usage efficiency and maximize growth. I will write more about how this is done in practice next week.

If you would like to know more about how this can be done in practice in your commercial hydroponic crop, please do not hesitate to send me an email, using the contact form on this page.


Five common reason why you’re losing yields

Mistakes in hydroponic culture are not uncommon among both amateur and seasoned growers. Since there is considerable distances between a successful crop and an optimal crop, growers can go a long time without noticing mistakes that are likely to be heavily detrimental to their actual crop yields. Today I am going to share with you five of the most common problems I see when consulting for hydroponic growers and why these might be costing you a lot in yields.

Sup-optimal vapor pressure deficit. Temperature and humidity play a huge role in guaranteeing a large crop production. Plants can survive under a wide array of environmental conditions but the range where they produce optimal results is dependent on several factors, including the amount of carbon dioxide in the air, the plant species and the nutrient solution used. Most growers who make mistakes regarding VPD are either growing at a temperature that’s too high or at a humidity that’s too low. During winter low humidity tends to be the largest problem while during the summer issues with higher temperatures are most common.

Bad environments around root zones. Many growers water their plants with nutrient solution without measuring the characteristics of the solution that comes out of their media. Not measuring run-off EC/pH, especially when using non-recirculating setups, is a recipe for failure since the grower is completely unaware of whether root-zone conditions are good or not. More often than not, growers who make this mistake end up with very high salinity and extreme pH values – often acidic – that can be extremely hard to correct.

No foliar spraying regimes. Plants can take a lot of nutrition through their root zones but certain additives and nutrients are taken with far more efficiency through leaves. A lot of yield can be gained if proper foliar spraying with adequate additives to enhance growth is carried out. Many growers do not carry out any foliar spraying, leaving a lot of potential growth on the table that could be gained with these procedures.

No silicate applications. Potassium silicate is a very important additive in hydroponic culture and can make the difference between a very successful crop and a crop that has been heavily affected by fungal or bacterial diseases. Silicate applications have been repeatedly demonstrated to make plants immune systems stronger and – through the prevention of diseases and the strengthening of plants – can lead to healthier plants that have stronger yields.

No tailor-made nutrient optimization. Each particular grower has a specific set of plant species, varieties, media, temperature/humidity and carbon dioxide conditions that make their particular growing situation unique. Although generic nutrient solutions can do the job well enough to provide satisfactory yields, there is a lot of potential product left on the table if proper optimization of the nutrient solution is not carried out. Some nutrients – like phosphorous and calcium – benefit greatly form being optimized to the particular conditions each hydroponic grower has. Optimization takes effort and money – as some plants need to be dedicated to research – but the results can be more than worth it.

Image result for hydroponic image

Although the above is not an exhaustive list of potential problems, it does provide you with an idea of the things that you might be doing wrong. With this in mind you can start to do your own research to attempt to fix these issues or you can contact me and schedule a call directly so that I can help you improve your hydroponic growing results.


Potassium concentration and yields in flowering plants

From the different nutrients that are needed by plants we have known for more than 4 decades that potassium is of critical importance to flowering/fruiting plants. Potassium is one of the most highly limited nutrients in soil due to its high mobility and great increases in yields have been achieved with both potassium fertilization in soil and the use of properly balanced nutrient solutions containing enough potassium in hydroponics. But how important is potassium and what is its ideal concentration in hydroponic nutrient solutions when growing flowering plants? Today we are going to take a look at the scientific literature about potassium and what the optimum levels of potassium for different flowering plants might be in order to maximize yields.

There are many studies in the scientific literature dealing with the effect of potassium on various flowering plants. Earlier evidence from the 1980s pointed to optimum concentrations of potassium being close to the 160-200 ppm range. The book “mineral nutrition” by P.Adams (here) summarizes a lot of the knowledge that was available at the time and shows that for the growing techniques available at the time using greater concentrations of K was probably not going to give a lot of additional benefit.

However newer evidence from experiments carried out within the past 10 years shows that optimum potassium concentration might depend on a significant variety of factors, from which media, other nutrient concentrations and growing system type might play critical roles. For example study on strawberries in 2012 (here) showed optimum concentrations of K to be around 300 ppm for strawberries and the optimum media to be a mixture of peat+sand+perlite (image from this article included above).

Evidence from experiments on tomatoes (link here and image from this article above) also shows that for tomatoes the actual optimum concentration of K might actually be larger under some condition with the optimum in this study in terms of fruit quality and yields being 300 ppm. In this last case the tomatoes were grown using a nutrient film technique (NFT) setup. However there have also been studies under other growing conditions – like this one on reused pumice – which shows that increasing K concentrations to 300ppm can actually have detrimental consequences. In this case tomatoes fed at 200, 290 and 340ppm of K had very similar results when using new substrate but the old substrate heavily underperformed when high K concentrations were used.

Papers published on the effect of different K concentrations in melons (here) and cucumbers (here) also point to optimal concentrations in the 200-300 ppm range and for the optimum N:K ratio to be between 1:2 and 1:3 for these plants. This is probably the reason why you will often find suggested nutritional guidelines for flowering plants – like those below taken from here – mostly suggesting K concentrations in the 250-350ppm range. However you will often find that they directly contradict research papers, like this guideline suggesting K of 150 ppm for strawberries while we saw in a recent paper that 300ppm might be better. This is most probably due to differences in the sources used which might have used different growing systems or plant varieties which responded to other conditions better.

All in all the subject of K concentration in hydroponics is no simple one. Using low K will limit your yields tremendously but increasing your K very high can also harm your plants, especially depending on the type of media you are using. In general aiming for a K concentration between 200-250 ppm is safest but in many cases increases to the 300-400ppm range can bring significant increases in plant yields. A careful study of the available literature and the actual growing conditions that the plants will be subjected to will be key in determining what the best K concentration to use will be. Alternatively carrying out adequately designed experiments under your precise growing environment will help you carry out an evidence-based decision about what K concentration to use.


Five reasons why a dedicated hydroponic testing room is a great idea

Most commercial hydroponic setups completely lack testing environments. The most common reason for this is that commercial crops are meant to produce revenue and a testing environment means dedicating space, time and money into something that might not be as productive as the rest of the production facility. Furthermore a testing room implies that you will need to create a completely independent setup and hire someone who knows how to do research in order to ensure it is both adequate and fruitful. Although many people believe this not to be worth it today I want to talk about the five most important reasons why I consider that a testing room is something incredibly useful to have as a part of your commercial growing facility and why getting one will probably pay off greatly for you going forward.

Testing product changes. Perhaps the first and most direct benefit to having a testing room is to ensure you can test product changes. It may be the case that your supplier for some particular fertilizer product or additive has ran out and you now want to test a new product to replace it. It may also be that you want to test how a product does compared to what you generally use but you don’t know if it does better or worse. Most growers are afraid of change because making facility-wide changes that won’t work could have huge financial consequences. A testing room ensures you can test safely and then roll-out changes slowly without having to risk your entire crop cycle to find out.

Optimizing what you currently have. Change is very rare across commercial facilities because growers understandably want to preserve their current results, even if some better results by making some change would be possible. This constraints growers from making incremental changes that might make their crops significantly more productive. By having a testing room you can optimize the setup you already have by making adequate research into optimizing things such as environmental or nutritional factors.

Trying potentially game-changing modifications from academic research papers. There are many papers published each year on how to increase the yields of hydroponic crops. Some of these papers offer somewhat risky and controversial changes that might not transfer well across species. However if something gives you the potential to increase your yields by say, 50%, it might definitely be worth trying across a testing setup. Obviously these things are too risky to try across an entire facility but a testing room would be perfect to help you try these new and exciting modifications, potentially giving you a huge edge versus all the other people who will never try this.

Try new plant varieties. Usually growers try new plants without having a clear idea of how productive they are going to be under their growing setup. This means that you introduce a new variety with a huge question mark regarding its productivity and potentially financial benefit or cost. A testing room provides you with a risk-free way to test how a particular plant variety will perform under the exact conditions in your facility, potentially allowing you to make far less risky decisions when it comes to making planting changes in your facility.

Image result for hydroponic plant testing room

Research new ideas. A final benefit you can get from a testing room is that you can research your own new ideas. With adequate experimental design even a small room with just 10 plants can be used to test some ideas to see how they affect plant growth. This means that you can develop your own in-house growing modifications that will make it much harder for others to compete with you. For example if you developed a secret foliar additive in your growing facility it would allow you to only use this for your own crops, without the industrial secret ever being used by your competitors.

Of course there are many other advantages to testing rooms but the above are just some of the wonderful things you’ll be able to do if you have a testing room and someone trained in scientific research who can help you design experiments and get the most out of it. A testing room also doesn’t need to be huge and even starting out with 10 plants can be a huge step in taking your commercial growing facility to the next level.