Why TDS is NOT equal to Total Dissolved Solids in hydroponics

Electrical conductivity is a very commonly used measurement in hydroponics, yet a very poorly understood one. I have written several posts about conductivity in the past (1,2,3) and today I want to talk about the use of the term “Total Dissolved Solids” and the poor usage of the unit “ppm” in order to express a measurement of electrical conductivity. In this article I will walk you through why this term exists in the first place and why its use in hydroponics is terribly misleading for growers.

Conductivity of sodium chloride solutions.  
Conductivity as a function of NaCl concentration (taken from here)

Conductivity is just a measure of how easy it is for an electrical charge to go from one electrode of a certain area to another. It’s generally expressed in mS/cm, which is a measurement of conductance (the opposite of resistance) and area (the area of the electrode). How in the world do we get from this to a measurement like “ppm”, which measures the concentration of something in mg/L? What does a measurement of 500 ppm even mean? What is it that we are expressing a concentration of?

The answer lies in the practical uses of conductivity and a simplification to make the evaluation of water sources easier. Conductivity is generally linearly proportional to the amount of a pure salt dissolved in solution at low concentrations. For a pure salt like table salt (NaCl) the higher the concentration of the salt in solution the higher the conductivity (you can see this in the image above). People working on water quality realized that they generally dealt with similar salt combinations (Mg and Ca carbonates and possibly some Na and K chlorides) so they decided to use some standard salt mixtures (say KCl, NaCl or some mixture of Ca/Mg/K/Na salts) and then use conductivity as a proxy for the concentration of these things that are actually in solution. So the “ppm” that your EC meter reads is just the equivalent conductivity of some standard. A meter reading 500 ppm in conductivity is telling you “your solution has the same conductivity as a solution of the standard at 500 ppm”. The “standard” can change – as mentioned before – which is why there are several different TDS scales. One meter might be telling you it’s the same conductivity as a solution of KCl with that concentration, while another might be in NaCl.

Conductivity curves of different salts used in hydroponics (taken from this article)

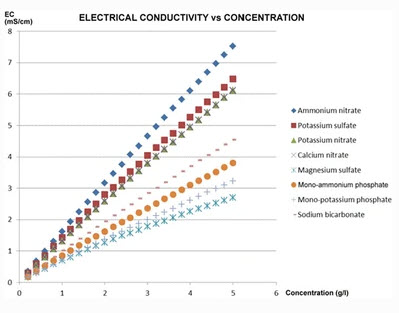
The above is very useful when you’re measuring things that tend to be similar but this becomes a complete nightmare when the composition of what you’re measuring can change substantially. In hydroponics you have a wide variety of different salts, all with very different conductivity values at different concentrations. Look at the graph above, which shows the conductivity as a function of concentration for 8 different salts commonly used in hydroponic culture. If you prepare three solutions, one with 1000 ppm solution of potassium sulfate, another with 1000 ppm of monopotassium phosphate and another with 1000 ppm of ammonium nitrate and measure them with your conductivity meter they would all give very different results. The meter might be close to 0.95mS/cm for the monopotassium phosphate, but it might read almost 1.5 mS/cm for the potassium sulfate. Both solutions have 1000 ppm of “total dissolved solids” but the conductivity meter is telling you one has 500 ppm and the other almost 800 ppm, none of them even close. This is because “total dissolved solids”, as used in water quality measurements, is a meaningless measurement in hydroponics as it relates to the actual ppm values of things dissolved.

This is the main reason why you should never compare the EC values of nutrients that contain different ratios of salts, because they are simply not the same. One nutrient might give you 100 ppm of potassium at some EC level, while another might give you 200 ppm. Thinking that having the same EC level means that both are at the same “strength” is a big mistake, since this is never going to be the case when two nutrient solutions are mixed with different ratios of nutrients. This is also why comparing vegetative and bloom formulation EC values is not correct. A solution in veg might contain a lot more of nitrates while a solution in bloom might contain more phosphates. As we saw above this might mean that a solution of the “same strength” might actually have a significantly lower measured EC value.

Since the TDS measurement is not telling you anything about “total dissolved solids” in hydroponics, you should avoid using it to avoid confusion. This is important since nutrient concentrations are usually expressed in ppm as well, ppm of actual nutrients dissolved in solutions. Instead use the normal conductivity measurements of your meter in conductance per area. You should also take care to only use EC values to talk about comparative strength when you’re talking about a formulation where the ratios of nutrients remain the same. If that’s not the case, then you should not talk in comparative terms between the two solutions as this might deviate a lot from reality.

My advice is to not think in EC terms to begin with, but to think about nutrient concentrations, prepare solutions that match the concentrations you want and then use the EC of those solutions as references to know whether they are prepared correctly or not. The conductivity should be a measurement used for confirmation but not as a guiding principle. For example the aim should be to “prepare a solution containing 150 ppm of N and an K:N ratio of 1.2” not to “prepare a solution with an EC of 1.2 mS/cm”.


Creating a robust pH/EC monitor for hydroponics using Atlas probes and an Arduino

A few months ago I talked about how you could build a simple sensor station for your hydroponic projects using an arduino (see here). However this small project used the relatively cheap – but I have found not very robust – pH/EC probes and boards from gravity which makes it a poorer choice for a more professional project aiming to constantly monitor the pH/EC of a production hydroponic setup. Today I am going to tell you how you can build a dedicated pH/EC monitor using the robust pH probes from Atlas, which also have several important advantages we will be discussing within this post. I would also like to point out that Atlas is not paying me anything to write this post, I write just because of my experience using their probes.

The pH/EC probes from gravity have several problems when looking for a robust sensing setup. The first issue they have is that the probes are not rated for constant immersion, so they are damaged if you place them within solution the whole time which is probably what you want to do within a production hydroponic setup. The second issue is that the boards require cable connections to the Arduino which introduces a significant amount of noise that can causes problems with measurements. Due to poor isolation there can also be issues with the gravity boards when measuring EC/pH at the same time. To overcome these issues we can use probes and boards from atlas which have the advantage of having no cable connections to the Arduino – connections are through pins directly – plus the probes are rated for constant immersion and are much more robust. These are the things we would need to build this project:

As you notice this sensor project is much more expensive than the sensor station I had discussed before, with a price tag of around 490 USD (not including shipping). However when looking for a robust setup you definitely should favor the additional expense as this will likely be paid off with much longer service times.

When you get the pH/EC kits the first thing you want to do is change your EZO boards (the small circuit boards that come with them) to i2C mode so that you can use them with your mini tentacle shield. To do this follow the instructions here, follow the instructions in the “Manually switch between UART and I2C” section, use female jumpers to make this process easier. Note that you can use your LCD shield analogue 5V and ground pins when you need power within the process.

//Libraries
#include <U8glib.h>
#include <stdio.h>
#include <Wire.h>
#include <Arduino.h>

#define TOTAL_CIRCUITS 2  

///---- variables for pH/EC tentacle shield ------- //

#define TOTAL_CIRCUITS 2   

char sensordata[30];                  
byte sensor_bytes_received = 0;       

byte code = 0;                        
byte in_char = 0;  
int channel_ids[] = {99, 100} ;                   
   
// ------------------------------------------------ //    

// EC values // CHANGE THESE PARAMETERS FOR EC PROBE CALIBRATION
#define EC_PARAM_A 0.00754256

//pH values // CHANGE THESE PARAMETERS FOR PH PROBE CALIBRATION
#define PH_PARAM_A 1.0
#define PH_PARAM_B 0.0

#define XCOL_SET 55
#define XCOL_SET2 65
#define XCOL_SET_UNITS 85

//--------------------------

U8GLIB_NHD_C12864 u8g(13, 11, 10, 9, 8);   
float pH, EC;

//--------------------------

void draw() {
  u8g.setFont(u8g_font_04b_03); 
  
  u8g.drawStr(0,11,"pH:");
  u8g.setPrintPos(XCOL_SET,11);
  u8g.print(pH);
  
  u8g.drawStr(0,21,"EC:");
  u8g.setPrintPos(XCOL_SET,21);
  u8g.print(EC);
  u8g.drawStr( XCOL_SET_UNITS,21,"mS/cm" );
  
}

void read_tentacle_shield(){

  for (int channel = 0; channel < TOTAL_CIRCUITS; channel++) {      
  
    Wire.beginTransmission(channel_ids[channel]);     
    Wire.write('r');                         
    Wire.endTransmission();                       
    
    delay(1000); 

    sensor_bytes_received = 0;                        
    memset(sensordata, 0, sizeof(sensordata));        

    Wire.requestFrom(channel_ids[channel], 48, 1);    
    code = Wire.read();

    while (Wire.available()) {         
      in_char = Wire.read();           

      if (in_char == 0) {               
        Wire.endTransmission();         
        break;                          
      }
      else {
        sensordata[sensor_bytes_received] = in_char;      
        sensor_bytes_received++;
      }
    }
    
    if (code == 1){
      if (channel == 0){
        pH = atof(sensordata);
        pH = pH*PH_PARAM_A + PH_PARAM_B;
      }
      if (channel == 1){
        EC = atof(sensordata);
        EC = EC*EC_PARAM_A;
      }    
    }
  }
  
}

void setup()
{
    pinMode(13,OUTPUT);  
    Serial.begin(9600);
    u8g.setContrast(0);
    u8g.setRot180(); 
}

void loop()
{
 
  digitalWrite(13, HIGH);       
  delay(800);
  digitalWrite(13, LOW);   
    
  read_tentacle_shield();

  u8g.firstPage();
    do  {
      draw();
    } 
      while( u8g.nextPage() );          
      
}

Once you have changed the EZO boards to i2C you can now plug everything into the arduino and upload the code into your arduino. Plug the EZO boards into the mini tentacle shield and then plug that shield into the arduino. You’ll notice that the EZO boards make it impossible to plug the LCD screen directly on top – as the EZO circuits make the shield too tall – so you should use stackable headers to extend the connections so that you can plug the LCD screen on top without any problems. Make sure you download and install the U8glib library in your arduino IDE before uploading the code.

As with the previous code you’ll notice there are variables called PH_PARAM_A, PH_PARAM_B and EC_PARAM_A within the beginning of the code that you should change in order to calibrate your probes. Follow the instructions about calibration I gave in the previous post in order to figure this out. Using the calibration solutions that come with your kits you’ll be able to perform this calibration procedure. Whenever you want to calibrate your probes you should reset these variables to their original values, reupload the code and retake measurements.

Following this guide you will have a very robust sensor setup using very high quality probes. These probes are also coupled with a board that has no wire connections with the arduino, offering very high quality readings with very small amounts of noise. Additionally the LCD shield opens up the possibility to add more sensors to your station so that you can monitor, temperature, humidity, and carbon dioxide potentially from a single place.


Comparing the conductivity of two different solutions

Conductivity is perhaps the most misunderstood and erroneously used measurement in hydroponic culture. This has a lot to do with conductivity also being called a “totally dissolved solid” (TDS) measurement and the conductivity scale being expressed in “ppm” units, concentration units which only cause confusion in this area. Today I want to talk about an important consequence of this confusion that happens when you try to compare the conductivity of different nutrient solutions. I’ll talk about a recent case I encountered and how it generated significant problems due to a natural misunderstanding of how conductivity works.

A grower wanted to run a side by side trial of two nutrient formulations using identical growing conditions. This grower then decided that the best way to do this was to ensure that the conductivity and pH of the two solutions were identical after preparing the nutrient solutions, then they would both be equivalent in terms of their strength and differences in results would be entirely due to the differences in ionic ratios between both of them. The media was the same, the environment was the same and plant genetics were the same.

However there was a small problem with this thinking. The same conductivity across two different solutions is not the same thing. You might think that using a conductivity of 2.0 mS/cm across two different nutrient solutions might mean that their “strength” is the same, but in reality the strength of a solution – as per what a plant really experiences – is determined by its osmotic pressure and osmotic pressure – although proportional to conductivity within the same solution – cannot be extrapolated when the composition of the solution changes. This confusion is further expanded when people see the conductivity numbers in ppm because the expression in mg/L makes them think there is the same “amount of stuff” in the two solutions. This is not the case.

All the ppm does is tell you that your solution has the same conductivity as a reference with that ppm concentration (commonly NaCl or KCl) but it tells you nothing about how many dissolved solids are really present within your nutrient solution. Given that non-conductive substances also affect the osmotic pressure of a solution it can happen that a nutrient solution with the same conductivity as another one in reality has a lot more dissolved solids, making it far more concentrated in real terms compared to the other one.

In the above mentioned particular case one solution had a chelating agent that effectively made a significant number of ions neutral in charge (effectively making them non-conductive) reducing the measured conductivity by around 20% at the same osmotic pressure as the other solution. So while the grower was feeding the two solutions at the exact same conductivity, the second solution was around 20% more concentrated in real terms – osmotic pressure terms – compared to the other one. Plants responded very negatively to this – as the conductivity was already quite high – so the grower erroneously assumed that this was due to the ionic ratios instead of it simply being due to an error in judging concentrations. The second solution was a lot stronger in real terms, although the conductivity was the same.

When comparing two nutrient solutions you should therefore resort to measurements different than conductivity because the conductivity of two different solutions with different ion compositions cannot be compared, the same level of conductivity will result in two completely different osmotic pressure values. Their strengths will not be the same. If you want to compare two different solutions at the same real strength then you need to use an osmometer to determine this point and sadly osmometers are neither cheap nor practical to use.

However another possibility is to simply compare at a constant concentration of a given element. Have a lab analysis of the two fertilizers made – remember you cannot trust labels to give you the real composition values – calculate how much of a given element, for example N, is present at a given application rate and then dial in the other fertilizer to match that N concentration. The osmotic pressures will probably be different but at least under this sort of A/B test you will be comparing apples to apples in the sense that the only variable will be the N:X ionic ratios between the two solutions. Total strengths will differ but this will be due to differences in ionic ratios, which is probably what you want to test.


Probes for constant immersion in hydroponic nutrient solutions

If you have a hydroponic crop then you probably have to measure and monitor the pH and EC of your nutrient solutions. This means taking probes out of storage, ensuring they are calibrated and then carrying out measurements. This process can be very inconvenient, reason why growers might prefer to carry it out less often, even if this means they will have a lot less data. However there are several solutions that can enable constant monitoring of hydroponic nutrient solutions without the need to constantly take out, calibrate and then store away probes. Today we will talk about why regular probes are not suited for this and what types of probes are needed if you want to do this.

Usually low quality EC/pH pens cannot be kept within nutrient solutions because they are not built to withstand constant contact with nutrient solutions. This is both due to the electrode composition – the actual glass or metal electrodes not being robust enough – and the actual junctions and other components not withstanding the nutrient solution as well. Although hydroponic nutrient solutions are not particularly harsh environments – with a slightly acidic pH and moderate ionic strengths – probes for constant monitoring of nutrient solutions must be designed with constant immersion in mind.

For constant monitoring of pH in nutrient solution tanks you want a proper submersible electrode assembly like this one. These electrodes are usually mounted on PVC fixtures and can be easily mounted on tanks to provide constant readings for the nutrient solution. The electrode comes with a standard BNC connector meaning that it is compatible with a wide variety of pH controllers. If you don’t want to mount it on the tank but you just want the electrode to be like a normal probe but constantly submerged then you can use something like this industrial probe which comes with a pH controller as well that can be used with any other probes you purchased and interfaces with an arduino or raspberry pi to get and store readings. For probes like this last one I usually wrap the entire outside body of the probe in electrical tape to give further strength to the probe/cable junction.

For conductivity readings you will want to go with electrode-less EC probes (like these ones) which over PVC mountings as well with the advantage that they do not suffer from polarization issues – like normal EC pens use – so they lose calibration much more rarely and can give much more accurate readings across a wide range of different solution types and conductivity values.

For the grower who wants it all there are also probes like the Mark I-A probe which is a tank-mounted probe assembly that does EC, pH and ORP readings, all in one single fixture. This is incredibly practical since it is able to implement all the readings you need in one single fixture. The problem of course is that calibration of any reading requires you to remove all three sensors so this can be a bit inconvenient when you want to ensure that any of the readings are indeed accurate.

Of course submersible robust probes are more expensive but they are much more convenient. They get damaged much less frequently, require much less maintenance, provide constant readings and need to be calibrated only a few times a year. For example the industrial EC and pH probes I use in my home hydroponic setup have only required calibration once a year, even then the loss in calibration was only around 0.2 units for the pH sensor and 0.3 mS/cm for the EC one so I probably could have continued using the probes without calibrating them for 2 years without having to face any dramatic consequences. If you spend 300-400 USD on high quality robust probes you will probably have them for much longer, with far more accurate results along the way.


How to prepare your own solutions for EC meter calibration

On a recent post I talked about how you can prepare your own solutions for the calibration of your pH meter. However hydroponic growers not only need to calibrate their pH meters but they also need to use EC meters to control their growing environment. Today I want to talk about how you too can prepare solutions for the calibration of your EC meter so that you don’t need to depend on expensive commercially prepared solutions for EC calibration. I will also give you some important tips about how to maintain these solutions so that they last for a longer time period.

As in the case of pH meters the correct calibration of an EC meter ideally requires the use of two solutions. Most people however use only one solution or use two solutions in a rather wide range. Ideally both solutions would need to be within the range in which we would want to measure so ideally we would want to have solutions in the 0.5-3.0 ms/cm range for the calibration of an EC meter used in hydroponic. We also need to make sure we use substances that show both a linear relationship between EC and concentration and that do not affect the pH of the solution considerably as the EC can also vary significantly with the pH of a solution.

As in the case of pH meters the easiest – but definitely not most analytically correct – way to carry out this preparation is to work with a calibrated EC meter to start with. In order to do this buy a single calibration solution so that you can ensure that your EC meter is at least calibrated properly over a single point. After the EC meter is calibrated we will use it to prepare a calibration solution with a specific EC level that we can then use for calibration. Since there is nothing special about any specific EC points – not the same case as with pH electrodes where pH 7 is the electrodes isoelectric point – preparing EC calibration solutions is easier.

Start with a water source – distilled would be preferred – and add around 1g per liter of NaCl, you can use any store-bought variety to carry out this process (the small amounts of additives won’t affect this process significantly). This should give you a conductivity reading in the range that is generally used in hydroponics, depending on your tap water it should be somewhere between 1.5-2.5 mS/cm. You can also prepare another solution with 0.5g per liter of NaCl which should allow you to perform a two solution calibration. Note that the addition values do not need to be exact. If you are using tap water make sure you let it sit for around a day before using it so that any chlorine is eliminated from the water.

After preparing the solutions take note of their EC levels, these are the levels you will use for calibration. A problem with EC solutions is that they have a fundamental dependence on the concentration of ions in solution and cannot compensate for this so the EC values will vary and become unknown if you let the solutions evaporate. When storing EC solutions it is therefore important to use airtight containers and additionally put electrical tape around the cap after every use, this will make sure that the loss of ions within the bottle is minimal. After some volume of solution is used make sure you discard it and never put it back inside the same bottle.

As in the case of pH meter calibration solution preparation this is definitely not the way in which these solutions would be prepared in a lab – as you can prepare solutions with extremely accurate predicted conductivity if you have very pure salts and double distilled water – but it’s a very good way to create cheap calibration solutions that offer low enough errors to allow for their use in hydroponic culture.


Growing a Hydroponic Garden Without a pH or EC meter

So you have decided you want to start a hydroponic garden but you do not want to use a pH or an EC meter. It is fairly common for people to feel this way when they are starting their own hydroponic gardening due to several reasons. Maybe you are not very familiar with the technical side of hydroponics, you don’t want to get into all that stuff in the beggining or perhaps pH/EC meters are terribly hard to get or expensive where you live. Does this mean that without a pH and EC meter you won’t be able to run a successful hydroponic venture ? No. On today’s post I am going to talk to you about how you can grow hydroponic crops without a pH or EC meter and yet get good results, sometimes even better than people using all those technical gizmos :o).

As a chemist I think like a scientist and part of this way of thinking is the controlling of variables. I like to control pH and EC because I feel that this allows me to have a record of what is happening within my nutrient solution, without these measurements I would be “blind”, so to speak. However when I was beginning my major I started my first hydroponic ventures with absolutely no control over pH or EC. I didn’t do this because the cost of an EC/pH meter where I lived was prohibitive so I said, “what the hell” and went for it. I have to say that I got some very satisfying tomato crops after having some significant failures due to both rookie mistakes and disease. I managed to get full, 2 meter high tomato plants filled with delicious vibrant tomatoes and this happened without ever checking my pH or EC.

How did I manage to do this ? After time went by and I got an EC/pH meter, I started to monitor how my crop evolved with time to know what I should or should not do to improve my corp’s yields. I found out that the pH of my crop increased steadily – and sometimes came near 8 – before I usually changed my nutrient solution. The EC oscillated widely but my reposition of the initial “level” of solution with water was enough to keep the EC at a good level. So if you want to be successful with hydroponic crops, it is not absolutely vital for you to have a pH or an EC meter, you just need to follow some simple guidelines to have a wonderful hydroponic crop.

1. Have one gallon of nutrient solution per plant. Having this volume of solution in your reservoir per plants allows you to have enough nutrients so that each plant will take a significant amount of time to absorb them. Having less solution is troublesome since your EC will change wildly and your nutrient solution changes will have to be more frequent. A one gallon per plant rule of thumb seems to be the best choice.

2. Add fresh water to recover the initial level of your solution . This is one of the easiest things to do. By adding fresh water -without any nutrients- to top off your reservoir to its initial level you will keep the EC near its initial value for the whole time. This simple technique ensures that your EC remains within rational levels and your plants stress-free.

3. Change your solution every 4 weeks. After 4 weeks, in a hydroponics system where there is one gallon per plant and the solution is continuously topped off (at least once a day) you will find that your plants have used about 40% of the nutrients at most (this is what I got from full production tomato plants and an atomic emission analysis of the nutrient solution). This means that your solution is now deprived of nutrients and it is time to use the solution to water your soil-garden and prepare everything again.

With this simple guidelines, anyone will be able to grow a hydroponic garden without using a pH or an EC meter. Of course, in the beginning you may find some problems while you find the adequate level of nutrients your plants need (if you do not prepare them yourself) but after a few trial and error runs you will be able to grow full hydroponics gardens without having to constantly monitor either pH or EC. Certainly, better results are achievable when you are monitoring these variables but it is possible to grow a beautiful hydroponics crop without the slightest monitoring of these aspects of a hydroponic nutrient solutions. People usually underestimate the ability of plants to adapt to changing conditions, something that they are able to do beautifully if you only follow the above advice. Do you have any advice or suggestions to help people grow without an EC or pH meter ? Feel free to leave a comment :o)