Creating a robust pH/EC monitor for hydroponics using Atlas probes and an Arduino

A few months ago I talked about how you could build a simple sensor station for your hydroponic projects using an arduino (see here). However this small project used the relatively cheap – but I have found not very robust – pH/EC probes and boards from gravity which makes it a poorer choice for a more professional project aiming to constantly monitor the pH/EC of a production hydroponic setup. Today I am going to tell you how you can build a dedicated pH/EC monitor using the robust pH probes from Atlas, which also have several important advantages we will be discussing within this post. I would also like to point out that Atlas is not paying me anything to write this post, I write just because of my experience using their probes.

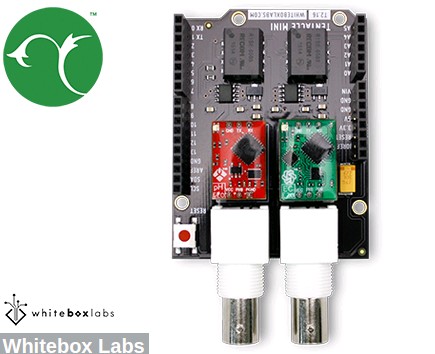
The pH/EC probes from gravity have several problems when looking for a robust sensing setup. The first issue they have is that the probes are not rated for constant immersion, so they are damaged if you place them within solution the whole time which is probably what you want to do within a production hydroponic setup. The second issue is that the boards require cable connections to the Arduino which introduces a significant amount of noise that can causes problems with measurements. Due to poor isolation there can also be issues with the gravity boards when measuring EC/pH at the same time. To overcome these issues we can use probes and boards from atlas which have the advantage of having no cable connections to the Arduino – connections are through pins directly – plus the probes are rated for constant immersion and are much more robust. These are the things we would need to build this project:

As you notice this sensor project is much more expensive than the sensor station I had discussed before, with a price tag of around 490 USD (not including shipping). However when looking for a robust setup you definitely should favor the additional expense as this will likely be paid off with much longer service times.

When you get the pH/EC kits the first thing you want to do is change your EZO boards (the small circuit boards that come with them) to i2C mode so that you can use them with your mini tentacle shield. To do this follow the instructions here, follow the instructions in the “Manually switch between UART and I2C” section, use female jumpers to make this process easier. Note that you can use your LCD shield analogue 5V and ground pins when you need power within the process.

//Libraries
#include <U8glib.h>
#include <stdio.h>
#include <Wire.h>
#include <Arduino.h>

#define TOTAL_CIRCUITS 2  

///---- variables for pH/EC tentacle shield ------- //

#define TOTAL_CIRCUITS 2   

char sensordata[30];                  
byte sensor_bytes_received = 0;       

byte code = 0;                        
byte in_char = 0;  
int channel_ids[] = {99, 100} ;                   
   
// ------------------------------------------------ //    

// EC values // CHANGE THESE PARAMETERS FOR EC PROBE CALIBRATION
#define EC_PARAM_A 0.00754256

//pH values // CHANGE THESE PARAMETERS FOR PH PROBE CALIBRATION
#define PH_PARAM_A 1.0
#define PH_PARAM_B 0.0

#define XCOL_SET 55
#define XCOL_SET2 65
#define XCOL_SET_UNITS 85

//--------------------------

U8GLIB_NHD_C12864 u8g(13, 11, 10, 9, 8);   
float pH, EC;

//--------------------------

void draw() {
  u8g.setFont(u8g_font_04b_03); 
  
  u8g.drawStr(0,11,"pH:");
  u8g.setPrintPos(XCOL_SET,11);
  u8g.print(pH);
  
  u8g.drawStr(0,21,"EC:");
  u8g.setPrintPos(XCOL_SET,21);
  u8g.print(EC);
  u8g.drawStr( XCOL_SET_UNITS,21,"mS/cm" );
  
}

void read_tentacle_shield(){

  for (int channel = 0; channel < TOTAL_CIRCUITS; channel++) {      
  
    Wire.beginTransmission(channel_ids[channel]);     
    Wire.write('r');                         
    Wire.endTransmission();                       
    
    delay(1000); 

    sensor_bytes_received = 0;                        
    memset(sensordata, 0, sizeof(sensordata));        

    Wire.requestFrom(channel_ids[channel], 48, 1);    
    code = Wire.read();

    while (Wire.available()) {         
      in_char = Wire.read();           

      if (in_char == 0) {               
        Wire.endTransmission();         
        break;                          
      }
      else {
        sensordata[sensor_bytes_received] = in_char;      
        sensor_bytes_received++;
      }
    }
    
    if (code == 1){
      if (channel == 0){
        pH = atof(sensordata);
        pH = pH*PH_PARAM_A + PH_PARAM_B;
      }
      if (channel == 1){
        EC = atof(sensordata);
        EC = EC*EC_PARAM_A;
      }    
    }
  }
  
}

void setup()
{
    pinMode(13,OUTPUT);  
    Serial.begin(9600);
    u8g.setContrast(0);
    u8g.setRot180(); 
}

void loop()
{
 
  digitalWrite(13, HIGH);       
  delay(800);
  digitalWrite(13, LOW);   
    
  read_tentacle_shield();

  u8g.firstPage();
    do  {
      draw();
    } 
      while( u8g.nextPage() );          
      
}

Once you have changed the EZO boards to i2C you can now plug everything into the arduino and upload the code into your arduino. Plug the EZO boards into the mini tentacle shield and then plug that shield into the arduino. You’ll notice that the EZO boards make it impossible to plug the LCD screen directly on top – as the EZO circuits make the shield too tall – so you should use stackable headers to extend the connections so that you can plug the LCD screen on top without any problems. Make sure you download and install the U8glib library in your arduino IDE before uploading the code.

As with the previous code you’ll notice there are variables called PH_PARAM_A, PH_PARAM_B and EC_PARAM_A within the beginning of the code that you should change in order to calibrate your probes. Follow the instructions about calibration I gave in the previous post in order to figure this out. Using the calibration solutions that come with your kits you’ll be able to perform this calibration procedure. Whenever you want to calibrate your probes you should reset these variables to their original values, reupload the code and retake measurements.

Following this guide you will have a very robust sensor setup using very high quality probes. These probes are also coupled with a board that has no wire connections with the arduino, offering very high quality readings with very small amounts of noise. Additionally the LCD shield opens up the possibility to add more sensors to your station so that you can monitor, temperature, humidity, and carbon dioxide potentially from a single place.
What is the ideal nutrient solution temperature in hydroponics?

One of the simplest variables that can make a substantial difference in crop yields in hydroponics is the temperature of the nutrient solution. Nutrient absorption by plants is mainly controlled by chemical processes within their roots and the efficacy of these processes is determined in an important part by the temperature the roots are subjected to. Since plants don’t have a mechanism for active temperature regulation they just react to changes in temperature in order to best adapt to the environment that surrounds them. Today I will be talking about the optimum solution temperature in hydroponics, what influences this value and what factors we must consider when deciding what temperature to use in our hydroponic system.

Solution temperature affects several important variables. Oxygen solubility changes as a function of temperature – decreasing as temperature increases – so as you increase the temperature the availability of oxygen to plant roots starts decreasing. As you increase temperature however the speed of the chemical reactions in plant roots increases, so there is an increase in respiration rates as temperature increases. The ideal temperature is therefore always a compromise between this decrease in oxygen availability and the increase in metabolic rate that is given by higher temperatures. For almost all commercially grown plant species optimum solution temperatures will be in the 15-30°C (59-86F) range due to this reason.

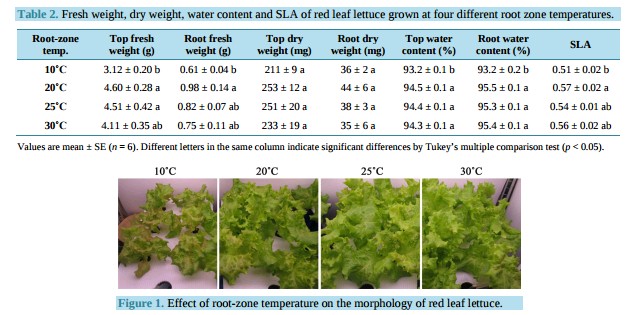
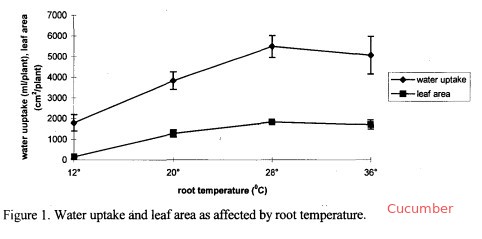
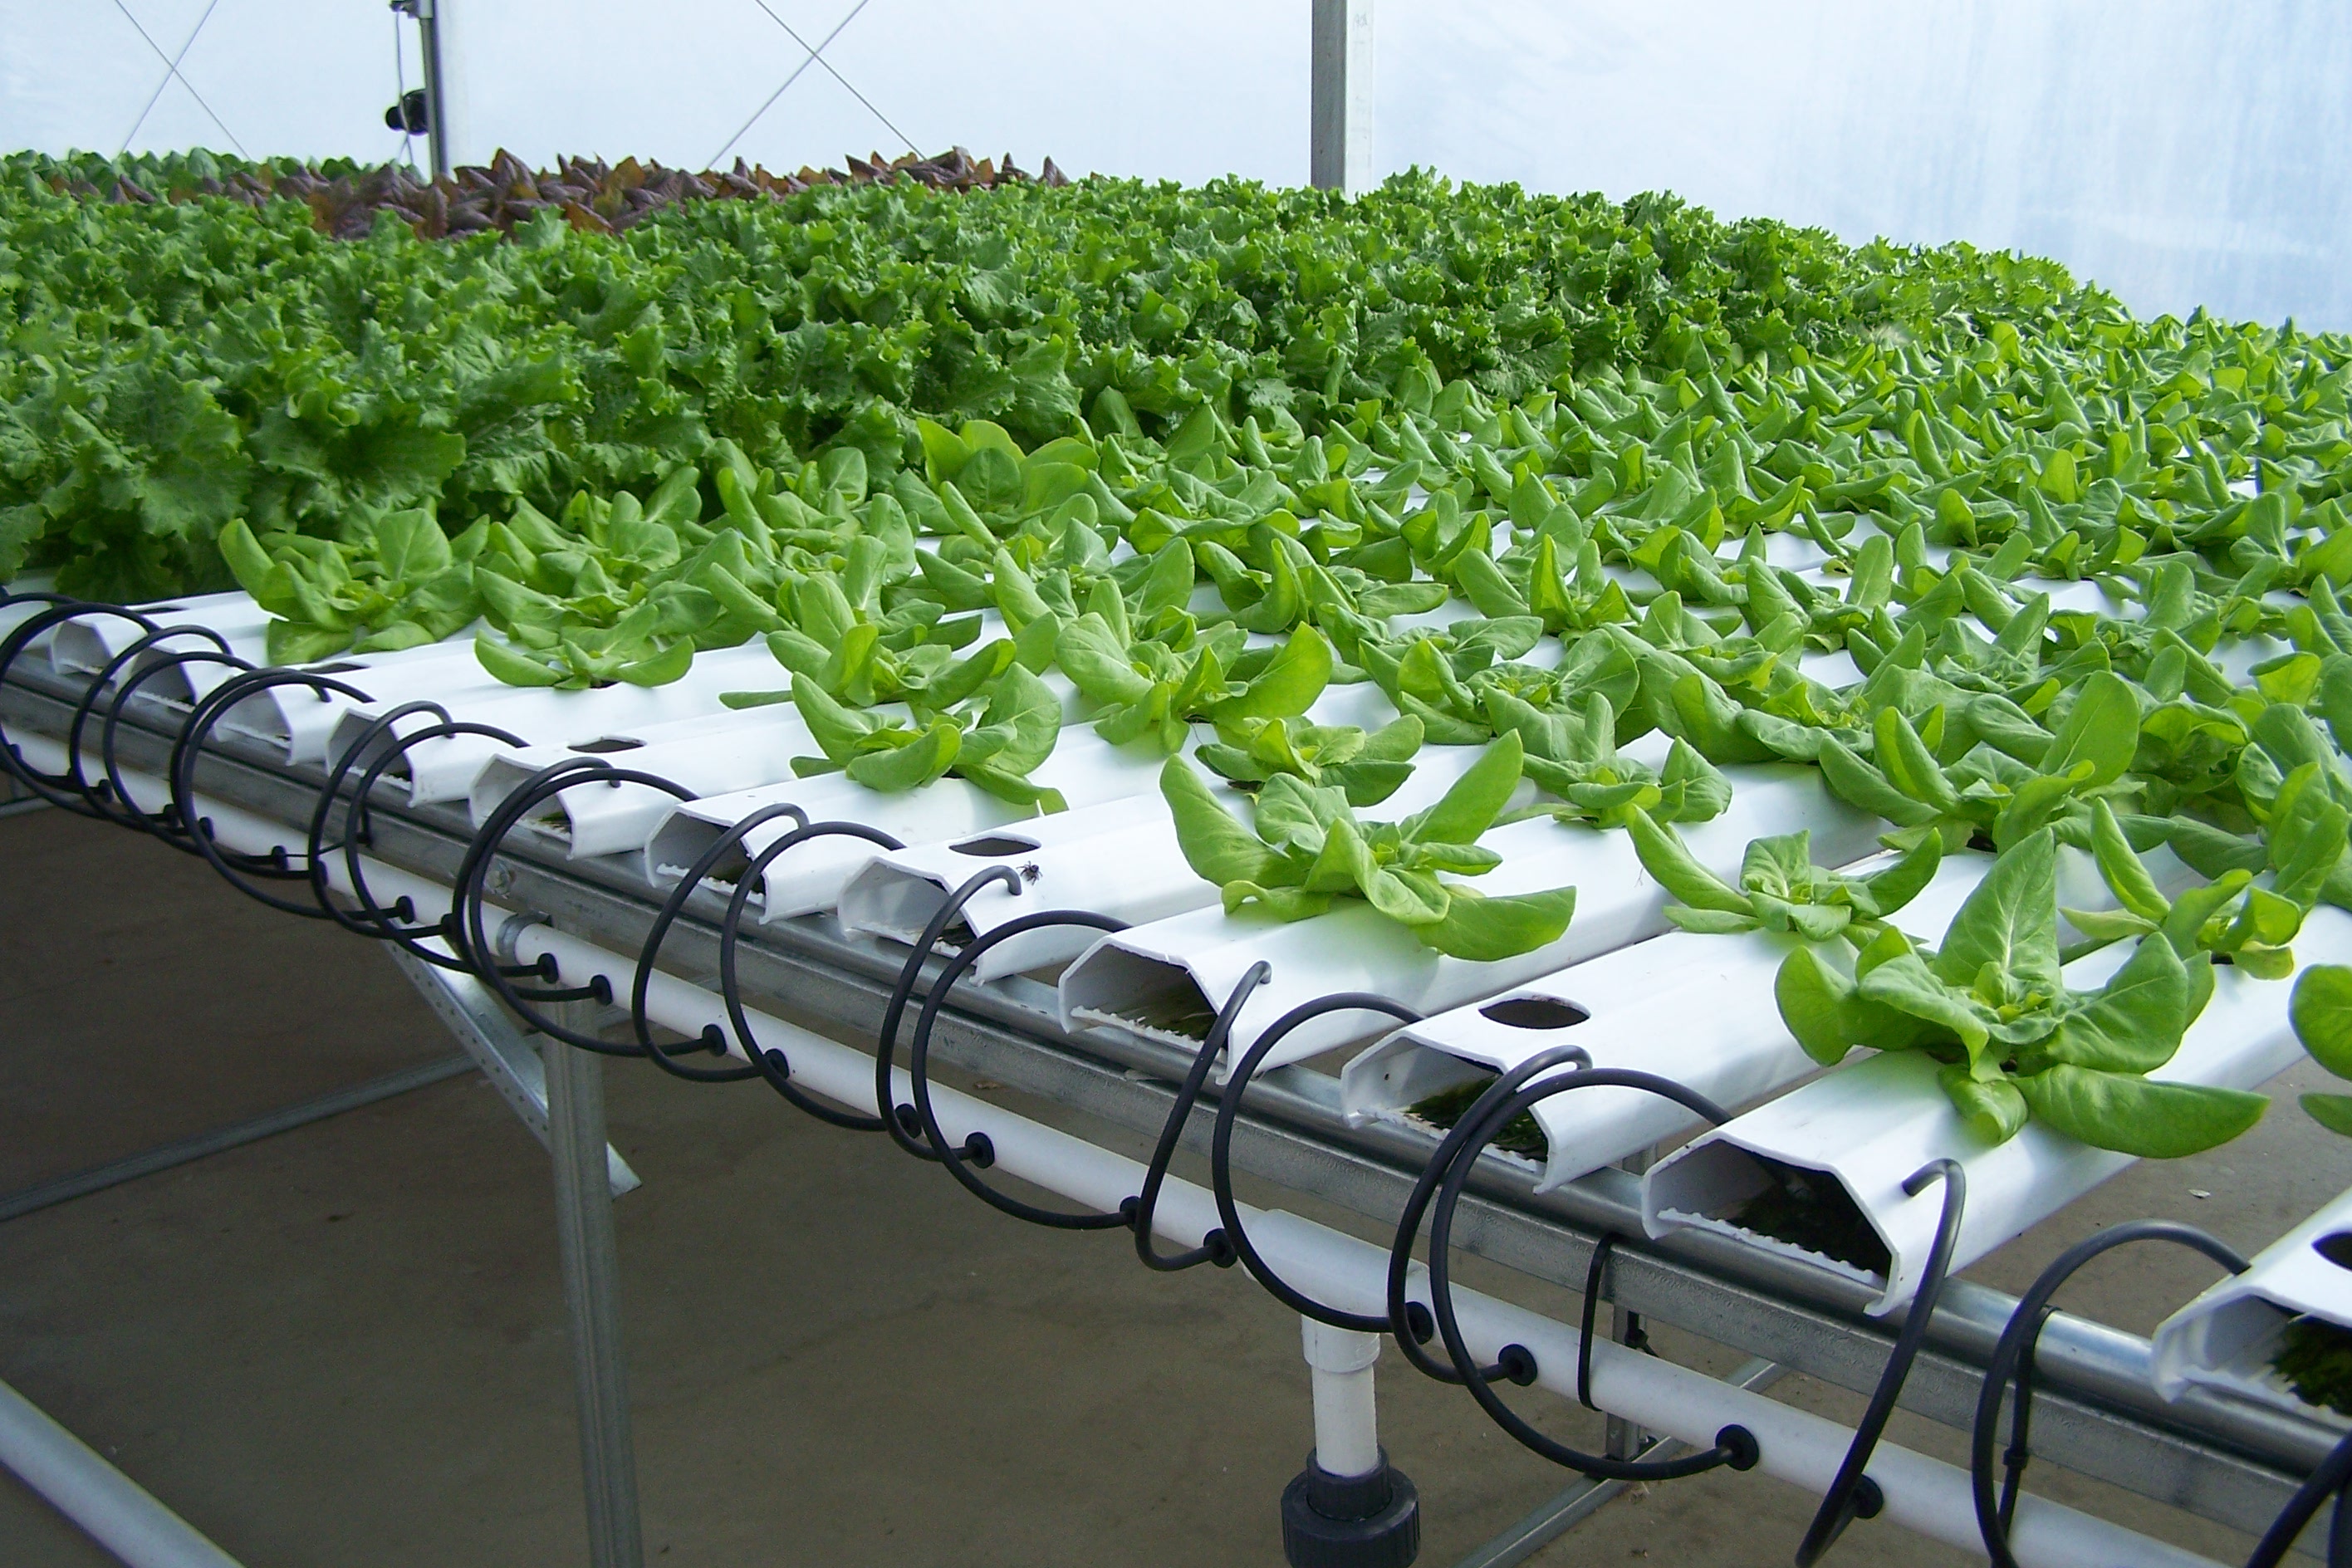
However there is no rule of thumb for optimum solution temperature selection in hydroponics. It should be clear that since different plants evolved across different conditions some of them perform better at lower temperatures and some others do better at higher temperatures. We know for example that the optimum nutrient solution temperature for potatoes is in the 20-25°C range (see here) while the optimum temperature for plants like cucumbers is higher, at 28°C (see here). For some plants like onions the best solution temperature can actually be a bit higher, even in the 26-30°C range (see here). Others like lettuce and baby leaf crops actually prefer much lower temperatures, with optimum results near 20°C (see here and here).

It is then clear that picking a random number between 15-30°C is not enough, a careful study of the plant specie being grown has to be carried out in order to select an adequate temperature. It is also important to note that higher temperature choices do not come without problems. We know for example that pythium and other infections are associated with increases in temperature since pathogen metabolism is also enhanced under warmer conditions (see here and here). This shows how even though the optimum temperature for tropical flowering plants is usually in the 25-30°C range, it is usually not common to see optimum results at these temperatures due to the potentially higher prevalence of diseases. This is most probably why growers usually go with a lower temperature in the 20-25°C to avoid risking diseases at a higher temperature.

If you want to try higher temperatures it is therefore better to go with sterile type hydroponic systems where microbes don’t play an important role and to implement measures – such as silicate additions to the nutrient solution, UV filtration and constant oxygenation – to ensure that disease prevalence is as low as possible. Also avoid adding any source of organic carbon (like sugars) as these can play an important role in feeding incoming pathogens. Big gains can be obtained with a better solution temperature control, provided that diseases are controlled and a temperature adequate for the plant being grown is selected.


Maximizing yields per area in hydroponics

Since the 1940’s hydroponics – which I use to talk about a broad variety of soilless growing methods – have promised to deliver better plant yields than soil culture with less water usage and higher fertilizer efficiency. However there are many different types of soilless cultures that vary in their initial cost, media used, irrigation method used and potential for yield. Today I want to talk about the decisions that need to be made if you want to maximize yields in a hydroponic crop and the compromises that you may have to make in order to get there.

There are mainly two ways in which yields can be increased in crops. The first is to increase the amount of production you can achieve per plant and the second is to increase the amount of plants you can have per area. Maximizing crop production requires using methods that allow you to reach the best compromise between these two, maximize the product of plants per area with production per plant. This often means not having the largest amount of plants you could possibly grow per square meter and not having the largest possible yields you could have per plant.

Assuming that plants are getting adequate lighting and carbon dioxide there are two things that can be done to maximize the amount of yield per plant. The first is to ensure that plants can get optimum contact with nutrient solution as often as possible. This means that nutrient solution should always be saturated with oxygen and that irrigation should happen as often as possible. This ideally means that the media should not allow for any waterlogging but should allow the solution to flow freely and constantly. The second is that the nutrient solution should contain adequate amounts of all nutrients – all within the plant’s sufficiency ranges – with adequate temperature, pH and EC values. The optimum nutrient ratios in solution depend on the plant being grown and they can play a substantial role in getting better yields per plant, especially in flowering crops. Here are some scientific articles with some experiments about some of the above (1, 2, 3, 4, 5, 6).

A typical problem when maximizing yields per plant is that this immediately means larger energy expenditure. It often means close to constant irrigation systems with highly efficient oxygen pumps. It also means potentially more expensive media – such as expanded clays or rockwool – with closed systems where solutions need to be closely monitored. Systems of this sort are more vulnerable to power outages and they are much less forgiving with grower mistakes. Plants are much more dependent on the ideal conditions being created around them and deviations from these conditions can eliminate any potential advantages that were obtained when going for this system class.

Our next area of yield maximization is to increase the number of plants per area. To do this we basically need to increase two things: light and ventilation. The main limiting factor in having more plants is the light that they can receive so either changing to systems where light can be better distributed – such as growing towers – or using more lights can alleviate this problem. Some growers have even used high power LED strips between plants to fix this issue. Since plants also absorb carbon dioxide around their leaves we also need to ensure we have stronger ventilation to ensure none of our plants are getting starved. Increasing plant density also increases the propensity of our plants to catch and transmit diseases so environmental manipulations like lower humidity are often coupled with increases in density to decrease these risks. See these articles for more on yields, light and density (1, 2, 3, 4).

Increasing plants per area automatically decreases yields after one point but it is often the case that you can get larger final yields per area by compromising some yield per plant in the process. Even if plants yield 10% less this might be worth it if you can include 2 more plants for every 10 within your hydroponic crop. The key to maximizing yields per area is to find how far you can push this before getting substantial issues that may dramatically decrease plant yields.

It is worth noting that steps taken to maximize yields are also often steps taken in making the crop more susceptible to problems. While lower yielding setups, like for example run to waste setups with sparse plant density, are often easy to manage and very forgiving, more technical setups like closed loop constant irrigation systems at high plant densities can be much better yielding but much more prone to problems, requiring much closer monitoring and attention. This is why many growers might get better yields with setups with lower yielding potential, because their mistakes are punished much less harshly under these conditions.


Managing a Run To Waste (RTW) hydroponic crop from a nutritional perspective

Today it’s very common to create hydroponic crops using techniques where nutrient solution is not recycled. This type of crop, commonly called drain-to-waste (DTW) or run-to-waste (RTW) offers the advantage of having a very cheap setup – since no recirculation is used – with the big disadvantage that nutrient control becomes harder as there is no constant feedback of how the plants are affecting the nutrient solution. Today I want to talk about the main differences between a RTW crop and a recirculating crop and how nutrient management needs to be done in order to be effective in RTW setups.

One of the most important difference between both crop types is the substrate. In a RTW crop you want the substrate to have a much higher capacity for water retention since you want to irrigate less frequently and ensure the plants are in contact with nutrient solution as much as possible without having aeration problems and a lot of run-off. Having a lot of run-off means wasting more nutrients in a RTW setup so you want to have a media that can minimize this. This means having a media like peat moss or coco coir where water retention can be very substantial.

The problem with the above is of course salt accumulation within the media. If you irrigate the plants with a full strength nutrient solution and you irrigate when the level of moisture descends then this is both because the plants have absorbed water and the solution has evaporated to some extent. This means that the next time you irrigate your total amount of salts will be the amount from your current irrigation plus the amount accumulated in the media. This can quickly turn into a very problematic situation where the plants are subjected to extremely high conductivity levels.

This is why run-off monitoring is key in RTW setups. You usually want to water your plants enough to allow for some run-off – usually 10-20% of the plant container’s volume – so that you can perform measurements of pH and EC over that run-off. This is why it’s so important to have the plants over trays where run-off can be collected as measuring the run-off is very important to ensure that your plants are receiving adequate nutrition. Measuring the run-off of every plant is impractical so collecting the solution from many plants in a single tray and then measuring that output is a lot easier. Alternatively – if you cannot place the plants on trays – you can use a suction lysemeter to take out solution from a few plants after watering to monitor conditions around their root zone.

In a RTW setup your run-off will always tend to be more concentrated than your input – this is normal – but you want to have conductivities in your run-off no more than 30% greater than your input concentration. If this is the case you should do plain water irrigation until your run-off has at least the same conductivity as your originally desired input. When you water with plain water also make sure you adjust the pH of the water to the value you desire. One of the lead causes of bad results in RTW setups is to have salinity build-ups that cause nutrient lock out simply due to a general lack of run-off monitoring. In general if watering using conductivities close to or above 2 mS/cm plain waterings should be done once for around each 1 or 2 nutrient solution feedings.

The pH is also very important. Depending on your media your pH can change substantially between your input and your run-off but in general you want your output pH to be as close to the desired pH as possible. You can compensate a bit by changing the pH of your input solution – for example if your run-off pH drops you can increase the pH of your input solution – but never increase your input pH above 6.5 or below 5.5. Some media like peat can acidify solutions a lot with time, in these cases it’s very important to pretreat the media to avoid these problems with output pH. A strongly buffered input solution can also help in these cases. Before starting your crop always test the run-off pH/EC of the media without plants to ensure you can make any needed treatments before you actually start your crop.

The key to successful RTW setups from a nutritional perspective is run-off monitoring. Once you start monitoring your outputs you will see how your plants respond to your input solution and you’ll be able to better control the plants’ root zone environment. Of course these issues are all eliminated by recirculating setups since in that case the nutrient solution returns to the tank and there is a constant feedback of how the plants are affecting the solution. This can make recirculating setups much better at giving higher yields.


Measuring ion concentrations in hydroponics using electronic tongues

One of the biggest problems in hydroponic research is the measuring of individual ion levels in hydroponic solutions. Right now there is no commercial solution for the accurate tracking of individual ions in hydroponic solutions and this makes it impossible to track ions in real-time to measure how nutrient absorption reacts to different environmental and chemical conditions. The only way to currently do this is to carry out more expensive and cumbersome ICPE analysis that provides a snap shot of a solution’s composition in time. However there is a solution that might be coming up within the next few years which is the use of electronic tongues to measure the concentration of a large variety of ions in solution.

Many of you may be thinking, what about Ion Selective Electrodes (ISEs) ? These electrodes are designed to measure the concentration of individual ions in solution and they are perfect when you’re trying to measure a single ion against an unchanging background. The issue with ISE is that they work via the interaction of ions with molecules that have a especially strong interaction with them (what we can an ionophore) but the interaction can also be strong with other ions, generating interference. For example a K+ ion selective electrode usually uses an ionophore like vancomycin but this ionophore also has strong interactions with NH4+ (ammonium) ions. Since the concentration of ammonium also changes with time in hydroponics this means that your reading will be changed not only by how K+ concentration varies in solution but also by how NH4+ concentration changes.

In reality interference is not generated by a single ion but by a good portion of the ions present in a hydroponic solution. This means that it is practically impossible to use an ISE in an accurate manner in hydroponics because you will always be getting changing interference from the other ions in solution. In the experiments I have done attempting to track nutrients using ISE this problem has always been so bad that the results become practically useless, regardless of how you calibrate the electrodes (since the concentration of the ions that interfere changes relative to the ion you want to monitor).

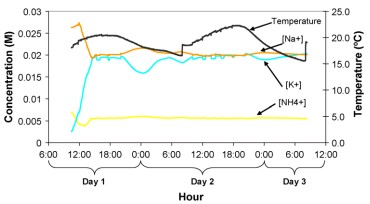
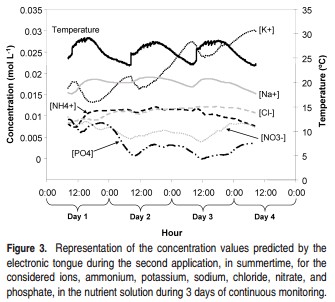
Electronic tongues are an intelligent idea to circumvent these problems. The idea is to use many ISE for different ions – with many for the same ion and many generic ionophores that have poor selectivity – and then to use statistical modeling tools – mainly neural networks – to come up with ways to figure out the noise/signal/interference and get accurate measurements for ion concentrations regardless of what the actual readings of the electrodes are. The neural network is trained with data from solutions with varying concentrations of all the ions being monitored and this allows the creation of a robust prediction engine that can be used to get actual ion concentrations. M. del Valle’s group in Barcelona has done some of the pioneering work in this area, the images in this post have been taken from some of their research papers on the subject (for example this one and this one).

Through this research they have been able to come up with ISE arrays that – using the neural network models – can measure concentrations in real-time for nitrate, chloride, sodium, potassium, ammonium, calcium, magnesium and phosphate. This means that you can effectively monitor how plants absorb different ions, not only allowing you to carry out experiments surrounding nutrient absorption but also allowing you to know which ions are getting depleted so that you can replace them. This brings a totally new dimension into hydroponic culture that simply isn’t accessible right now.

It might take a significant time for these sensors to reach commercial applications – mainly due to the expensive calibration that is needed due to the variability in fabrication – so it might be years before we see something like this available to the general public. However if you have a commercial hydroponic setup that is large enough you definitely can follow this research to make your own ISE array and build an electronic tongue with them. This will give you access to a ton of information that is inaccessible to all of your competition.


Do you really need to be using RO water?

One of the most common practices in hydroponics is to use reverse osmosis (RO) water in order to create your hydroponic nutrient solutions. This water is made by running another water source – most commonly tap water – through a reverse osmosis system that removes a very large portion of the ions within the initial water source. The RO process is very energy intensive and also uses a large volume of water, only around one third of the water input ends up as RO water while the rest ends up as a more highly concentrated solution. Today we are going to discuss whether using RO makes the most sense, when it doesn’t and how you can make sure that using tap water does not cause you any important issues.

The idea behind using RO water is to have the best “base” for the construction of a nutrient solution. If your water starts up with some substances within it then the amount of control you have over composition is limited and therefore your results might suffer because of that. If for example your nutrients add 150 ppm of Ca but your water already contains around 40-60 ppm then adding so much Ca might place you within a suboptimal spot. If your water contains a lot of carbonates, sodium, fluorides or other substances they can also cause significant problems within your hydroponic crop. Using RO water brings a “clean slate” that ensures that what you add is what you get.

So what is wrong with RO water? There are two main issues with using RO water. The first is that it’s a very energy intensive process – therefore a costly process – and the second is that the waste products of the RO process can create environmental problems. Additionally tap water already contains many nutrients necessary for plant life – mainly Mg and Ca – so why would you remove these elements only to later add them again later on? Surely you would rather save the energy from the RO process and use the nutrients within your water as part of your nutrient solution.

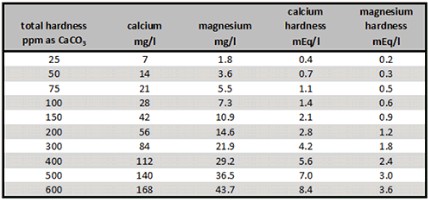
The above map shows you the mean hardness of water (as ppm of calcium carbonate) across the United States. The people with the highest Ca concentrations have around 100ppm of Ca while those who have the least have around 0 to 24ppm. This means that for the people with the highest Ca, the Ca from tap water could contribute more than 50% of the Ca needed by a flowering crop while for the other states the contribution would be rather small. If your water is high in Ca then chances are it is also high in Mg so performing a water analysis will be necessary. From my experience with customers Mg is usually around one fourth to one third the concentration of Ca in solution, but the proportion can change significantly depending on the zip code. The table below shows the Ca/Mg content of water sources at different overall hardness levels in Germany.

Mineral content in water also changes substantially as a function of temperature since rocks that contribute Ca/Mg carbonates will be more soluble during the warmer months of the year. It is therefore ideal to get two analysis, one during February – usually the coldest month – and another during August, the hottest month, to get a good idea of the range of Ca/Mg concentrations that you will be getting in your tap water. This will allow you figure out how to adjust your nutrients as a function of the average temperature where you live.

Carbonates are also something you should worry about, if you have a high water hardness you might have more than 150ppm of carbonate within your nutrient solution. This is not ideal since carbonate ions can cause issues in your crop. To deal with this you can simply work at a slightly more acidic pH (say 5.6-5.8) this will limit the amount of hydrogen carbonate ions that can be present within the water as it will shift the equilibrium significantly more towards the evolution of carbon dioxide (since carbonic acid in solution is in constant equilibrium with atmospheric carbon dioxide).

There are however some circumstances where using RO water is unavoidable. If you water contains more sodium than your crop can deal with (read here for more info), more than 50 ppm of chlorides or if there are more than 10 ppm of fluoride then you will need to use RO water because those elements in those quantities are not going to be good for your plants. If these elements are absent or in low enough quantities then there is no reason why you would want to use RO instead of tap as using RO would be an unnecessary energetic and environmental expense given that you can just compensate for the ions already within your water through adjustments in your nutrient solution.


Hydroponic micro and macro nutrient sufficiency ranges

When you want to prepare a nutrient solution one of the first things you want to know is which concentration ranges are appropriate for the growth of the specific plant specie you want to cultivate. You will definitely want to make sure that you do not feed either too much or too little of any of the essential nutrients a plant requires. Lucky for you there is a ton of research surrounding what we call “sufficiency ranges” in hydroponic culture. The sufficiency range of a nutrient is simply the range of concentration where a plant does not show a toxicity or a deficiency but develops in a normal manner. On this blog post we will talk about the different sufficiency ranges that are provided across the scientific literature and what they tell us about plant nutritional needs.

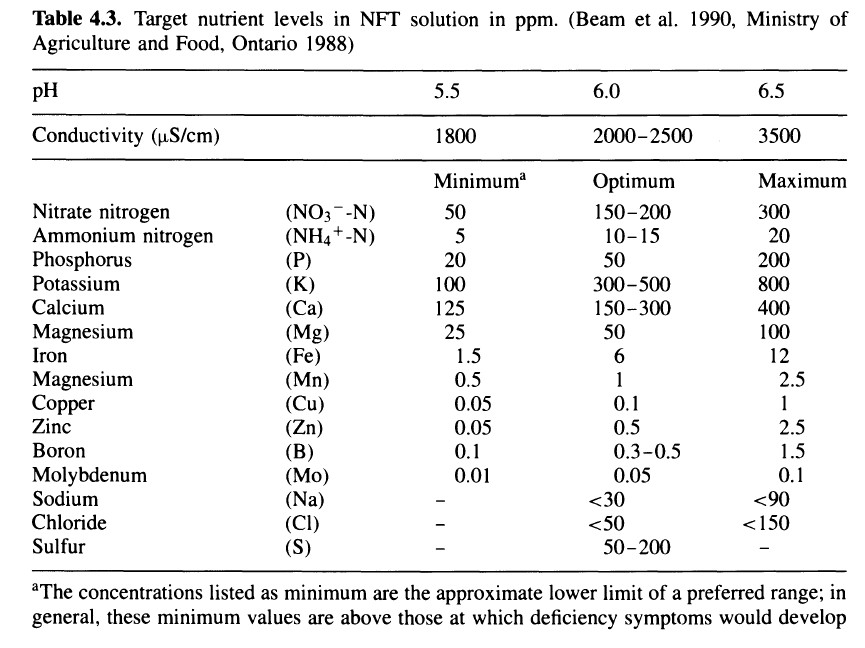
The first thing to be clear about is that there is no single “sufficiency range” table. There have been many people who have worked on this subject using different plants and each one of them will tell you that the sufficiency range is slightly different. The above hydroponic nutrient concentration table shows you the minimum, optimal and maximum nutrient values that were determined by the Canadian ministry of Food and Agriculture using NFT systems. These requirements were determined for flowering plants – mainly tomatoes – reason why you can see the optimum Ca range at 150-300 and the optimum K range at 300-500. Also notice the very high optimal Fe requirement of 6 ppm. This is almost certainly using either a form of unchelated Fe or an Fe chelate that is not so stable in the hydroponic conditions under study. The sufficiency range of micro-nutrients also depends on exactly what form of the micro nutrients you use since some forms are absorbed much  more efficiently than others (it’s not the same to have 3 ppm of simple Fe+2 or 3ppm of FeEDDHA).

In general you’ll see that micro-nutrient sufficiency ranges have the most disparity between different sufficiency range tables. This is mainly because both the form of the micro nutrient and the specific cultivation media play a huge role in determining sufficient and toxic levels in hydroponic culture. For example a media like peat moss will contain a far greater amount of micro-nutrients than something like say, rockwool, so it is very important to account for media contributions when assessing micro-nutrient sufficiency ranges. While plants require so much macro nutrients that the sufficiency ranges are fairly coherent between different studies in the case of the micro nutrients the media choice itself could provide the entire requirement of a micro-nutrient through the plant’s growth cycle.

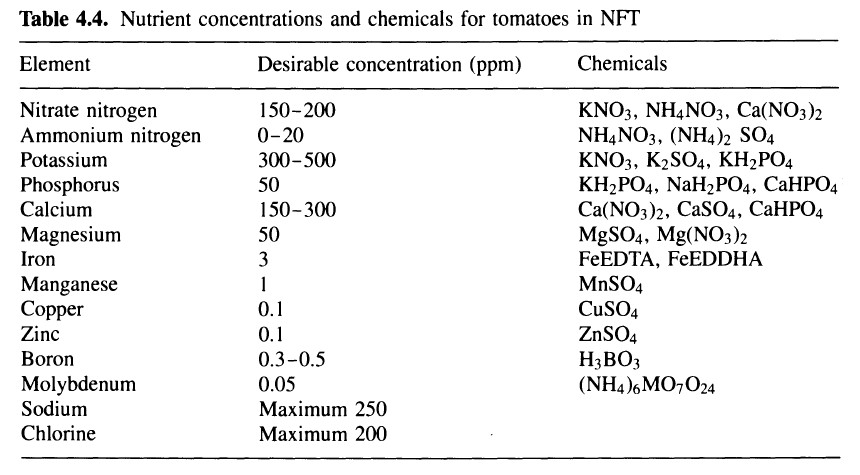
The second image shows another sufficiency range table for hydroponic nutrients. This time we can see the source salts being used. As you can see we have a fairly good agreement in the macro-nutrients – with perhaps the exception of the ammonium minimum being set at zero – but in the case of the micros we see that the recommended amount of Fe is actually 3 ppm instead of the 6 ppm that were recommended before. This is most probably because in this case some percentage of this was given as FeEDDHA, which is much more effectively absorbed than either unchelated Fe sources or Fe EDTA. The boron range is exactly the same and this is undoubtedly because boron is always supplied in the same manner in hydroponic crops, therefore its sufficiency range tends to be coherent as long as the same plant specie is used for determination.

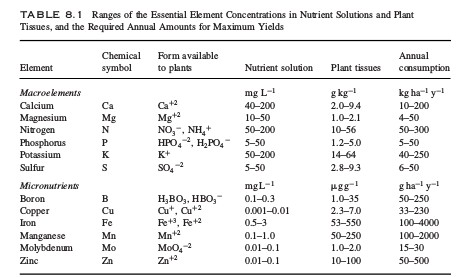
Macro nutrient suggestions are also not free from variations. Depending on the method used to determine the sufficiency range there can also be differences. The table below shows you yet another sufficiency range table which was geared towards maximum yields in terms of product weight. In this case You can see optimum K concentrations in the 50-200 range which is confusing given that the two tables before had suggested a much higher range of 300-500 ppm. Who is right here then? Do plants require 300-500 ppm of K for optimum growth or can they do fine with 50-200?

 –

The answer is that both can be right. Under some growing systems plants might require the solution to have more K because the setup might make K absorption harder while in other setups you might want to have lower K. This sort of contradiction surfaces constantly in hydroponic nutritional studies, simply because the variability in the subject of study (yields of a certain plant) will tend to vary very significantly depending on exactly which plant is grown and under which conditions. Just the plant and its development phase can make a huge difference in what has actually been found to work better.

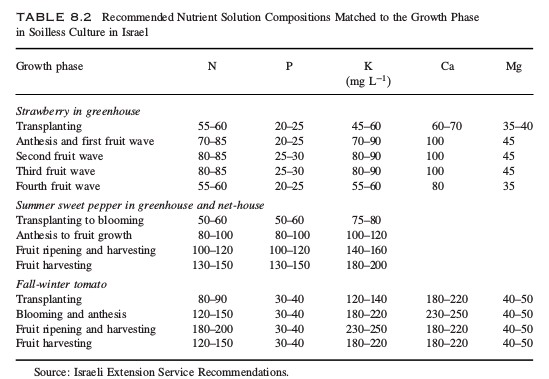
Checkout for example the Israeli service recommendations for growing three different plants across their life cycle. You can see that the amount of nutrients they use can be different from what we have learned before. In this case their recommendations for all plants fall within the sufficiency ranges in the previous table but notice how for strawberry plants we use a potassium level that is at most 90 ppm while for tomatoes we go as high as 250 ppm within the fruit ripening stage. Also notice how in the case of sweet peppers the P can go as high as 150 ppm while for tomatoes we always stay within the 30-40 ppm range. If we had followed the previous recommendations we would have never considered something like a 150 ppm of P to be an acceptable value for this element, since all of these sufficiency range studies point to the optimum P being 50 ppm. However a sweet pepper is not a tomato. In the same way that a house cat isn’t a tiger.

So although sufficiency range tables are good to determine starting points, you should be well aware that these tables need to be considered in the context in which they were created. The plant used, the exact nutrient salts used and the growing system can all play significant roles that may cause two sufficiency studies to tell you very different things. In the end the best thing that can be done is to use the values for the plant that is taxonomically closest to the one you want to study in the system that resembles your system the most and then go from there to establish what the best values are in your particular case.


What is the effect of chloride in hydroponics?

I recently wrote a post about the effect of sodium ions in hydroponics and how it is important to keep an eye on sodium levels due to the potentially negative effects they can have on plants. However you may have noticed that sodium is never added alone into nutrient solutions and there is always a counter-ion that accompanies sodium, which is – more often than not – chloride. This ion is very special and it has some clear effects in hydroponic culture. Today we are going to be talking about chloride, how it can dramatically affect plants and why it does so in such a special way.

Chloride – not to be confused with chlorine – is a reduced form of the element Cl, an ion with negative charge (Cl-). Unlike elemental chlorine, which is a strong oxidant, chloride is extremely inert in terms of its chemical reactivity and does not appreciably react with anything in a hydroponic nutrient solution. This however does not mean that it is inert when you put it in contact with plants, as a matter of fact chloride is a micro-nutrient – essential for plant life – but it plays such a small role that any important increase in concentration can be detrimental. Usually there is no need to add chloride but simply the chloride present in the water – or as impurities within the other salts – will be more than enough.

But what effect does chloride have? Chloride is special in that it behaves chemically in a similar way to ammonium when in contact with plants, that is, chloride can go through plant cells very easily. This means that whatever chloride you put in solution is very readily absorbed, meaning that it counteracts the absorption of other anions very strongly. This is why the expected effect of plants dropping a solution’s pH due to the addition of ammonium is completely negated if instead of ammonium sulfate you add ammonium chloride. This is because you add both an anion and a cation that are absorbed very fast, hence you do not affect the cation/anion absorption balance of the plant and the pH will continue to drop or increase in exactly the same manner as before.

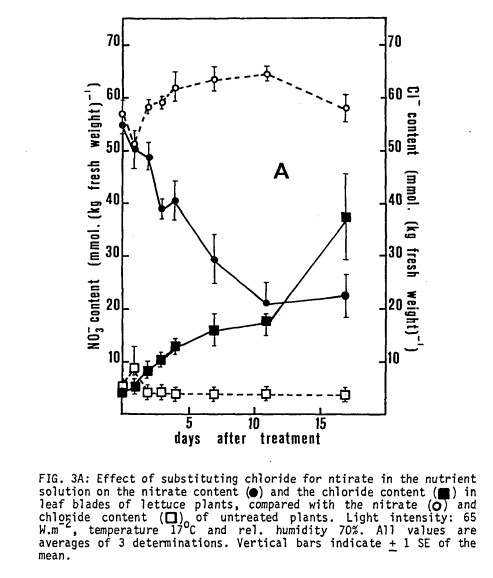
This anion absorption of chloride implies that it readily competes with anion absorption. This means that if you have chloride and nitrate in solution plants will tend to absorb the chloride instead of the nitrate and you will see symptoms of nitrogen deficiency – not because you don’t have enough in solution – but because nitrogen absorption is being hindered by the presence of a very competitive anion. Not only this but other anions, particularly phosphates, will also suffer and therefore you will also start seeing problems with P absorption as well. If you’re interested in reading more about this I recommend this chloride replacement study showing the dramatic effect it has on nutrient absorption.

In many cases, deficiency problems in salinity studies can be attributed to the action of chloride and not so much the direct action of sodium ions. See here for a study that does a direct comparison on seedlings. However since sodium and chloride are very often present in equimolar ratios it is important to always search for both to know what type of problems you are dealing with. Chloride can cause problems at much lower concentrations than sodium, with just chloride concentrations above 20-30 ppm already causing very substantial issues for a wide variety of plants. If you have chloride it is wise to consider this when gauging the concentration of the other anions in solution as their concentration will need to be increased to account for the presence of this ion.

As in the case of sodium there is not much you can do to decrease the amount of this ion in solution since almost all chlorides are soluble. Some zeolites – like clinopitolite – might be able to remove some of these ions from solution but the most effective method if your water contains an important concentration of chloride is to use a reverse osmosis machine. If this is not possible – due to costs or water availability – then the best chance you have is to try to increase anion concentrations to try to compensate for chloride absorption. However this will not work if the Cl concentration is very high as the osmotic pressure will be too high for the plants to handle after compensating.


Some things you should know about sodium in hydroponics

Sodium is a ubiquitous element, you can find it in your tap water, in the sea and in most eatable foods. It is also necessary for animal life where it plays a key role in many biological processes. However – despite its overwhelming abundance – sodium is in fact not required for plant life in general (although some species, like C4 plants, do require it in small measure), meaning that it can act in a detrimental manner when present in significant quantities in hydroponic culture. Today I want to talk about what problems sodium can cause, how they can be attenuated and how we can deal with it in hydroponic crops.

So what is the problem with sodium? Sodium in its cation form (Na+) is an extremely soluble ion with an ionic radius that is intermediate between those of lithium and potassium. Being from the same group it chemically behaves in a similar way to these two elements and can therefore act in a similar manner when in contact with plants. Sodium – when present in large enough quantities – will enter plants in significant quantities and replace potassium in some biological roles. Although this might work in your favor when potassium is scarce it does not replace it very well and ultimately costs you dearly in terms of plant growth when compared to plants grown without sodium. You can read this 1976 review for some good information about some general effects of sodium on plants.

Since sodium is so ever-present it is a significant concern in agriculture. This is a reason why there are so many salinity studies – which is what the abundance of salts like sodium chloride is usually called – often aimed at finding ways to attenuate the effects of sodium to make plants grow effectively under high salinity conditions. This is not because people will add things like table salt to agricultural crops but because many areas around the world simply don’t have a choice and need to deal with higher salinity conditions. Things like additives, substrates, irrigation cycles and light treatments are investigated to figure out how they affect plant behavior under these conditions. For example this recent study sought to find out if silica nano-particles could help with this problem (and they do!).

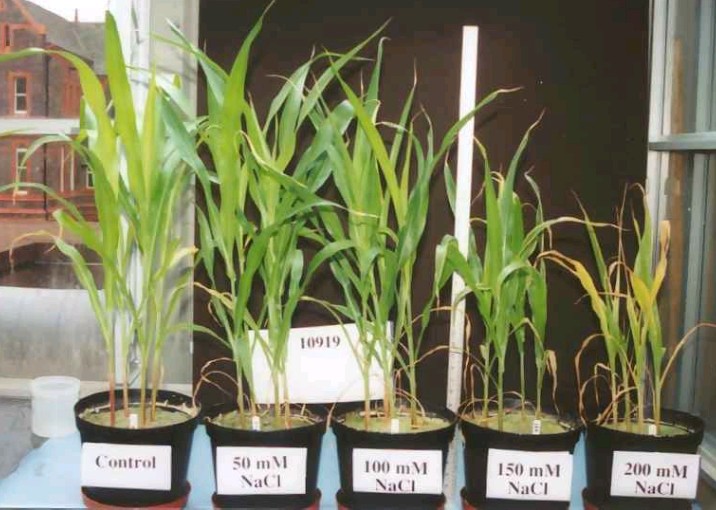
In your hydroponic crop sodium might be an important concern in two main ways. The first is if your water source contains a significant amount of sodium. In general sodium starts to be worrisome above 5 mM which is around 120 ppm which is the point where it can start to significantly affect yields and growth. However sodium even at 12 ppm can start having some micro-nutrient like effects, but these can be mostly beneficial in flowering plants like tomatoes and peppers, even increasing fruit quality when given in moderation (see here). However many plants are resistant to even moderate levels of sodium if these are not kept for too long so if your source water has something like 20-60 ppm of sodium (common in the US), you shouldn’t really worry too much about it. In reality huge problems usually start at around 75mM  of NaCl which is closer to 1725ppm of Na, although with some Na sensitive crops this might be much lower (like lettuce where 100ppm is already very detrimental to growth).

The second problem you might face only happens if you have a system that recirculates nutrient solution. Since sodium is not absorbed so readily by plants it can easily accumulate in a nutrient solution that is recirculated for a significant period of time. During one month of operation a 1 gallon per plant deep water culture system can increase the concentration from tap water 5 fold. This presents a problem since this implies that a hydroponic system that initially had 50 ppm of Na can easily end up with 250 after a single month of solution recirculation. This poses a limit to the life of a nutrient solution, even if other nutrient concentrations are adequately controlled through routine lab analysis. This means that if you want to keep solutions for longer than a few weeks you probably need to use reverse-osmosis water to avoid this problem — although more about the issue of solution life in a future post.

In the end sodium is an element that might be good to have in small measure in most cases, if you are growing C4 plants – like maize or sugar cane – then it is essential in a small amount (20-60 ppm) but you will want to avoid having sodium in any bigger amount or it can start to affect your growth. For plants where sodium isn’t biologically necessary it can still provide some useful supplemental roles but in this case it might be best to keep it close to micro-nutrient levels, at 5-15 ppm. However if you are growing a halophilic plant – like say swiss chard – then you might want to have even more than 1000ppm of sodium to increase your growth (see here).


Using UV sterilization in your recirculating hydroponic crop

In general most growers want their hydroponic setups to remain fairly sterile. This is because maintaining a sterile environment discourages problems such as algae growth and can eliminate bacterial and fungal problems even before they appear. This is especially important in recirculating hydroponic setups where algae can cause important nutrient balance issues within hydroponic solutions and root pathogens can spread very quickly across an entire hydroponic operation. Today we will be talking about one of the least invasive methods to maintain sterility within a hydroponic solution, UV light.

This days hydroponic growers have access to a wide variety of in-line UV lamps that can be used in all hydroponic system sizes. An inline UV lamp like the one above – which uses 18 Watts of power – can be used to effectively sterilize at a 750 GPH flow rate and can therefore provide appropriate sterilization for even moderate system sizes of 200-300 gallons. Larger inline setups also exist but if you cannot find them there is also no reason why you cannot use several of these – each one with its own pump – in order to maintain an even larger reservoir sterilized.

Research has also shown that UV light sterilization is effective in reducing bacterial and fungal populations (see here). But this research also shows that the use of UV lights also affects native bacterial populations so if you’re using any type of beneficial microbes these will need to be systematically replenished to compensate for their loss due to the sterilization system. There have been some reports of 99.99% of pathogen inactivation in water in hydroponic crops when using adequate doses of UV radiation, so this is definitely a good way to keep pathogens at bay, even if it can somewhat compromise root bacteria populations.

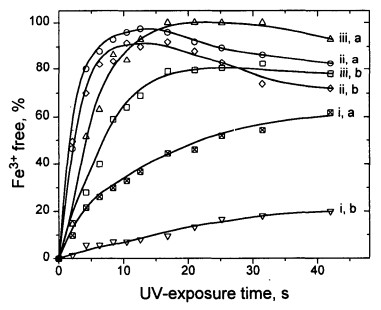
Iron stability has also been an important concern in UV sterilization for a while. This is because UV irradiation of chelated iron species can destabilize and destroy the chelate, leading to non-chelated forms of iron that can much more readily precipitate from solution. The image below – taken from this article – shows the degradation of 3 different Fe chelates at pH values of a (3.0) and b (6.0) as a function of time. Note that the fact that free Fe is generated does not mean that the Fe is precipitated but merely that the chelate has been destroyed, which is the first step before the Fe can precipitate. From this it is clear that different chelates have very different stabilities and in this case chelate i-Fe-EDDHA had the largest stability while other chelates had much poorer stability against UV radiation.

In the end UV sterilization offers many advantages with only a few disadvantages if the formulation is properly prepared and the crop is properly managed. Fe depletion can be a problem if chelates like EDTA and DTPA are used but this problem can be alleviated in great measure by using a chelate like Fe-EDDHA. Micro-organism depletion from the roots can also be a problem if symbiosis are important for yields but this can also be alleviated by the periodic introduction of new beneficial microbe populations within the plant root environment.

However UV is definitely not the only way to go for nutrient solution sterilization. There are other methods that can be used, some of which do not generate the problems that UV has – but different problems – and others that are less generic in their protection, implying that they must be somewhat targeted towards a particular pathogen in order to be effective. You can read this review about nutrient solution sterilization in hydroponics if you want to learn more before I post about these alternatives.