Preparing your own low cost A+B generic hydroponic nutrients at a small scale from raw salts
In a recent post about the cost of custom hydroponic nutrients, I talked about the cost of preparing nutrients equivalent to those of a commonly used brand (general hydroponics Flora series) at a small scale. We saw that the cost savings are not very significant when doing this with small amounts of salts, given that the cost of the salts only drops significantly at larger scales. However there are low cost alternatives to prepare viable hydroponic solutions. In today’s post I want to write about the DIY preparation of hydroponic nutrients and how you can do this from raw salts to arrive at a generic formulation that you can use for flowering plants.
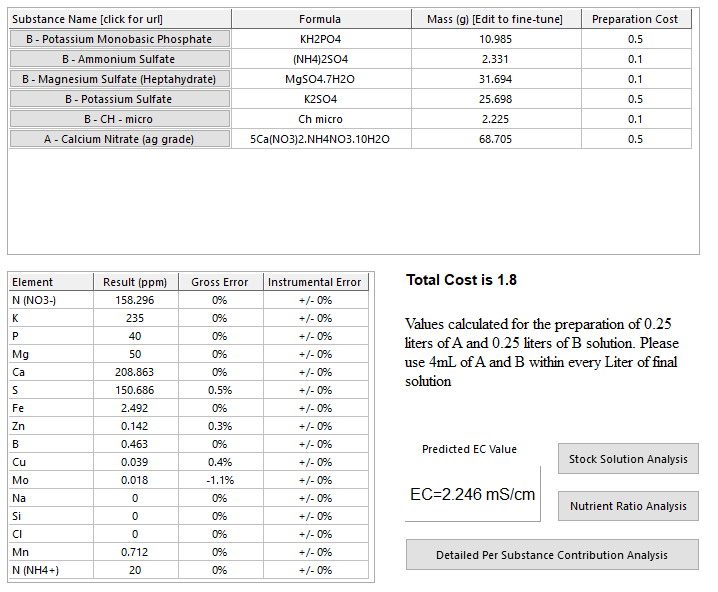
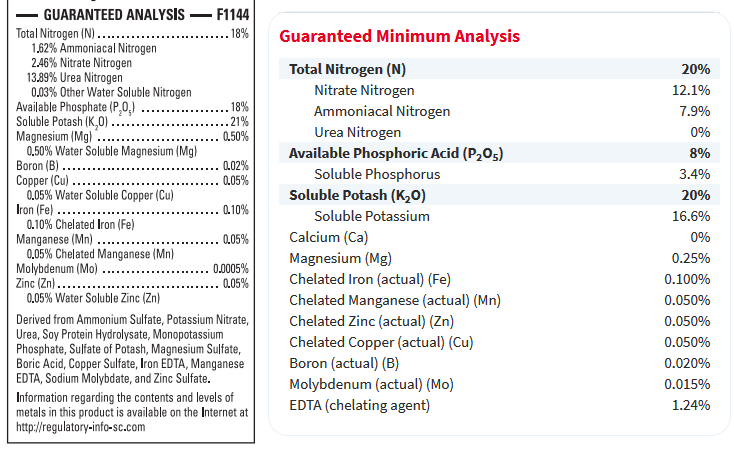
The formulation shown above is meant to be a low cost formulation that is close to a Hoagland solution in as many nutrient concentrations as possible, using as few inputs as possible. The concentrated solution is meant to be prepared in distilled water and it is meant to be used in RO/distilled water as no mineral contributions from the incoming water have been taken into account for its making. The solution is prepared at a 250:1 concentration factor, meaning that a gallon of A and a gallon of B can be used to prepare 250 gallons of final nutrients. This is a concentration factor pretty similar to that of the General Hydroponics Flora series, with an intended dosage of around 15mL/gal of A + 15mL/gal of B. At this dosage the EC is expected to be around 2.2 mS/cm (but this should be experimentally determined!). With 250mL of concentrated solution you can prepare up to 62.5L of final solution (~16.5 gallons).
Note that I have decided to use a “chelated nutrient mix” instead of preparing a solution adding micros one-by-one, as this is not very convenient for people new to nutrient solution preparation, plus, some micros are only available in relatively larger quantities that are unnecessary to store for someone who is only interested in the preparation of small amounts of nutrient solution. The above preparation has a cost of around 25 USD/(gal A+ gal B), which is less than one third the cost of one gallon of Flora series. This cost will be significantly lower if you buy the fertilizers in larger quantities and/or if you buy all the micros and weight them independently.
To prepare this accurately at a small scale – as shown in the image above – you will need the following materials and chemicals:
- Class A Volumetric Flask (250mL)
- Beaker set
- A scale adequate for this range (+/- 0.01g , max 500g)
- Customhydronutrients chelated micro mix
- Calcium nitrate
- Ammonium sulfate
- Epsom Salt
- Monopotassium phosphate
- Potassium sulfate
- Distilled water
- air-tight 250mL Glass container for storage
You can follow this process to prepare the nutrients:
- Prepare a clean and dry 250mL beaker, wash with distilled water (no soap)
- Weight each raw salt on your scale, transfer to the beaker (use distilled water as necessary to ensure everything is transferred)
- Add more water and heat – if necessary – to ensure everything is dissolved (add less than 200 mL of water)
- Transfer the liquid to the volumetric flask (use distilled water as necessary to ensure everything is transferred)
- Take to the final volume using distilled water and homogenize
- Transfer to the final storage container
I have also made a video to show you how this entire preparation process is carried out, which I will be sharing shortly! Note I used a potassium sulfate I had previously purchased, which was of significantly low purity (mined potassium sulfate), the link above is for a refined potassium sulfate source, which should give you significantly less problems than it did for me and lead to higher quality solutions (my B solution was cloudy and contained some solids, which were impurities from the potassium sulfate).
If you want to prepare these solutions at a larger scale, then you will face other problems. For example how to accurately measure the final volume of these solutions. Lines in tanks and buckets are terrible volume indicators, flow meters also are also not enough since the salts take a very significant amount of the volume as well (remember we care about the volume of water+salts!). How to properly mix, homogenize, heat and dissolve larger amounts of solution is also not trivial. These are all problems we will be discussing in future posts and videos!