Calcium EDTA and its problems in hydroponics
Calcium is mainly used in hydroponics as calcium nitrate, given that this is a very soluble and abundant form of calcium. However this is not the only way calcium can be fed to plants and a myriad of other calcium sources exist. Among this we find calcium sulfate, calcium chloride, calcium hydrogen phosphate, calcium citrate, calcium gluconate and calcium EDTA. This last form, a chelate of calcium with EDTA, is one of the most cheaply available forms of chelated calcium but carries with it some substantial problems in hydroponic culture. In this article we are going to talk about Ca EDTA, its advantages and challenges when used as a supplement for calcium in hydroponics.
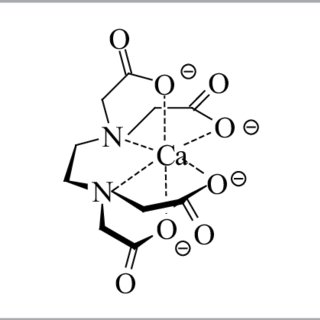
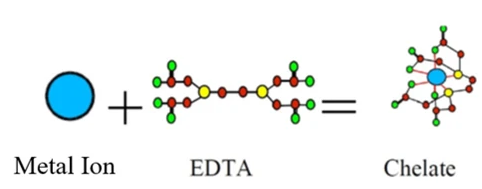
When talking about Ca EDTA we should first understand that this is not simply a calcium ion with an EDTA molecule wrapped around it. In reality, the product we purchase as Ca EDTA, that contains 9.7% Ca by weight, is actually represented chemically as C10H12O8CaN2Na2·2H2O. The Ca EDTA product is actually four parts, a few waters of crystallization, the Ca+2 cation, the chelating agent anion that wraps around it (EDTA-4) and two sodium cations, Na+, that are used to counter the two excess negative charges coming from the Ca EDTA (which we should more accurately call (CaEDTA)-2). When adding Ca EDTA we are actually adding four things, a little water, Ca, EDTA and Na. Most importantly Ca EDTA is in reality 12.15% sodium, meaning you’re adding more Na than you’re adding Ca when you use it.
Because of the above, thinking about Ca EDTA as any significant portion of a plants Ca nutrition is going to be a problem. Adding 100 ppm of Ca through this chemical would imply adding more than 100 ppm of Na. This addition of sodium can start to be heavily detrimental to plants as higher and higher values are reached (read my article on sodium in hydroponics to learn more). Although there is not much in the way of scientific literature using Ca EDTA, we do find some reports talking about heavy toxic effects at concentrations near 2.5 mM (940.7 ppm), which would contribute around 90 ppm of Ca to a solution.
Another important aspect to consider is the EDTA molecule itself. The EDTA chelate is not passive by any means and is not covalently attached to the Ca, so can easily move away. Since it binds pretty weakly with Ca, it will want to exchange Ca with anything else that seems more attractive to it. This poses an important problem when applying it in solution, as the EDTA in Ca EDTA might dissociate from Ca and attach to another ion that it finds more attractive, it prefers heavy metals so this can actually cause extraction of things like lead from the media. This might be an important consideration when used in cases where the media might contain significant amounts of heavy metals.
Yet another interesting issue – that I haven’t seen mentioned anywhere else and only know experimentally – is that the actual CaEDTA-2 anion can form insoluble salts with Ca itself. This means that you can actually precipitate Ca(CaEDTA) in solutions that are highly concentrated in both ions. This is an important reason why concentrated solutions of Ca EDTA and Ca nitrate are very hard to prepare right, because as soon as you pass the solubility limit of Ca(CaEDTA) you will start to see it crystallize out of solution. Many people wonder why something is precipitating out of a solution made of two very soluble Ca salts, the reason is that Ca EDTA is not a neutral entity but can actually form a salt with free Ca. The Ca EDTA definitely requires its own concentrated solution most of the time.
So why would anyone use CaEDTA given the above set of very important problems? There are a some advantages to it that make it a good salt for some applications, particularly foliar sprays. The first is that it is not going to precipitate easily out of solutions because of anions, so it can remain at a high concentration with anions that would normally precipitate as Ca salts in the presence of free Ca. This can be interesting in the case of some anions, like salicylates, that are often used as plant growth promoters (you can see this specific use in this paper). It is also one of the only forms of Ca that is taken in by the plant as an anion, so it is Ca that can get into the plant without having to compete with other cations in their transport channels. There are therefore some cases where Ca can be used very successfully in foliar applications (1).
Although there might be some niche applications for CaEDTA, particularly allowing some experiments that would be impossible with regular Ca salts, there are also some very important issues with its use in hydroponic culture. If you’re contemplating using it, I would suggest you carefully consider its chemistry in solution and interactions with other substances that will be with it, particularly in stock solutions. You should also consider the amount of sodium being added and preferably avoid using it in feeding solution applications unless you have carefully considered all of the above and its advantages are more important for your particular use case.