Five things that will damage your pH probes
Since pH is one of the most important variables to control in hydroponic culture almost all hydroponic growers have and use pH probes. There are however several things that can go wrong with these probes due to the very nature of the sensor and the way in which other substances interact with it. Today we will learn about some of the worst things that you can do to your pH probes and how you can potentially avoid these issues.
–

–
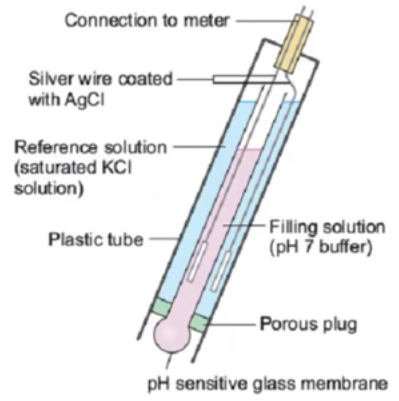
1. Let them dry. These probes are made from glass and the readings depend on the potential difference between the inside and outside surfaces of the sensor. These are determined mainly by pH since hydronium (H3O+) ions interact strongly with the glass surface. For measurements to be accurate the surface needs to be in equilibrium with the media that is being measured. If you let the electrode dry then the hydration of the surface will be lost and the equilibrium state will be much harder to achieve (a dry probe should be placed in a KCl solution for at least 4 hours before being used). Any junctions within the probe might also dry which will require further stabilization before the probe can be used . Dry pH probes are therefore a big no no.
2. Keep them in water. Although keeping pH probes in water is better than letting them dry this has a similar effect in that it alters the composition of the glass with time. Since the solution around the probe is much more diluted, with time ions in the glass will have no problem migrating away from the probe, creating defects within the glass that will mess with your sensor’s calibration. Ideally you will want to store your pH probes in a concentrated KCl solution (usually around 150-300g/L) which will prevent any of these migration effects and will ensure that your probe remains stable in the longer term. If you buy KCl you can use distilled water to prepare your own pH probe storage solution.
3. Measure very basic solutions. Since pH probes are made of glass and glass is mainly made of silicates this means that basic solutions will tend to react with your pH probe. When the pH goes above 10 a pH probe will start to dissolve in solution, completely altering the surface and making the sensor lose calibration very quickly. In general avoid measuring the pH of any solution above 10 so that this effect can be kept to a minimum.
4. Measuring solutions with chemicals that react with glass. Besides basic solutions – where hydroxide ions dissolve glass – there are a variety of substances that can affect the performance of pH probes by reacting with the glass. This includes solutions containing silicate species and solutions containing fluoride ions. If the solution has ions that can react with glass then the pH probe’s lifetime will be diminished and much more frequent calibration will be required. Try to avoid long term measurements of solutions containing large amounts of these ions and beware that weekly calibration might be necessary.
5. Not cleaning the probe. When measuring solutions such as hydroponic nutrient solutions the pH probe is usually subjected to an environment filled with potentially microorganism contaminants. If the probe is not properly cleaned then microbes can form a biofilm over the glass that will seriously affect the accuracy of pH readings. A probe can be cleaned with a bleach or hydrogen peroxide solution to remove these contaminants but the probe will then need to be recalibrated as the film will have effectively changed the glass surface to some extent.
–
–
Having pH probes that give accurate reading for a long time is not a difficult task if you take proper care of your sensors. Storing them adequately, ensuring they are not exposed to harmful conditions and cleaning them ensures that they will last for a much longer time. IF you keep track of your pH sensor calibrations you might notice changes in the calibration slope – as in the first image in this post – which indicates a loss of sensor sensibility (the slope becomes less pronounced). You can use a sensor until around 20% of the sensor’s sensibility is lost, time after which you’ll need to buy a new probe.
There are also several sensors that can be used for long term continuous measurements – which are made in a much more robust manner – we will talk about industrial quality and in-line sensors in a future post.