I’ve written several articles in the past about how to characterize concentrated hydroponic nutrient solutions using simple yet highly accurate small scale methods. I have now released a video showing how this is all done in practice, using the B solution I showed how to prepare in a previous video.
How tap water affects your hydroponic nutrient formulation
Tap water is often the most reliable source of water for hydroponic growers. However, especially in the North America and Europe, tap water can contain a significant amount of dissolved solids. These substances can fundamentally affect the properties of the water and require adjusting the nutrient formulation in order to achieve proper nutrient concentrations in the final nutrient solutions. In this post I’m going to walk you through some of the most important considerations when dealing with tap water and how you should adjust your nutrient formulations to make sure that the final nutrient concentrations are adequate for plant growth.
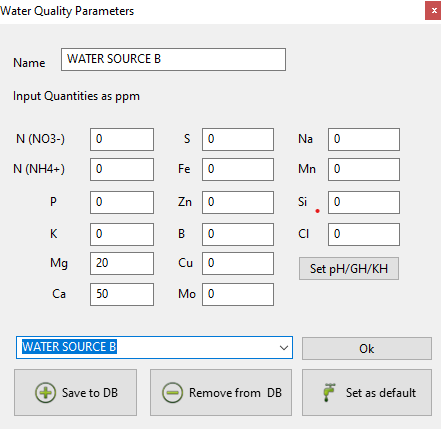
Hydrobuddy allows you to set water quality parameters to ensure they are taken into account within your calculations
There are four important factors to consider when adjusting a nutrient formulation to your tap water.
Dissolved nutrients. Tap water often contains nutrients that are used by plants. The most common ones are Calcium, Magnesium and Iron. It is often fundamental to adjust your nutrient formulation to account for their presence. If you are using HydroBuddy to prepare your nutrient formulations you can use the “Set Water Quality Parameters” dialogue to introduce the ppm concentrations of these nutrients so that they are properly added when considering your nutrient targets. This will mean that less Ca, Mg and Fe will be added from salts, because the program will assume some will come from the water. An important fact to consider is also that the Ca, Mg and Fe concentrations in the water will tend to change with the seasons, as hotter temperatures means that underground limestone/dolomite deposits will dissolve more and therefore lead to more Ca/Mg rich water. Usually I will advice people to get two analysis – one in August, one in February – so that they can know the two extremes their formulation will be at and adjust accordingly through the year depending on the temperature of the incoming water.
Alkalinity. Your water will also contain a substantial amount of carbonates and will tend to be basic due to this reason. It is often easiest to take the amount of moles of Ca plus the moles of Mg in the water and discount this by the moles of Sulfur, then calculate how much moles of acid you will need to neutralize this amount. This makes the assumption that all Mg and Ca in the water are carbonates, except for the amount that are present as sulfates. Knowing how much moles of acid are needed to neutralize this you can now calculate how much ppm of S, N or P – depending on the acid you are going to be using – will take to neutralize the water and set this into the “Set Water Quality Parameters” box in HydroBuddy. This will account for the acid addition that will be needed to remove all alkalinity from the water when you prepare the nutrient solution. Note that although HydroBuddy contains fields to set pH/gH/kH within the program, it actually does not take into account any of these values when calculating compensations (these are just there to store for reference).
Dissolved non-nutrient minerals. There can be a lot of minerals dissolved in the water that are not nutrients, which is why a complete chemical panel of the water is required if the water source to be used hasn’t been evaluated before. In particular Na, Cl and heavy metals are the most important things to look for, as these can very negatively affect your plants. High presence of these substances will often make the water completely unusable for hydroponics, unless some specific pretreatment steps are taken to fix the issue. Make sure that the ppm of Cl are below 50 ppm, Na is below 100 ppm and all heavy metals are within quantities considered safe for human use.
Some typical soft/hard water concentrations of Ca+Mg
Dissolved organics. Perhaps one of the least evaluated aspects of tap water, dissolved organics can be particularly important when considering a tap water source. Substances like chloramines and herbicides can be fundamentally damaging to plant roots. While it is easy to test for oxidative substances like chloramines, normally it is hard to get a lab test for most specific organic substances, reason why the best solution for this problem is adequate pretreatment. Always make sure your tap water runs through both media – sand, ceramic – and activated carbon filters before it is used in your hydroponic crop. An adequate sterilization treatment, UV, ozone, etc, can also help reduce the risk of getting organic molecule contamination.
As you can see, tap water is a complex beast. Not only do we need to account for the nutrients and non-nutrients it can contribute, but we also need to account for its alkalinity and the ways in which these three things might change through the seasons. These complications are the main reason why so many growers end up deciding to use RO water instead – higher reproducibility, less problems – but they are certainly not insurmountable. Creating a hydroponic formulation and infrastructure that accounts for these problems can lead to great cost savings, as you can save both on fertilizers – because the tap water already contains some minerals – and energy.
How much Phosphorous are you adding to your solution to adjust pH?
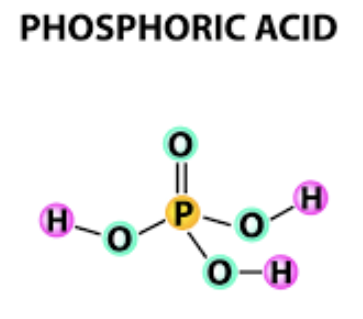
Phosphoric acid is one of the most commonly used pH down agents in hydroponics. This is because phosphoric acid is available in high purity, is easier to handle and has lower cost. However, phosphorous is a significant plant macro-nutrient as well, and substantially changing the level of available P in a nutrient solution can have negative effects on plant growth. Since many hydroponic users – especially those that use hard water sources – might be adding significant amounts of acid to correct their pH level, it is important to estimate how much phosphorous you’re contributing to your solution by adjusting pH and whether this means you also need to adjust your formulation to use less P within it.
Schematic representation of a phosphoric acid molecule.
Phosphoric acid is generally available in concentrations from 30 to 80%, most hydroponic users will use pH-down solutions that are in the 35-45% range, which are prepared to be concentrated enough to last a significant amount of time while diluted enough to allow for easier handling and to be less corrosive. You can use the equation given above to calculate the P contribution in ppm from a given addition of phosphoric acid (you can look up the density for a given concentration using this table). Adding 1mL/gal of 45% phosphoric acid will contribute around ~48 ppm of P to your nutrient solution. This is a very large amount of P considering that the normal range for flowering plants is between 30-60 ppm.
Having an excess of P can be very problematic as phosphorous can strongly antagonize certain nutrients, especially if the pH of the solution drifts up as the plants are fed. At P concentrations exceeding 120 ppm, this element can start to antagonize elements like Fe, Ca and Zn very strongly, preventing their absorption and leading to plant issues. Furthermore, excess of P can often cause problems with P absorption itself – as it can become locked up inside the plant as Fe or Ca salts – which can lead to P deficiency-like symptoms. The most tricky thing about P toxicity issues is that they do not show as certain characteristic symptoms, but mostly as deficiencies for other nutrients or even P itself. The exact symptoms will depend on the VPD and particular environmental conditions as these play an important role in Ca absorption as well.
P contribution in ppm = (Acid concentration in % / 100) * 0.3161 * (volume of addition in mL) * (density of acid in g/mL) * 1000 / (total volume of solution in liters)
Many growers will indiscriminately add P without considering how much was required to adjust pH, which is a bad idea due to the above reasons. A water source that is very hard might require almost 1mL/gal to fully adjust the solution to the pH range required in hydroponics, if a normal hydroponic solution is fed – which will contain all the necessary available P (assuming the user adds very little outside of it) – then this means that the final solution might end up with P levels that will strongly antagonize several nutrients. It’s therefore no wonder that many hydroponic growers in harder water areas suffer from consistent issues with Ca and Mg, many of these cases could be caused by the presence of excess P within nutrient solutions. While many hydroponic hard-water formulations will adjust for Ca and Mg in hard water, they will generally not adjust for P as they cannot know for certain how the user will lower the pH.
If you’re a hydroponic grower using phosphoric acid, keeping track of how much P you’re adding to your nutrient solution to adjust pH is going to be very important. If you’re adding more than 0.25 mL/gal of 45% phosphoric acid – of course adjust accordingly for higher/lower concentrations – then you should consider adjusting your hydroponic formulation to account for this expected P addition and prevent your formulation from reaching abnormally high levels of P.
How to deal with nutrient solution waste in hydroponics
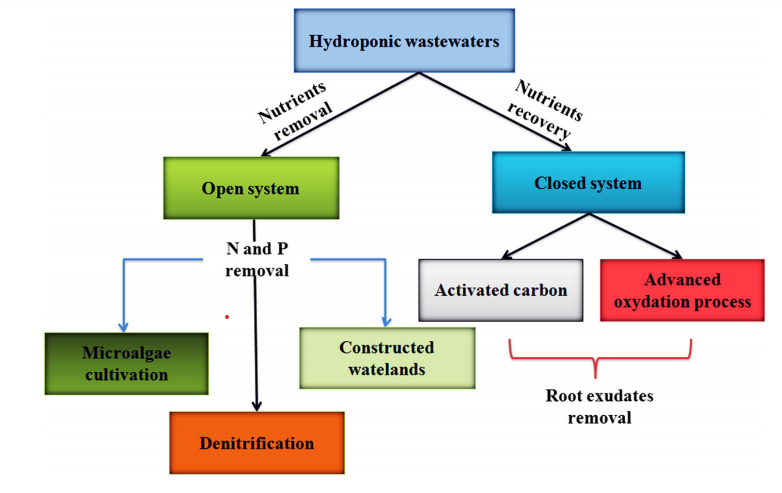
Hydroponic nutrients contain a wide array of chemicals that are fundamentally contaminating to water sources and can heavily contribute to eutrophication. Both run-to-waste and recirculating systems eventually generate significant amounts of waste as nutrient solutions cannot be infinitely used – even when recirculation is done – due to the many ways in which a solution can deteriorate (see here). Because of this reason, it becomes important to figure out ways to treat this waste and ensure its nutritional content is adequately reduced before it is flushed down the drain. In this post I will go through the ways in which this can be done and which might be the more practical implementations for small/medium sized hydroponic installations. A lot of the content below will be based on information obtained from this review article on the subject.
Route for the treatment of hydroponic waste waters depending on whether nutrients are to be removed or recovered (taken from the review mentioned above). Note that eventually solutions need to be changed so the disposal of nutrient solutions cannot be endlessly avoided, even in close systems.
The main problem when dealing with hydroponic waste solutions are the nitrogen and phosphorous content, as these are normally the nutrients limiting plant growth in bodies of fresh water. A hydroponic solution where most N and P is removed can be mostly considered safe for disposal as the contaminating power of the solution will be substantially lower once these two nutrients are removed. This is why most of efforts – both in the academic literature and in real life situations – are focused on the removal of these nutrients whenever nutrient solution is to be discarded. The following are the most tested methods for the treatment of hydroponic waste solutions.
Denitrification using anaerobic organisms. In this process the solution is treated with bacteria that denitrify the nutrient solution by reducing the nitrate to nitrite and then to nitrogen gas. The process usually requires some sacrificial substance for oxidation – such as a thiosulfate or elemental sulfur granules – the process can be quite successful, removing more than 90% of the nitrogen from solutions. An issue however is that a carbon source is also needed – because the bacteria need to be fed – and this is the most important cost for this method of removal. This process also fails to address the removal of phosphorous from solution as it’s mainly focused on the removal of nitrogen.
Artificial wetlands. This is the method with the lowest cost as it makes use of plants to consume all the nutrients left within the solution. It not only addresses N and P but also removes other macro and micro nutrients from the solution, generating the best effluents in terms of mineral content. Usually either common reed (Phragmites australis) or common bulrush (Scirpus lacustris) are planted and fed the waste nutrient solution so that they can process it for a predetermined period of time before the solution is fully disposed of. This process can achieve a removal efficiency greater than 90% for both N and P. Its main disadvantage is the need for a considerable amount of space and issues working when temperatures drop significantly, as these wetlands are not built inside greenhouse environments to keep costs low.
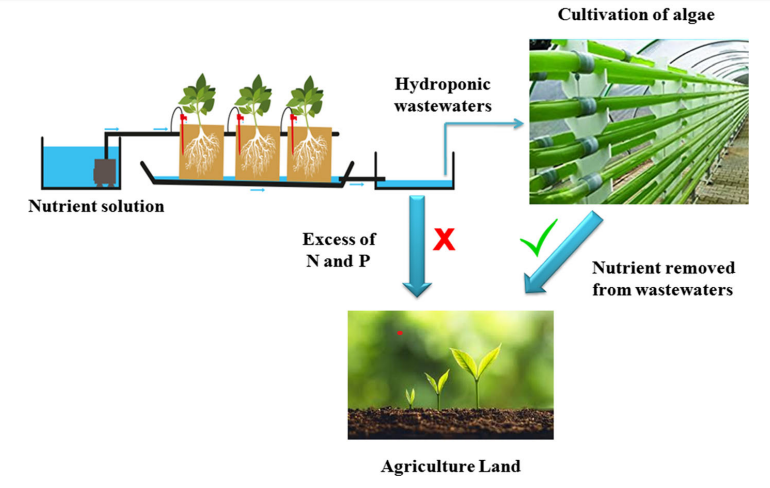
Scheme showing nutrient removal by algae. Taken from the review mentioned in the first paragraph of this post.
Algae. In the same way as artificial wetlands, microscopic algae can also remove N and P from nutrient solutions. The algae are usually grown in transparent tubes, where the waste nutrient solution is run through. The algae can be very efficient at removing these nutrients although they will not be very efficient at removing some micro nutrients from the solution. Efficiencies greater than 90% have been achieved for both N and P removal in the academic literature. These organisms can also then be harvested in order to obtain an additional product for the hydroponic installation, which gives this process the unique opportunity to add value instead of just being an additional cost to the grower. Chlorella vulgaris and Dunaliella salina are the two most studied algae species for hydroponic nutrient solution waste treatment.
Any waste treatment process will introduce an additional cost to a hydroponic crop. However this might not be optional in the future, as regulators in the US and Europe tighten their monitoring of hydroponic waste and restrict the amount of pollutants that might be dumped into the sewage system. With this in mind, it’s good to start thinking about ways in which your hydroponic waste could be treated and what might be the lowest cost method to do so. If you have significant amounts of area then an artificial wetland might be the best method to follow while if you arr short on space, algae will offer you the best method to treat your solution with a small footprint. However algae also have light needs, which means you might need to provide artificial light to them if you do not have the outdoor or greenhouse space to accommodate them.
Polluting is something none of us wants to do and ensuring hydroponic waste effluents are properly and economically treated is going to be important for hydroponic cultivation to be sustainable going forward.
Factors limiting the life of a recirculating hydroponic nutrient solution
Hydroponic systems that use recirculating nutrient solutions can be more efficient in terms of water and nutrient usage. However, despite how good the management of a solution is, there are certain factors that will limit the time that a solution can be maintained without performing a full change of the entire recirculating nutrient solution within the system. By performing actions to attenuate some of these factors the life of the nutrient solution can be increased but trying to keep a nutrient solution endlessly is often impractical, both from a technical and economic perspective. In today’s post I will talk about the factors that limit the life of a recirculating nutrient solution and some of the actions that can be taken to increase the life of the solution.
Selective nutrient uptake. Plants will uptake some nutrients significantly faster than they do others. This will lead to a substantial accumulation of certain nutrients within the solution if nutrients are replenished to keep the EC of the solution constant at constant volume. Most commonly phosphorous will tend to accumulate within the solution. This is because plants will uptake this nutrient significantly slower than the others, while it will be replenished in full strength every time nutrients are added. This will tend to increase the ratio of phosphate to other nutrients, eventually causing phosphorous, calcium and magnesium issues within the solution. Micronutrients will also be replenished more than they are consumed and micros like Molybdenum and copper can dangerously accumulate in solutions that are kept for long periods of time (months).
The above is the main reason why nutrients are often replaced every 2-4 weeks in recirculating hydroponic setups. Chemical analysis can help expand this time – by allowing the grower to selectively replace only the things that have been taken – but this requires growers to have experience in the calculation and creation of nutrient formulations and to be able to effectively adapt the nutrients as required.
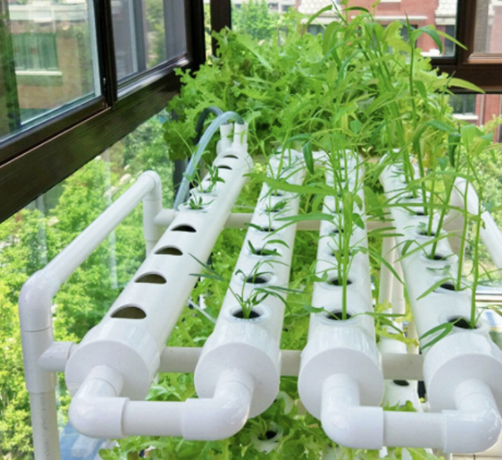
A small scale, recirculating hydroponic crop
Contamination by pathogens. Nutrient solutions will get contaminated by external pathogens as they recirculate and come into contact with the media and the air. This contamination with pathogens might grow to the point that plants start developing disease, which can lead to substantial losses as diseases are spread incredibly efficiently within recirculating nutrient solutions. Potential solutions such as ozone and UV filtration can help eliminate the pathogens, but these oxidative actions will also destroy important aspects of the nutrient solution, such as the chelating agents that are used to wrap around heavy metal ions. This means that – as you destroy pathogens – you will lose heavy metal availability as it will become easier for the free metal ions to precipitate under this circumstances. When using in-line UV or ozone in a reciruclating environment it often becomes necessary to be careful with the analysis and replenishing of chelated heavy metals, especially iron.
Plantroot system contributions (exudates). The plants will also contribute chemicals to the nutrient solution, which will increase both the carbon content and the biological activity of the nutrient solution. These substances can severely impact the growth and development of the plants as well, as these exudates can contain hormonally active molecules that trigger biological processes within plants. You can eliminate most of these molecules by the use of carbon filters and oxidative sterilization processes but this will cause some of the same issues mentioned in the previous paragraph about pathogen contamination. Carbon filters will also need to be checked and replaced regularly otherwise they will just fill up and become ineffective.
Accumulation of non-nutrient substances. Some ions that are added with water will not be used as nutrients and will just tend to accumulate in a nutrient solution until they become poisonous to plants. The most important accumulation problems are related with sodium and chloride in regions where water contains a significant amount of these ions (like Southern Europe, see here). This is problematic because you will always tend to add these ions with new water additions, so you have limited power to control their accumulation. This might require the use of reverse osmosis systems to add water that contains low levels of these contaminants or – often way more economically – will force the replacement of the solution at some point. Note that poisonous heavy metals – like As, Hg, Cd – can also accumulate with time, reason why the life of a nutrient solution should always be limited, regardless of the efforts made to never replace it. Impurities in your salt inputs can also play an important role in contributing with this non-nutrient accumulations.
I hope the above serves as a good explanation of the common factors that limit the life of a recirculating solution in hydroponics. Maintaining a recirculating nutrient solution is not just “adding water with nutrients to top it off” or “add nutrients to maintain a certain EC”, it requires a substantial amount of care in the evaluation of the nutrient evolution as ions accumulate, other are used and the plants themselves also contribute their own organic molecules to change the makeup of the nutrient solution. In most cases, the solution to just “change the solution every 2 weeks” is just the most economically viable answer but this can be undesirable if both water usage and contamination of water resources wants to be minimized. With good management, solution lifetimes can often be extended to 8-16 weeks, but going beyond that can be risky due to aspects of ion accumulation that are hard to control (as those mentioned in the last problem).
Preparing your own low cost A+B generic hydroponic nutrients at a small scale from raw salts
In a recent post about the cost of custom hydroponic nutrients, I talked about the cost of preparing nutrients equivalent to those of a commonly used brand (general hydroponics Flora series) at a small scale. We saw that the cost savings are not very significant when doing this with small amounts of salts, given that the cost of the salts only drops significantly at larger scales. However there are low cost alternatives to prepare viable hydroponic solutions. In today’s post I want to write about the DIY preparation of hydroponic nutrients and how you can do this from raw salts to arrive at a generic formulation that you can use for flowering plants.
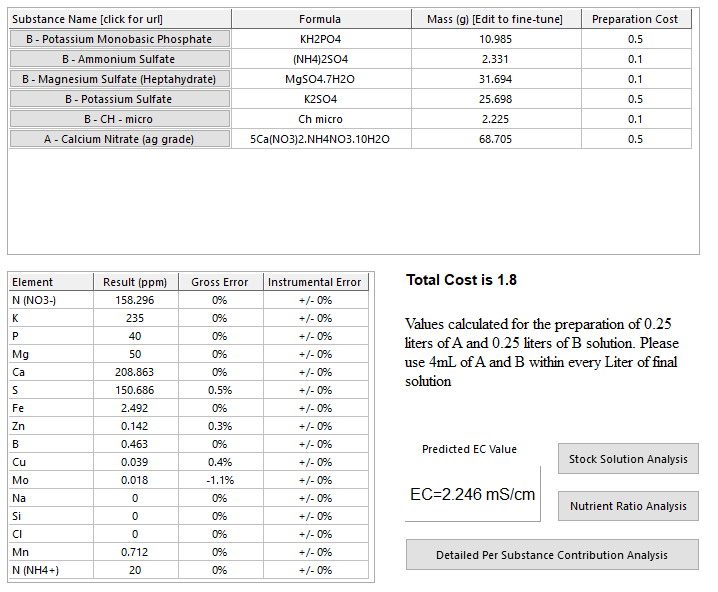
Generic A+B formulation prepared using
The formulation shown above is meant to be a low cost formulation that is close to a Hoagland solution in as many nutrient concentrations as possible, using as few inputs as possible. The concentrated solution is meant to be prepared in distilled water and it is meant to be used in RO/distilled water as no mineral contributions from the incoming water have been taken into account for its making. The solution is prepared at a 250:1 concentration factor, meaning that a gallon of A and a gallon of B can be used to prepare 250 gallons of final nutrients. This is a concentration factor pretty similar to that of the General Hydroponics Flora series, with an intended dosage of around 15mL/gal of A + 15mL/gal of B. At this dosage the EC is expected to be around 2.2 mS/cm (but this should be experimentally determined!). With 250mL of concentrated solution you can prepare up to 62.5L of final solution (~16.5 gallons).
Note that I have decided to use a “chelated nutrient mix” instead of preparing a solution adding micros one-by-one, as this is not very convenient for people new to nutrient solution preparation, plus, some micros are only available in relatively larger quantities that are unnecessary to store for someone who is only interested in the preparation of small amounts of nutrient solution. The above preparation has a cost of around 25 USD/(gal A+ gal B), which is less than one third the cost of one gallon of Flora series. This cost will be significantly lower if you buy the fertilizers in larger quantities and/or if you buy all the micros and weight them independently.
To prepare this accurately at a small scale – as shown in the image above – you will need the following materials and chemicals:
You can follow this process to prepare the nutrients:
Prepare a clean and dry 250mL beaker, wash with distilled water (no soap)
Weight each raw salt on your scale, transfer to the beaker (use distilled water as necessary to ensure everything is transferred)
Add more water and heat – if necessary – to ensure everything is dissolved (add less than 200 mL of water)
Transfer the liquid to the volumetric flask (use distilled water as necessary to ensure everything is transferred)
Take to the final volume using distilled water and homogenize
Transfer to the final storage container
I have also made a video to show you how this entire preparation process is carried out, which I will be sharing shortly! Note I used a potassium sulfate I had previously purchased, which was of significantly low purity (mined potassium sulfate), the link above is for a refined potassium sulfate source, which should give you significantly less problems than it did for me and lead to higher quality solutions (my B solution was cloudy and contained some solids, which were impurities from the potassium sulfate).
If you want to prepare these solutions at a larger scale, then you will face other problems. For example how to accurately measure the final volume of these solutions. Lines in tanks and buckets are terrible volume indicators, flow meters also are also not enough since the salts take a very significant amount of the volume as well (remember we care about the volume of water+salts!). How to properly mix, homogenize, heat and dissolve larger amounts of solution is also not trivial. These are all problems we will be discussing in future posts and videos!
How to correctly prepare dilutions from concentrated solutions in hydroponics
Accurately preparing dilutions of concentrated nutrients is no trivial task. For example, if you want to prepare a 10 gallon solution at “2mL per gallon” of a hydroponic nutrient, ensuring that you’re adding 20mL and actually having a final volume of 10 gallons is not trivial, given the inherent errors in the measurement of both the transference volume and the final volume. If you’re using non-standardized methods to measure volume (buckets, gallon jugs or “tank markings” to measure volumes), you could be off by +/-20% the volume you want. However you can accurately prepare dilutions at whatever volume you want by first measuring the conductivity of an accurately prepared solution at a small scale. A solution prepared using calibrated volumetric material.
The cost of reproducing the label of a commercial hydroponic fertilizer with raw salts at a small scale
Creating your own hydroponic nutrients can dramatically change the amount of money you spend in fertilizers per crop cycle. Commercial pre-blended hydroponics nutrients carry significantly high margins, so making your own nutrients can often save you a lot of money down the line. Raw fertilizer salts are not expensive at all – millions of tons of some of them are produced per year – so it is quite possible to save big amounts of money by just preparing the basic fertilizers yourself. But how much money can you save? In this blog post we will be looking at the price points of some commonly used hydroponic nutrients, I am also going to share with you the cost of reproducing the fertilizer composition specified in their label.Note that this is not necessarily going to reproduce the actual fertilizer, since the label information is very often not accurate (read this post to learn more about this), but it can give an idea about the order of magnitude of the cost difference.
Let’s use the General Hydroponics Flora series, which is one of the most popular hydroponic brands use by small growers, as an example. The Flora Series has a cost of 79 USD per one pack of three (total three solution, each one gallon) (I got this price from Amazon US). This includes one gallon of FloraMicro, ona gallon of FloraGro and one gallon of FloraBloom. The summary of the label information for the three fertilizers can be seen in the table below. How much would it cost to recreate a fertilizer that would reproduce this exact label information? (meaning it could be sold with the same composition values).
To make the costs comparable I have used the costs of salts that are directly available for purchase at Amazon US, not including the cost of shipping (I also did not include it for the General Hydroponics products). These costs are therefore for relatively small amounts of the raw fertilizers, which could be realistically purchased and used by anyone, the costs are expected to be lower if salts are bought in bulk (more about this at the end of the post). Also note that the cost per gallon only includes the amount of grams per salt used to prepare each gallon of concentrated solution but does not consider if the minimum purchasable amount is significantly higher than that. The compositions I arrived to are identical to the GH label compositions within +/- 0.1%. I have made reasonable assumptions to make my salt choices, but beware that the reported label concentrations are often purposefully misleading to make any attempts at reverse engineering from them use more expensive inputs.
Element
FloraBloom
FloraMicro
FloraGro
N (Nitrate)
–
4.7
1.75
N(Ammonium)
–
0.3
0.25
P (P2O5)
5
–
1
K (K2O)
4
1
6
Mg
1.5
–
0.5
Ca
–
5
–
S
1
–
–
Fe
–
0.1
–
B
–
0.01
–
Zn
–
0.015
–
Mn
–
0.05
–
Mo
–
0.0008
–
Cu
–
0.01
–
Composition values (in %) from the labels of the FloraBloom, FloraMicro and FloraGro fertilizers from the GH Flora series
For the FloraBloom bottle – the least complicated of the three – I have used 4 different salts to reproduce the formulation, which gives me a final cost per gallon of 22.1 USD. For the FloraMicro I had to use 9 different products, with a total cost of 24.7 USD per gallon of solution. Finally, for the FloraGro I ended up using 6 different salts, with a total cost of 24.7 USD per gallon of solution. Adding all of these up, the total cost to prepare three gallons of fertilizer with the same composition as mentioned in the General Hydroponics labels would be 71.5 USD, which is surprisingly not that big of a saving from the retail cost of 79 USD for the three gallons. At a retail scale, the savings are not very evident, given that we’re purchasing more expensive, small packages of raw salts.
The most expensive fertilizer salt I used had a cost of 12.8 USD/gallon in the FloraBloom, at a retail cost of 0.04 USD per gram of salt. However, if you bought this salt in a larger amount (5 pounds instead of the 1 pound bag in amazon), the cost would drop to 0.01 USD/gram of it, it can drop even more if you buy it at a larger scale (>25 pounds). As the scale grows, so does the drop in the cost of these salts, if you are willing to spend moderately large amounts of money – say 1000-2000 USD in raw salts – the cost of exactly reproducing something like the GH Flora series label composition could go below 10 USD for the three gallons. This shows you that scale is very important when making concentrated fertilizer solutions since the price per gram of fertilizers drops dramatically as we go to larger volumes.
With that said, the biggest savings can be achieved, NOT by copying a commercial nutrient solution’s label, but by instead designing a fertilizer formulation that best feeds your needs and that uses the inputs that make the best sense for your growing situation and budget. This is why I encourage you to think about creating your own formulations by thinking about your needs, rather than attempting to copy something like the GH series, which might be less cost effective and more complicated for a small grower.
Starting a youtube channel to teach chemistry related hydroponic skills
The ScienceInHydroponics blog has been a great place to share my knowledge and experience in hydroponics during the last 11 years. However, the world has changed a lot since then and video has now become easier to produce and a better way to share a lot of practical content. For this reason I have decided to start the Chemisting youtube channel where I will be sharing chemistry related content. For starters this will be mostly about practical skills in hydroponics – things like properly measuring large and small volumes, properly preparing stock solutions, taking care of electrodes, etc – but it will be expanded with videos on other topics that might eventually be outside of the realm of hydroponic culture.
The following is our first video – my wife has been instrumental in creating this channel and the video – where I share the proper technique to prepare a concentrated solution at a small scale. The video shows how to accurately measure volume and weight and how to carry out the transferring processes necessary. Please don’t forget to like, subscribe, share and suggest any topics you would like to see in future videos!
The Scienceinhydroponics blog will continue to be updated frequently though, as I continue to enjoy sharing blog articles with hydroponic growers around the world!
Hardware for building a wifi-connected DIY monitoring/control system for a hydroponic crop
Success in hydroponic systems can be increased by having adequate control over a wide array of different variables. Having automated monitoring and control will mean faster reaction times and provide better information about crop cycles as they happen. Having the possibility to choose the sensors that you require and code the control algorithms yourself will also provide much more flexibility when compared with commercial solutions, although the price can often be higher since you are going to get hardware that has capabilities that will likely exceed the minimal capabilities required to perform the specific setup you will arrive at. In today’s post I want to talk about the hardware I generally use to build a basic DIY monitoring/control system that involves no soldering and allows for easy connections of all sensors. I will talk about each piece, its cost and why/how it’s needed within a basic system.
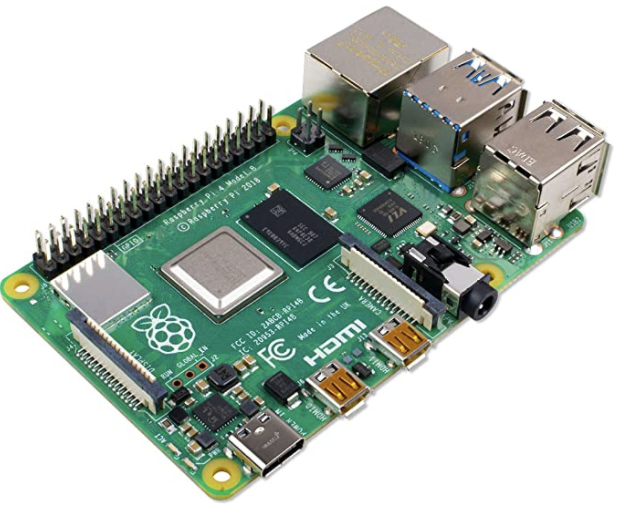
Raspberry Pi 4 – 39.61 USD. This is going to be the computer that will be the brain of the entire operation. The Raspberry Pi will receive information from all the sensors around and will make control decisions that will then be sent to the appropriate control-executing stations within the network, it will also record sensor readings and provide a proper interface for the management staff. Usually I use the raspberry Pi to host the database that contains all the sensor readings, plus the execution of the control algorithms and the hosting of web server that the people who manage the crop can access from their other devices (in order not to have to access the raspberry pi directly all the time).
The raspberry Pi 4 computer. Note that you will need a power supply cable and SD card as well, which are an additional cost to the above.
Arduino UNO WiFi REV2 – 39.96 USD. These arduino boards are going to be the heart of the sensing stations and the stations that execute control actions. They will take sensor readings and send them back to the Raspberry Pi via the wifi network. When I build DIY solutions of this type I usually use the MQTT protocol to communicate between the Raspberry Pi and the Arduinos, for this reason it’s really convenient to have the Arduinos include Wifi themselves, so that additional money does not need to be spent on WiFi chips for them. With the Arduino UNO WiFi REV2 you will have all the WiFi connectivity you need available from the get-go, with the ability to still use all the shields an Arduino UNO can support.
Whitebox labs Tentacle shield – 127 USD. This arduino shield offers you the ability to implement measurement of several different sensors in your hydroponic crop. With this shield you can connect up to 4 different Atlas probe sensors, with all the measurements being properly electrically isolated, allowing you to place all the different probes in the same tank.
Atlas pH kit – 164 USD. This is the pH probe sensor and EZO board that are required to be able to connect an Atlas pH probe to your Whitebox labs Tentacle shield above. This pH probe is of very good quality and will provide good readings even if the probe is immersed for a significant period of time. I have used these probes successfully for constant monitoring of recirculating solution tanks, with the probes having to be recalibrated every few months and so far no probes having to be replaced. However, if you want a probe that will withstand a lot of additional stress, then the industrial Atlas pH probe might be a better choice. The kit also includes the calibration solutions necessary to setup the probes.
Atlas EC probe conductivity kit – 239 USD. This contains the necessary materials to connect an EC probe to the Whitebox Tentacle shield. The kit also includes all the necessary calibration solutions to setup the probe, it is analogous to the pH kit mentioned above.
Gravity IO Expansion shield for Arduino – 8.90 USD. This shield provides you with a lot of additional plug-and-play IO capabilities for your Arduino UNO sensor/control stations. I generally use these shields to be able to easily connect digital/analogue sensors and relays from dfrobot. It is very easy to do and does not require the use of any soldering or proto-boards. When you couple the use of these shields with project boxes you can come up with some very robust and practical DIY implementations that are easy for anyone to create.
The Gravity IO shields are an incredibly versatile tool to connect sensors/relays to an Arduino sensing/control station
Gravity quad motor shield for Arduino – 14.90 USD. Like the above, I generally use these shields as part of control stations where I will be using motors to carry out control actions. This shield can power up to 4 small DC motors, so it is ideal to control small peristaltic pumps like the ones we generally use to move small amounts of concentrated nutrient solutions or pH up/down solutions.
Environmental sensors (Temperature, relative humidity, barometric pressure) BME280 – 15 USD. These sensors are my all-time favorites for measuring temperature, humidity and barometric pressure in hydroponic crops. They have one of the most accurate low-cost chipsets to measure humidity and this DFRobot package is extremely easy to plug into the DFRobot IO shield mentioned above (just plug the connector into a digital input row!).
Analog infrared carbon dioxide sensor – 58 USD. These sensors have been my go-to solution when it comes to measuring carbon dioxide concentrations. They are fairly accurate and can tell you if you are circulating air enough or if your carbon dioxide enrichment is working as expected. I usually equip at least one of the environmental sensing stations I setup with one of these sensors so that I can keep an eye on the crop’s average carbon dioxide level.
Capacitive soil moisture sensor – 14.90 USD. When we measure water content in hydroponic crops we are going to be placing the sensor in contact with highly corrosive and conductive nutrient solutions, so we want to avoid any water content measuring devices that use conductivity. This capacitive sensor has become my choice of sensor for the measuring of water-content, it is really easy to use and calibrate and offers the ability to monitor several different plants due to its relatively low cost.
Ambient light sensor – 2.60 USD. This very low cost sensors are great for telling whether lights are actually on/off based on their inputs. They can also give you a crude measurement of how strong light is – if you are growing under the sun – so they can help you track if shades are needed. There are certainly more elaborate sensor, but this sensor gets the job done for a very low price.
120V, 5A Relay – 2.60 USD. These relays are my go-to choice when having to power low power appliances on-off in a hydroponic setup. They are great to control things like fans and smaller lights. If you want to control larger lamps then I would suggest you use the 16A relays that can handle much larger currents. As with the previous sensors/controls we’ve discussed, these relays can be easily plugged into the Gravity IO shield, allowing for the easy building of relay control stations.
The above are some of the pieces that I will commonly use in a hydroponic crop for systematic monitoring/control. While some of these – like the pH/EC sensors and boards – could be replaced by cheaper equivalents, I prefer to go with more expensive parts that have better electrical isolation and properties. However, a very cool and useful sensor setup can be built with just an Arduino, a Raspberry Pi, a gravity IO shield and a bunch of environmental sensors. Of course the above setup gives the most flexibility but significantly lower cost alternatives are possible if very specific stations want to be built or if the use of very specific sensor configurations is desired (so no gravity shields would be used and the sensors would just be soldered where needed).