Arduino hydroponics, how to build a sensor station with an online dashboard

In a previous post about Arduino hydroponics, I talked about some of the simplest projects you could build with Arduinos. We also talked about how you could steadily advance towards more complex projects, if you started with the right boards and shields. In this post, I am going to show you how to build a simple sensor station that measures media moisture and is also connected to a free dashboard platform (flespi). The Arduino will take and display readings from the sensor and transmit them over the internet, where we will be able to monitor them using a custom-made dashboard. This project requires no proto-boards or soldering skills.
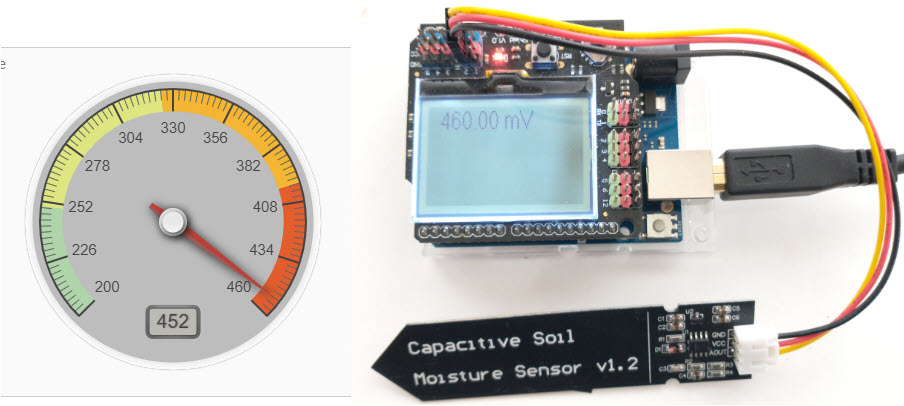
An Arduino Wifi Rev2 connected to a moisture sensor, transmitting readings to an MQTT server hosted by flespi that generates an online dashboard

The idea of this project is to provide you with a simple start to the world of Arduino hydroponics and IoT interfacing. Although the project is quite simple, you can use it as a base to build on. You can add more sensors, improve the display, create more complicated dashboards, etc.

What you will need

For this build, we are going to use an Arduino Wifi Rev2 and an LCD shield from DFRobot. For our sensor, we are going to be using these low-cost capacitive moisture sensors. This sample project uses only one sensor, but you can connect up to five sensors to the LCD shield. Since this project is going to be connected to the internet, it requires access to an internet-connected WiFi network.

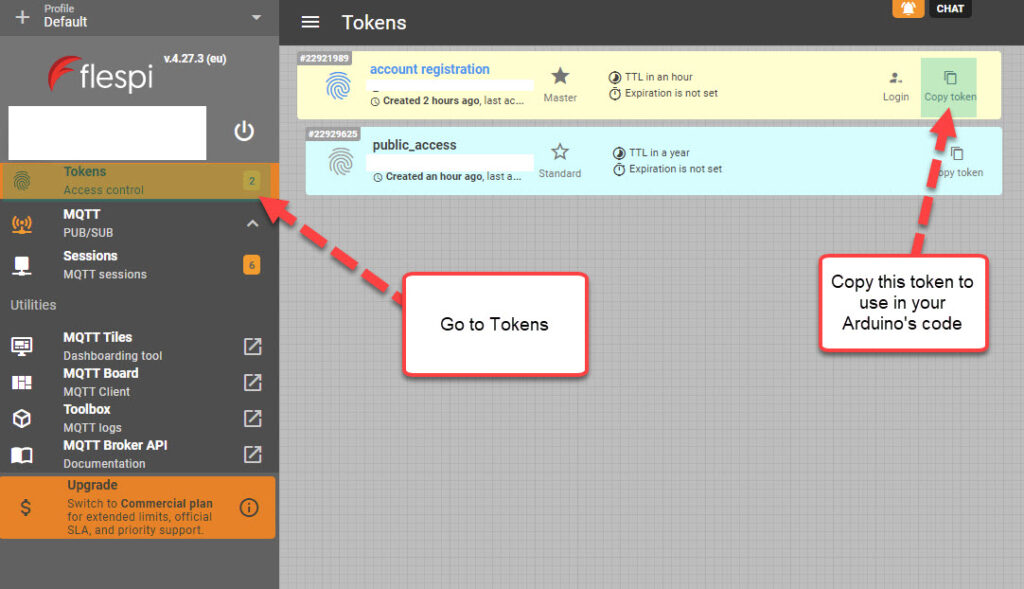
Additionally, you will also need a free flespi account. Go to the flespi page and create an account before you continue with the project. You should select the MQTT option when creating your account since the project uses the MQTT protocol for transmission. After logging into your account, copy the token shown on the “Tokens” page, as you will need it to set up the code.

Copy the token from the “Tokens” menu in flespi

Libraries and code

This project uses the U8g2, ArduinoMQTTClient and WiFiNINA libraries. You should install them before attempting to run the code. The code below is all you need for the project. Make sure you edit the code to input your WiFi SSID, password, and Flespi token, before uploading it to your Arduino. This also assumes you will connect the moisture sensor to the analogue 2 port of your Arduino. You should change the ANALOG_PORT variable to point to the correct port if needed.

#include <Arduino.h>
#include <U8g2lib.h>
#include <WiFiNINA.h>
#include <ArduinoMqttClient.h>
#include <SPI.h>

#define SECRET_SSID "enter your wifi ssid here"
#define SECRET_PASS "enter your password here"
#define FLESPI_TOKEN "enter your flespi token here"
#define ANALOG_PORT  A2

#define MQTT_BROKER    "mqtt.flespi.io"
#define MQTT_PORT      1883

U8G2_ST7565_NHD_C12864_F_4W_SW_SPI u8g2(U8G2_R0, /* clock=*/ 13, /* data=*/ 11, /* cs=*/ 10, /* dc=*/ 9, /* reset=*/ 8);
float capacitance;
WiFiClient wifiClient;
MqttClient mqttClient(wifiClient);

// checks connection to wifi network and flespi MQTT server
void check_connection()
{
  if (!mqttClient.connected()) {
    WiFi.end();
    WiFi.begin(SECRET_SSID, SECRET_PASS);
    delay(10000);
    mqttClient.setUsernamePassword(FLESPI_TOKEN, "");
    if (!mqttClient.connect(MQTT_BROKER, MQTT_PORT)) {
      Serial.print("MQTT connection failed! Error code = ");
      Serial.println(mqttClient.connectError());
      delay(100);
    }
  }
}

void setup() {
  pinMode(LED_BUILTIN, OUTPUT);
  pinMode(4, OUTPUT);
  Serial.begin(9600);
  analogReference(DEFAULT);
  check_connection();
}

void loop() {

  String moisture_string;
  check_connection();

  // read moisture sensor, since this is a wifiRev2 we need to set the reference to VDD
  analogReference(VDD);
  capacitance = analogRead(ANALOG_PORT);
  
  // form the string we will display on the Arduino LCD screen
  moisture_string = String(capacitance) + " mV";
  Serial.println(moisture_string);
  
  // send moisture sensor reading to flespi
  mqttClient.beginMessage("MOISTURE1");
  mqttClient.print(capacitance);
  mqttClient.endMessage();

  // the LCD screen only works if I reinitialize it on every loop
  // I also need to reset the analogReference for it to properly work
  analogReference(DEFAULT);
  u8g2.begin();
  u8g2.setFont(u8g2_font_crox3h_tf); 
  u8g2.clearBuffer();          // clear the internal memory
  u8g2.drawStr(10,15,moisture_string.c_str());  // write something to the internal memory
  u8g2.sendBuffer();          // transfer internal memory to the display

  delay(5000);
  
}

Your Arduino should now connect to the internet, take a reading from the moisture sensor, display it on the LCD shield and send it to flespi for recording. Note that the display of the data on the LCD shield is quite rudimentary. This is because I didn’t optimize the font or play too much with the interface. However, this code should provide you with a good template if you want to refine the display.

Configure Flespi

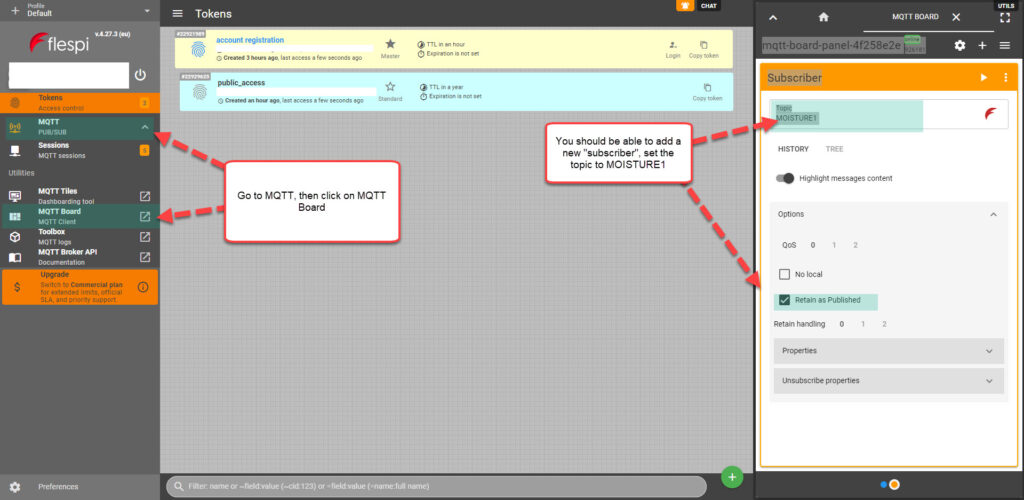
The next step is to configure flespi to record and display our readings. First, click the MQTT option to the left and then go into the “MQTT Board” (click the button, no the arrow that opens up a new page). Here, you will be able to add a new subscriber. A “subscriber” is an instance that listens to MQTT messages being published and “MOISTURE1” is the topic that our Arduino will be publishing messages to. If you want to publish data for multiple sensors, you should give each sensor its own topic, then add one flespi subscriber for each sensor.

Go to flespi and create a new “subscriber”, set the topic to MOISTURE1

Create the Dashboard

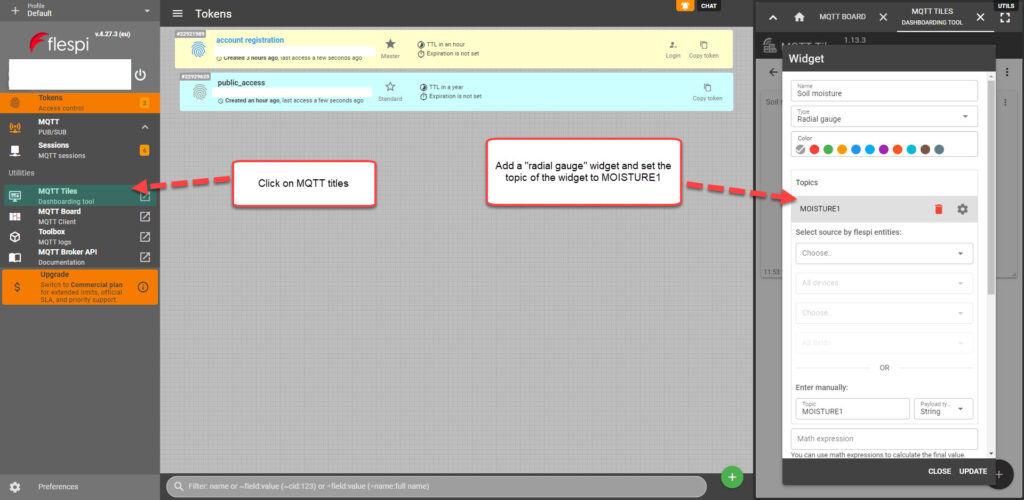
The last step, is to use the “MQTT Titles” menu to create a dashboard. I added a gauge widget to a new dashboard, and then set the topic of it to MOISTURE1, so that its data is updated with our MQTT messages. I set the minimum value to 200; the maximum value to 460; and the low, mid, and high levels to 250, 325, and 400 respectively.

Use the MQTT titles menu to add widgets to a new dashboard

After you finish creating the dashboard, you can then use the “Get link” button, which looks like a link from a chain next to your dashboard’s title. You will need to create an additional token in the “Tokens” menu so that you can use it for the sharing of the dashboard. After you generate the link, it should be publicly available for anyone who is interested. This is the link to the dashboard I created.

Conclusion

You can create a simple and expandable sensor station using an Arduino Wifi Rev2, a capacitive moisture sensor, and an LCD shield. This station can be connected to the internet via Wifi and send its data to flespi, which allows us to create free online dashboards. You can expand on this sensor station by adding more moisture sensors or any other Gravity shield compatible sensors, such as a BME280 sensor for temperature, humidity, and atmospheric pressure readings.

Six things to look for in a Hydroponic sensor data logging system

Data is key. It will help you obtain high yields and improve with each additional crop cycle. Having sensor measurements not only allows you to diagnose your crop at any given point in time but also allows you to go back and figure out what might have happened if something went wrong. With all the commercial offerings now becoming available, it is starting to become harder and harder to evaluate which data logging system might be ideal for you. In this post, I seek to share with you 5 things that I always look for when evaluating data logging systems for a greenhouse or grow room. These are all things that will enable you to store sensor data adequately and take full advantage of it, ensuring you’re not handy capped by a poor starting choice.

Sensor compatibility. One of the first things that I look for is which sensors I can add and what restrictions I might have on sensors that are added to the system. I like to have systems where I can connect any 3-5V analog sensor I want. I also want to be able to connect sensors that use common protocols, like i2c sensors. I also like to know that for things like pH and EC, the boards have standard plugs I can connect to, to make sure I can replace the electrodes given to me by the company with others if I wish to do so. Freedom in sensor compatibility and in the ability to replace sensors with sensors from outside the company are both a must for me.

Expandability. Many of the commercially available data logging platforms are very restricted and can often only accommodate a very small number of sensors. Whenever you’re looking for a data logging solution that will need to be deployed on a medium/large scale, it is important to consider how this implementation can expand, and how painful it would be to make that expansion. Being able to easily add/remove sensors to a platform is key to having a flexible and robust data logging solution.

Wikimedia Commons

Not cloud reliant. It is very important for me to be able to use the system, regardless of whether the computers are online or not, and to have all the data that I register logged locally in some manner. Systems where an internet connection is needed for data logging or where data is not stored locally are both big show stoppers when it comes to evaluating a data logging system. There is nothing wrong with having data backed up to the cloud – this is indeed very desirable – but I want to ensure that I have a local copy of my data that can I always rely on and that logging of data won’t be stopped because there is some internet connection issue. Also bear in mind that if your sensors are cloud reliant you will be left without any sort of data logging system if the company goes under and those servers cease to exist.

Connectivity of sensors is robust. In many of the more trendier new systems sensor connectivity is wireless. This can be perfectly fine if it is built robustly enough, but it is often the case that connections based on WiFi will tend to fail under environments that are filled with electromagnetic noise, such as when you have a lot of HPS ballasts. It is therefore important to consider that if you have such an environment, having most of your sensors connected using cables, or using a wireless implementation robust to this type of noise is necessary.

Have a robust API to directly access your data. Since I do a lot of data analyses using the data from hydroponics crops, I find it very crippling to be limited by some web interface that only allows me to look at data in some very limited ways. I want any data logging system I use to allow me to use an API to get direct access to the data so that I can implement a data structure and analysis the way I see fit. Having your data available through a robust API will allow you to expand the usage of your data significantly and it will also ensure you can backup your data or structure the database in whatever way you see fit. An example of this is sensor calibration logging and comparisons, while commercial platforms almost never have this functionality, having an API allows me to download the data and compare sensor readings between each other to figure out if some sensors have lost calibration or make sure to schedule their calibration if they haven’t been calibrated for a long time.

Ability to repair. When making a data logging choice, we are making a bet on a particular company to continue existing and supporting their products in the long term. However, this is often not the case and we do not want to be left with a completely obsolete system if a company goes under and ceases to support the product they made. I always like to ensure that the systems that are being bought can continue working if the company goes under and that there is a realistic ability to find parts and replace sections of those products that might fail in the future if this were to be the case. Open source products are the most ideal because of this fact.

These are some of my top six priorities whenever I evaluate a commercial data logging solution for deployment. From the above, not being cloud reliant and having a robust API are the most important, while sensor compatibility can be ignored to an extent if the system is only being deployed for a very specific need (for which the sensors provided/available are just fine). Which of the above you give the most priority to depends on how much money you’re going to be investing and how big and robust you want the implementation to be.


The cricket IoT board: A great way to create simple low-power remote sensing stations for hydroponics

When you monitor variables in a hydroponic plant where more than a few plants exist, it becomes important to be able to deploy a wide array of sensors quickly and to be able to set them up without having to lay down a couple of miles of wire in your growing rooms or greenhouses. For this reason, I have been looking for practical solutions that could easily connect to Wi-Fi, be low powered, allow for analogue sensor inputs and be more user friendly than things like ESP8266 boards that are often hard to configure and sometimes require extensive modifications to achieve low power consumption. My quest has ended with the finding of the “cricket” an off-the-shelf Wi-Fi enabled chip that fulfills all these requirements (you can find the sensor here). Through this post, I will talk about why I believe it’s such a great solution to deploy sensors in a hydroponic environment. It is also worth mentioning that this post is not sponsored.

The cricket IoT board by ThingsOnEdge

When I seek to create custom monitoring solutions for hydroponic crops, one of the first requirements that comes to mind is the ability to connect through wifi effectively and be able to deliver the measurements to computers without needing wires. The cricket does this without any modifications, when you power it on it creates its own wifi hotspot that you can connect to, where you use a web interface to configure the device to connect to the normal network.

Besides connecting to the Wi-Fi, the next problem I often face is having the ability to have a proper protocol to communicate between devices. The MQTT standard has been my preferred solution – due to how easy it is to receive and relay information – so I always seek boards that are able to easily hook up to an MQTT server once they are in a Wi-Fi network. The cricket achieves this effortlessly as well, as MQTT is part of its basic configuration, which allows you to connect it with your MQTT server and relay its data right off the bat.

One of the simplest but most powerful applications for hydroponics is to hook up a capacitive moisture sensor to a cricket board and have this relay the data to an MQTT server. You can set this up to even send the data to an MQTT server powered by ThingsOnEdge, so that you don’t have to send the data to your own server. This setup can be battery powered with 2 AA batteries, it can then give you readings for several months, depending on how often you want the sensor to broadcast its readings. You can read more about how to carry out this project here.

A complete assembled device
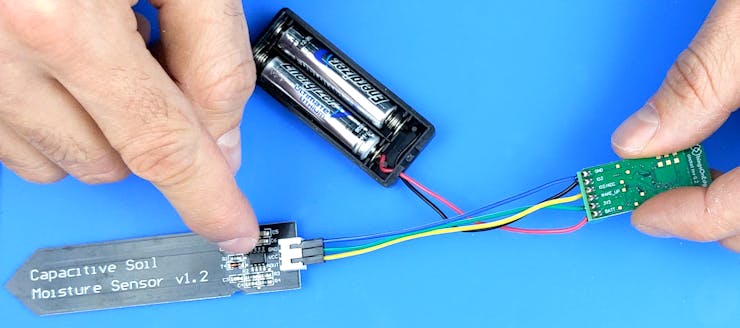
cricket hooked to a capacitive sensor, image taken from here.

One of the disadvantages of the cricket – the main reason why it won’t fully replace other boards for me – is that it only has one analog sensor and one digital sensor input. This means that you’re limited to only two sensors per cricket and you also have an inability to use more advanced input protocols, such as the i2c protocol that is used by a wide variety of sensors. If you lack i2c it means you’re going to miss the opportunity to use a lot of advanced sensors, many of which I consider basic in a hydroponic setup, such as the BME280 sensors (see here why).

Although it is not a perfect sensor, the cricket does achieve two things that make it a great intro for people who want to get into IoT in hydroponics or those who want to setup a couple of low-power sensor stations with absolutely no hassle. The first is that it achieves simple configuration of both Wi-fi and MQTT and the second is that it simplifies the power consumption aspects, making it very easy to configure things such as sleep times, sensor reading intervals, and how often the sensor tries to relay those readings to the MQTT server. All-in-all, the cricket is a great starting point for those who want to get going with custom IoT in hydroponics with the least possible hassle.