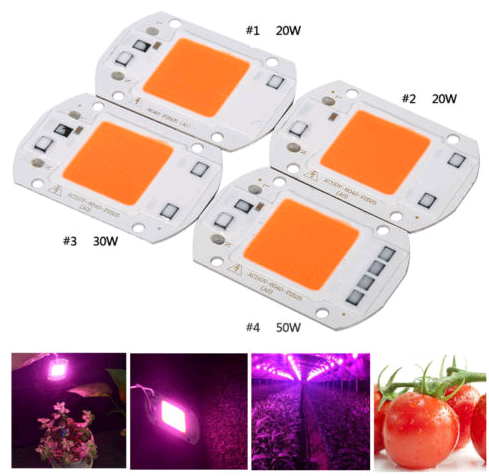
Why red and blue LED grow lights never took off

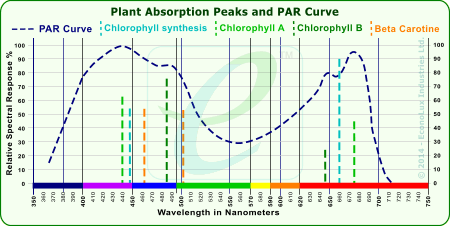
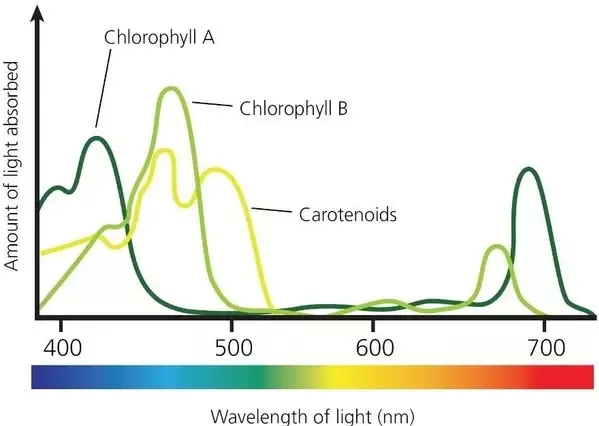
Anyone who has been growing plants for a while has probably seen a chart showing the absorption profile of chlorophylls A and B, as shown in the image below. From this it seems that most of the light absorbed by plants has a wavelength below 500 nm or above 650nm so it seems incredibly straightforward to hypothesize that plants can be effectively grown just using light in these regions. The commercial answer to this hypothesis came in the form of the red/blue growing LED light, which give the plant energy that it is “best suited” to absorb and avoids “wasting” any energy in the generation of light that will not be absorbed anyway (but just reflected away by the plants). However these grow lights have been an overall failure so far – with the vast majority of the industry now shifting onto full spectrum LED lights – why has this been the case?

Image showing the absorption spectra of Chloropyll A, B and carotenoids

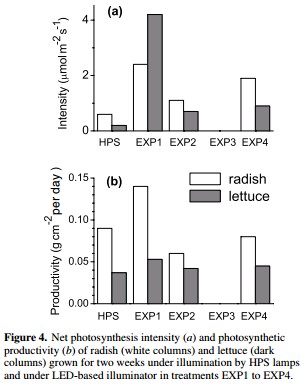
When the cost of red/blue lights dropped enough, there was a significant move to evaluate them in the scientific community to figure out how they affected plant growth. It quickly became clear that plants could be grown with these new lights and that the products could be as healthy as those produced under normal full spectrum lights. However some issues started to become noticeable when these red/blue lights started to move onto larger commercial applications. Although the commercial application of these lights in large fruiting plants is practically non-existent due to the high cost of supplemental lighting, their use was feasible for some small leafy crops – for example lettuce and spinach – which could be grown under high density conditions in urban settings. Their main use however, was in the cannabis growing space, which is one of the only high-cost crops that is grown largely under supplemental lighting when far from the equator.

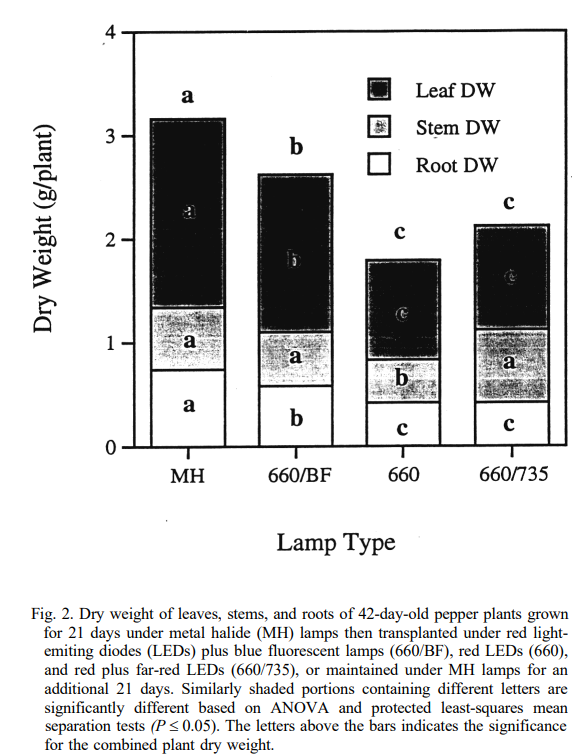
Most people who tried this soon realized that the growing of plants wasn’t equal to that obtained when using fuller spectrum lights, such as HPS or even metal halide lamps, even at equivalent photon flux values. Although scientific publication in cannabis are scarce, this 2016 report (1) shows that white lights in general did a better job at growing the plants compared to the blue/red lights. Other research (2) shows that the blue/red lights can also affect the chemical composition of secondary metabolites, which makes the decision to move to red/blue LED grow lights affect the quality of the end-product.

It has also been shown that green light is not entirely unused by plants, but can actually have important functions. This review (3) goes into many of the important signaling functions of green light and why it can be important for healthy plant growth. Some researchers also started doing experiments with red/blue/green grow lights, showing the positive effects of including some green light in the composition (4). It has also been shown that other regions of the spectrum, such as the far-red (5) can also contribute substantially to photosynthesis and the regulation of plant biological processes. Ultra-violet light can also contribute substantially to the expression of certain molecules in plants. A paper evaluating cannabis under several different light regimes shows how the composition of the light spectrum can manipulate the secondary metabolite makeup of the plants (6).

Image taken from this study (7) showing the effect of far-red light in the growth of pepper plants.

Finally, the last problem in the grow light phenomenon, especially in the case of plants like cannabis, came from the fact that plants look black under this red/blue light. This meant that growers were completely unaware of any potential problems that developed, as the plants were virtually invisible to them through their entire lifetimes. This was one of the main reasons why these lights were never widely adopted, as they made the diagnosing of nutrient issues and insect issues – which are relatively easy to diagnose under full spectrum lights for an experienced grower – almost impossible to do with these red/blue growing panels. In practice a large commercial operation relies heavily on the experience and on-going evaluation of the crop by the on-site personnel and failure to have this useful check in the process is a recipe for disaster.

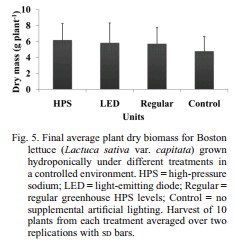
The LED industry learned from these problems and has since gone into the development of full spectrum high efficiency growing panels for the hydroponic industry. These will certainly become the future and standard in the in-door hydroponic industry, especially if prices continue to come down as a consequence of mass adoption. Having full spectrum lights that are way more power efficient than HPS and MH lamps will offer growers the chance to save a lot on costs while maintaining, or even improving, the quality and yield of their crops.


DIY Warm white LED lamp PAR measurements, not so exciting after all!

If you read my last few posts about DIY LED lamps built using 150W warm white LED cobs (which do not require an independent driver) you might have been excited by some of my claims. I previously stated that you could probably get around a 1000W HPS equivalent using just two of these lamps, which meant an energy saving of around 60% relative to the HPS equivalent. However to really verify these claims I wanted to get new PAR and lux meters to perform proper PAR and lux measurements. The results my friends, are disappointing.

Previously I thought that these lamps were close to half of an HPS equivalent based on initial lux measurements. At the same distances, directly below the lamp, I could get around half the lux equivalent of your average HPS lamp, I thought from the warmer spectra of these white warm cobs that the PAR contribution would be significantly higher than that of a regular HPS but it seems that – due to the inefficient use of a white phosphor to produce the spectra – basically the PAR efficiency is equal to that of an HPS lamp.

The PAR (Photo-synthetically Active Radiation) basically measures the number of photons that can be used in photosynthesis that you get per square meter per second off a given light source. I will write a more in-depth post about PAR in the future, but it basically tells you the plant-usable photon flux you get. It is therefore measured in umol*s-1*m-2.

I performed classic PAR measurements with a 150W lamp 15 inches above a target center with measuring points around a 4 square feet area (to compare with the variety of HPS measurements you can find here). The results, in the first image in this post, show you the map of PAR values across the 2 feet by 2 feet area. This shows that the lamp is basically giving you 1466 umol*s-1*m-2  per 1000W at its highest point, which is below the PAR/watt of even the poorest HPS models. With this lamp model using 150W cobs you will therefore need at least 7 lamps to reach the same equivalent of a 1000W HPS in terms of actual photo-synthetically active radiation.

Not only that but without any focusing or dispersing elements the PAR decay as a function of light distance is much more dramatic than for regular, reflector mounted HPS lights. With all these information it now seems clear that these warm white light LED cobs are NOT a good HPS replacement.

However the idea of the zip tie lamp is not dead! I found out that there are actually “full spectrum” LED cobs that are specifically designed to be grow lights (so basically a combinations of red and blue LED lights). These cobs come in 20, 30 and 50W formats and they should have a much more favorable PAR than the 150W warm white LED cobs. I have now ordered some of these cobs (here) to rebuild my zip tie lamp and see if I can indeed get a much better PAR/watt and watt/dollar compared with normal HPS lights.


Cheap DIY high power LED grow lights: Introducing the Zip-tie lamp

Make sure you also read this post, where I studied the PAR of these lamps and realized they are not as good as I thought!

Several months ago I wrote a post about using high power LED cobs that do not require an external driver in order to build a high power DIY LED lamp. However I hadn’t built a practical lamp using these cobs at that particular point in time so I just gave a general idea of why I would use these diodes and how the particular lamp setup would work. Today I want to talk about how to build one of these lamps in practice using an aluminum heat sink, a 150W warm white LED cob, a fan and some zip ties. The setup lacks the use of any adhesives and should provide you with roughly a 40-50% equivalent of a 1000W HPS. With two of these lamps you should be able to run the equivalent setup to 80-100% of a 1000W HPS in terms of PAR with around 60% less power consumption.

The idea of this post is to help you build a very affordable DIY lamp. However please note that this lamp involves work with mains voltages which are dangerous. Please familiarize yourself with all the precautions needed when working with high voltages. All the information herein in is provided as-is for educational purposes with absolutely no guarantee, either expressed or implied.

To build this lamp – showed above – you will need these materials (note that if your country uses another voltage you will need to buy the appropriate pieces for the voltage in your country):

Initially I wanted to build a lamp using a high power warm white LED cob by gluing the cob to the heatsinks using a thermally conductive glue. However the problem with this is that these glues very permanently bind the cob to the heatsink so if for any reason the cob fails you would lose the heatsinks because the cob would be bound to them. For this reason I decided to use zip ties instead, which provide an easy way to secure the entire ensemble and allow you to easily replace any failing part rather quickly. I used nylon zip ties but you can also use stainless still ones if you want the setup to be more resilient (although things will be harder to cut if you make a mistake).

To assemble the lamp I basically used 4 zip tie lines two horizontal and two vertical. For the lines that go the width of the heat sink I just had to use one zip tie but for the other two lines – that also go above the fan – I had to use two zip ties for each line (you can connect one zip tie to another to have a larger zip tie). You need to tighten the zip tie very hard to ensure the cob is in direct contact with the aluminum along all its length, you can also use some thermal compound (like the one you use for CPUs) between the cob and the aluminum heat sink for maximum heat transfer. The pictures below show you a bit better how I performed the entire assembly. When putting the fan on top of the heat sinks make sure the airflow is towards the heatsink (flow arrow in the case pointing down) and that the fan can spin freely).

Finally I connected the cob directly to the AC line by soldering the appropriate live/neutral cables to the connectors at the left size of the cob (in the above picture). I then covered the soldered spots with silicon glue to ensure that the connections were as electrically isolated as possible. Make sure you solder as small portion of wire as possible and make sure the wire makes absolutely no contact with the aluminum heat sink or you will have a short. I also soldered the fan cables to the live/neutral as well since the fan can be driven directly by AC as well.

Since you have the zip ties you can also use them to hang the lamp, you can also add screws to the fan screwing ports and use those to hang the lamp from the ceiling. When I turned on this lamp its power consumption was around 220W – measured directly from the wall – meaning that it consumed a bit more power than what was advertised (which is not uncommon for these cobs). Since my voltage is a bit higher than 110V – which is the minimum rating for this cob – I actually get a slightly higher light/heat output than someone using it at a lower voltage. The fan – which takes around 12-15W on its own, also contributes to this consumption level.

When you power on this lamp – image above (sorry about the camera not being able to handle the light intensity) – you’ll immediately notice how the heat sink starts to heat up. I have tested the lamp through 2 hours of continuous operation up until now and the heat sink reached a stable temperature of around the 120°C (~ 250F), the final temperature you reach will of course depend on your ambient temperature and how well you assemble the components. It is however very important for you to test each one of these lamps for 12/24 hours to ensure that they don’t heat up excessively. Nylon will melt at around 220°C so you definitely don’t want your lamp to ever reach even close to that temperature (to be safer you can use stainless steel zip ties). However it is very likely that the LEDs will burn out way before this happens if your temperature rises too far. You can also add a second fan or use a larger heat sink if your temperature is too high.

In the end the setup is extremely simple to build and you can get roughly 40-50% of a 1000W HPS with one of these lamps. With two of these lamps you will run at around 450W which is 55% less power than an equivalent HPS setup. Although heat generation is no joke here, it is indeed much less than the comparable heat output of a 1000W HPS. With a cost of less than 80 USD per lamp you will be able to build these lamps at a far lower cost than the very expensive grow lights you can get online (which can often go for thousands of dollars for a single 1000W HPS equivalent). If you read my earlier post you will notice that I previously thought you needed 4 cobs to reach the equivalent of a 1000W HPS, turns out you only need two 110V cobs running at 120V!

I have made some PAR,  lux and temperature measurements but I want to keep those for a future post where we will look at some of the spectral and thermal characteristics of this lamp vs other lamp types.


Are High Pressure Sodium (HPS) Lamps better than LEDs?

Growers who use artificial lighting usually prefer high pressure sodium (HPS) lamps to do the job. Not only do HPS lamps have a very high photon flux but compared to metal halide (MH) lamps they have a much more prominent red spectral component and therefore a significantly larger dose of photosynthetically active radiation (PAR) per watt. However during recent years light emitting diode (LED) lamps have become much more efficient and have started to compete for the artificial lighting domain. However is there any advantage to using LED lights over HPS lamps? Are HPS lamps always going to be the winners? Today we are going to look at the science comparing HPS and LED lamps to see if there is currently a winner between the two.

The above graph shows you the PAR spectra. Basically this tells you which wavelengths of light are most prominently absorbed by plants. From this diagram it is clear that plants have peak absorptions around the blue and red parts of the spectra while the green section of the spectra is absorbed much less intensely and instead reflected (the reason why most plants look green). Ideally we would want lamps that have peaks in the regions of the spectra where the PAR peaks as well and we would like to have the highest peak in the red which is the region where we get the most efficient photons for the photosynthesis process.

In HPS lamps our spectra is basically fixed by the nature of the light source while in LED lamps we can tune the light source a lot. This is one of the reasons why there is such confusion when comparing HPS and LED lamps. Since LED lamps can be tuned so much it isn’t surprising that there are a large variety of cases where growers have experienced worse results from LED lamps compared with their HPS counterparts. With HPS lamps you basically buy one 1000 W lamp and you’re done while with LED lamps things such as the color distribution of the diodes being used and the focusing elements they have installed can make a tremendous different.

Checkout this study comparing LED and HPS lights to grow lettuce and radishes. The picture above shows you the results they had with HPS lamps compared with 3 different experiments using different LED distributions. A person running setups 2 or 4 would have thought that LEDs are worse than HPS lights while someone using setup 1 would have concluded that LED lamps are simply much better. This is why some growers will tell you that LED lamps are the greatest thing on earth while others will tell you they are never as good as HPS — they simply have used different lamps. Notice that in setup 3 a complete breakdown of the photosynthetic process happened.

In the above experiment growers used 4 LED types, 455nm, 640nm, 660nm and 735nm LEDs in a roughly 10:120:10:1 ratio. In setup 2 the 640nm LED intensity was reduced by a factor of 1.5, in the setup 3 the 735nm component was changed to nighttime only and in setup 4 the 735nm LED was changed to only two hours during nighttime. You can see how the decision to change a light source that contributed less than 2% of the total light flux to nighttime had a very important effect. This is because the 735nm wavelength has a circadian rhythm effect that can substantially change how the plant responds. Just turning on 2% of the LEDs at the wrong time completely turned around the results.

With the above it is not surprising that we find contradictory evidence in the scientific literature. Articles like this paper on cucumbers find that HPS provides better growing efficiency compared to LED lamps in line with other articles like this one on lettuce. However we should bear in mind that the LED lamps used are always different and the fact that a LED array provides worse results compared to HPS does not mean that this is true for all LED lamps overall. Since LED lamps can be tuned so much it is almost certain that for a given plant specie you will always find an LED combination that gives you at least the same results as an HPS lamp.

Nonetheless the power savings from LED lamps also need to be considered. In experiments where comparable photon fluxes are used LED lamps tend to provide savings of at least 30-40% in terms of power consumed from the lamps only while these savings can reach even higher values when considering the additional cooling needs of HPS lamps (that are often much lower for LED lamps).

Per the above LED lamps are definitely worth considering as a replacement for HPS lamps. However you need to properly build your LED lamps such that the photon flux and spectral composition does provide you with results that can surpass those of regular HPS. Building a lamp that is underpowered or that has an inappropriate spectral composition can indeed cause you to get results inferior to those of HPS lamps. This is most probably the reason why so many growers are so reluctant to move to this type of solutions when using either only artificial or supplemental artificial lighting.