Tensiometers (irrometers) the best way to time irrigations in hydroponics

I have recently written blog posts about the measurements of water content in media in hydroponics. The first one was about the problems with resistive moisture sensors in hydroponics and the second one showed you a low-cost capacitive sensor that does the job adequately. However, while capacitive sensors are significantly better at measuring moisture compared to resistive sensors, they are not the only type of reliable sensor that we can use to measure water content in hydroponics. In this post, I want to talk about tensiometers and how they can be used to measure water potential in hydroponics and soil. We will go a bit into how tensiometers work and why they are the most reliable sensors for irrigation timing.

Overall layout of modern tensiometers

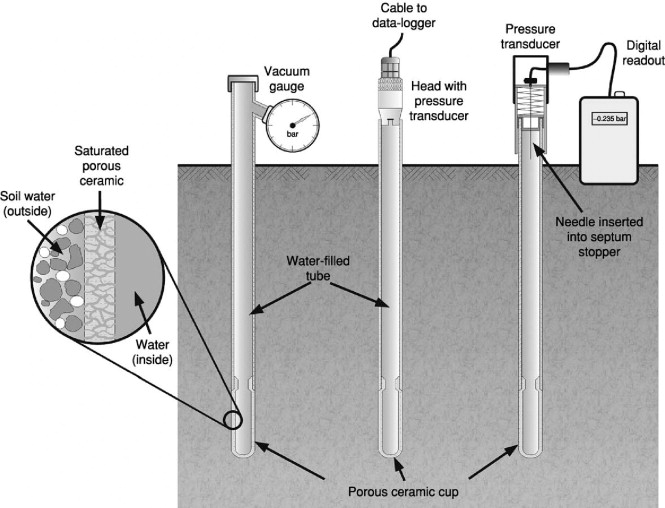
Both capacitive and resistive sensors try to measure the amount of water in the media by measuring how the electrical properties of the media change when different amounts of water are present within it. However, plants do not care so much about how these electrical properties change but they care most about the effort that is required to move water from the media into the plant’s root system. The tensiometer is a sensor that is designed to measure the difficulty of this process. The device is built using a ceramic cup that is filled with degassed distilled water that a pressure gauge is attached to. When water is not present outside the tensiometer, the water inside of it will face a pressure to go out – causing the pressure gauge in the tensiometer to sense a vacuum – as water is added to the media, this pressure is reduced.

The above is very similar to what plants actually experience. When the media is wet, the plant has an easier time taking water into its root system, when the media is dry, the plant needs to fight in order to keep water inside of its roots from flowing into the media. Since this process mimics what the plants actually care about, it accounts for a lot of variables that can directly affect this pressure, such as the osmotic pressure of the solution and the chemical composition of the media. While resistive sensors are harshly affected by these variables and capacitive sensors are to a large extent insensitive to them, tensiometers account for them in a way more similar to how plants do.

RSU-V
Digital tensiometer from irrometer.com

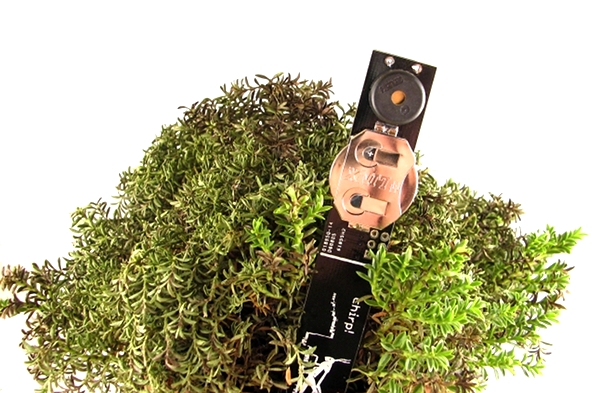
Although tensiometers can be analogue – as shown in the first image in this post – there have been great strides in the creation of digital tensiometers that you can use to monitor your crops. The company Netafim (who did not sponsor this post and does not have any affiliation with me) provides digital tensiometers that send measurements to a central hub with data logging capabilities. Although they have been created mostly for soil, they can also be used in hydroponics to directly monitor the moisture content – or perhaps more accurately the “drying pressure” – of the media. You can also find tensiometers at irrometer.com (who did not sponsor this post and do not have any affiliation with me) where you can get both analogue and digital sensors that you can use within your custom setups, including Arduino builds. In a future post I will show you how to build such a monitoring setup. Please note that the Watermark sensor they sell is not a traditional tensiometer, it is a type of resistive sensor that also uses a ceramic membrane, a sort of “hybrid”.

Note that tensiometers are not perfect sensors, they come with a substantial set of problems. The first is that they are going to be sensitive to salt buildup because of how water flows in and out of the tensiometers, if salt accumulates in the pores of the tensiometer’s ceramic cup, it will lose its ability to properly sense the water potential of the media. This can be especially problematic if significantly hard to dissolve salts accumulate within the irrometer’s structure. The second most common issue with them is their slow response, tensiometers by their very nature rely on reaching a steady state within a process that is significantly slow – water flow across a ceramic – so they will tend to respond slowly to changes in the water content of the media, as the process reaches this state.

All-in-all, if you want the absolutely best way to time irrigations of our media in hydroponics, then a tensiometer that is placed right at the root ball level of your plants will offer the best results for this, especially if you’re using significant volumes of media. Tensiometers/irrometers cannot be beat when it comes to timing the watering of plants in coco or peatmoss, while they can struggle with media that are smaller, like rockwool, due to the volume that the tensiometer itself has.


The Chirp Sensor: A plug-and-play solution to moisture monitoring in hydroponics

If you want high yields in hydroponics, then you need to monitor moisture quite closely. Watering plants when they need it – and not on a timer – is critical if you want to maintain ideal water and nutrient transport within your plants. As I’ve discussed in a previous post, most of the cheap sensors available for this are inadequate as they are affected by the salts present in hydroponics and do not offer proper sensing of the amount of moisture in hydroponics media. Although there are a lot of different sensors that do offer adequate measurements – which we will be discussing in future posts – these are usually not easy to use and often require custom electronics, powering and sometimes complicated calibration. In this post we are going to discuss the easiest solution if you want to have adequate moisture monitoring within your crop with least possible hassle. The chirp sensor. Note that this post has not been sponsored by Chirp’s creator or anyone else.

Chirp! - plant watering alarm 1
The Chirp moisture sensor

The Chirp sensors were created a couple of years back. They are available for purchase here. The sensors use a capacitive measuring principle, which means that the sensor detects moisture by a change in the capacitance of the media in the presence of water, rather than by a change of electrical resistance, and, therefore, the sensor is not strongly affected by the salts present in hydroponics. Additionally, the sensor plates are not corroded by the flow of current between the electrodes. The plates of the sensor are actually covered in an insulating material, giving the sensor the ability to last for a long time. The big advantage of the Chirp alarm sensor is also how easy it is to set up and how useful it can be to growers.

In order to set up the sensor, you will need to put it in the media at the point where the media will require watering, you then wait a couple of minutes for the sensor reading to stabilize and you will then press the button at the top of the sensor in order to indicate that this is the threshold for moisture where the sensor will start “chirping”. Whenever the sensor reaches this reading again it will start chirping, chirping louder and more frequently as the moisture level drops below this point. It will also only do so when it detects light, so it will not detect the need for watering when the lights are out. When it chirps, you water, that’s it.

If you want to figure out when to set up the sensor for watering, you can set up a pot with media (with no plants), water it till there is consistent run-off, wait for the run-off to stop, weight it – this will be the saturated weight – then weight it again every hour to quantitatively measure the dry-back of the media. You can then set up the chirp sensor when 60-70% of the water weight has been lost, which indicates a condition where watering is going to be necessary. This measurement can then be used for the watering of your plants, deeper or shallower dry-backs might be optimal depending on your conditions, but the above is a good starting point where you will not risk overwatering your plants.

The advantage of the Chirp sensor is that all of this can be done without any fancy setup, so it can be as good for watering a single plant as it could be for an entire greenhouse if enough Chirp sensors are used. Additionally, the Chirp sensors are also i2C compatible, so if you buy Chirp alarm sensors to perform this sort of monitoring you will still be able to hook them up to Arduinos or other microcontrollers in the future in order to perform your own quantitative moisture measurements and automate the entire watering cycle. If you’re looking for a low-cost, reliable yet expandable plug-and-play solution for moisture monitoring then the Chirp sensor is the way to go.


How to identify resistive moisture sensors and why to never use them in hydroponics

The measuring of media moisture, also known as water-content, is critical to successfully irrigating crops in hydroponics. Badly timed irrigations cause lots of the problems faced by novice and even some large scale hydroponic growers. Trying to time irrigations at regular intervals often leads to failure because of how the water demand of a plant changes with size and environmental conditions. It is therefore critical to use a quantitative input that truly represents the amount of water in the media in order to decide whether to water or not. Sadly, the most common method to do this is through the use of resistive moisture sensors; a type of sensor that is ill-fitted for this task in hydroponics. Through this post, I will talk about how resistive sensors work, how you can identify them and why you should never use them to measure water content in your hydroponic crop.

Modulo Sensor de Humedad del suelo Resistivo Higrometro Humedad Tierra, Ferretronica
A typical resistivity sensor for measuring moisture content in soil/media

In order to measure the amount of water in media, we need to measure a property of the media that changes in proportion to how wet it is. One of the simplest approaches to this is to put two electrodes inside the media and measure the amount of resistance to the flow of electricity between these electrodes. This exploits the difference in conductivity between water and air. When the media is wet the electrodes will experience more current flow between them. On the other hand, when the media is dry, there will be more air and, therefore, less current flowing between the electrodes. This type of sensor, where we assume that the current flow between two electrodes at a fixed potential is proportional to the amount of moisture in the soil, is what we call a resistivity moisture sensor.

There are several problems with these measurements, especially in hydroponics. The most important is that hydroponic nutrient solutions are significantly more conductive than tap water and therefore the amount of current that flows through the electrodes of the sensor will be much larger than the amount the electrodes were designed for. Since current is flowing, chemical reactions will also happen at the electrodes, corroding them and changing the measurement of resistance with time as corroded electrodes become less conductive. Due to this fact, electrode performance will deteriorate with time and the electrodes will often become useless.

TROLMASTER Aqua-X Water Content Sensor – Growbuds Canada
A more advanced resistive sensor that uses AC and stainless steel electrodes to avoid the durability issues faced by cheaper sensors like the one in the previous image.

Some manufacturers will try to reduce the above issue by creating electrodes using less easily corroded materials, such as stainless steel, and using AC instead of DC to measure resistivity. This might partially solve the issue of the electrodes being damaged with time but another issue arises; the conductivity of the solution is generally not constant with time as the amount of salts within the media changes. Imagine you start watering a crop with a solution that has a conductivity of 2.1mS/cm, you will then determine the measurement that corresponds to this value in the resistive sensor as “wet” but as you continue feeding salts might accumulate in the media and the conductivity in the root zone might actually be 3.0mS/cm when watering. This means that the “wet” measurement of the sensor is now greatly below the expected conductivity and therefore the sensor will fail to correctly tell you how much water there is in the media.

While resistive sensors might be able to tell between fully dry or fully wet conditions in their first use, this ability will deteriorate with time as the conductivity of the media changes or the electrodes deteriorate. Since in hydroponics we often rely on the accurate measurement of pretty specific dry back conditions in order to properly water plants, having a sensor that lacks a good degree of granularity in measuring water content is not acceptable. For this reason you should avoid sensors that use resistivity as their way to tell how much moisture there is in your media.

Thankfully telling whether a water-content sensor is a resistivity-based sensor is pretty easy. Almost all resistive sensors will contain metallic legs that are used to penetrate the media, so any sensor that uses metallic prongs like the ones showed in the two electrode examples above is most likely a sensor that uses electrical resistance to measure water-content. Sensors like this should always be avoided.

Which sensors should you use then? Within the next several posts I will be going deeper into other types of moisture sensors. I will describe other ways to measure moisture content that are better suited for hydroponics and give you some links to sensors you can get to carry out this task successfully.


Automated media moisture monitoring in hydroponic crops

Irrigation control is one of the most important things to control in a hydroponic crop. Irrigate too frequently with a media that has high water retention and your plants will start to wilt as their roots die due to lack of oxygen and reductive conditions, water too sparingly and your plants will not grow as much as they could and maybe even die from the drought conditions you’re imposing on them. On today’s post we will discuss the topic of irrigation, more importantly how to know when to water your crops and how to control this process using sensor based approaches instead of just using look-and-feel to determine when to water your plants.

Plant roots need to have access to water and nutrients. This means that the root zone needs to be saturated with nutrient-rich water as often as possible while avoiding oxygen depletion and salt accumulation. This means that irrigation needs to be controlled to ensure that plants get as much as possible, as often as possible, without going into any excess that would be detrimental to growth. Sadly there is no solution that is true for all crop setups and gauging irrigation frequency requires a close monitoring of what is going on within the crop.

To really know when to irrigate crops you should have a way to properly monitor moisture levels. This can be achieved through several methods, for example with tensiometers or with simple weighting of the plants, but many of these methods are often not cheap or practical for routine practice. Manual inspection of plants can also be misleading since top level moisture perception is subjective and can often lead to very suboptimal results.

In today’s world the best way to monitor moisture without having to pay a high cost is to use simple capacitive moisture measuring sensors. These sensors are corrosion resistant and independent of salt concentrations in solution and therefore provide you with a good measure of moisture within your root zones without having to worry about the conductivity of the nutrient solutions. My favorites right now are this small capacitive sensor for smaller media containers and the chirp for larger containers. If you don’t want the chirp features and just want sensor readings you can also get this simpler I2C sensor for larger containers. Both of these sensors are cheap and can be installed in crops with many plants.

plant watering alarm

If you want to go with the simplest possible setup the chirp provides auditory signals when plants need to be watered, although this is not the ideal way to setup the sensors. Ideally you would want to connect these sensors to an arduino so that you can process the data. The arduino mega is particularly well suited for this task as you can connect up to 16 analogue input sensors to it, however you can use less analogue inputs with a normal arduino. Both sensors provide sample code for measuring values from an arduino, you can then output them to an LCD screen or save them within a computer. You can even connect the arduino’s digital outputs to a relay so that you can automatically trigger your irrigation system when a custom set moisture level is reached.

Obviously you do not have to place a sensor within each plant. Just monitoring around 10-20% of your crop will give you enough information to know exactly how moisture levels behave within your crop and when you should ideally water them. This will eliminate all the guessing from your watering and will allow you to water your media perfectly while completely accounting for how long it takes for water to leave your plants. This means you no longer would need to just guess when to water, but your watering will be perfectly tailored to what your media allows and what your plants need.