Five dos and don’ts for automated pH control in hydroponics

The pH is one of the most important variables to control in hydroponic culture as it plays a key role in the availability of different ions and their absorption dynamics. Although most growers control pH manually it is often desirable to implement automatic pH control so that you can ensure that your solution always stays within an optimum range. This is especially true in recirculating systems where correcting the pH of the solution after it goes through the plants’ roots is necessary. Today I want to share with you five dos and don’ts when implementing automated pH control in hydroponic culture.

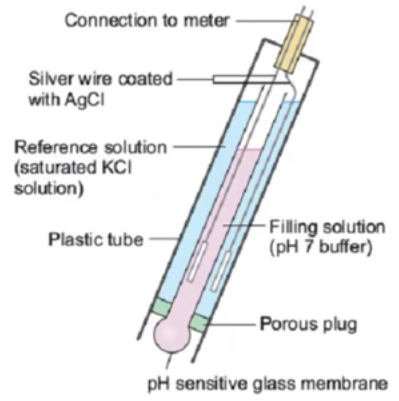
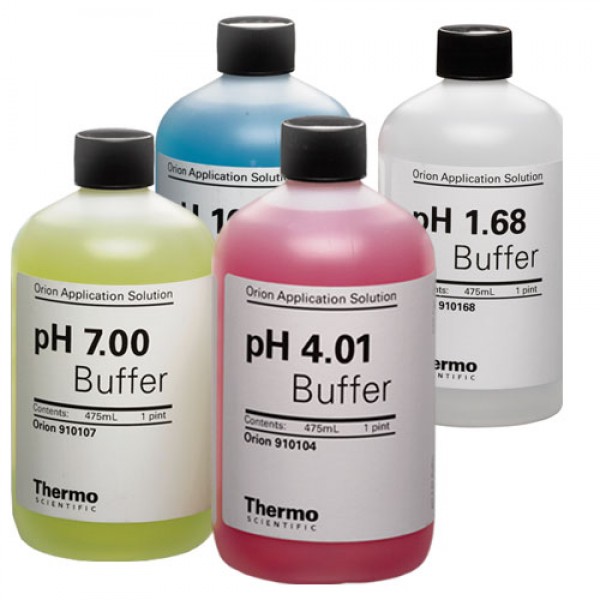
Do test your pH meter frequently with a buffer solution.  In hydroponics pH meters can lose calibration rather quickly as a consequence of being immersed in a nutrient solution that is at a lower ionic concentration than what’s ideal for most glass electrodes. This means that testing your pH meter with a buffer solution often – every week is ideal – is necessary in order to ensure that you are getting accurate readings. If the reading is not accurate you can then recalibrate the meter.

Do recondition your pH meter every month. In line with the above and in other to increase the life of a pH meter and each calibration it’s necessary to immerse the pH electrodes in a pH 4 or 7 buffer solution every month – for at least 2-3 hours – to ensure that the ionic content of the electrode is restored and the glass membrane’s responsiveness remains accurate. If you do this your electrode will be happier and you will need to calibrate less frequently. If an electrode is covered in biofilm the putting it in a hot bleach solution for half an hour before the buffer immersion is also necessary.

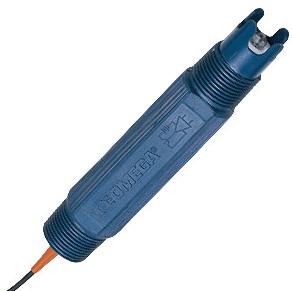
Do use electrodes designed for constant immersion. Regular pH electrodes – including those sold with some automated pH controllers – are not meant to be immersed the whole time and therefore get damaged and lose calibration much more quickly when used in this manner. To get best results use pH electrodes that are fabricated with long term immersion in mind. I wrote a blog post about these electrodes and why they are different than traditional pH electrodes.

Do place your electrode as far as possible from your pH changing inputs. When using a pH controller you should place the pH probe as far away as possible from the place where your pH up/down solutions will enter the hydroponic system. This is so that your pH electrode can get a slow change in pH as the pH up/down is mixed with the entire reservoir. Placing the probe close to the inputs will cause very erratic changes in the pH that do not really reflect the effect of the addition across the entire reservoir.

Do have addition limits in your controllers. Allowing a pH controller to add as much substance as needed to correct the pH can be a very bad thing to do. This is because several things can go wrong – pH probe losing calibration, controller getting damaged, electrical noise etc- that can cause unnecessary levels of addition that can kill an entire crop. Always have controllers where maximum additions per unit of time can be specified so that the possibility of this happening is minimized.

Don’t rely on a single pH probe. Although single probe controllers are the most common they can also be the most dangerous. A pH probe can get damaged, it can lose calibration or it can give erratic readings due to other reasons (for example electrical interference from other things in the reservoir). Therefore it’s always best to use two-probe controllers where readings are always verified across the two probes to ensure that the reading the controller is getting is accurate. If you have a commercial enterprise then this is a must, you wouldn’t want to lose an entire crop due to a bad pH probe adding a ton of acid/base to your solution.

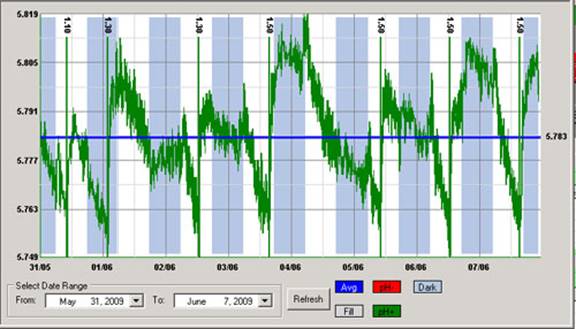
Don’t aim for a specific pH value. A pH controller should not aim for a specific value of pH but to maintain pH within an adequate range. Usually the best way for a controller to act is to have a range with high/low thresholds where the controller will act to take the pH to the middle of the range when these thresholds are exceeded. For example a controller can be told to maintain pH in the 5.6-6.4 region and then it will act whenever the pH reaches 5.6 or 6.4 to take it back to 6 when any one of these two thresholds is breached. However if the pH is at 6.4 and the controller drops it to 5.8 it will not try to then bring the pH up (because it’s above the lower threshold).

Don’t place your pH probes near pumps or other electrical equipment in reservoirs. A pH probe takes an electrical measurement and is therefore prone to electrical interference. Having a pH probe close to other electrical equipment – especially those that draw significant current – can cause those wires to induce currents in the pH probe wires and generate all sorts of issues with pH readings. Always place pH probes away from pumps and ensure the pH probe and pump wires are never tangled together.

Don’t use very concentrated acid/base input solutions. A pH controller will be doing very fine control over a small pH range so it won’t need a very large amount of acid/base to do this job. Using very concentrated acid/base can cause the pH controller to completely overshoot its targets and cause it to either cause the system to get into an undesirable state – for example a very low pH if the controller can only add acid – or enter a loop where acid additions are followed by base additions in an endless cycle. Usually you want your acid/base mixtures to be concentrated enough to shift the pH over their addition volume but not much more than that. Strong acids/bases in the 10-20% concentration range are usually more than enough for this job.

Don’t ignore your controller’s data. A pH controller will do its job – control pH within a range – but it will not tell you whether your system is doing ok or not from a plant-health perspective. How often your pH controller has to add acid/base and how much acid/base it’s using to perform its job are important pieces of information that you need to take into account in order to ensure that your system is working properly. Remember that pH controlling substances often also contribute nutrients – like phosphorous or potassium – so it’s important to keep all these additions in check.

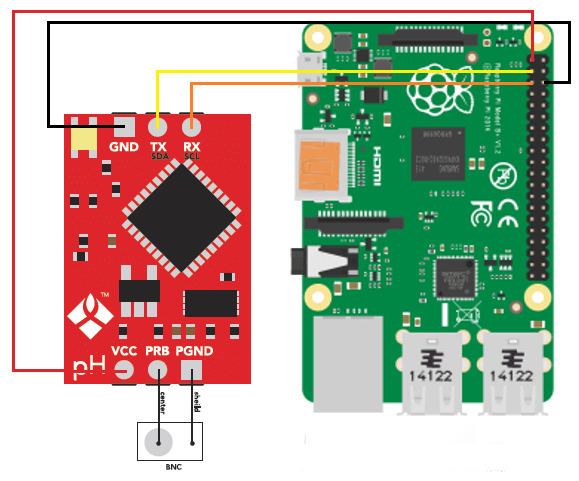
Of course pH control is no simple task and different pH controllers will have different advantages and disadvantages. However doing what you can to ensure proper maintenance – cleaning, conditioning electrodes, having proper placement, etc – can go a long way in ensuring that your setup behaves as ideally as possible. If you can then I would advice you build your own controllers using things like arduinos, raspberry pi computers and robust immersion pH probes so that you can have an optimum setup that can deliver all the advantages of pH control with as few disadvantages as possible. I’ll write about building your own pH controller in a future post.


Probes for constant immersion in hydroponic nutrient solutions

If you have a hydroponic crop then you probably have to measure and monitor the pH and EC of your nutrient solutions. This means taking probes out of storage, ensuring they are calibrated and then carrying out measurements. This process can be very inconvenient, reason why growers might prefer to carry it out less often, even if this means they will have a lot less data. However there are several solutions that can enable constant monitoring of hydroponic nutrient solutions without the need to constantly take out, calibrate and then store away probes. Today we will talk about why regular probes are not suited for this and what types of probes are needed if you want to do this.

Usually low quality EC/pH pens cannot be kept within nutrient solutions because they are not built to withstand constant contact with nutrient solutions. This is both due to the electrode composition – the actual glass or metal electrodes not being robust enough – and the actual junctions and other components not withstanding the nutrient solution as well. Although hydroponic nutrient solutions are not particularly harsh environments – with a slightly acidic pH and moderate ionic strengths – probes for constant monitoring of nutrient solutions must be designed with constant immersion in mind.

For constant monitoring of pH in nutrient solution tanks you want a proper submersible electrode assembly like this one. These electrodes are usually mounted on PVC fixtures and can be easily mounted on tanks to provide constant readings for the nutrient solution. The electrode comes with a standard BNC connector meaning that it is compatible with a wide variety of pH controllers. If you don’t want to mount it on the tank but you just want the electrode to be like a normal probe but constantly submerged then you can use something like this industrial probe which comes with a pH controller as well that can be used with any other probes you purchased and interfaces with an arduino or raspberry pi to get and store readings. For probes like this last one I usually wrap the entire outside body of the probe in electrical tape to give further strength to the probe/cable junction.

For conductivity readings you will want to go with electrode-less EC probes (like these ones) which over PVC mountings as well with the advantage that they do not suffer from polarization issues – like normal EC pens use – so they lose calibration much more rarely and can give much more accurate readings across a wide range of different solution types and conductivity values.

For the grower who wants it all there are also probes like the Mark I-A probe which is a tank-mounted probe assembly that does EC, pH and ORP readings, all in one single fixture. This is incredibly practical since it is able to implement all the readings you need in one single fixture. The problem of course is that calibration of any reading requires you to remove all three sensors so this can be a bit inconvenient when you want to ensure that any of the readings are indeed accurate.

Of course submersible robust probes are more expensive but they are much more convenient. They get damaged much less frequently, require much less maintenance, provide constant readings and need to be calibrated only a few times a year. For example the industrial EC and pH probes I use in my home hydroponic setup have only required calibration once a year, even then the loss in calibration was only around 0.2 units for the pH sensor and 0.3 mS/cm for the EC one so I probably could have continued using the probes without calibrating them for 2 years without having to face any dramatic consequences. If you spend 300-400 USD on high quality robust probes you will probably have them for much longer, with far more accurate results along the way.


Five things that will damage your pH probes

Since pH is one of the most important variables to control in hydroponic culture almost all hydroponic growers have and use pH probes. There are however several things that can go wrong with these probes due to the very nature of the sensor and the way in which other substances interact with it. Today we will learn about some of the worst things that you can do to your pH probes and how you can potentially avoid these issues.

1. Let them dry. These probes are made from glass and the readings depend on the potential difference between the inside and outside surfaces of the sensor. These are determined mainly by pH since hydronium (H3O+) ions interact strongly with the glass surface. For measurements to be accurate the surface needs to be in equilibrium with the media that is being measured. If you let the electrode dry then the hydration of the surface will be lost and the equilibrium state will be much harder to achieve (a dry probe should be placed in a KCl solution for at least 4 hours before being used). Any junctions within the probe might also dry which will require further stabilization before the probe can be used . Dry pH probes are therefore a big no no.

2. Keep them in water. Although keeping pH probes in water is better than letting them dry this has a similar effect in that it alters the composition of the glass with time. Since the solution around the probe is much more diluted, with time ions in the glass will have no problem migrating away from the probe, creating defects within the glass that will mess with your sensor’s calibration. Ideally you will want to store your pH probes in a concentrated KCl solution (usually around 150-300g/L) which will prevent any of these migration effects and will ensure that your probe remains stable in the longer term. If you buy KCl you can use distilled water to prepare your own pH probe storage solution.

3. Measure very basic solutions. Since pH probes are made of glass and glass is mainly made of silicates this means that basic solutions will tend to react with your pH probe. When the pH goes above 10 a pH probe will start to dissolve in solution, completely altering the surface and making the sensor lose calibration very quickly. In general avoid measuring the pH of any solution above 10 so that this effect can be kept to a minimum.

4. Measuring solutions with chemicals that react with glass. Besides basic solutions – where hydroxide ions dissolve glass – there are a variety of substances that can affect the performance of pH probes by reacting with the glass. This includes solutions containing silicate species and solutions containing fluoride ions. If the solution has ions that can react with glass then the pH probe’s lifetime will be diminished and much more frequent calibration will be required. Try to avoid long term measurements of solutions containing large amounts of these ions and beware that weekly calibration might be necessary.

5. Not cleaning the probe. When measuring solutions such as hydroponic nutrient solutions the pH probe is usually subjected to an environment filled with potentially microorganism contaminants. If the probe is not properly cleaned then microbes can form a biofilm over the glass that will seriously affect the accuracy of pH readings. A probe can be cleaned with a bleach or hydrogen peroxide solution to remove these contaminants but the probe will then need to be recalibrated as the film will have effectively changed the glass surface to some extent.

Having pH probes that give accurate reading for a long time is not a difficult task if you take proper care of your sensors. Storing them adequately, ensuring they are not exposed to harmful conditions and cleaning them ensures that they will last for a much longer time. IF you keep track of your pH sensor calibrations you might notice changes in the calibration slope – as in the first image in this post – which indicates a loss of sensor sensibility (the slope becomes less pronounced). You can use a sensor until around 20% of the sensor’s sensibility is lost, time after which you’ll need to buy a new probe.

There are also several sensors that can be used for long term continuous measurements – which are made in a much more robust manner – we will talk about industrial quality and in-line sensors in a future post.


Preparing your own buffer solutions for pH calibration

If you are interested in learning how to prepare buffers without needing a previously calibrated pH probe, please read this post.

One of the most common tasks that hydroponics growers have to carry out is to calibrate their pH meters in order to ensure that the readings are accurate. To do this it is generally necessary to buy somewhat expensive pH buffer solutions that will only last for a relatively small while before new solutions have to be bought. However the fact of the matter is that you don’t need to buy these solutions forever and you can actually make your own using a few chemicals. This will be a ton cheaper than buying buffer solutions and will allow you to prepare solutions whenever you need them.

To calibrate a pH meter for hydroponics we generally need two different buffer solutions. One of these solutions needs to have a pH of 4 and another one needs to have a pH of 7. You can actually calculate the exact amount of chemicals you need to add to create these buffer solutions but this assumes that your water source is very pure (distilled water) and that your chemicals are also very pure and standardized. To make buffer solutions in less-than-ideal conditions we need to have a calibrated pH meter, which means you will need to purchase some buffer solutions, but only once.

After you have calibrated your pH meter ensure that the pH meter measures the exact value that you want to prepare within the buffer solution you have purchased. So make sure that the pH meter when placed in the pH 7 buffer solution measures 7 if this the solution you want to prepare and make sure it measures 4 when placed in the pH 4 buffer solution if this is what you want to make. Once you have the pH meter in a coherent state with the solution you want to prepare we can now proceed to make a new buffer solution.

To do this first fill a contained with tap water, make sure you don’t fill it to more than 80% of its volume (to account for some volume expansion when we add the solids) and use your calibrated pH meter to measure its pH. For the pH 7 buffer add 10g of mono potassium phosphate per liter of solution (this doesn’t need to be exact) and stir the solution until it dissolves. Then add KOH slowly, add it flake by flake, while you measure the pH until your pH reaches 7.00. You will notice that as the pH approaches 7 you will need more KOH to change the pH. If you go a bit above the intended pH you can add mono potassium phosphate to decrease it to 7.00. For the pH 4 solution you can perform the same procedure but instead add 20g per liter of citric acid and then add KOH slowly to increase the pH up to 4.00. After preparation leave the buffers to rest for a few hours and measure the pH again to ensure that your solution pH remains stable. Remember to store any prepared buffers in air-tight bottles and store these bottles in dark places.

What we are doing with the above procedure is basically adding two acidic substances which have pKa values close the pH values that interest us. Close to 7 (mono basic phosphate) and close to 4 (citric acid). We then generate the necessary amount of conjugate base to reach the necessary pH level by adding KOH. The buffer strength is established by the initial amount of the acidic substance we add and the role of the KOH is basically to move the buffer pH to the point where we want it, a point that has a very high buffer capacity given the pKa values of the acids used.

Of course the above is very far form the ideal analytical procedure to prepare a buffer but it’s the easiest, cheapest and most effective way to prepare a buffer that is accurate enough for pH meter calibration use in hydroponics at a minimum cost. Sure, it requires an initial pH calibration – which can be a bit inconvenient – but you can buy a small couple of buffer bottles to calibrate and then prepare 2 gallons worth of pH buffer that you can then use to calibrate your pH meters for a long time. If you use tap water to prepare the above and some solids precipitate you can filter them before storing your solutions. Then measure the pH again after filtering to ensure that everything remains stable.