MyCodo: an open-source solution for control, data logging and visualization

There are sadly not a lot of open source solutions for data logging, visualization, and control that have all the features required to be decently expandable and allow for different use cases. Most open source solutions have been developed by individuals for their particular needs. The consequence of this is that the hardware is very specific and difficult to expand on and the software has been written to be hard-coded to the hardware, making true wide use by the DIY community hard. However, MyCodo – a project that was shared with me by a reader of the blog – seems to get rid of this paradigm, creating an open-source implementation that is truly expandable and that offers most of the features anyone would want in a truly flexible DIY setup. In this post, we will talk about this project, what it offers and how it could be expanded for hydroponic grows of all scales.

Sample control panel image taken from the MyCodo github project website

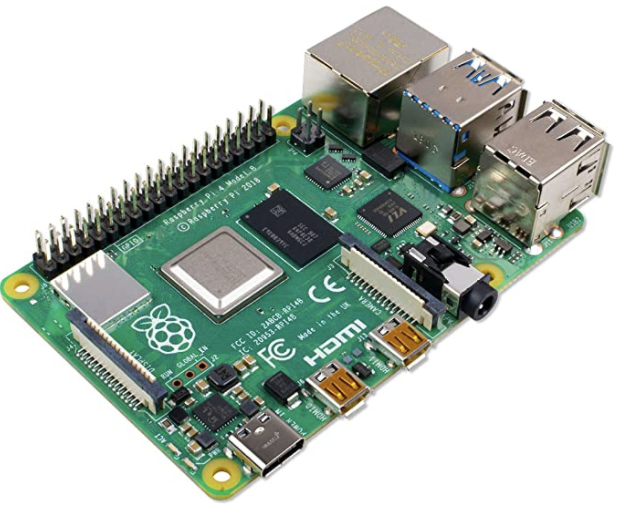
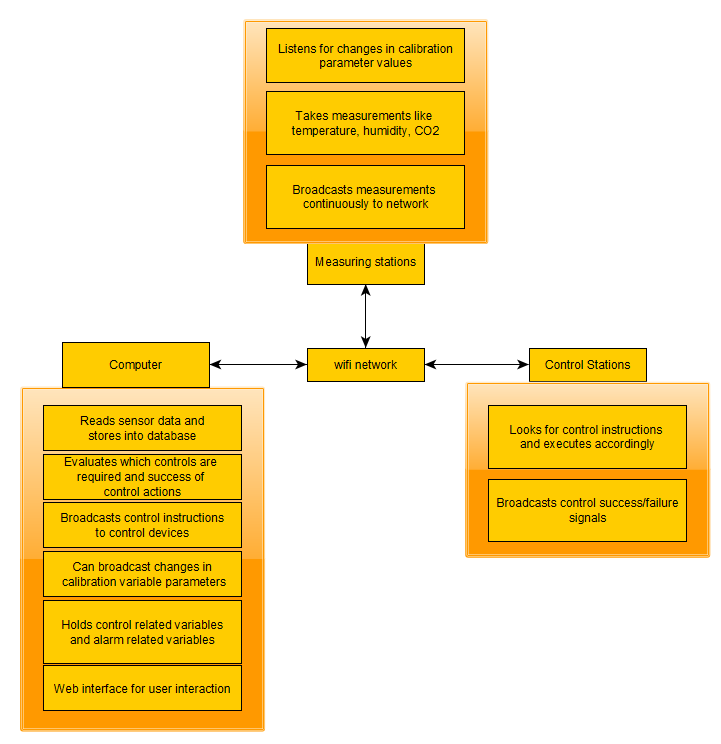
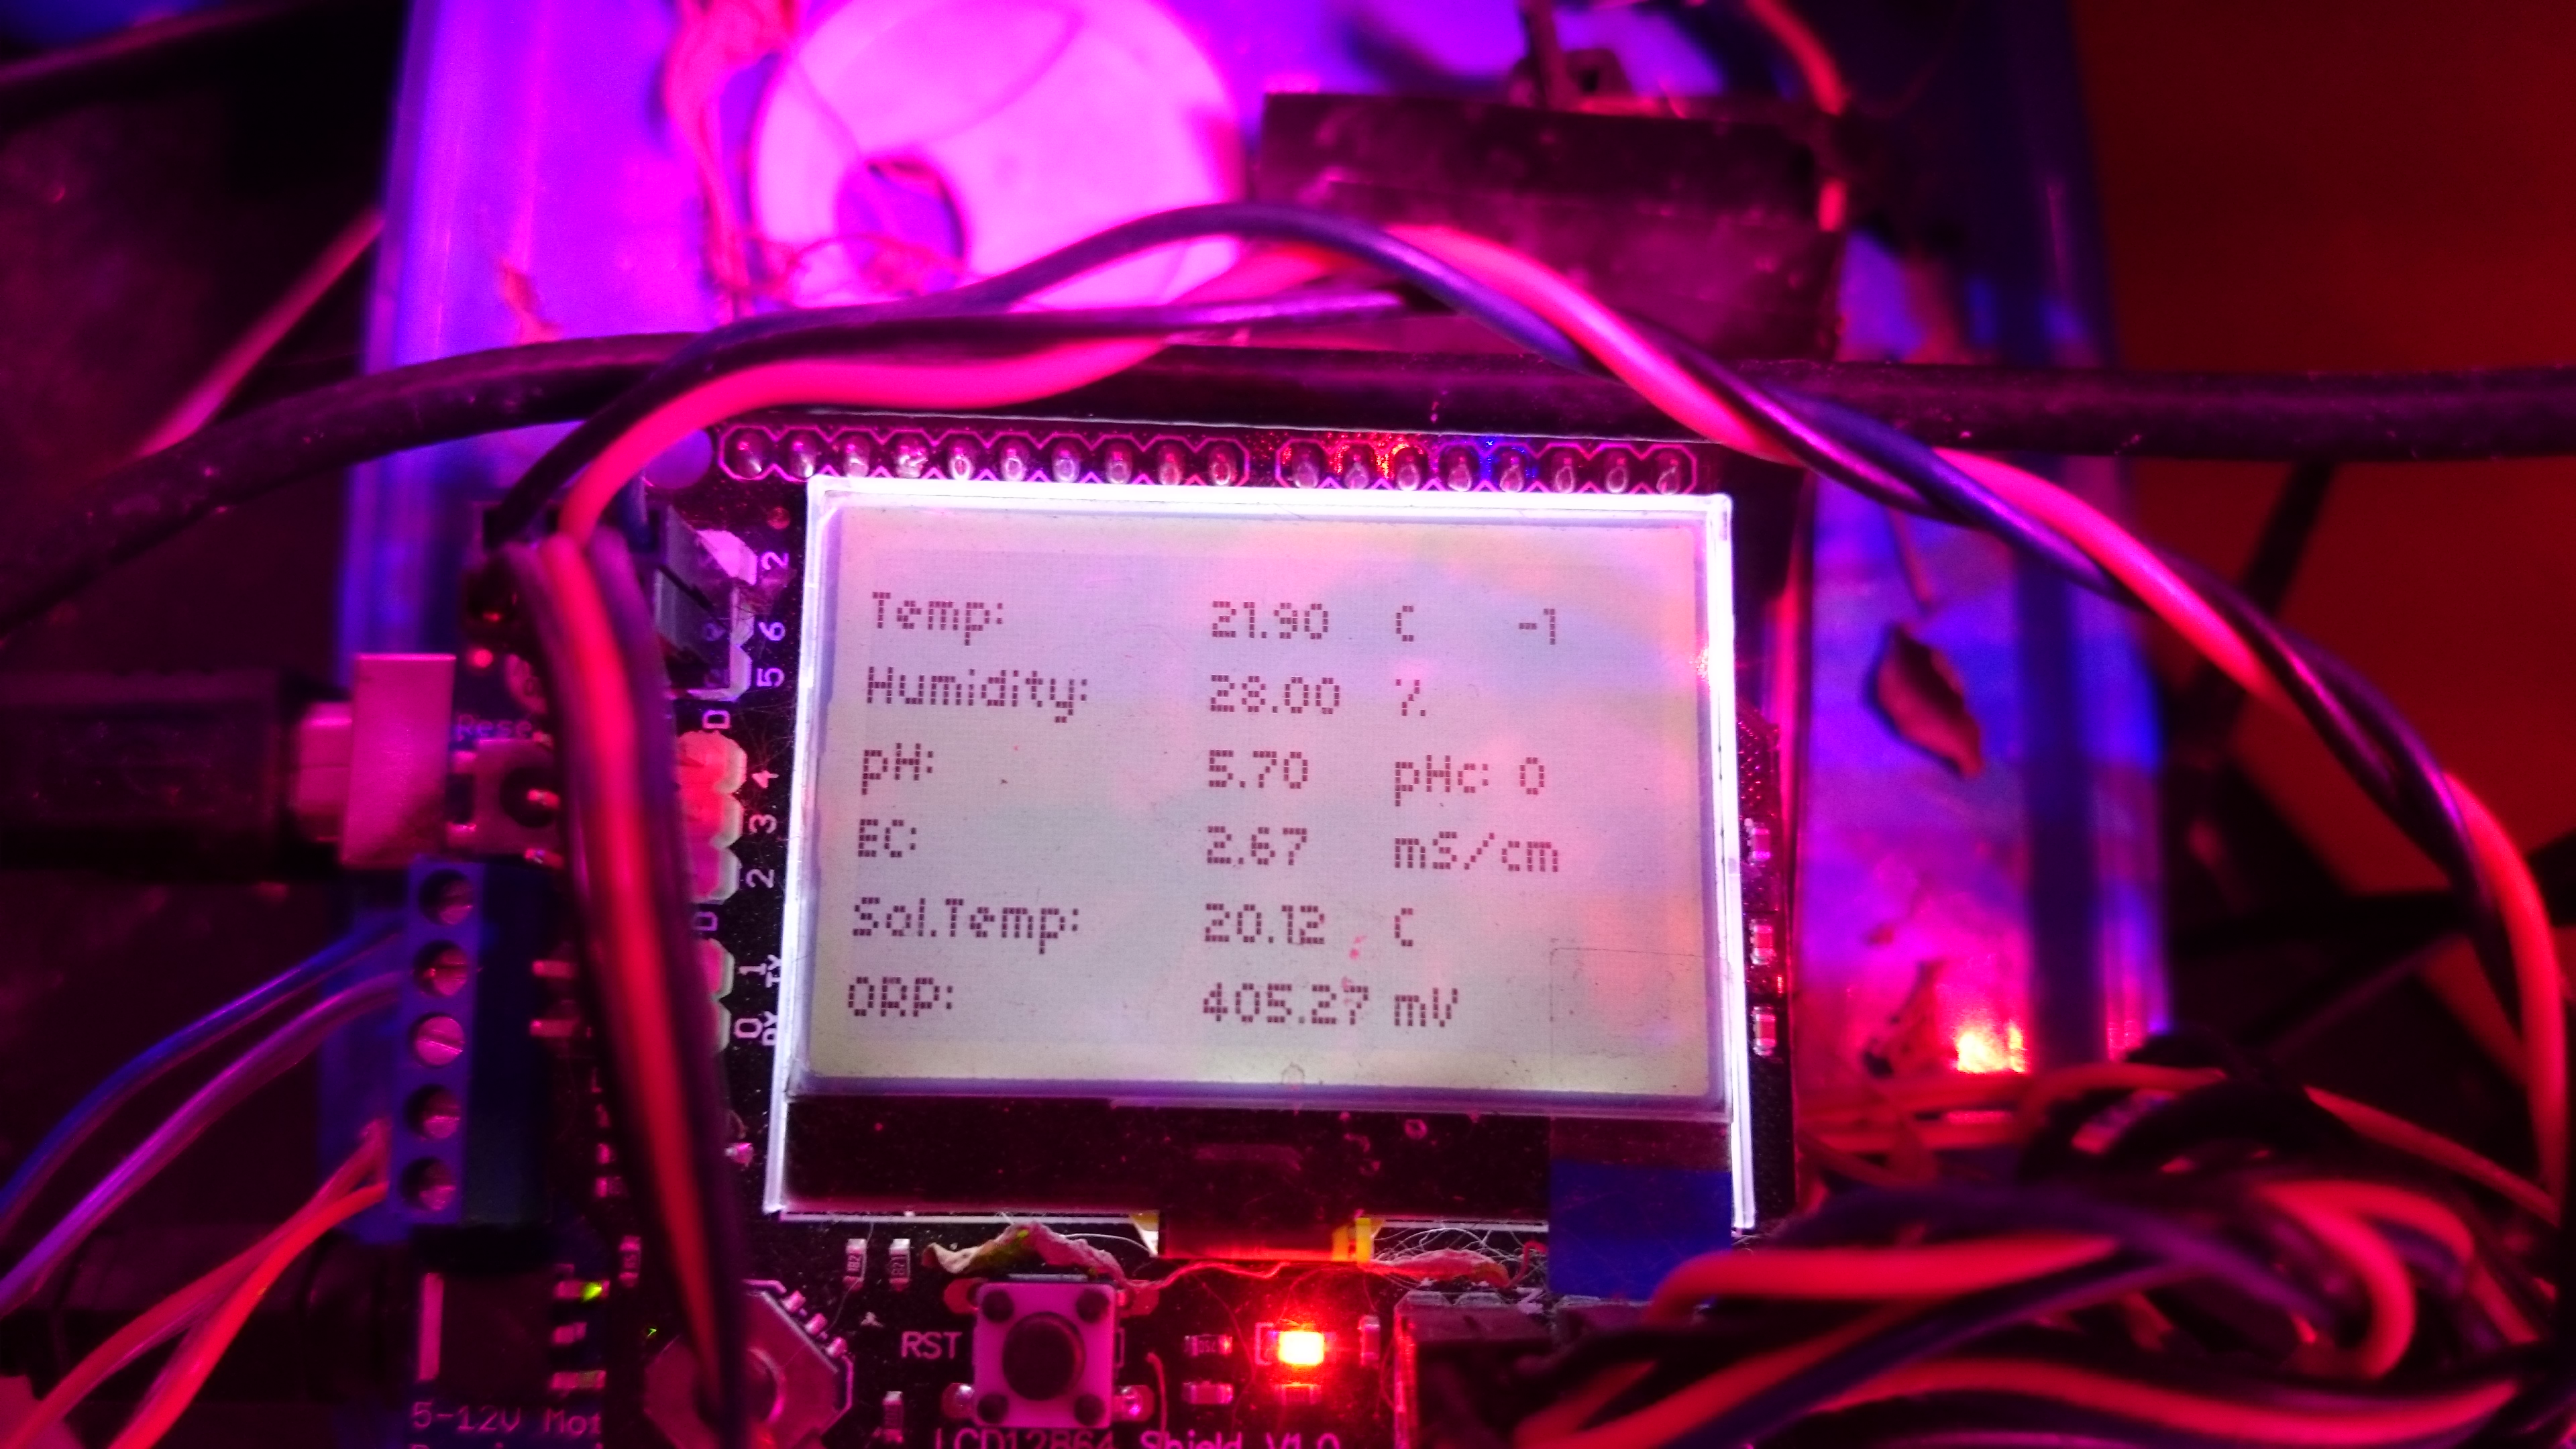
MyCodo is centered around a Raspberry Pi as its main computing hub. Once you install it, the project creates a web interface in the Raspberry Pi that you can use to manage inputs and the control actions that are derived from them. Most of the inputs that are supported by the MyCodo implementation are designed to be directly connected to the Raspberry Pi, such that the Pi acts both as the computing brains and the sensor/control hub for the implementation. When used in this way, only the Raspberry Pi is required, with whichever sensors and relays you want to add to it. This can already be powerful but has the problem that the Raspberry Pi is directly in the middle of the sensing/control environment and the entire implementation could be vulnerable to catastrophic failure due to interactions with the environment (say water getting on the Raspberry Pi).

Thankfully, the developer(s) of the MyCodo implementation had the vision to implement input/output options to use MQTT subscribe/publish mechanics. The MQTT protocol is a messaging system where a device in a network can listen to or publish to different “topics”. So you can have an Arduino that publishes messages under the topic “HumiditySensor1” that contain the humidity value measured at each point in time and you can have it at the same time subscribe to a topic called “HumidityControl” and when it receives an “on” message in this topic it turns on a dehumidifier. You can then use MyCodo to “listen” to the humidity sensor messages, execute its own control algorithms on it, and publish the adequate control action to the “HumidityControl” topic whenever it thinks that a dehumidifier needs to be turned on. This is the way in which my custom-built Arduino/Raspberry PI control implementation generally works.

Add ability to set number of color ranges for dashboard gauges · Issue #749  · kizniche/Mycodo · GitHub
Another sample MyCodo panel

MyCodo, therefore, has a lot of flexibility that is not shared by any other open-source implementations, at least among the ones I have found, for environmental control. Although there are no MQTT sensor stations implemented that I could find for the MyCodo, it should be fairly straightforward to build these sensing/control stations using Arduinos and the MQTT protocol and it should then be easy to add these stations to the MyCodo so that they can benefit from the system’s control interfaces. In a system like this – with independent MQTT enabled sensor/control stations – you can control small or large facilities and not depend on the use of a single raspberry pi to do the entire setup. This means you could use the MyCodo to control different rooms and be able to have a centralized sensing setup for all your needs.

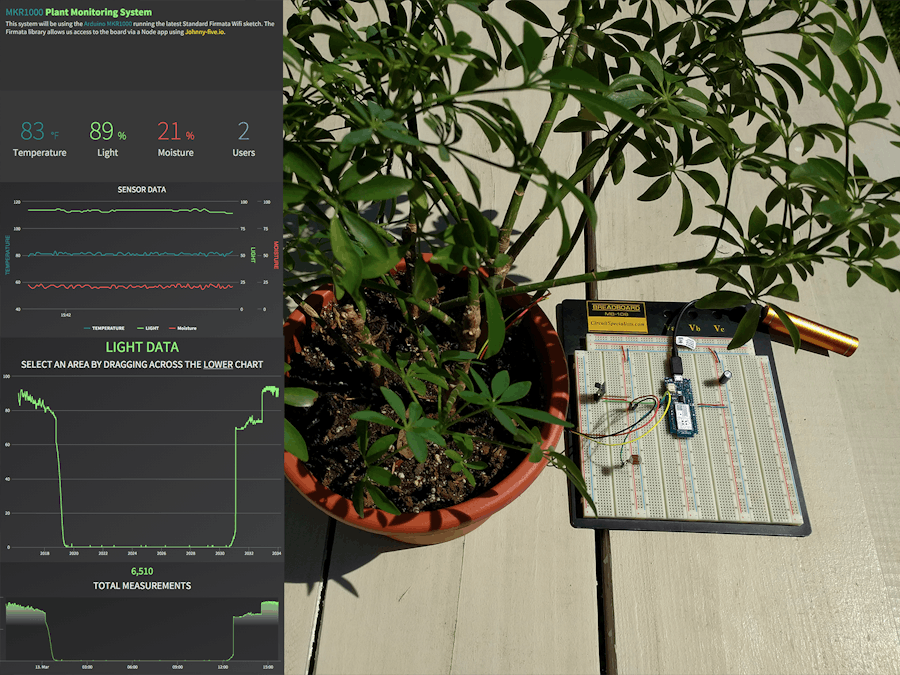
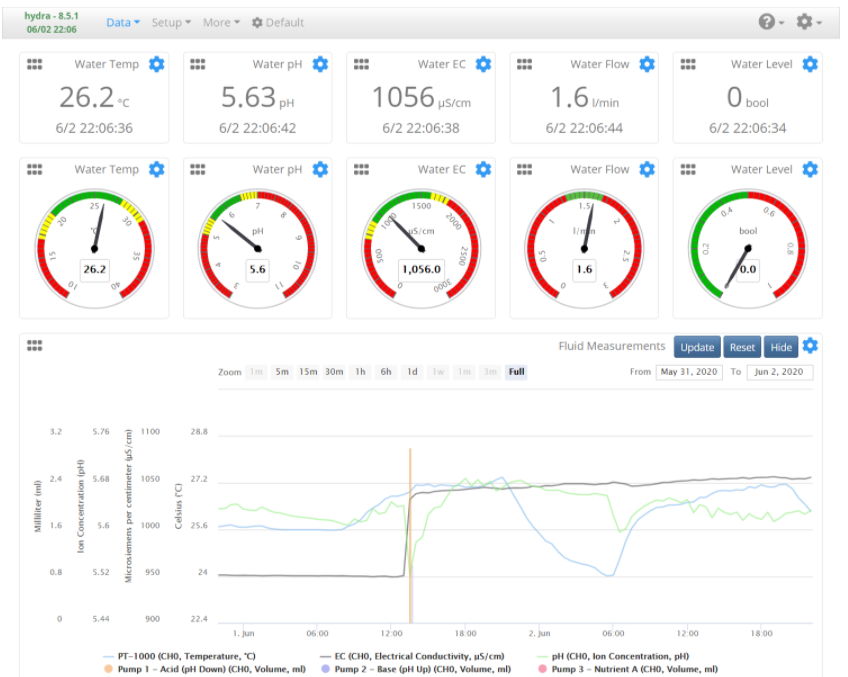
I have decided to give MyCodo a try for my latest hydroponic system. You should expect some videos about this in my youtube channel along with a github repository containing the code for the sensing and control stations that I am going to build in order to use Arduinos for turning relays on/off and send sensor readings. A Raspberry Pi will be used as the central control hub for the project, hosting the MyCodo webserver and code.


Pros and cons of building your own sensor and data logging system in hydroponics

If you’ve read my blog before, you know how important data logging is to having a successful hydroponic crop. Data allows you to monitor and tune the different variables in your grow, which allows you to give your plants the perfect environment through their entire growing cycle. However, deciding how to do this is not simple, you need to decide if you’re going to go with a company that sells some pre-made data-logging solution or you need to build everything yourself. In this post, I’m going to talk about several pros and cons of building your own data logging system for your hydroponic crop.

Pros

You have control over everything. The most important pro when building your own data logging solution is that you have total and absolute control over all aspects of it. If you want to support some type of sensors or have your data stored a certain way, there is nothing preventing you from doing this except your own skills and imagination. If you want to support an obscure messaging protocol, wireless transmission system, etc, it is all up to you. You won’t be limited by the management decisions of an external company and you will be able to build a system that perfectly caters to your needs.

Plant Monitoring System
A simple plant monitoring custom built system. Read more here.

You will be able to leverage low-cost hardware. When building your own system you will be able to get all the parts yourself. This means you will be able to substantially reduce costs. Of course, you’re incurring the important cost of your time but the hardware itself will be low cost and once you implement the basic setup you will be able to connect new rooms and build new logging stations for a fraction of the cost of buying one commercially.

Take advantage of new hardware quickly. As new technologies for monitoring environmental variables are invented or the desire to control new variables comes into play, your ability to fully control your setup will allow you to take advantage of new hardware that comes into the scene while companies will usually be very slow to respond to such changes.

A much deeper understanding. When you build all the monitoring setup yourself, you will create a lot of understanding about how the sensors work, how each one of them is calibrated, how data is transmitted, stored, etc. If you build your own monitoring setup you will gain a much deeper understanding than somebody who just buys an off-the-shelf product.

No need for patchwork approaches. When you decide to get a commercial solution for data logging, one of the issues that comes along is that you will get the setup from a company that supports some types of sensors but you will often face challenges if you want a sensor outside this offering. This will usually mean buying a setup that includes that sensor from a completely different company, measuring some variables with one system and some others with another system.

Cons

No one to support it. The biggest drawback of building things yourself – or hiring someone to build a custom system for you – is that you will have no one to help you debug your system when things go wrong. You will also have limited ability to delegate this work, as your highly custom system will demand somebody with a high level of skill to become familiar with it and operate it with the same level of proficiency as you do. A custom solution means all of this responsibility will fall on the shoulders of those who developed the system.

Nano 33 IoT + EC/pH/ORP + WebAPK
A custom built data logging system to read EC/pH/ORP. Read more here.

Limited by your knowledge. Although it is true that you will get a pretty deep understanding of the things you decide to incorporate into your system, you will also be very limited in the design and implementation of your system because of your particular limitations as an individual. A big company that develops a data logging system will have dozens of people working on it, and all of their experience will go into the decisions that were made in the sensor and software implementations. This can mean better sensor choices are made, more robust communication protocols are used, etc.

Not built for sharing. Custom-built systems usually have the problem that they are built with poor documentation. Sharing is normally not the priority and people will prefer to build “fast and dirty” in order to get things done. This means that the code is usually poorly commented and of a lower quality than what you get from a product that comes from a business. Although some people who build custom software that they intend to release as open-source implementations will often go to great lengths to provide great code quality this is rarely the case when the intention is not to make everything open source.

Big overhauls are a big problem. Since your custom building efforts will usually rely on one or two individuals, bad decisions that are made at the beginning of a project will carry a big toll during the entire life of the system. Poor decisions will be hard to overcome, as a lot of work will be needed to overhaul these “built from scratch” systemA big business with large teams will make fewer poor decision and those mistakes will be found out and fixed faster.

Messy hardware that often breaks easily. Due to the fact that people who build DIY implementations will go for rapid prototyping and functionality over robustness, sensor and data logging setups built in this manner will usually lack the roughness of commercial implementations. While a business dedicated to data logging wants to build systems with adequate sensor housing, and durability for transport, with customer satisfaction in mind, a person who builds this for him or herself might be ok with having a lot of exposed boards and cables. Overall DIY setups are therefore less robust, more likely to break, and more likely to suffer from electrical issues like poorly grounded circuitry.

Hopefully, the above pros and cons give you a useful idea of what you’re gaining and losing when you decide to build your own custom-built data logging system for hydroponics. While you will usually get much more flexible, lower cost, cohesive and personalized setups from custom building, this will usually come at the cost of higher support costs in time, lower reliability, lower build quality, and compromises in quality depending on where your strengths as a builder/coder are. For small setups, it is usually a no-brainer to go with a custom setup – because of how much you learn from doing this and how much you can experiment – while for larger setups careful consideration of the above cons is important.


Hardware for building a wifi-connected DIY monitoring/control system for a hydroponic crop

Success in hydroponic systems can be increased by having adequate control over a wide array of different variables. Having automated monitoring and control will mean faster reaction times and provide better information about crop cycles as they happen. Having the possibility to choose the sensors that you require and code the control algorithms yourself will also provide much more flexibility when compared with commercial solutions, although the price can often be higher since you are going to get hardware that has capabilities that will likely exceed the minimal capabilities required to perform the specific setup you will arrive at. In today’s post I want to talk about the hardware I generally use to build a basic DIY monitoring/control system that involves no soldering and allows for easy connections of all sensors. I will talk about each piece, its cost and why/how it’s needed within a basic system.

Raspberry Pi 4 – 39.61 USD. This is going to be the computer that will be the brain of the entire operation. The Raspberry Pi will receive information from all the sensors around and will make control decisions that will then be sent to the appropriate control-executing stations within the network, it will also record sensor readings and provide a proper interface for the management staff. Usually I use the raspberry Pi to host the database that contains all the sensor readings, plus the execution of the control algorithms and the hosting of web server that the people who manage the crop can access from their other devices (in order not to have to access the raspberry pi directly all the time).

The raspberry Pi 4 computer. Note that you will need a power supply cable and SD card as well, which are an additional cost to the above.

Arduino UNO WiFi REV2 – 39.96 USD. These arduino boards are going to be the heart of the sensing stations and the stations that execute control actions. They will take sensor readings and send them back to the Raspberry Pi via the wifi network. When I build DIY solutions of this type I usually use the MQTT protocol to communicate between the Raspberry Pi and the Arduinos, for this reason it’s really convenient to have the Arduinos include Wifi themselves, so that additional money does not need to be spent on WiFi chips for them. With the Arduino UNO WiFi REV2 you will have all the WiFi connectivity you need available from the get-go, with the ability to still use all the shields an Arduino UNO can support.

Whitebox labs Tentacle shield – 127 USD. This arduino shield offers you the ability to implement measurement of several different sensors in your hydroponic crop. With this shield you can connect up to 4 different Atlas probe sensors, with all the measurements being properly electrically isolated, allowing you to place all the different probes in the same tank.

Atlas pH kit – 164 USD. This is the pH probe sensor and EZO board that are required to be able to connect an Atlas pH probe to your Whitebox labs Tentacle shield above. This pH probe is of very good quality and will provide good readings even if the probe is immersed for a significant period of time. I have used these probes successfully for constant monitoring of recirculating solution tanks, with the probes having to be recalibrated every few months and so far no probes having to be replaced. However, if you want a probe that will withstand a lot of additional stress, then the industrial Atlas pH probe might be a better choice. The kit also includes the calibration solutions necessary to setup the probes.

Atlas EC probe conductivity kit – 239 USD. This contains the necessary materials to connect an EC probe to the Whitebox Tentacle shield. The kit also includes all the necessary calibration solutions to setup the probe, it is analogous to the pH kit mentioned above.

Gravity IO Expansion shield for Arduino – 8.90 USD. This shield provides you with a lot of additional plug-and-play IO capabilities for your Arduino UNO sensor/control stations. I generally use these shields to be able to easily connect digital/analogue sensors and relays from dfrobot. It is very easy to do and does not require the use of any soldering or proto-boards. When you couple the use of these shields with project boxes you can come up with some very robust and practical DIY implementations that are easy for anyone to create.

Gravity: IO Expansion Shield for Arduino V7.1
The Gravity IO shields are an incredibly versatile tool to connect sensors/relays to an Arduino sensing/control station

Gravity quad motor shield for Arduino – 14.90 USD. Like the above, I generally use these shields as part of control stations where I will be using motors to carry out control actions. This shield can power up to 4 small DC motors, so it is ideal to control small peristaltic pumps like the ones we generally use to move small amounts of concentrated nutrient solutions or pH up/down solutions.

Environmental sensors (Temperature, relative humidity, barometric pressure) BME280 – 15 USD. These sensors are my all-time favorites for measuring temperature, humidity and barometric pressure in hydroponic crops. They have one of the most accurate low-cost chipsets to measure humidity and this DFRobot package is extremely easy to plug into the DFRobot IO shield mentioned above (just plug the connector into a digital input row!).

Analog infrared carbon dioxide sensor – 58 USD. These sensors have been my go-to solution when it comes to measuring carbon dioxide concentrations. They are fairly accurate and can tell you if you are circulating air enough or if your carbon dioxide enrichment is working as expected. I usually equip at least one of the environmental sensing stations I setup with one of these sensors so that I can keep an eye on the crop’s average carbon dioxide level.

Capacitive soil moisture sensor – 14.90 USD. When we measure water content in hydroponic crops we are going to be placing the sensor in contact with highly corrosive and conductive nutrient solutions, so we want to avoid any water content measuring devices that use conductivity. This capacitive sensor has become my choice of sensor for the measuring of water-content, it is really easy to use and calibrate and offers the ability to monitor several different plants due to its relatively low cost.

Ambient light sensor – 2.60 USD. This very low cost sensors are great for telling whether lights are actually on/off based on their inputs. They can also give you a crude measurement of how strong light is – if you are growing under the sun – so they can help you track if shades are needed. There are certainly more elaborate sensor, but this sensor gets the job done for a very low price.

120V, 5A Relay – 2.60 USD. These relays are my go-to choice when having to power low power appliances on-off in a hydroponic setup. They are great to control things like fans and smaller lights. If you want to control larger lamps then I would suggest you use the 16A relays that can handle much larger currents. As with the previous sensors/controls we’ve discussed, these relays can be easily plugged into the Gravity IO shield, allowing for the easy building of relay control stations.

The above are some of the pieces that I will commonly use in a hydroponic crop for systematic monitoring/control. While some of these – like the pH/EC sensors and boards – could be replaced by cheaper equivalents, I prefer to go with more expensive parts that have better electrical isolation and properties. However, a very cool and useful sensor setup can be built with just an Arduino, a Raspberry Pi, a gravity IO shield and a bunch of environmental sensors. Of course the above setup gives the most flexibility but significantly lower cost alternatives are possible if very specific stations want to be built or if the use of very specific sensor configurations is desired (so no gravity shields would be used and the sensors would just be soldered where needed).


Building a DIY control infrastructure for a hydroponic crop: Part one

Controlling an entire hydroponic crop using electronics is not a trivial task. This includes everything from the automated control of things like relative humidity and ambient temperature, to other variables, such as lights, solution pH, conductivity and temperature. Many paid solutions exist in the market, but, in my experience, none of them offer enough flexibility to accommodate all potential environments, as all the ones I know are closed source and do not allow users to readily modify the firmware/software used to fit the user’s particular needs. Through the past 5 years I have setup control infrastructures across several different crops and have usually done so using an entirely DIY infrastructure that focuses on flexibility and power for the end user. In this post I want to talk about how this setup usually works and why I came to these design choices.

Usual network configuration I used to built electronic monitoring/control infrastructures for hydroponics

In general the infrastructure I setup relies on the use of wifi for the communication of the devices. This is because it’s usually the easiest to setup, although it might not be the most power efficient or the most desirable in all cases. I generally divide devices into three camps. There is a main device – which is usually a capable computer – which serves as the “central hub” for the entire setup. This computer contains the main database that stores all information about devices, sensor readings, calibration variables, alarms, etc and is in charge of deciding which control actions to take given the sensor reading it is receiving and the control devices it has access to. This central computer usually hosts a website as well, where the user can easily modify things, issue manual control actions, add new devices, set up alarms, etc. The computer can be duplicated as well, to prevent this from being an important point of failure. In several cases we have used a raspberry pi to play this role.

The second and third group of devices are usually Arduinos whose main role is to either take readings (measuring stations) or execute control actions (control stations). Some arduinos might actually serve both purposes as an arduino can often be fit with things like pH/EC probe readings as well as relays that control peristaltic pumps that are used to push pH up/down or nutrient solution into a solution tank. It is worth noting that the decision of what to do for control is never taken by any control station but all they do is interpret control messages from the computer and then try to execute those actions and then give back some response of what’s going on. Measuring stations, on the other hand, are only trusted with the task of taking some measurement from the environment and broadcasting it to the network, the only thing they might listen for are messages issued by the computer to modify their calibration, whenever this is required.

The arduino nano includes wifi capabilities and offers a very convenient low-power core for measuring stations that do not require high power to operate sensors

Measuring stations can be fully customized to have as many reading as the user desires and can be implemented to do all sorts of things, from measuring temperature and humidity, to measuring air-flow, to measuring media water content. This allows for dozens of different temperature and humidity reading spots using different kinds of sensors, to monitoring things such as irrigation flow and solution ORP and dissolved oxygen values.

The entire setup relies on the use of the mosquitto (mqtt) protocol in order to have each device brodcast a specific topic with a specific reading that other devices can subscribe to. The computer will listen to all the devices it sees within its database and it is therefore easy for a new device to be added by a user, since it only requires the inclusion of the device into the database. The measure/control stations can subscribe to the specific topics their interested in for calibration or control actions and can act whenever they receive these messages. All the devices are automatically added to a web platform and alarms can easily be set for any of the measurements carried out by the measuring stations.

A big advantage of this approach is that control actions can be made as complex as the user desires. This includes doing things like implementing reinforcement learning based controls for things like temperature/humidity allowing the computer to use a wide array of measurements in order to take control actions, not relying solely on the measurement of one limited sensor to make these decisions. This allows a computer to use information such as outside temperature to decide how much air it wants to get into the facility for control, or how long it wants to turn on humidifiers in order to allow the desired level of humidity within a grow room.

With all this said, DIY control is definitely not the easiest route to take. Implementing something like the above will require the purchasing of a lot of different electronics – which are sometimes expensive depending on what the user wants – and does require a lot of time programming firmware and deploying software so that the desired outcome can be achieved. With that said, the unparalleled level of control is often worth it and can be accompanied by substantial gains in the information available to the user, which often leads to improvements in yields and the significantly quicker catching of potentially important problems.

On the next part of this post, I will talk about some of the practical aspects of this project, such as which arduinos and sensors I usually use and how these are setup to communicate with the central computer. If you want to learn more about how I can help you set this up for your crop please feel free to contact me using the website’s contact form.


Automating a hydroponic system: Sensors and monitoring

Hydroponic systems benefit greatly from gathering more information as this gives the grower the ability to better diagnose problems and better understand the evolution of their hydroponic crops. Usually growers limit the information they gather to single sensor measurements carried out either at different points during the day or even only when nutrient solutions need to be changed. These measurements are often not recorded and are difficult to analyse in a wider context. Today I am going to talk about the automation of sensors in a hydroponic crop and the benefits this can yield you in the longer term. I will give you some advice regarding how to do this and will in a later post provide some practical steps to achieve an automatically monitored setup. Below you can see a picture of the output of my home hydroponic setup monitoring pH, EC, ORP, humidity, ambient and solution temperatures.

Automating sensors is not only having sensors that can take readings at predefined intervals but also making sure that the reading from these sensors are stored so that they can be used for analysis and diagnosis later on. Thankfully these days we have Arduino micro-controllers which are compatible with a wide variety of sensors that can be used for automated monitoring. We also have very cheap raspberry pi computers which we can use to store this information and build a database with our sensor information. Ideally we would like to monitor as many variables as possible but we are somewhat limited both by cost and the sensor capabilities of the Arduino micro-controllers. If you want to perform automated monitoring then you would definitely want to buy pH, EC, ambient temperature, solution temperature, humidity and carbon dioxide sensors. If you have more money or want to have more data then I would also advice getting a dissolved oxygen sensor and an ORP sensor. If you have a large grow room then you might want to place several CO2 and temperature sensors to properly monitor the entire crop. Here is a small shopping list with sensors and micro-controllers you could use for this:

Although the LCD shield isn’t really necessary for the setup it does allow you to write an Arduino program that displays readings right away. This is very useful as you can see readings as they happen within your hydroponic crop. The image below shows you how this looks like within my home hydroponic setup. In this setup I have all the sensors constantly taking measurements from the crop, which are displayed in this LCD screen. There is also a raspberry pi connected to this Arduino that records one measurement every 2 minutes. I don’t record measurements any faster since this would cause the memory usage to grow very fast within the Raspberry pi without any important gains in the amount of knowledge gained from the information taken.

It is also important to know that the sensors should be industrial quality sensors designed to be kept submerged all the time. For example the above ORP, dissolved oxygen and EC meters are not designed for being constantly submerged so after a while they will stop working and you will need to change them. However if you clean the sensors around once a week and cover the body of the sensor – especially where the cable goes out the back – with electrical tape you can significantly extend their service life. After they run out you can still use the interface to connect an industrial grade sensor. It is worth noting that all sensors can lose their calibration so you want to calibrate your pH/EC sensors at least once every month within this setup. Also when taking sensor measurements you will want to take the median of a large number of measurements (>100) in order to ensure better stability.

Within a followup post I will share the code I use for my automated home setup as well as some additional information dealing with the automatic use of peristaltic pumps to automatically adjust pH/EC and ORP. For a few hundred dollars automated monitoring can greatly increase your ability to understand your hydroponic crops.