How to identify resistive moisture sensors and why to never use them in hydroponics

The measuring of media moisture, also known as water-content, is critical to successfully irrigating crops in hydroponics. Badly timed irrigations cause lots of the problems faced by novice and even some large scale hydroponic growers. Trying to time irrigations at regular intervals often leads to failure because of how the water demand of a plant changes with size and environmental conditions. It is therefore critical to use a quantitative input that truly represents the amount of water in the media in order to decide whether to water or not. Sadly, the most common method to do this is through the use of resistive moisture sensors; a type of sensor that is ill-fitted for this task in hydroponics. Through this post, I will talk about how resistive sensors work, how you can identify them and why you should never use them to measure water content in your hydroponic crop.

Modulo Sensor de Humedad del suelo Resistivo Higrometro Humedad Tierra, Ferretronica
A typical resistivity sensor for measuring moisture content in soil/media

In order to measure the amount of water in media, we need to measure a property of the media that changes in proportion to how wet it is. One of the simplest approaches to this is to put two electrodes inside the media and measure the amount of resistance to the flow of electricity between these electrodes. This exploits the difference in conductivity between water and air. When the media is wet the electrodes will experience more current flow between them. On the other hand, when the media is dry, there will be more air and, therefore, less current flowing between the electrodes. This type of sensor, where we assume that the current flow between two electrodes at a fixed potential is proportional to the amount of moisture in the soil, is what we call a resistivity moisture sensor.

There are several problems with these measurements, especially in hydroponics. The most important is that hydroponic nutrient solutions are significantly more conductive than tap water and therefore the amount of current that flows through the electrodes of the sensor will be much larger than the amount the electrodes were designed for. Since current is flowing, chemical reactions will also happen at the electrodes, corroding them and changing the measurement of resistance with time as corroded electrodes become less conductive. Due to this fact, electrode performance will deteriorate with time and the electrodes will often become useless.

TROLMASTER Aqua-X Water Content Sensor – Growbuds Canada
A more advanced resistive sensor that uses AC and stainless steel electrodes to avoid the durability issues faced by cheaper sensors like the one in the previous image.

Some manufacturers will try to reduce the above issue by creating electrodes using less easily corroded materials, such as stainless steel, and using AC instead of DC to measure resistivity. This might partially solve the issue of the electrodes being damaged with time but another issue arises; the conductivity of the solution is generally not constant with time as the amount of salts within the media changes. Imagine you start watering a crop with a solution that has a conductivity of 2.1mS/cm, you will then determine the measurement that corresponds to this value in the resistive sensor as “wet” but as you continue feeding salts might accumulate in the media and the conductivity in the root zone might actually be 3.0mS/cm when watering. This means that the “wet” measurement of the sensor is now greatly below the expected conductivity and therefore the sensor will fail to correctly tell you how much water there is in the media.

While resistive sensors might be able to tell between fully dry or fully wet conditions in their first use, this ability will deteriorate with time as the conductivity of the media changes or the electrodes deteriorate. Since in hydroponics we often rely on the accurate measurement of pretty specific dry back conditions in order to properly water plants, having a sensor that lacks a good degree of granularity in measuring water content is not acceptable. For this reason you should avoid sensors that use resistivity as their way to tell how much moisture there is in your media.

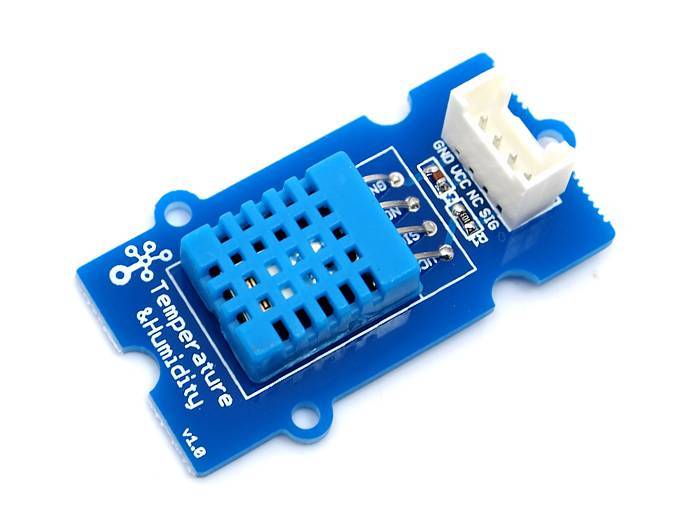
Thankfully telling whether a water-content sensor is a resistivity-based sensor is pretty easy. Almost all resistive sensors will contain metallic legs that are used to penetrate the media, so any sensor that uses metallic prongs like the ones showed in the two electrode examples above is most likely a sensor that uses electrical resistance to measure water-content. Sensors like this should always be avoided.

Which sensors should you use then? Within the next several posts I will be going deeper into other types of moisture sensors. I will describe other ways to measure moisture content that are better suited for hydroponics and give you some links to sensors you can get to carry out this task successfully.


The best cheap sensor setup for relative humidity in hydroponic automation projects

I have written in the past about humidity in hydroponics, especially how accurately measuring humidity is hard due to problems with the sensors. In my experience during the past 5 years with different humidity sensors in Arduino based automation projects I have tried different chipsets and have now reached a conclusion about my preferred chipset setup for the measurement of humidity in hydroponics. Today I want to share with you my experience with different sensors, what I think the best overall setup is and where you can buy breakout boards that use these chipsets to use them in your projects.

One of my favorite sensors for the measurement of relative humidity in hydroponics

The first sensors I ever tried for measuring humidity in hydroponics where the DHT11 sensors which are the cheapest but have really poor accuracyand limited range. I then moved to the DHT22 sensors (also known as AM2302 sensors) which in theory have an accuracy of +/-3% but I had a lot of problems with the sensors dying on me as a function time, this was particularly the case when the sensors were places near plant canopy, where they could be exposed to much higher levels of humidity than those placed to measure overall room humidity values. We also tried using them in a commercial tomato greenhouse and the sensors placed near canopy failed miserably after only a couple of months. More infuriatingly, the sensors that did not outright die seem to have lost a lot of their sensibility, with increased hysteresis in their measurements as humidity changed through the days.

This table of properties was taken from this website.

I then moved to the SHT1x humidity sensors – which were much better and more reliable – and these sensors became my go-to sensors for around a year. However I was increasingly concerned about problems with systematic errors, since all these sensors use a capacitive technique to measure relative humidity, so I decided to try other sensors that used different measuring methods. The only cheap sensor I could find using an alternative measuring technique was the BME280 – released within the last two years – which turned out to be a very reliable sensor. My default setup for measuring humidity has now become a 2 sensor setup where I connect one SHT1x and one BME280 sensor board to an Arduino and then make sure both sensors are within 2% to take a value or issue a control action. If the deviation between both sensors is above 2% then I make sure to be notified about it so that I can see if there is any problem with either of them. I was happy to learn that my conclusions are also supported by other people who have systematically evaluated humidity sensors.

Although I usually prefer the sensors from dfrobot for regular builds, as they are easier to use, you can find breakout boards or more elaborately packaged sensors with these chipsets at other places. In particular I have found the mesh protected SHT-10 sensor from Adafruit to be particularly useful for more demanding environments (like canopy, greenhouses or just outdoor sensing) which might be suitable for those of you looking for a significantly more robust solution to measure humidity, even if at a higher price. Adafruit also carries low cost breakout boards for the BME280 and the SHT-31D, which is a more accurate chip of the SHT family. In any case, I wouldn’t bother with the AM family of sensors, as they have proven to be less reliable than the above mentioned counterparts.

Last but not least, please make sure to contact me if you’re interested in getting my help or input to build a custom made sensing setup for your hydroponic facilities. Having wireless sensing and controls, all integrated into a centralized sensing unit, is perhaps one of the best ways to get reliable real-time data and enhance the control and decision making processes within your hydroponic facility.


Calibrating your digital humidity sensors

On a recent post I talked about vapor pressure deficit and its importance in hydroponic culture. To adequately control VPD it’s necessary to accurately measure relative humidity and in order to do so it’s necessary to have adequately calibrated humidity sensors. Since most of today’s humidity sensors are digital this becomes even more important as these sensors can get damaged very easily, especially if the dew point is reached at any given point in time. Today I am going to talk about humidity sensor calibration, how it can be easily carried out and why you should do it in order to ensure that your humidity sensors are being accurate enough for your cultivation needs.

Most modern digital humidity sensors are based on conductive polymers whose resistance changes with the amount of water in the air. If the polymer is in equilibrium with water vapor in the air then this change will be proportional to relative humidity. Sensors like those from the SHTX and DHTX series work using this principle. However if the polymer gets wet – water falls on the sensor or the dew point is reached – or if it faces very low humidity conditions for a long time then the humidity sensor will stop working correctly and it will need to be reconditioned and calibrated.

Reconditioning of these sensors is usually carried out by exposing the sensor to higher temperature dry conditions and then exposing the sensor to a controlled higher humidity lower temperature environment. These are some typical instructions for humidity sensor reconditioning. Once this process is carried out the sensor is now ready to be calibrated. Depending on the sensor you’re using you might be able to change some calibration parameters to adjust the sensor to changes in its response or you might just use the calibration procedure to check the sensor’s accuracy and discard it if it isn’t behaving properly.

Calibration of digital humidity sensors can be carried out by putting them in the atmosphere composition generated over a saturated solution of a given salt. This table shows the expected relative humidity values at different temperatures for different salts. Basically you want to use a glass container where you can prepare a solution that has so much salt that there are undissolved crystals within it and then place your sensor in a closed environment above this solution (without touching it!). You can achieve this by drilling a hole at the top of a container with a lid to place the sensor (like it’s showed here), alternatively you can stick the sensor with electrical tape inside a glass and then place it upside down in a small amount of solution. This last process – first image in this post – completely eliminates any issues caused by potential holes and the atmosphere reaches equilibrium a bit faster. Another potential option is to create a paste with water and salt and place this past with the sensor inside a zip lock bag.

For starters you can perform a single measurement with a saturated sodium chloride solution – which should give you a humidity of around 75%. This is a good way to check if the sensor is working properly without the need to buy any additional materials. If you want you can then get some additional salts, like potassium chloride, magnesium nitrate and potassium nitrate, which should give you several different calibration points to draw an appropriate calibration curve to gauge how your sensor is working across the entire humidity range. Ideally you would want to have two salts with equilibrium points above 50% and two below 50% relative humidity.


Probes for constant immersion in hydroponic nutrient solutions

If you have a hydroponic crop then you probably have to measure and monitor the pH and EC of your nutrient solutions. This means taking probes out of storage, ensuring they are calibrated and then carrying out measurements. This process can be very inconvenient, reason why growers might prefer to carry it out less often, even if this means they will have a lot less data. However there are several solutions that can enable constant monitoring of hydroponic nutrient solutions without the need to constantly take out, calibrate and then store away probes. Today we will talk about why regular probes are not suited for this and what types of probes are needed if you want to do this.

Usually low quality EC/pH pens cannot be kept within nutrient solutions because they are not built to withstand constant contact with nutrient solutions. This is both due to the electrode composition – the actual glass or metal electrodes not being robust enough – and the actual junctions and other components not withstanding the nutrient solution as well. Although hydroponic nutrient solutions are not particularly harsh environments – with a slightly acidic pH and moderate ionic strengths – probes for constant monitoring of nutrient solutions must be designed with constant immersion in mind.

For constant monitoring of pH in nutrient solution tanks you want a proper submersible electrode assembly like this one. These electrodes are usually mounted on PVC fixtures and can be easily mounted on tanks to provide constant readings for the nutrient solution. The electrode comes with a standard BNC connector meaning that it is compatible with a wide variety of pH controllers. If you don’t want to mount it on the tank but you just want the electrode to be like a normal probe but constantly submerged then you can use something like this industrial probe which comes with a pH controller as well that can be used with any other probes you purchased and interfaces with an arduino or raspberry pi to get and store readings. For probes like this last one I usually wrap the entire outside body of the probe in electrical tape to give further strength to the probe/cable junction.

For conductivity readings you will want to go with electrode-less EC probes (like these ones) which over PVC mountings as well with the advantage that they do not suffer from polarization issues – like normal EC pens use – so they lose calibration much more rarely and can give much more accurate readings across a wide range of different solution types and conductivity values.

For the grower who wants it all there are also probes like the Mark I-A probe which is a tank-mounted probe assembly that does EC, pH and ORP readings, all in one single fixture. This is incredibly practical since it is able to implement all the readings you need in one single fixture. The problem of course is that calibration of any reading requires you to remove all three sensors so this can be a bit inconvenient when you want to ensure that any of the readings are indeed accurate.

Of course submersible robust probes are more expensive but they are much more convenient. They get damaged much less frequently, require much less maintenance, provide constant readings and need to be calibrated only a few times a year. For example the industrial EC and pH probes I use in my home hydroponic setup have only required calibration once a year, even then the loss in calibration was only around 0.2 units for the pH sensor and 0.3 mS/cm for the EC one so I probably could have continued using the probes without calibrating them for 2 years without having to face any dramatic consequences. If you spend 300-400 USD on high quality robust probes you will probably have them for much longer, with far more accurate results along the way.