How to get more phosphorus in organic hydroponics

It is difficult to supply plants with readily available phosphorus because of the insolubility of many phosphorus compounds (2). Whenever orthophosphoric acid species are present in a solution, all the heavy metals, calcium, and magnesium form progressively insoluble phosphate salts as the pH increases (3). At high pH, all of the phosphate is expected to be precipitated as long as there are excess cations to form these insoluble salts. In this post, we are going to talk about how this problem exists mainly in organic hydroponics and how we can solve it by efficiently using organic sources of phosphorus.

Seabird guano, one of the few organic, high P, soluble sources for organic hydroponics

Phophorus in traditional hydroponics

In hydroponic systems that are not organic, soluble phosphorus salts are used to provide the phosphorus necessary for plant growth. These salts are all synthetic and are therefore not allowed for use in organic crops. They are mainly mono potassium phosphate (MKP) and mono ammonium phosphate (MAP). At the concentrations generally used in hydroponics – 25-100 ppm of P – at a pH of 5.8-6.2 and in the presence of chelated heavy metals, the phosphorus all remains soluble and there are rarely problems with phosphorus availability that are directly related to the P concentration in solution. However, when trying to move to an organic hydroponic setup where we want to avoid the use of all these synthetic salts, we run into big problems with P availability.

Organic soluble phosphorus fertilizers

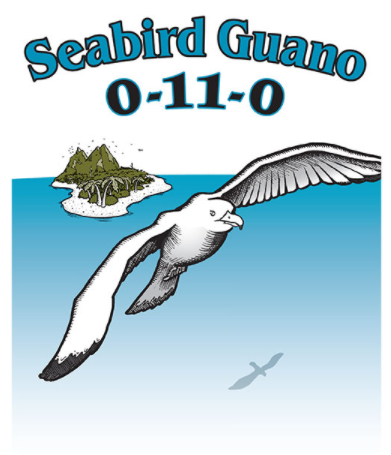
The first problem we find is that there are no organic sources that are equivalent to MAP or MKP. However, there are thankfully some highly soluble organic sources that contain significant amounts of P. Some guano sources are particularly high in P, especially Seabird Guano (0-11-0), while some vegetable sources like corn steep liquor (CSL) (7-8-6) can also have high phosphorus (1, 9).

However, these sources do not only contribute phosphorus but will also contribute a variety of different substances that need to be taken into account when considering them for use. In the case of CSL, very high lactate and organic nitrogen levels imply that you will need to prepare an appropriate compost tea to use this in a nutrient solution. I wrote a blog post about a paper that describes how to make such a preparation.

In the case of seabird guano, a lot of calcium is also provided (20%) so we also need to take this into account in our formulations. Using 3g/gal of seabird guano will provide you with a solution that contains 38ppm of P and 158ppm of Ca, although not in exactly readily available form – as MKP would provide – it will become available much easier than insoluble phosphate amendments. Seabird guano applications should be enough to completely cover both the P and Ca requirements of most flowering plants. The seabird guano also includes a lot of microbial activity, which will reduce the oxygenation of the media when it is applied, reason why you need to be careful with the aeration properties of your media (as I mentioned in this post).

These organic sources of P might also contain significant amounts of heavy metals. Seabird guano can be notable for having significant levels of cadmium (4, 5) so make sure you have a heavy metal test of the soluble P source you intend to use to ensure you’re not adding significant amounts of heavy metals to your crops.

Insoluble organic phosphorus amendments

Besides these soluble organic phosphorus sources, we also have the possibility to use mineral amendments that can be directly incorporated into the media from the start. These sources offer us some additional advantages relative to the pH and nutrient stability through time, which are not offered by using the soluble solutions. The most common amendments available in this area are rock phosphates and bone meal. Not all rock phosphates and bone meal sources are created the same though, rock phosphates mined across the world can differ in their carbonate content, which can greatly affect their solubility. These amendments are generally used at around 60-120mL per gallon of soil.

P uptake for different concentrations of citrate or oxalate.

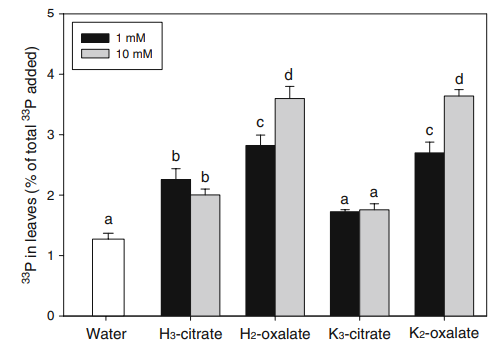
Plants, however, will respond to low P in their root zone by releasing organic anions that can chelate metals and slowly dissolve these phosphates (6). Tests by adding organic acids directly do show that not all acids are the same and some are much more effective than others. In this article (7), the authors showed that oxalic acid was more effective than citric acid in making P available from a rock phosphate source. Malic acid, a very important organic acid for plants (8), can also be used for this purpose and is preferable to oxalic acid. This is because oxalic acid is not only toxic to humans but can also strongly precipitate metals like iron, which are also needed by plants.

From the literature, we can conclude that adding these acids ourselves in concentrations of around 1mM, can be a good way to help solubilize P contained in these rock phosphate amendments. Watering with a solution of citric or malic acid at 150mg/L (567mg/gal) can help free these rock phosphate amendments and contribute to plant absorption of both the phosphorus and the calcium that is bound with it. Alternatively, we can also use fulvic acid at 40mg/L to achieve a similar effect (10).

Conclusion

While there are no easy replacements for phosphorus in organic hydroponics, there are some satisfactory solutions. Soluble phosphorous sources like CSL and seabird guano can be used to provide large amounts of soluble P when required, while solid amendments like rock phosphate and bone meal can provide a sustained release of these nutrients with time, also increasing the pH stability of the media. While using only soluble sources can be the easiest initial transition from a purely hydroponic crop, it will also be harder to manage due to the effects on media pH that such applications might have. A combination of both approaches – soluble applications and amendments – can often be the most successful when implementing an organic hydroponic approach.


Never fail with ebb and flow hydroponic systems

Ebb and flow or “flood and drain” systems, are some of the most popular systems built in hydroponics. These are low cost, can host a large number of plants, and can generate good results, reason why they are a preferred choice for both new and experienced hydroponic growers. However, there are a substantial number of issues that can come up in these systems, both due to the different ways they can be built and because of failures in their management. In this post, I am going to give you some tips on the construction and management of ebb and flow systems so that you can minimize the chances of failure when building your own hydroponic setup of this kind. For some basics of how an ebb and flow system is set up, I advise you to watch this video.

Ensure full drainage

A common mistake when building a flood and drain system is to have incomplete drainage of the nutrient solution. Make sure you have a setup that allows for complete drainage of the solution as soon as a certain level is reached, and always stop pumps as soon as the return of the solution starts. It is quite important to also ensure that as little solution as possible remains at the bottom of your flood and drain trays or buckets, as plants sitting in puddles of water can be a recipe for disease and a very good environment for pests to develop. A very simple system I built in 2010 had the problem of never being able to efficiently drain, which caused substantial issues with the plants as root oxygenation was never as good as it should have been.

Rolling Tables Ebb And Flow Hydroponic Systems - Buy Bandejas De Plástico  De Flujo Y Flujo,Sistema Hidropónico,Sistemas De Cultivo Hidropónico  Product on Alibaba.com
Typical flood and drain table with plants in media on top of the table.

Fast cycle speed

Ideally, you would want the flood and drain cycle of an ebb and flow system to be as fast as possible. Also, the cycles should not take more than 15 minutes, from starting to flood the growing table to completely draining the system. For this, you need to have an adequately sized pump for the volume of your table that needs to be filled (total volume minus volume taken up by plants and media). If you want to use a smaller pump, you can always add some rocks to the table in order to take up volume and ensure you require to add less volume to fully flood the reservoir. Time your cycles and make sure these are as short as possible, adequately saturate the media and completely drain, as mentioned above.

The right media

A common reason why flood and drain systems are less productive is because of a suboptimal choice of media. Ebb and flow systems periodically flood the media with nutrient solution, completely saturating it with water, so media that retains too much moisture will require infrequent cycles and will be harder to time. Media like peat moss and coco are often inadequate for ebb and flow systems due to this fact, as over-saturation of the media will lead to periods of low oxygen availability for the plants. Media that drain fast generally do much better, choices such as rockwool or perlite can give much better results when compared with media that have much higher moisture retention. Since this is a recirculating setup, perlite and rockwool also have the advantage of being more chemically inert. I however do not like media that drain too fast, such as clay pellets, as these can require too frequent cycling.

China Greenhouse Ebb and Flow Rolling Benches Movable Seedbed for Sale -  China Rolling Bench, Ebb and Flow Rolling Bench
Another typical ebb and flow table setup

Time irrigations with water content sensors

Your flood and drain system requires good timing of irrigation cycles in order to have optimal results. If you irrigate based on a timer, you will over irrigate your plants when they are small and will under irrigate them when they are big. Overwatering can be a big problem in these systems and it can be completely solved by both choosing the right media – as mentioned above – and using capacitive water content sensors for the timing of your irrigations. If you’re interested in doing this, check out this post I wrote about how to create and calibrate your own simple setup for using a capacitive water content sensor using an Arduino. This will allow you to flood your table only when it is needed and not risk over watering just because of a timed event happening.

Oversize the reservoir

The nutrient reservoir contains all the nutrition that is used by the plants, this means the bigger this is relative to the number of plants you have, the lower the impact of the plants per irrigation event will be. Having a reservoir that has around 5-10 gallons per plant – if you’re growing large flowering plants – or 1-3 gallon per plant, for leafy greens, will give you enough of a concentration buffer so that problems that develop do so slowly and are easier to fix. A large reservoir can fight the effects of plants more effectively and make everything easier to control.

Add inline UV sterilization

Disease propagation is one of the biggest problems of this type of system. Since recirculation continuously redistributes any fungal or bacterial spores among all the plants, it is important to ensure you have a defense against this problem. A UV filter can help you maintain your reservoir clean. You can run the solution through the inline UV filter on every irrigation event, ensuring that all the solution that reaches the plants will be as clean as possible. Make sure you use a UV filter that is rated for the gallons per hour (GPH) requirements of your particular flood and drain system. Also read my post about getting read of algae, to learn more about what you can do to reduce the presence of algae in a system like this.

Typical UV in-line filter used to sterilize a nutrient solution in a hydroponic setup. These are sold in aquarium shops as well.

Run at constant nutrient EC, not reservoir volume

One of the easiest ways to manage a recirculating system, especially with an oversized reservoir, is to keep it at constant EC instead of constant volume. This means you will only top it off with water in order to bring the EC back to its starting value, but you will never add nutrients to the reservoir. This will cause your total volume to drop with time as you will be adding less volume each time to get back to the original EC. When the volume drops to the point where you have less than 50% of the original volume, completely replace your reservoir with new nutrients. This gives you a better idea of how “used up” your solution really is and how close to bad imbalances in the nutrient solution you might be. A large flowering plant will normally uptake 1-2L/day, meaning that with a reservoir sized at around 5 gallons per plant, it will take you around 2-3 weeks to replace the water.

Note that more efficient and complicated ways to manage a nutrient reservoir exist, but the above is a very safe way to do so without the possibility of toxic over accumulations of nutrients from attempts to run at constant volume by attempting to add nutrients at a reduced strength to compensate for plant uptake. Topping off with nutrients without regard for the changes in the nutrient solution chemistry can often lead to bad problems. The above approach is simple and gives good results without toxicity problems.

Change your pH according to the return pH values

Instead of watering at the normal 5.8-6.2 range, check the pH of the return on a drain cycle to figure out where you should feed. Since a flood and drain system is not a constantly recirculating system, the solution conditions do not necessarily match the root zone conditions and trying to keep the solution at 5.8-6.2 might actually lead to more basic or acidic conditions than desired in the root zone. Instead, check for the return pH to be 5.8-6.2, if it is not, then you need to adjust your reservoir so that it waters at a higher or lower pH (always staying in the 5-7 range) in order to compensate for how the root zone pH might be drifting. This can take some practice, but you can get significantly better results if you base your pH value on what the return pH of your solution is, rather than by attempting to set the ideal pH at the reservoir. You will often see that you will be feeding at a consistently lower pH 5.5-5.6, in order to accommodate nutrient absorption.

Finally

The above are some simple, yet I believe critical things to consider if you want to succeed with an ebb and flow system. The above should make it much easier to successfully run a setup of this kind and grow healthy and very productive plants. Let me know what you think in the comments below!