Calibrating a capacitive moisture/water content sensor for hydroponics

As I’ve mentioned multiple times in my blog, moisture sensing is one of the most important measurements in a hydroponic crop that uses a significant amount of media. It allows you to properly time irrigations and avoid over or under watering your plants. Capacitive sensors are the lowest cost initial approach to adequate moisture monitoring of your media. In this post, we are going to learn how to use an Arduino with a gravity shield and a low-cost capacitive moisture sensor in order to accurately monitor the water saturation of our media.

A capacitive sensor plugged into an LCD shield and an Arduino UNO. The measurements are very easy to track with this setup.

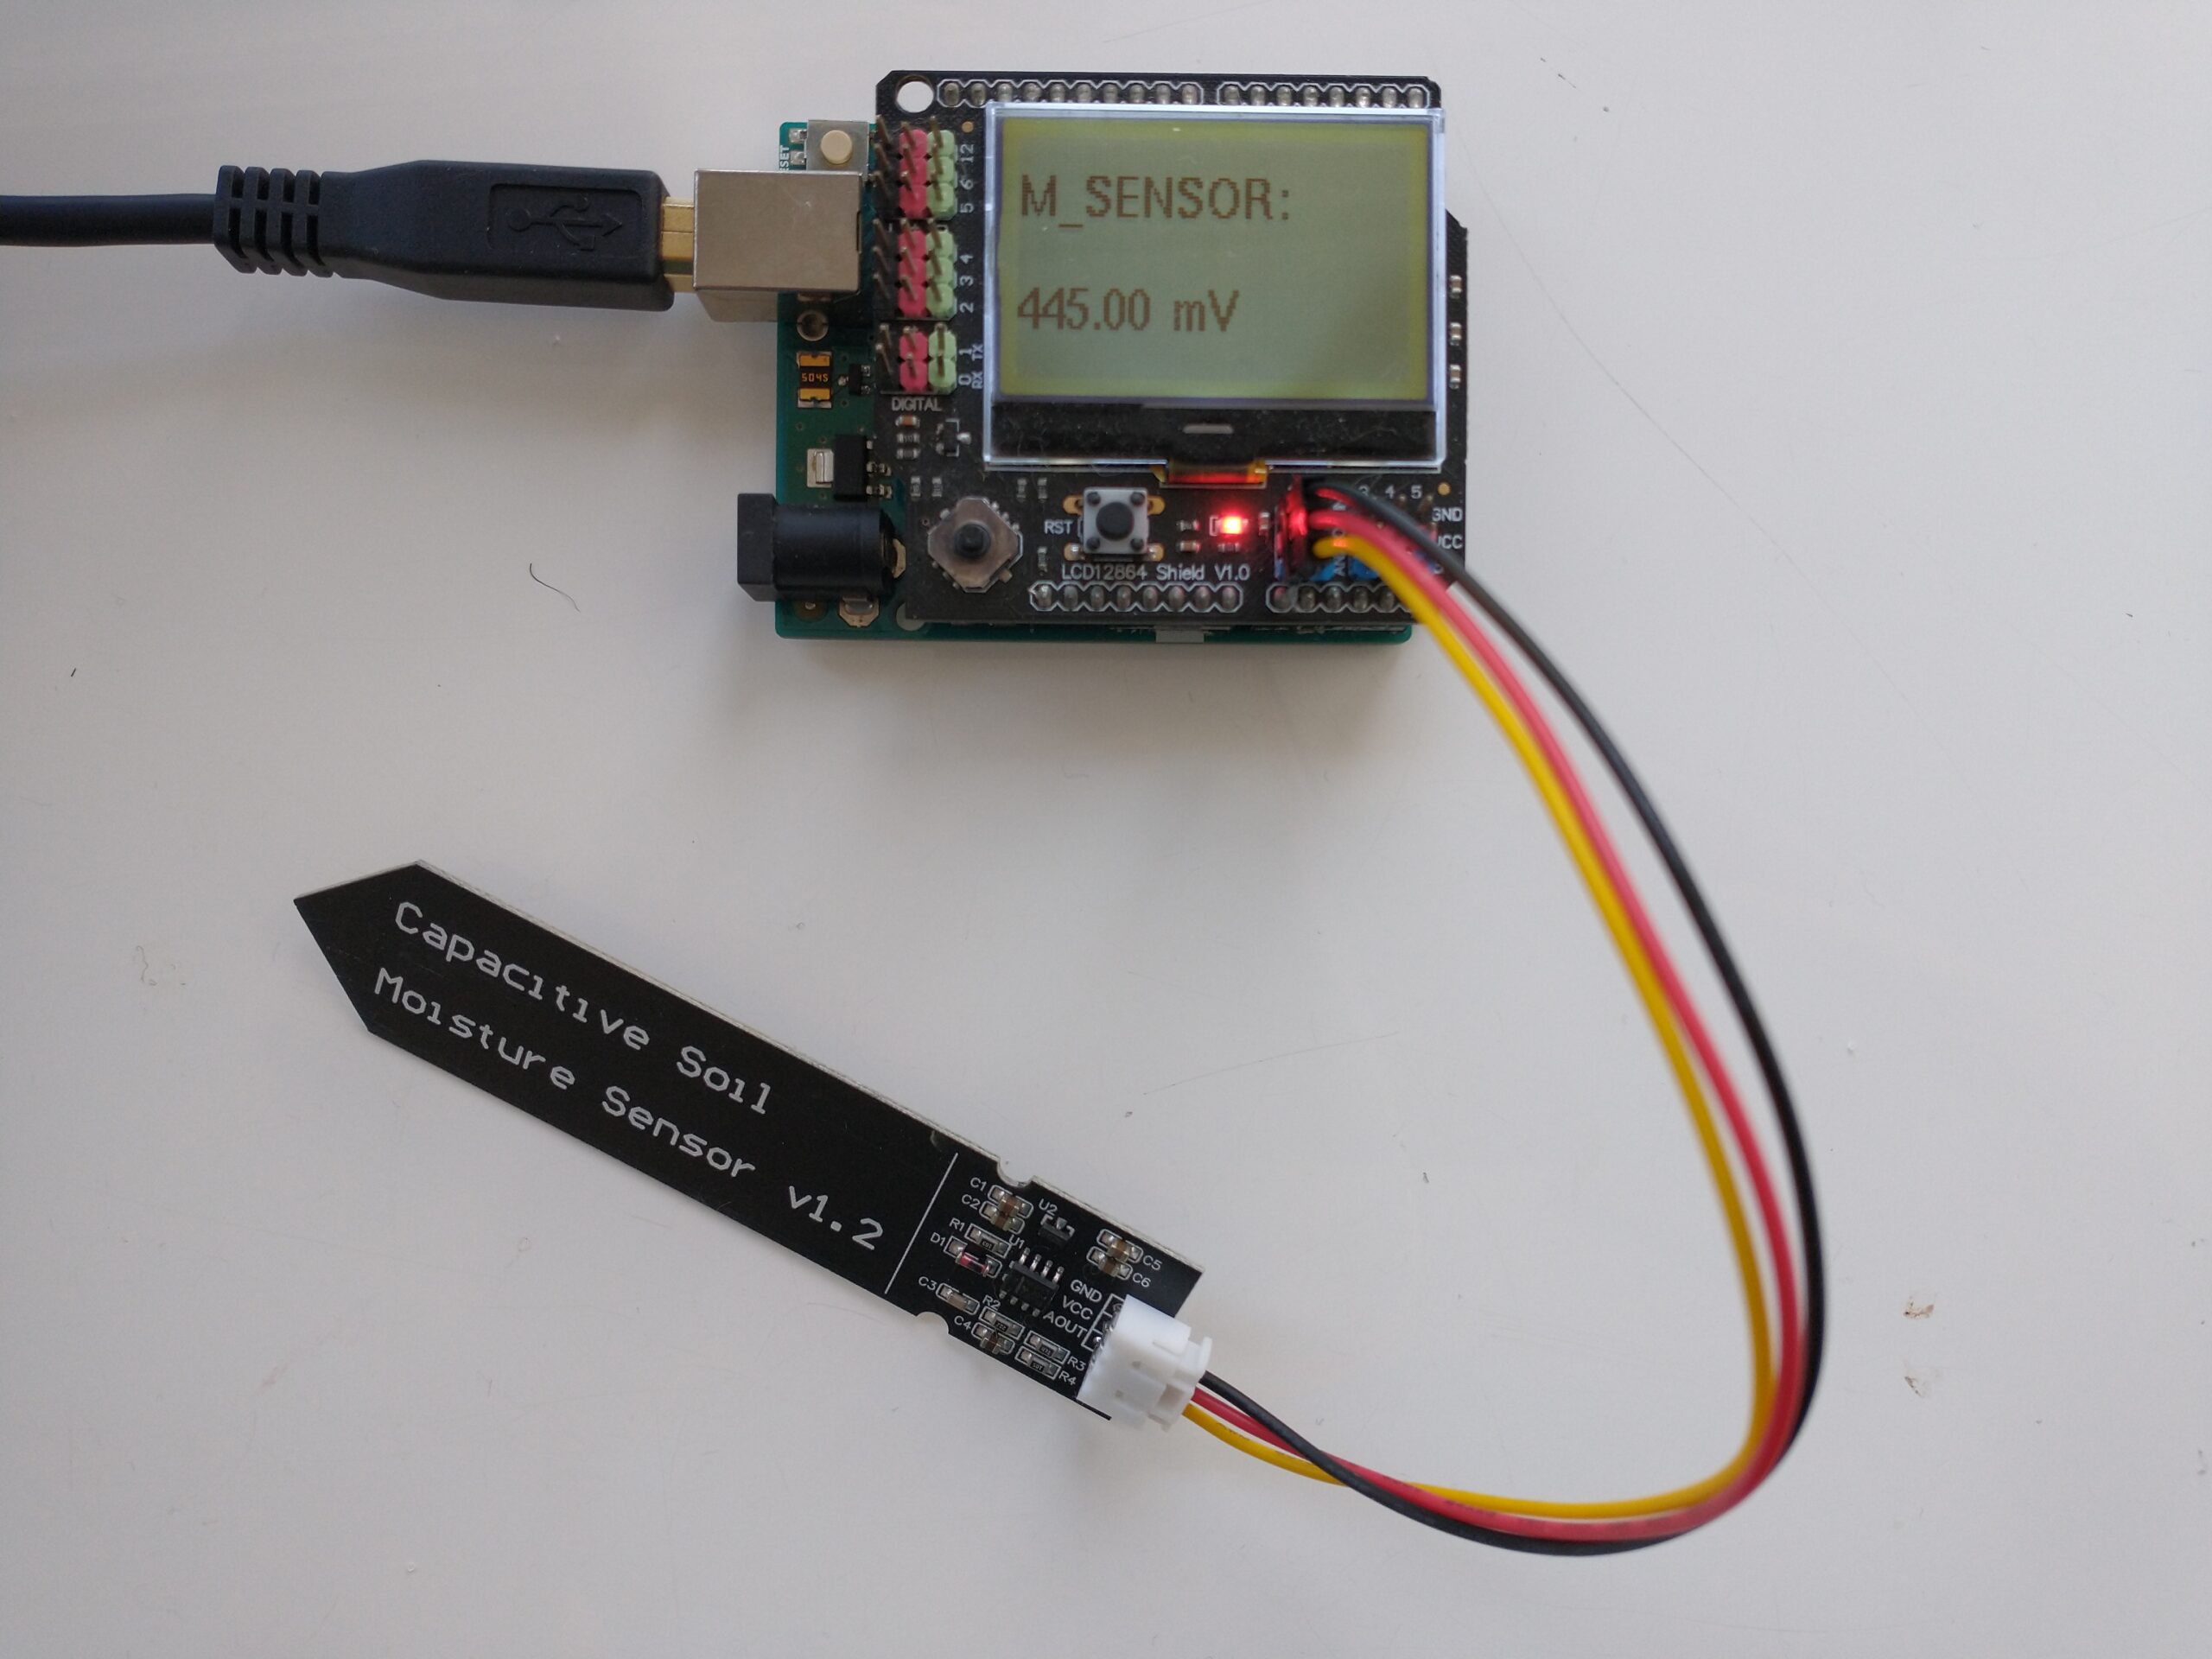
An analogue capacitive moisture sensor like this one does not expose any metallic parts to the media and can be used for the monitoring of moisture content. This sensor is powered by 3.5-5V and gives you a voltage signal that is proportional to the dielectric constant of the media it is in. As the dielectric constant of media changes with the presence of water, so does the signal of the sensor. However, no specific voltage corresponds to a specific water content measurement by definition, so we need to calibrate the sensor in order to interpret the voltage values we read from it. In order to get readings from this sensor, I use an Arduino UNO, the above-linked capacitive sensor, and an LCD shield from dfrobot that I can use to easily get the device readings. The arduino code used for this device is also shared below.

#include <U8glib.h>

#define XCOL_SET 0
#define XCOL_SET_UNITS 50

U8GLIB_NHD_C12864 u8g(13, 11, 10, 9, 8); 
float capacitance;

void draw() {

  u8g.setFont(u8g_font_helvB10); 
  
  u8g.drawStr(0,21,"M_SENSOR:");
  u8g.setPrintPos(XCOL_SET,51);
  u8g.print(capacitance);
  u8g.drawStr( XCOL_SET_UNITS,51,"mV" );
  
}

void setup() {
  pinMode(LED_BUILTIN, OUTPUT);
  pinMode(4, OUTPUT);
  Serial.begin(115200);
  analogReference(DEFAULT); 
  Serial.println("MOISTURE");

  u8g.setContrast(0);
  u8g.setRot180();
}

void loop() {

  draw();
  capacitance = analogRead(1);
  Serial.println(capacitance);

  u8g.firstPage();
    do  {
      draw();
    } 
      while( u8g.nextPage() );   

  delay(1000);
  
}

The calibration of a moisture sensor usually requires the creation of what soil scientists call a “water retention” curve, which is a curve where you plot the sensor’s signal as a function of a fixed volume or weight of water added to the media. However, this approach involves the use of many different containers and the addition of water to the media followed by oven drying steps in order to accurately determine how much moisture was actually in the media for every measurement carried out.

In order to do this procedure in an easier manner, losing as little accuracy as possible, I have created a calibration procedure that makes use of natural drying and only requires one single oven drying step. The procedure is as follows:

  1. Heat the media that will be used for an experiment in an oven at 110°C (this drives out all water).
  2. Wait for the media to cool to room temperature.
  3. Fill the container that will be used for the test (this can plastic but has to have holes at the bottom). Put the sensor in the media, make sure the sensor is driven into the media until the top line is reached.
  4. Take a reading, this is the “completely dry” media reading.
  5. Disconnect the sensor from the Arduino.
  6. Weigh the container+media+sensor. This will be the “dry weight”.
  7. Take the sensor out.
  8. Add water to the media until there is ample runoff coming out of the bottom.
  9. Wait until no more runoff comes off.
  10. Put the sensor in the media, making sure you drive it in until the top line is reached. The sensor won’t be taken out for the remainder of the experiment.
  11. Connect the sensor and take a reading. Take note of this value.
  12. Disconnect the sensor.
  13. Weigh the container+media+sensor. Take note of this value. The first reading you take is the “max saturation” weight.
  14. Repeat steps 11 to 13 every 1-6 hours (time is not very important as long as you gather enough data points) until you reach close to the dry weight. This can take several days depending on the media used. The more points you measure, the more accurate your curve will be.

After carrying out this procedure, you can create a curve like the one shown below. You can use the difference between each weight and the dry weight divided by the difference between the weight at max saturation and the dry weight in order to calculate the water saturation percentage. As you can see, the curves for these sensors are fairly linear in the 40-100% moisture range for the media I tested, while below 40% the regime changes and the measurement increases exponentially until it reached the “dry weight” sensor value. The entire curve can be described with a power-law equation. This behavior will not be the same for all media tested, reason why it’s very important for you to calibrate the sensor for the specific media you want to use.

Calibration curve for a capacitive moisture sensor. In this case, the media was a mixture of 50% river sand and 50% rice husks.

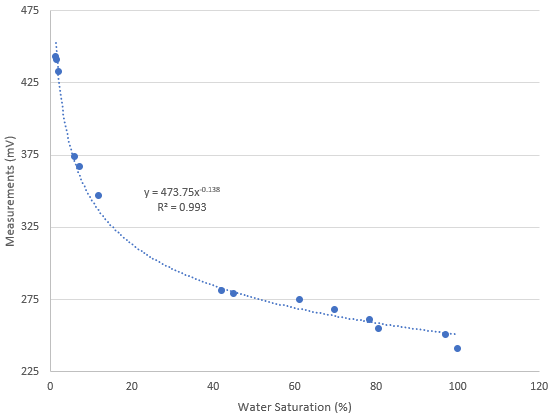
Once you have your sensor calibrated you can know what a measurement in mV implies in terms of water saturation for a given media type. This allows you to time your irrigations at a given water saturation % effectively. Which water saturation percentage might be better, depends on the properties of your media and how the water potential changes as a function of the water saturation. However, this allows you to experiment with irrigations at different water saturation % values and figure out exactly where you need to water so that your plants are not under or overwatered.

It is also worth noting that the above sensor is probably not rugged enough for use in a hydroponic setup without a bit more hardening. In order to use these sensors in practical applications, you should apply conformal coating to the electronics at the top of the sensor and then use shrink tubing in order to fully protect these electronics from the elements.


Using VH400 sensors to build an automated irrigation setup

I have written several posts in the past about the measurement of water content in media, I have covered some very low cost and easy to use sensors that can also be plugged into Arduinos using i2c as well as some of the more accurate sensors you can get for this in hydroponics. However, there are several companies that offer more plug-and-play solutions for the monitoring of moisture in media and the setup of automated irrigation schemes using these measurements. The company Vegetronix offers moisture sensors that are insensitive to salt in media that can be plugged straight into boards that contain relays that can be used to control irrigation pumps. In this post, we will talk about these sensors, how they operate and how you could use them to automate irrigation within your growing room or greenhouse without much coding or setup efforts required. This post is not sponsored by Vegetronix and I have no association with them.

Soil Moisture Sensor
The VH400 moisture sensor

The main offering of Vegetronix in terms of moisture monitoring is their VH400 sensor, this sensor has the advantage of being completely waterproof and rugged in construction. It can be placed deep inside media – right next to the root ball – which is a huge advantage in hydroponic setups that use cocoa or peat moss and use large amounts of media per plant. The small size of the sensor also means that this will be more practical for something like rockwool compared with a sensor like the chirp, which has exposed circuity and cannot be fully submerged. In addition, the VH400 is also suitable for outdoor use. Another thing I like about these sensors is that they are analogue and can therefore be interfaced quite simply with Arduinos or other such control mechanisms, making them great for DYI. This would make them a great candidate to interface with a cricket board, which I showed in a recent post.

The technology used in these sensors is however kept secret. Given that the sensor has no exposed ceramic or metal leads, it would be fair to assume that it is capacitive in nature and probably uses a technology similar to the Chirp sensor, although it is difficult to know precisely how it carries the measurements without doing some heavy reverse-engineering of the sensors. One of its key features though is that it is unaffected by salinity, which is a key requirement for accurate measurements in hydroponics, and – given the lack of exposed metal leads – we are sure this is not a resistive sensor. Vegetronix does not seem to hold any patents on the sensor – please correct me if I’m wrong – so it is fair to assume that the technology is probably well within the well-known techniques in the field.

It is worth noting however that – although advertised as “unaffected by salinity” – it will require routine maintenance, washing with distilled water to reduce salt accumulation and recalibration to ensure it is giving accurate moisture content measurements. As with all moisture sensors, adequate calibration and monitoring of sensors is fundamental to long term success with them. If these sensors are not maintained they will stop giving proper readings with time, especially if they are buried around the root zone of plants in hydroponic setups.

Another important point is that these are low cost sensors and have significant fabrication differences between them, proper and individual calibration of all sensors is required for proper quantitative use.

Latching Relay Board for Moisture Sensors
Vegetronix battery powered relay sensor

With the sensors in mind, we can now discuss the relay boards that make this choice quite attractive. The board shown above, which you can find here, is a battery-powered sensor that links to a single VH400 sensor to trigger a pump at a given moisture sensor threshold. All it takes to use this sensor is to perform a calibration procedure using the VH400 sensor and use the screw on the board to set the point where you want the relay to trigger. The board is 60 USD and the VH400 is 40 USD – at the shortest cable length – so with these two sensors you can set up a quite decent irrigation setup that is fully automated and battery-powered, with minimal wiring required.

However, if you want a more extensive setup, you can get their relay hub, which can connect to popular cloud data services in order to send your data to the cloud while also being battery-powered and allowing for triggering of an irrigation system using multiple sensor readings or input from the cloud. Although this relay box is more expensive, at near 150 USD when you consider the battery accessories, it does provide you with a lot of additional options if you want access to remote monitoring of your moisture sensors. Since it can relay the data to third-party sites like thingspeak, it would be relatively easy for an experienced programmer to hook all that data into a central database to put it together with data from other sensors.

So although the Vegetronix sensors are not my preferred solution if a fully DIY setup is possible – if enough time, experienced personnel, and financial resources are available – I do believe that they make a very good value offer for those who want a decently accurate setup to monitor soil moisture content without the hassle of having to deal with the complications of a fully DIY setup. Their boards offer both super simple, low-cost solutions and more elaborate solutions for those who give more importance to data logging and monitoring. If you aren’t controlling your irrigation with moisture sensors, a quick 100 USD setup of VH400+battery powered relay station is a huge step in the right direction.


Timing irrigations with moisture sensors in hydroponics

After discussing the different types of off-the-shelf sensors for measuring moisture in hydroponics (1,2,3), we are now going to explore the practical use of these sensors to time irrigations within a hydroponic crop. In this post, I’m going to share with you some of the key aspects of timing irrigations using moisture sensors as well as some useful resources I have found in the scientific literature that discuss this problem. We will mostly discuss sensor calibration, placement, and maintenance.

Image result for moisture sensor calibration curve
Some sample curves of volumetric water content as a function of sensor output. Taken from here.

In principle, the use of sensors to perform irrigations sounds simple. Wait till the sensor tells you there is little water in the media, turn on irrigation, wait till the sensors says there is enough water, turn irrigation off and wait for the process to repeat. However, there are several issues that complicate the problem, which need to properly considered if you want to successfully use these sensors for irrigation. The first such issue is the “set point” of the irrigation – when a sensor triggers an irrigation event – and how we can determine this.

Ideally, the first thing you will do with a sensor is calibrate it for your particular media to ensure that you can equate a given sensor reading with a given moisture content. The procedure below describes how this is can be done:

  1. Fill a container of known volume with drain holes with fully dry media without any plants.
  2. Weigh this full container.
  3. Insert the moisture sensor in it and take measurements till you have a stable reading. This will be the sensor set point.
  4. Wet the media with nutrient solution until there is substantial run-off coming off the bottom.
  5. Wait till the run-off stops.
  6. Weigh the media and take one moisture sensor reading every 1-2 hours, recording the time of each reading, until the media goes back to within 10% of the value of the initial reading.

With this data you can plot a graph of sensor signal vs water content (measured weight – dry weight) that you can use to determine what different signals from the sensor correspond in terms of amounts of water within the media. You can translate that water weight into volumetric water content by calculating the volume of water from the weight and then diving that by the total volume of the media. You should in the end arrive to curves like the ones shown above, where you can use regression analysis to create a relationship between moisture content and the sensor signal.

With the sensors now calibrated you can now decide on a set point for the irrigation based on how much dry back you desire. The optimal point for this will depend on your VPD and your growing objectives – whether you want to save water, maximize yields, etc – but starting with irrigations at a 50% dry-back point is usually a good idea, if no other guidelines exist. Some plants species are not very sensitive to this point – see this paper on basil – provided that you allow for enough dry-back for adequate oxygenation of the root system. By allowing deeper dry-backs you can save on water, although this can be problematic if your irrigations are done with nutrient solutions of significantly high strength. The ratio of plant size to media volume will also play a role as larger plants in smaller containers will tolerate shallower dry-backs as the total amount of water in the media will be smaller.

When an irrigation event is triggered it is also worth considering for how long this event will happen. If you water only till the sensor gives you a high moisture content reading, then there will be very little run-off and nutrients will tend to accumulate in the media and imbalances will be created since nutrients that are not absorbed cannot be leached out. For this reason, irrigations are usually continued for several minutes after sensors reach their high moisture reading, in order to ensure that enough run-off is collected to avoid these problems.

Sensor placement is also going to be critical for irrigation timing since you want to ensure that all plants are properly watered. Since irrigation events will generally be triggered by a single sensor, it is up to the grower to decide whether the risk of under or over watering is more acceptable. If the risk of underwatering is considered more important, the sensor will usually be placed in the plant that is largest, has the location with the micro-climate with the highest VPD, and which receives the most light. This is going to be the plant with the highest water demand and most likely the first to need irrigation, if you irrigate whenever this plant needs water, then almost everything else will be at a point of higher moisture content. This can be a dangerous game though, especially if over-watering can be problematic. In these cases, it is usually better to have multiple sensors and irrigation zones and make decisions based on more complex control processes. You can read more about irrigation timing and irrigation in hydroponics in general here.

The last important point here is sensor maintenance. Assuming that moisture sensors will always work in the same way can be a recipe for disaster because these sensors can deteriorate due to a variety of reasons. Since they are exposed to high-salinity, wet environments, contacts can corrode, leads can break and salts can accumulate within sensor structures. For this reason, it is good practice to wash these sensors with distilled water with some frequency – usually I recommend at least once per month – and to recalibrate the sensors at least once per year. It is also good to keep a a couple of already calibrated sensors in reserve, such that these sensors can be deployed quickly if an irrigation sensor fails. To be safer, have irrigations controlled by measurements taken by two sensors in the same plant and be alerted if the measurements of these sensors diverge, this usually indicates that a sensor has deteriorated and needs to be changed.


Tensiometers (irrometers) the best way to time irrigations in hydroponics

I have recently written blog posts about the measurements of water content in media in hydroponics. The first one was about the problems with resistive moisture sensors in hydroponics and the second one showed you a low-cost capacitive sensor that does the job adequately. However, while capacitive sensors are significantly better at measuring moisture compared to resistive sensors, they are not the only type of reliable sensor that we can use to measure water content in hydroponics. In this post, I want to talk about tensiometers and how they can be used to measure water potential in hydroponics and soil. We will go a bit into how tensiometers work and why they are the most reliable sensors for irrigation timing.

Overall layout of modern tensiometers

Both capacitive and resistive sensors try to measure the amount of water in the media by measuring how the electrical properties of the media change when different amounts of water are present within it. However, plants do not care so much about how these electrical properties change but they care most about the effort that is required to move water from the media into the plant’s root system. The tensiometer is a sensor that is designed to measure the difficulty of this process. The device is built using a ceramic cup that is filled with degassed distilled water that a pressure gauge is attached to. When water is not present outside the tensiometer, the water inside of it will face a pressure to go out – causing the pressure gauge in the tensiometer to sense a vacuum – as water is added to the media, this pressure is reduced.

The above is very similar to what plants actually experience. When the media is wet, the plant has an easier time taking water into its root system, when the media is dry, the plant needs to fight in order to keep water inside of its roots from flowing into the media. Since this process mimics what the plants actually care about, it accounts for a lot of variables that can directly affect this pressure, such as the osmotic pressure of the solution and the chemical composition of the media. While resistive sensors are harshly affected by these variables and capacitive sensors are to a large extent insensitive to them, tensiometers account for them in a way more similar to how plants do.

RSU-V
Digital tensiometer from irrometer.com

Although tensiometers can be analogue – as shown in the first image in this post – there have been great strides in the creation of digital tensiometers that you can use to monitor your crops. The company Netafim (who did not sponsor this post and does not have any affiliation with me) provides digital tensiometers that send measurements to a central hub with data logging capabilities. Although they have been created mostly for soil, they can also be used in hydroponics to directly monitor the moisture content – or perhaps more accurately the “drying pressure” – of the media. You can also find tensiometers at irrometer.com (who did not sponsor this post and do not have any affiliation with me) where you can get both analogue and digital sensors that you can use within your custom setups, including Arduino builds. In a future post I will show you how to build such a monitoring setup. Please note that the Watermark sensor they sell is not a traditional tensiometer, it is a type of resistive sensor that also uses a ceramic membrane, a sort of “hybrid”.

Note that tensiometers are not perfect sensors, they come with a substantial set of problems. The first is that they are going to be sensitive to salt buildup because of how water flows in and out of the tensiometers, if salt accumulates in the pores of the tensiometer’s ceramic cup, it will lose its ability to properly sense the water potential of the media. This can be especially problematic if significantly hard to dissolve salts accumulate within the irrometer’s structure. The second most common issue with them is their slow response, tensiometers by their very nature rely on reaching a steady state within a process that is significantly slow – water flow across a ceramic – so they will tend to respond slowly to changes in the water content of the media, as the process reaches this state.

All-in-all, if you want the absolutely best way to time irrigations of our media in hydroponics, then a tensiometer that is placed right at the root ball level of your plants will offer the best results for this, especially if you’re using significant volumes of media. Tensiometers/irrometers cannot be beat when it comes to timing the watering of plants in coco or peatmoss, while they can struggle with media that are smaller, like rockwool, due to the volume that the tensiometer itself has.


The Chirp Sensor: A plug-and-play solution to moisture monitoring in hydroponics

If you want high yields in hydroponics, then you need to monitor moisture quite closely. Watering plants when they need it – and not on a timer – is critical if you want to maintain ideal water and nutrient transport within your plants. As I’ve discussed in a previous post, most of the cheap sensors available for this are inadequate as they are affected by the salts present in hydroponics and do not offer proper sensing of the amount of moisture in hydroponics media. Although there are a lot of different sensors that do offer adequate measurements – which we will be discussing in future posts – these are usually not easy to use and often require custom electronics, powering and sometimes complicated calibration. In this post we are going to discuss the easiest solution if you want to have adequate moisture monitoring within your crop with least possible hassle. The chirp sensor. Note that this post has not been sponsored by Chirp’s creator or anyone else.

Chirp! - plant watering alarm 1
The Chirp moisture sensor

The Chirp sensors were created a couple of years back. They are available for purchase here. The sensors use a capacitive measuring principle, which means that the sensor detects moisture by a change in the capacitance of the media in the presence of water, rather than by a change of electrical resistance, and, therefore, the sensor is not strongly affected by the salts present in hydroponics. Additionally, the sensor plates are not corroded by the flow of current between the electrodes. The plates of the sensor are actually covered in an insulating material, giving the sensor the ability to last for a long time. The big advantage of the Chirp alarm sensor is also how easy it is to set up and how useful it can be to growers.

In order to set up the sensor, you will need to put it in the media at the point where the media will require watering, you then wait a couple of minutes for the sensor reading to stabilize and you will then press the button at the top of the sensor in order to indicate that this is the threshold for moisture where the sensor will start “chirping”. Whenever the sensor reaches this reading again it will start chirping, chirping louder and more frequently as the moisture level drops below this point. It will also only do so when it detects light, so it will not detect the need for watering when the lights are out. When it chirps, you water, that’s it.

If you want to figure out when to set up the sensor for watering, you can set up a pot with media (with no plants), water it till there is consistent run-off, wait for the run-off to stop, weight it – this will be the saturated weight – then weight it again every hour to quantitatively measure the dry-back of the media. You can then set up the chirp sensor when 60-70% of the water weight has been lost, which indicates a condition where watering is going to be necessary. This measurement can then be used for the watering of your plants, deeper or shallower dry-backs might be optimal depending on your conditions, but the above is a good starting point where you will not risk overwatering your plants.

The advantage of the Chirp sensor is that all of this can be done without any fancy setup, so it can be as good for watering a single plant as it could be for an entire greenhouse if enough Chirp sensors are used. Additionally, the Chirp sensors are also i2C compatible, so if you buy Chirp alarm sensors to perform this sort of monitoring you will still be able to hook them up to Arduinos or other microcontrollers in the future in order to perform your own quantitative moisture measurements and automate the entire watering cycle. If you’re looking for a low-cost, reliable yet expandable plug-and-play solution for moisture monitoring then the Chirp sensor is the way to go.


How to identify resistive moisture sensors and why to never use them in hydroponics

The measuring of media moisture, also known as water-content, is critical to successfully irrigating crops in hydroponics. Badly timed irrigations cause lots of the problems faced by novice and even some large scale hydroponic growers. Trying to time irrigations at regular intervals often leads to failure because of how the water demand of a plant changes with size and environmental conditions. It is therefore critical to use a quantitative input that truly represents the amount of water in the media in order to decide whether to water or not. Sadly, the most common method to do this is through the use of resistive moisture sensors; a type of sensor that is ill-fitted for this task in hydroponics. Through this post, I will talk about how resistive sensors work, how you can identify them and why you should never use them to measure water content in your hydroponic crop.

Modulo Sensor de Humedad del suelo Resistivo Higrometro Humedad Tierra, Ferretronica
A typical resistivity sensor for measuring moisture content in soil/media

In order to measure the amount of water in media, we need to measure a property of the media that changes in proportion to how wet it is. One of the simplest approaches to this is to put two electrodes inside the media and measure the amount of resistance to the flow of electricity between these electrodes. This exploits the difference in conductivity between water and air. When the media is wet the electrodes will experience more current flow between them. On the other hand, when the media is dry, there will be more air and, therefore, less current flowing between the electrodes. This type of sensor, where we assume that the current flow between two electrodes at a fixed potential is proportional to the amount of moisture in the soil, is what we call a resistivity moisture sensor.

There are several problems with these measurements, especially in hydroponics. The most important is that hydroponic nutrient solutions are significantly more conductive than tap water and therefore the amount of current that flows through the electrodes of the sensor will be much larger than the amount the electrodes were designed for. Since current is flowing, chemical reactions will also happen at the electrodes, corroding them and changing the measurement of resistance with time as corroded electrodes become less conductive. Due to this fact, electrode performance will deteriorate with time and the electrodes will often become useless.

TROLMASTER Aqua-X Water Content Sensor – Growbuds Canada
A more advanced resistive sensor that uses AC and stainless steel electrodes to avoid the durability issues faced by cheaper sensors like the one in the previous image.

Some manufacturers will try to reduce the above issue by creating electrodes using less easily corroded materials, such as stainless steel, and using AC instead of DC to measure resistivity. This might partially solve the issue of the electrodes being damaged with time but another issue arises; the conductivity of the solution is generally not constant with time as the amount of salts within the media changes. Imagine you start watering a crop with a solution that has a conductivity of 2.1mS/cm, you will then determine the measurement that corresponds to this value in the resistive sensor as “wet” but as you continue feeding salts might accumulate in the media and the conductivity in the root zone might actually be 3.0mS/cm when watering. This means that the “wet” measurement of the sensor is now greatly below the expected conductivity and therefore the sensor will fail to correctly tell you how much water there is in the media.

While resistive sensors might be able to tell between fully dry or fully wet conditions in their first use, this ability will deteriorate with time as the conductivity of the media changes or the electrodes deteriorate. Since in hydroponics we often rely on the accurate measurement of pretty specific dry back conditions in order to properly water plants, having a sensor that lacks a good degree of granularity in measuring water content is not acceptable. For this reason you should avoid sensors that use resistivity as their way to tell how much moisture there is in your media.

Thankfully telling whether a water-content sensor is a resistivity-based sensor is pretty easy. Almost all resistive sensors will contain metallic legs that are used to penetrate the media, so any sensor that uses metallic prongs like the ones showed in the two electrode examples above is most likely a sensor that uses electrical resistance to measure water-content. Sensors like this should always be avoided.

Which sensors should you use then? Within the next several posts I will be going deeper into other types of moisture sensors. I will describe other ways to measure moisture content that are better suited for hydroponics and give you some links to sensors you can get to carry out this task successfully.