pH vs Nutrient Availability: Rethinking the Classic Charts
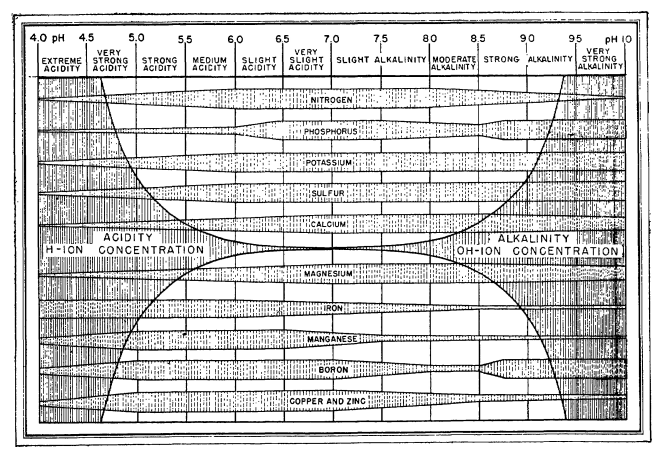
If you’ve been around hydroponics long enough, you’ve probably seen the ubiquitous “pH vs nutrient availability” chart. It usually looks like a series of colored bars, each showing how available a nutrient supposedly is across a pH range. The bars are wide for some nutrients at certain pH values, narrow for others, and the chart often comes with a moral: keep your solution pH between 5.5 and 6.5.
I discussed some of these issues in a previous post, but it’s worth revisiting them here with a clearer chart. The problem is that most of these charts trace back to soil agronomy research from the 1930s and 1940s. They’re not based on solution chemistry relevant to hydroponics. They conflate microbial activity, lime chemistry, and plant physiology with solubility. And, in some cases, they are flat out misleading.
Let me talk about why the traditional chart is wrong, what modern chemistry tells us, and how a more honest representation looks.
Where the Old Charts Went Wrong
The historical diagrams were designed for soils, not hydroponic solutions. For example:
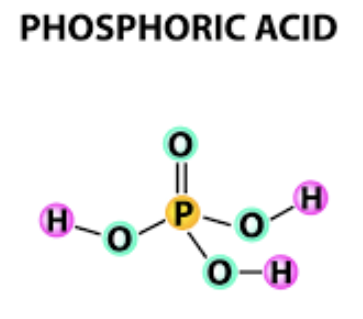
- Nitrate (NO₃⁻): In many charts, nitrate availability appears to fall off at low pH. In reality, nitrate is completely soluble across any reasonable pH range. The “loss” in those charts comes from soil microbial nitrification shutting down under acidic conditions, not relevant when you’re directly dosing nitrate salts in solution.
- Calcium (Ca) and Magnesium (Mg): Old charts show Ca and Mg as always available at high pH. But that ignores precipitation with phosphate or carbonate, which can start as low as pH 6.2 for Ca. The old charts show high Ca and Mg availability at high pH because the high pH in soils was usually achieved by the addition of dolomite or lime, which greatly increased Ca and Mg concentrations in soil, this is not the case in a soilless setup.
- Micronutrients (Fe, Mn, Zn, Cu): These are shown as less available above neutral pH, which is true for unchelated forms (they hydrolyze and precipitate quickly). But in hydroponics, I typically use chelates, and their stability extends availability well above pH 7.
- Phosphorus (P): Charts often suggest a broad plateau around pH 6 to 7. In truth, phosphate solubility is sharply influenced by calcium concentration and carbonate alkalinity. The idea of a universal “wide bar” is misleading.
These errors matter. They lead growers to overemphasize the magic 5.5 to 6.5 range without appreciating that different nutrients behave differently, and that chelation or precipitation risks can change the picture entirely.
Building a Better Chart
To improve on the old diagrams, I constructed a new heatmap. Instead of arbitrary bar widths, each nutrient’s relative availability (scaled from 0 = low to 1 = high) is modeled based on actual solubility, speciation, and chelation chemistry. The chart covers pH 4.0 to 8.5.
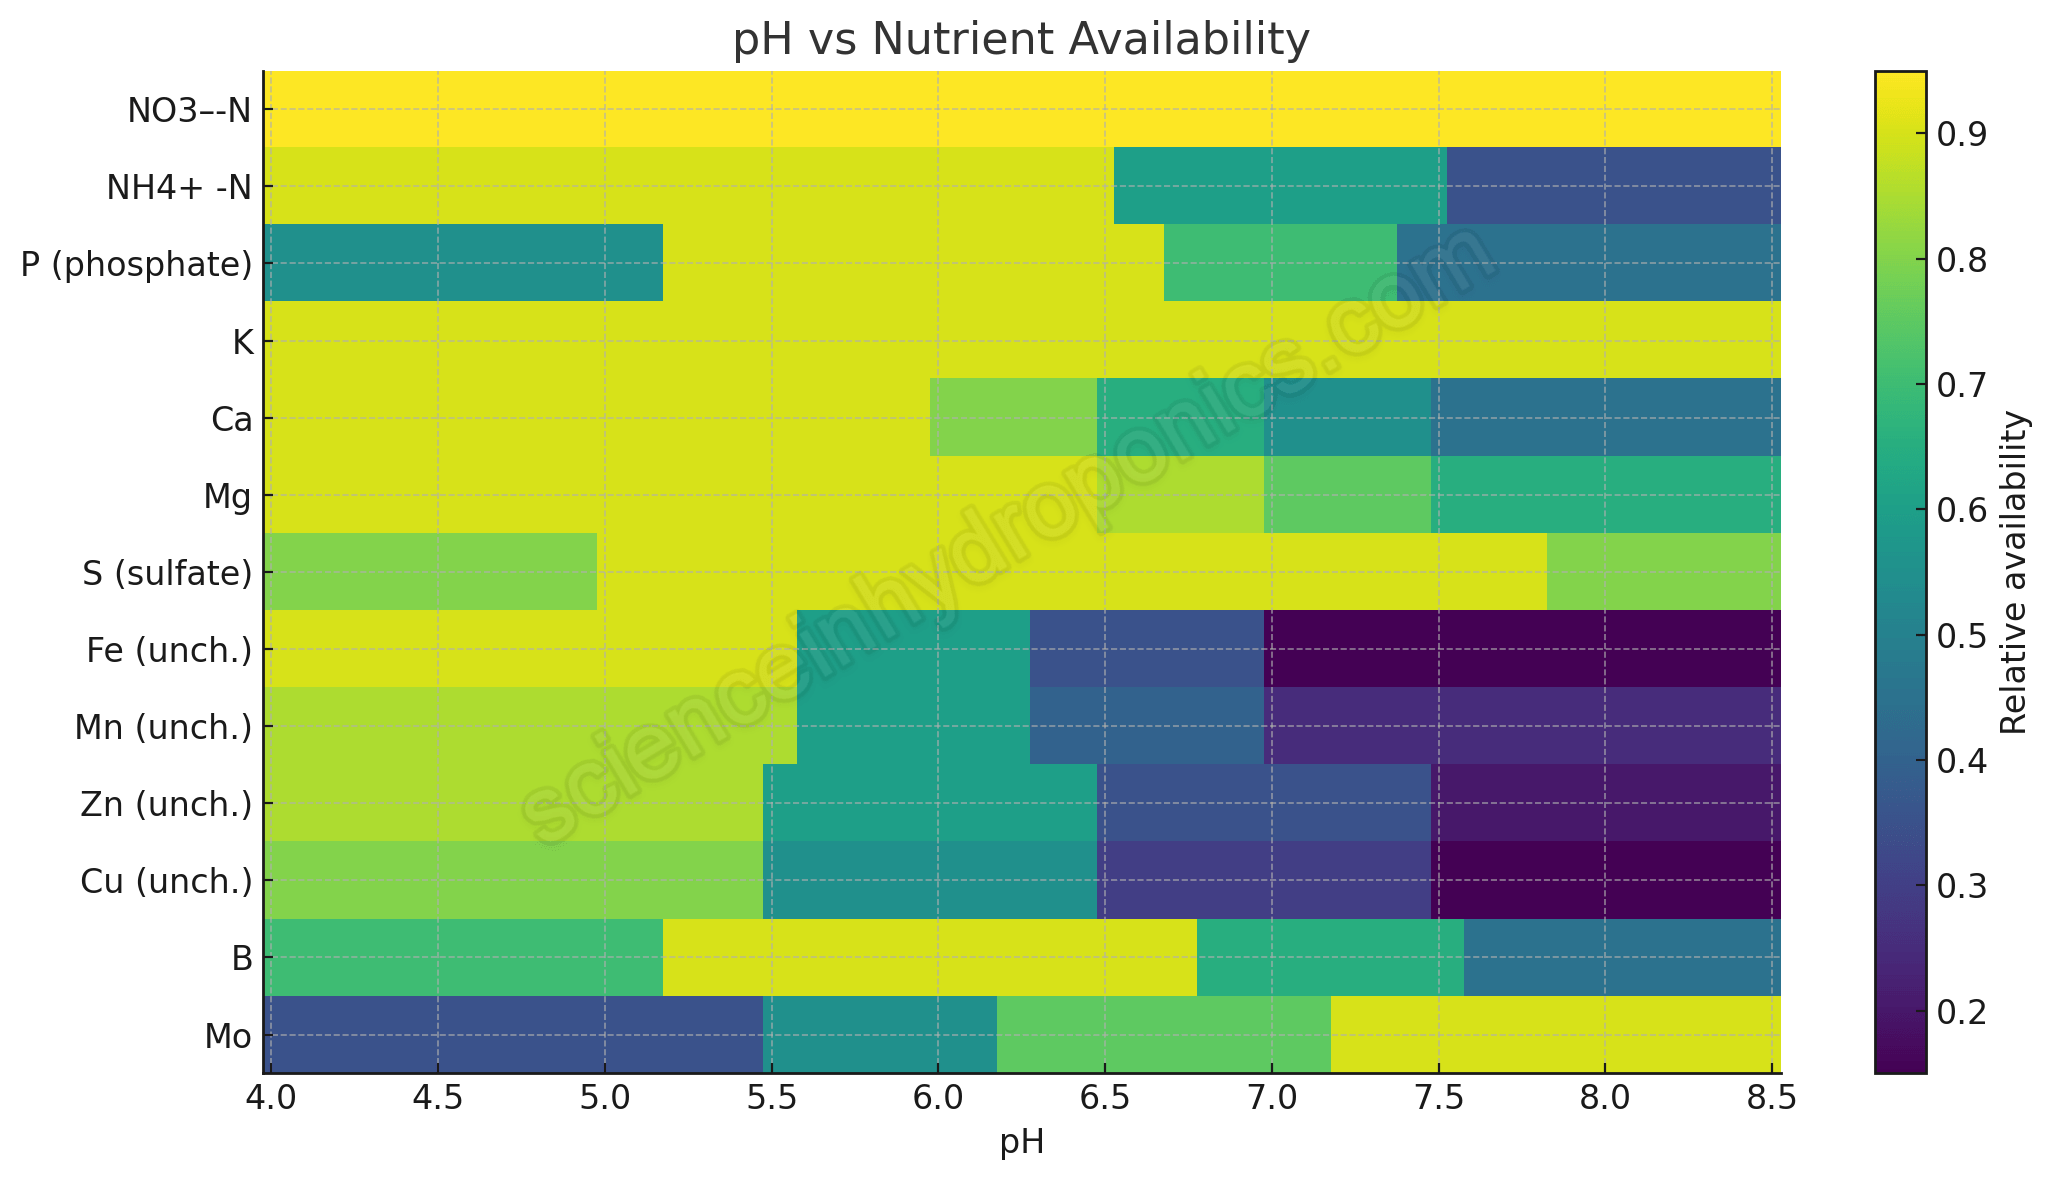
This chart is not an absolute quantitative prediction (real world systems have variations depending on concentration, alkalinity, chelate type, etc.). But it captures the directional chemistry more honestly. For nutrients that are effectively pH independent (like nitrate), the line is flat. For those that crash with pH (like unchelated iron), the line drops. And for Ca and Mg, I’ve introduced tapering to reflect phosphate precipitation behavior.
Nutrient by Nutrient Ranges
Here’s a summary table describing the approximate pH behavior, the range of best availability, and the underlying reason:
| Nutrient | Broad Availability Range | Notes / Reason |
|---|---|---|
| NO₃⁻-N | 4.0 to 8.5 | Soluble across all relevant pH; uptake independent of pH in hydroponic solution. Old charts confused microbial nitrification with solubility. |
| NH₄⁺-N | Best <6.5; declines >7.0 | At higher pH, conversion to unionized NH₃ increases, which is less available and potentially toxic. |
| Phosphorus (P) | Peak 5.5 to 6.5; drops <5.2 and >7.0 | Solubility falls at high pH due to Ca+P precipitation (starting ~6.2); also limited at low pH by fixation and speciation. |
| Potassium (K) | 4.0 to 8.5 | Monovalent cation, highly soluble, minimal precipitation issues (sometimes K containing silicates at higher pH values) |
| Calcium (Ca) | Stable <6.0; declining >6.2 | Precipitates with phosphate and carbonate as pH rises; availability falls gradually above ~6.2. |
| Magnesium (Mg) | Stable <6.5; mild decline >7.0 | Mg+P precipitation is less aggressive than Ca+P; solubility loss is slower but still possible at higher pH. |
| Sulfate (SO₄²⁻) | Broad 4.5 to 8.0 | Generally soluble. At very low pH, some soils can adsorb sulfate due to protonated variable charge surfaces, reducing availability. At very high pH, reduced root uptake efficiency and competition with other anions can occur; in concentrated Ca²⁺ + SO₄²⁻ systems gypsum may precipitate by saturation. |
| Iron (Fe, unchelated) | Max <5.5; falls sharply >6.0 | Fe³⁺ hydrolyzes and precipitates as hydroxides and oxides above ~pH 6; nearly unavailable by pH 7. |
| Manganese (Mn, unchelated) | Best <6.0; declining >6.3 | Mn²⁺ oxidizes and precipitates above neutral pH. |
| Zinc (Zn, unchelated) | Best <6.0; low >7.0 | Zn²⁺ solubility decreases with increasing pH; precipitates as hydroxide/carbonate. |
| Copper (Cu, unchelated) | Best <6.0; poor >7.0 | Cu²⁺ strongly hydrolyzes, falls out of solution quickly with rising pH. |
| Boron (B) | Best 5.5 to 6.8 | Boric acid is readily available in this range; at higher pH, more borate forms, reducing uptake. |
| Molybdenum (Mo) | Improves >6.0 | Molybdate solubility increases with pH; plants often deficient in acidic conditions, more available at neutral/alkaline pH. |
The Ca vs Mg Difference
A key improvement over older charts is distinguishing calcium from magnesium. While both can precipitate with phosphate, their behaviors differ:
- Ca+P precipitation is strong and begins around pH 6.2, especially in solutions with 1 to 3 mM phosphate. Brushite, dicalcium phosphate, and hydroxyapatite phases progressively reduce solubility.
- Mg+P precipitation is slower and less pronounced. Mg²⁺ is more strongly hydrated and less eager to form insoluble phosphates. It tends to stay soluble longer, only declining gently above pH 7.
Chelation: The Missing Dimension
My chart above shows unchelated forms. In real hydroponics, Fe, Mn, Zn, and Cu are almost always chelated. Depending on the chelate (EDTA, DTPA, EDDHA, HBED), stability can be maintained up to pH 7.5 to 9. This dramatically extends availability, particularly for Fe. A separate chart is needed to show chelated behavior.
Why This Matters
So why obsess about getting this chart right?
Because oversimplified charts lead to oversimplified thinking. If you believe nitrate solubility collapses below pH 6, you might panic when your reservoir drifts to 5.2, even though NO₃⁻ is unaffected. If you believe Ca is “always available,” you might miss that phosphate precipitation is happening in your tank right now at pH 6.3. And if you don’t distinguish between chelated and unchelated micronutrients, you’ll misdiagnose deficiencies.
A better chart isn’t just about scientific pedantry. It’s about helping growers make better decisions: when to acidify, when to buffer, when to choose a stronger chelate, and when to worry (or not worry) about a drifting pH.
Final Thoughts
The classic nutrient pH charts had their place in teaching basic agronomy 80 years ago. But hydroponics deserves more precision. Nutrients don’t all behave the same way. Some are flat across the entire range (NO₃⁻, K). Some rise or fall gradually (B, Mo, Mg). Others are brutally sensitive (Fe without chelates). And precipitation interactions mean that Ca and phosphate availability are tied together, not independent.
This new heatmap and the accompanying table aren’t the last word, they’re a more honest starting point. The real message is: understand the chemistry, not just the cartoon.