Powdery mildew (PM) is a hard disease to fight. It affects plants of multiple different species and causes big crop losses around the world. Although the best treatment against it is prevention, there are still ways to combat the pathogen and reduce crop losses once plants are infected. There are a lot of products currently being marketed to try to fight these fungi but many of these products are systemic fungicides that cannot be easily used in eatable crops, especially when getting closer to harvest dates. In this post, I want to share with you a formulation for an all-organic and powerful fungicide, backed by peer-reviewed research, that you can use as a strong line of defense against PM. Also checkout my previous post detailing the recipe for a natural fungicide based on a US patent to fight fungal disease.
A lot of research has been done to deal with PM. This disease is sadly not caused by a single species of fungus but is actually an array of different species of fungi that attack multiple different plants, showing similar symptoms. Thankfully, there are several organic treatments that have been found to be effective against many of the fungi that cause this problem.
Jojoba beans and oil
Vegetable oils have been some of the more effective solutions found. Sunflower oil was found to be quite effective in the treatment of PM in tomato crops (1). Emulsions of vegetable oils with yolk have also been found to be effective fungicides to treat PM in cucumber (2). As a matter of fact, many cooking oils, including safflower, olive, corn, and soybean, show some control properties against PM, especially when they are properly emulsified and can spread evenly on leaves. Their main mode of action seems to be to inhibit the germination of spores.
More chemically active plant oils have also been found to work against powdery mildew. This review (3) highlights some of the research that was done until 2014 for the control of PM using this sort of chemicals. Essential oils such as Hyssop (4), citronella, lemongrass, eucalyptus, cinnamon, tea tree (5), and many others have been tried, but although active in PM control, few have been able to give broad efficacy across multiple plant species. However, Jojoba oil has been one of the few oils with consistent results across multiple plant species (6, 7, 8). Japanese knotweed oil has also proved effective (9, 10, 11), although it is considerably more expensive.
Comparison of multiple different treatments in the inhibition of powdery mildew spore germination. Taken from this article.
It is also key to realize that the effectiveness of the above oil treatments hinged on the proper emulsification of these oils with water. This means that an adequate formulation should contain a surfactant to help disperse the oils into the water. The papers cited above use either completely synthetic emulsifiers – such as Tween 20 – to natural emulsifiers such as milk or yolk. However, one of the most popularly used and effective organic emulsifiers, yucca extract, could help us better emulsify these oils for their use as foliar sprays.
To prepare the organic fungicide for the prevention and treatment of PM, use 1g/gal of yucca extract, 45mL/gal of Jojoba oil, and 25mL/gal of sunflower oil. Add the yucca extract first and mix till it’s all dissolved, then add the oils and mix well before application. Ensure the oils are completely emulsified before performing an application. You can apply this as a foliar spray once per week.
Making a nitrate rich compost tea for organic hydroponics
Organic hydroponic solutions – meaning solutions derived from organic inputs – contain a lot of nitrogen derived from organic sources that are mainly in either ammonium or protein form. These forms of nitrogen can be useful when decomposed by microbes but can be hard for your plants to use before this decomposition process takes place. Nitrate, the form of nitrogen plants crave the most, is not easy to add directly in an organic setting, because most available nitrates are synthetic – therefore cannot be used – and mined sodium nitrate, the only one that can be used under OMRI guidelines, contains a large amount of sodium, which is not beneficial for plants. However, we can create compost teas that contain a high enough level of nitrates, that will be eagerly taken up by our plants and contain little to no sodium, starting from no mined materials.
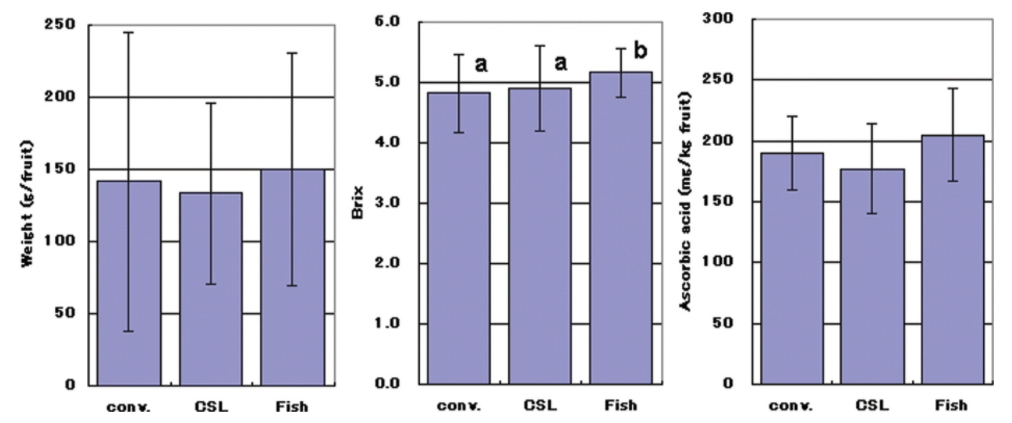
Results of using either conventional chemical fertilizers (a), compost tea made with CSL (b) or compost tea made with fish emulsion (c). Taken from here.
In order to do this, we will take advantage of a research paper that was published in 2010, on the creation of nitrate-containing fertilizers from organic sources. The process takes advantage of the presence of saprophytic bacteria – those that recycle dead organisms – in several different organic materials and puts them into contact with organic inputs that are high in protein or ammonium nitrogen. With time, this creates a nitrate-rich solution that contains virtually no left-over protein or ammonium. In the paper, they tried many different organic nitrogen sources, sources of bacteria, and processing times. The process I will describe hereafter is taken from an examination of these results and what they found worked best.
The first thing we require is an organic source of nitrogen. From the many that they tried, only fish emulsion and corn steep liquor (CSL) offered high enough conversion rates into nitrate. Between these two, I would recommend using CSL, since fish emulsion can be very smelly, which can be a very important factor when large amounts are being used. The second thing we require is a source of bacteria capable of carrying out the conversion. They tried several, all with good conversion rates, but their preferred source ended up being bark compost, due to its wide availability and reproducibility.
Growth and quality of tomato plants grown with conventional mineral fertilizers and either CSL or fish emulsion derived compost teas. Taken from here.
To create the starting solution, add CSL at 1g/L and bark compost at 0.5g/L. To prepare 5 gallons of the starting solution, you would add 19g of CSL and 9.5g of bark compost. You should then connect an aeration pump into this solution, to ensure ample oxygen is available for the conversion processes. The entire process will take around 12 days. After this time has passed, you can then use this final compost tea as a nutrient solution. If you want to know what the results of your process were, I would recommend you use a nitrate ISE from Horiba which you can use to measure the final nitrate concentration of your solution. You would expect to measure around 450-600 ppm of nitrate with this meter, which would be equivalent to 100-130 ppm of N as nitrate. Since different CSL sources will have different NKP values, you might need to adjust your CSL additions to come up with better numbers. However, the above numbers should generate nitrate levels in a reasonable range.
Overall, this paper shows that a solution derived in this manner can be used to successfully grow tomatoes when compared to normal chemical fertilizers. However, note that the media did contain some amendments, as the above solution is not able to provide significant amounts of Calcium or Magnesium. Although this compost tea can provide a lot of the nutrition required, it cannot replace a full hydroponic solution when fully inert media is used. By adjusting the amount of CSL used in the process, you should also be able to control the amount of N, P, and K present in the final solution. This should allow you to create a great compost tea that can be used for the successful growing of organic hydroponic crops.
Never fail with ebb and flow hydroponic systems
Ebb and flow or “flood and drain” systems, are some of the most popular systems built in hydroponics. These are low cost, can host a large number of plants, and can generate good results, reason why they are a preferred choice for both new and experienced hydroponic growers. However, there are a substantial number of issues that can come up in these systems, both due to the different ways they can be built and because of failures in their management. In this post, I am going to give you some tips on the construction and management of ebb and flow systems so that you can minimize the chances of failure when building your own hydroponic setup of this kind. For some basics of how an ebb and flow system is set up, I advise you to watch this video.
Ensure full drainage
A common mistake when building a flood and drain system is to have incomplete drainage of the nutrient solution. Make sure you have a setup that allows for complete drainage of the solution as soon as a certain level is reached, and always stop pumps as soon as the return of the solution starts. It is quite important to also ensure that as little solution as possible remains at the bottom of your flood and drain trays or buckets, as plants sitting in puddles of water can be a recipe for disease and a very good environment for pests to develop. A very simple system I built in 2010 had the problem of never being able to efficiently drain, which caused substantial issues with the plants as root oxygenation was never as good as it should have been.
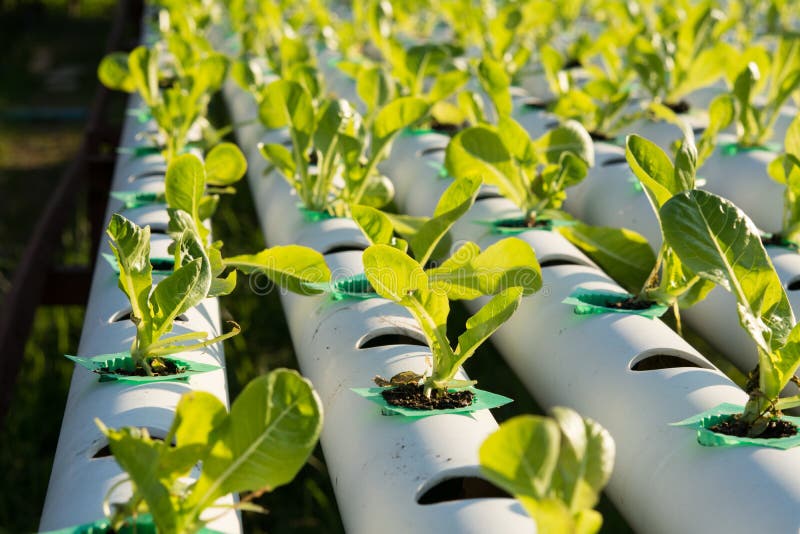
Typical flood and drain table with plants in media on top of the table.
Fast cycle speed
Ideally, you would want the flood and drain cycle of an ebb and flow system to be as fast as possible. Also, the cycles should not take more than 15 minutes, from starting to flood the growing table to completely draining the system. For this, you need to have an adequately sized pump for the volume of your table that needs to be filled (total volume minus volume taken up by plants and media). If you want to use a smaller pump, you can always add some rocks to the table in order to take up volume and ensure you require to add less volume to fully flood the reservoir. Time your cycles and make sure these are as short as possible, adequately saturate the media and completely drain, as mentioned above.
The right media
A common reason why flood and drain systems are less productive is because of a suboptimal choice of media. Ebb and flow systems periodically flood the media with nutrient solution, completely saturating it with water, so media that retains too much moisture will require infrequent cycles and will be harder to time. Media like peat moss and coco are often inadequate for ebb and flow systems due to this fact, as over-saturation of the media will lead to periods of low oxygen availability for the plants. Media that drain fast generally do much better, choices such as rockwool or perlite can give much better results when compared with media that have much higher moisture retention. Since this is a recirculating setup, perlite and rockwool also have the advantage of being more chemically inert. I however do not like media that drain too fast, such as clay pellets, as these can require too frequent cycling.
Another typical ebb and flow table setup
Time irrigations with water content sensors
Your flood and drain system requires good timing of irrigation cycles in order to have optimal results. If you irrigate based on a timer, you will over irrigate your plants when they are small and will under irrigate them when they are big. Overwatering can be a big problem in these systems and it can be completely solved by both choosing the right media – as mentioned above – and using capacitive water content sensors for the timing of your irrigations. If you’re interested in doing this, check out this post I wrote about how to create and calibrate your own simple setup for using a capacitive water content sensor using an Arduino. This will allow you to flood your table only when it is needed and not risk over watering just because of a timed event happening.
Oversize the reservoir
The nutrient reservoir contains all the nutrition that is used by the plants, this means the bigger this is relative to the number of plants you have, the lower the impact of the plants per irrigation event will be. Having a reservoir that has around 5-10 gallons per plant – if you’re growing large flowering plants – or 1-3 gallon per plant, for leafy greens, will give you enough of a concentration buffer so that problems that develop do so slowly and are easier to fix. A large reservoir can fight the effects of plants more effectively and make everything easier to control.
Add inline UV sterilization
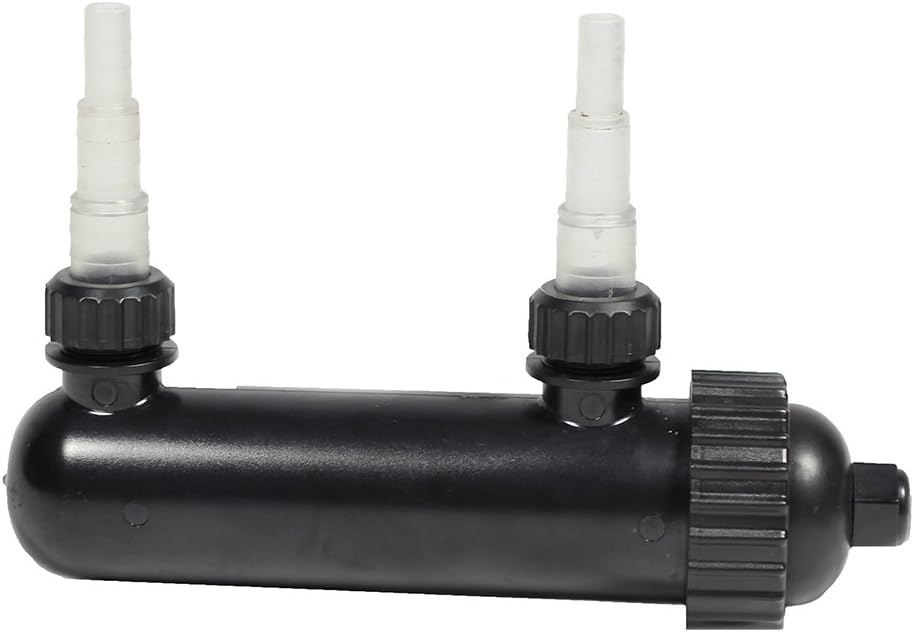
Disease propagation is one of the biggest problems of this type of system. Since recirculation continuously redistributes any fungal or bacterial spores among all the plants, it is important to ensure you have a defense against this problem. A UV filter can help you maintain your reservoir clean. You can run the solution through the inline UV filter on every irrigation event, ensuring that all the solution that reaches the plants will be as clean as possible. Make sure you use a UV filter that is rated for the gallons per hour (GPH) requirements of your particular flood and drain system. Also read my post about getting read of algae, to learn more about what you can do to reduce the presence of algae in a system like this.
Typical UV in-line filter used to sterilize a nutrient solution in a hydroponic setup. These are sold in aquarium shops as well.
Run at constant nutrient EC, not reservoir volume
One of the easiest ways to manage a recirculating system, especially with an oversized reservoir, is to keep it at constant EC instead of constant volume. This means you will only top it off with water in order to bring the EC back to its starting value, but you will never add nutrients to the reservoir. This will cause your total volume to drop with time as you will be adding less volume each time to get back to the original EC. When the volume drops to the point where you have less than 50% of the original volume, completely replace your reservoir with new nutrients. This gives you a better idea of how “used up” your solution really is and how close to bad imbalances in the nutrient solution you might be. A large flowering plant will normally uptake 1-2L/day, meaning that with a reservoir sized at around 5 gallons per plant, it will take you around 2-3 weeks to replace the water.
Note that more efficient and complicated ways to manage a nutrient reservoir exist, but the above is a very safe way to do so without the possibility of toxic over accumulations of nutrients from attempts to run at constant volume by attempting to add nutrients at a reduced strength to compensate for plant uptake. Topping off with nutrients without regard for the changes in the nutrient solution chemistry can often lead to bad problems. The above approach is simple and gives good results without toxicity problems.
Change your pH according to the return pH values
Instead of watering at the normal 5.8-6.2 range, check the pH of the return on a drain cycle to figure out where you should feed. Since a flood and drain system is not a constantly recirculating system, the solution conditions do not necessarily match the root zone conditions and trying to keep the solution at 5.8-6.2 might actually lead to more basic or acidic conditions than desired in the root zone. Instead, check for the return pH to be 5.8-6.2, if it is not, then you need to adjust your reservoir so that it waters at a higher or lower pH (always staying in the 5-7 range) in order to compensate for how the root zone pH might be drifting. This can take some practice, but you can get significantly better results if you base your pH value on what the return pH of your solution is, rather than by attempting to set the ideal pH at the reservoir. You will often see that you will be feeding at a consistently lower pH 5.5-5.6, in order to accommodate nutrient absorption.
Finally
The above are some simple, yet I believe critical things to consider if you want to succeed with an ebb and flow system. The above should make it much easier to successfully run a setup of this kind and grow healthy and very productive plants. Let me know what you think in the comments below!
The value of Fulvic Acid in hydroponics
Fulvic and humic acids have been studied for decades and used extensively in the soil and hydroponic growing industries. I previously talked about the use of humic acid in hydroponics and the way in which it can improve crop results. In that post, we talked about how humic acids can improve nutrient chelation and how this can lead to improvements in yields depending on the origin and properties of the humic substances used. In this post, we are going to take a look specifically at fulvic acid substances, which are a smaller family that has potentially more valuable uses in the hydroponic space. We will start by discussing what differentiates fulvic and humic acids and what the current peer-reviewed evidence around fulvic acids tells us.
This is a model of the general type of molecule that makes up fulvic acid. Note that fulvic acid is not a pure substance, but a mixture of many substances with similar chemical properties.
Fulvic acids are not chemically pure substances, but a group of chemicals that result from the decomposition of organic matter. This process generates both humic and fulvic acids. However, fulvic acids are different from humic acids in mainly two ways. The first is that fulvic acids are soluble at both acid and alkaline pH values, and the second, is that fulvic acids generally have much lower molecular weights. Fulvic acids are therefore more soluble and are more easily accessible to plants compared to humic acids, which have much larger molecular weights. But why should we use them in hydroponics and exactly how?
Sadly, not many publications have tackled the use of fulvic acid in crops specifically. One of the few examples of reviews that touch on the matter is this paper, which covers most of the literature around fulvic acids before 2014. I also did a literature review myself, trying to find articles in which the fulvic acid source, application type and rate, and the results against a control without fulvic acid were clearly explained. The table below shows you the results of my search, I was able to find 10 papers overall, with a mix of root and foliar applications of fulvic acid, with a range of application rates and plant species. Almost all of these papers found positive results from the use of fulvic acid, except two papers that found either no effect or mixed results from their use.
The range of application depends substantially on the application type. Most papers that tackled foliar applications chose application rates in the 1-3g/L range, while papers that tackled root applications generally stayed in the 25-150ppm range. This is normal since foliars are generally much more concentrated than root applications. Both types of applications have different effects. Root applications are going to exercise an additional strong nutrient chelating role, while foliar applications are more likely to exert a hormonal role. A study around genetically modified tomato plants showed that plants engineered to be insensitive to IAA were also unable to respond to fulvic acid, hinting at the fact that fulvic acid has an auxin-like effect in plants.
Literature search of fulvic acid related publications. The websites where you can read the articles are linked in the “Ref” column.
The effects seem to be quite positive overall, with increases in yield, quality, and flower numbers across the board. The studies above that investigated nutrient transport also showed substantial benefits when root applications of fulvic acid were used. Plants grown in a Hoagland solution showed better nutrient transport when fulvic acid substances were used in the nutrient solution. This is possibly both due to their ability to chelate micronutrients and their ability to provide an additional pH buffer at the region of interest in hydroponics (5.5-6.5). This study, shows how fulvic acid substances can have pKa values in this precise region, although their still relatively large molar mass implies that they will contribute marginally to buffering capacity, especially if used only in <100 ppm concentrations.
Fulvic acids also seem to be synergistic with several other biostimulants in the studies showed above. When tests were done with humic acids or other biostimulants, the effect of the combination is usually better than the effect of either part on its own. This means the fulvic acid might not only be a good addition on its own, but it might also contribute significantly to enhance the effect of other biostimulants used.
It is however important to note that fulvic acids do have negative effects when used in excess, reason why their application rates need to be carefully controlled. Using too much can lead to drops in yields and quality along with slower growth. If you want to start using them, it is, therefore, wise to start at the lower range of the application rates shown above and climb up as you gauge the effects. It is also important to note that – as humic acids – different sources of fulvic acid might have different effects, as the actual molecules that make up the substance will change.
A big advantage of the use of fulvic acids in hydroponics is also that their solubility is quite high, so the risk of clogging or damaging equipment is low. This is a significant advantage over humic acids, which have lower solubility and can cause problems because of this in hydroponics culture, especially if there are drops in the pH. In hydroponics, fulvic acids can also lead to additional solution stability, especially in recirculating systems, where the destruction of heavy metal chelates as a function of time can become a bigger risk.
All in all, fulvic acids represent a relatively cheap addition to a hydroponic regime that has limited risk and a lot of potential upsides. Literature research shows us that low rate applications, if anything, might just have no effect, so the risk of damage to a hydroponic crop by trying fulvic acid applications is low. The synergistic effects shown by fulvic acid are also interesting since this means that they might make other additives you are currently using even more potent. When looking for fulvic acids, make sure you check for high solubility, solubility in low and high pH, and a source that matches the sources used in the literature results you’re interested in reproducing.
New to organic hydroponics? Consider these six things
Although hydroponic crops cannot usually be labeled as “organic” by official certifying authorities, like the USDA, we can create a hydroponic crop that is “organic” in spirit. We can do this if we avoid the use of traditional synthetic chemical fertilizers – meaning using only OMRI listed products – and use a growing media that mimics some of the functionality that is provided by soil. This can be quite tricky to do and can lead to substantial issues in crops, reason why it is important to be aware of the problems that can arise. In this post, I will talk about five important things to consider when trying to do an organic hydroponic crop.
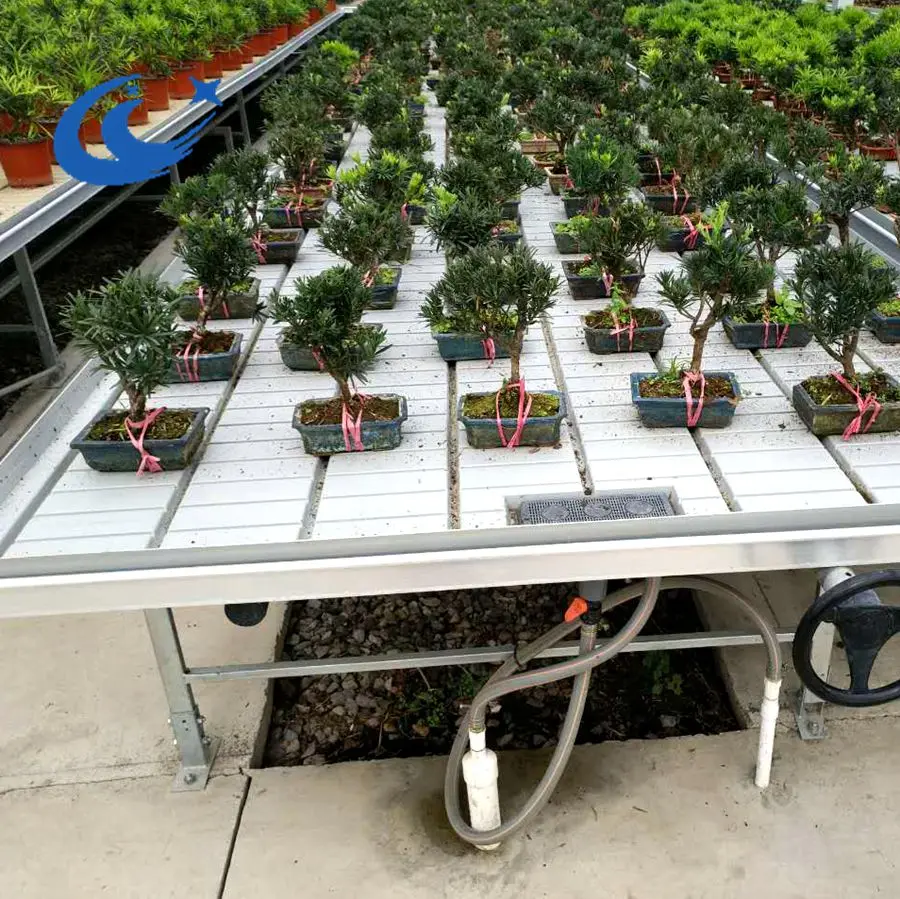
The media needs to be friendly for microbes. A traditional hydroponic crop will benefit from having media that is as inert as possible. However, if you are going to be avoiding synthetic fertilizers, this means that certain functions will need to be carried out by microbes. Most importantly, microbes will carry out the conversion of protein-derived nitrogen to ammonium and then nitrate nitrogen. Peat moss and coco can be friendly media for microbes, while rocky media like rockwool, perlite, vermiculite, and sand, can be more hostile. Peat moss is my preferred media for this type of setup, as the acidification of the peat moss will also help deal with some of the chemical issues that arise through an organic hydroponic crop.
Organic hydroponics farm using a nutrient solution with an amended media
Provide a nutrient solution that is as complete as you can. Your hydroponic nutrient solution should still give your plants a fair amount of nutrition, especially nutrients that are easily soluble and can leech from the media. There are several OMRI approved soluble sources of vegetable/animal-derived nutrition that can be used to create an organic feed for your plants, such as fish emulsions and kelp extracts. There are also some valuable mineral sources that are mined that can be used, such as sodium nitrate, potassium sulfate, gypsum, and magnesium sulfate (Epsom salt). Use these sources to create a balanced nutrient solution for your plants.
Amend the media to compensate for what the nutrition solution will lack. An organic hydroponic crop will generally need to contain some form of amended media because the nutrient solution will not be able to effectively provide all the nutrients it provides in a regular hydroponic crop. The absence of synthetic salts implies that we will not be able to provide things like nitrates and phosphates in the amounts we would desire. This means that nitrogen and phosphorus will both need to be added to the media to some extent. This can be done with vegetable protein, bone meal, and rock phosphate amendments.
Keep aeration higher than you would in a normal hydroponic crop. In a normal hydroponic crop, the number of microorganisms and organic decomposition reactions in the media will be quite low. However, when we move to a setup where a significant amount of nutrition is provided by microorganisms in the root zone, aeration becomes a big issue due to the increased oxygen demand from the bacterial and fungal populations in the media. A media used for an organic hydroponic setup will usually require a substantial amount of aeration to be present. If using peat moss, it is useful to mix it 40/60 with something like perlite or rice husks in order to improve the aeration properties of the media substantially.
A great, yet very smelly, source of N, Fe and other micronutrients for organic hydroponics
Bad heavy metals are going to be your enemy. Plants require some heavy metals and media like peat moss will lack the amounts necessary to properly sustain plant growth. However, resist the temptation to amend the media with something like green sand or azomite – a volcanic rock – as these sources can contain very important amounts of bad heavy metals, like lead, arsenic, and mercury. Instead, it is better to use amendments that provide animal sources of metals – like blood meal – or to use an organic source of soluble heavy metals in your nutrient solution, such as the Biomin series of products. Compost teas can also be a very important source of needed heavy metals. Be very aware of bad heavy metals in your organic inputs.
Inoculate the media with the bacterial and fungal populations you need. Since bacteria and fungi are going to be your allies, you need to properly inoculate the media with healthy microbe populations. I would advise inoculating with both beneficial fungi, like Trichoderma species and also with a bacteria-containing product, such as Tribus. Compost teas can also be an important source of bacteria and fungi to colonize the plant’s rhizosphere.
Although the above is by no means a complete list, it does highlight some key points when moving from a purely hydroponic setup into a hydroponic setup that will rely heavily on microbes for the release of nutrients. This is a midway approach between a soil-based approach and a complete hydroponic setup, where we are expected to provide some of the nutrition through the nutrient solution but a lot of it is also expected to come from the media itself. It can be done successfully and amazing crops can be grown with it, however, it does require you to apply the skills of both soil and hydroponic crop manager.
Is hydroponics organic? Is it better or worse?
There has been a battle raging during the past decade between soil-based organic producers and hydroponic growers, to figure out whether hydroponically produced crops can or cannot be considered for organic certification. The entire discussion centers around whether a hydroponically grown crop can in fact comply with the requirements of the USDA organic standard. Within this post, we are going to discuss why there is even a discussion, why a hydroponic crop could be considered organic, and what the arguments against such a designation currently are.
USDA Organic food coming from traditional organic based growing practices
All that is required for a crop to be considered “hydroponic” is the complete absence of soil. This means that all the nutrition required for the crop is going to come from the nutrient solution and the substances that are put within this solution can or cannot comply with the USDA requirements for the “organic” label. Some substances like heavy metal chelates, potassium phosphates, and most nitrates, are forbidden by the USDA organic designation due to their synthetic origin, and the environmental impact of their production and normal usage. However, the total impact of these substances also rests heavily on how the hydroponic crop manages them and how efficiently they are used.
A hydroponic crop could use a fraction of the water and fertilizer used by a traditional soil crop of the same area while capturing all fertilizer effluents, making it environmentally more sustainable than a traditional soil crop and probably worthy of some sort of designation to recognize this fact. A hydroponic crop grown with traditionally produced synthetic fertilizers, that has absolutely no fertilizer dumping of wastewater to the environment and uses no synthetic pesticides on products has a low environmental impact and produces food of very high quality. Hydroponic crops can also use land that would otherwise be unusable by traditional soil-based methods, expanding the area that could be used for healthy and sustainable food production.
However, the defendants of the organic designation argue that it is not only about what is being produced and how it is being produced but where it is being produced. The argument is that the organic designation and requirements have specific provisions about soil sustainability and soil building, that a hydroponic crop could not possibly comply with. They argue that part of the spirit of the organic designation is to make growing in soil more sustainable and that hydroponically grown crops simply cannot do this because they completely lack any soil or any soil building process.
Both hydroponic and traditionally designated organic crops can produce food that is healthy, pesticide-free, and sustainable. Hydroponic crops can do this on land that is not traditionally arable and can do so at astonishingly high efficiencies. Therefore, it would be fair to provide hydroponic crops that are evaluated to be sustainable and grown over non-arable land, an organic designation, since they comply with the spirit of what, I believe, the people who buy organic want, which is to have foods that are produced in a sustainable manner, with little impact on the environment. If the use of synthetic fertilizers is a concern, a requirement to meet this designation could also be the use of the same array of inputs available to traditional organic growers. This is harder to achieve, but still viable within the hydroponic production paradigm.
Some hydroponic farms can be very sustainable. Farms coupling hydroponics with fish production – known as aquaponics – can make use of no synthetic fertilizers at all.
Recently, hydroponic growers have won battles in California about being granted an organic designation, however, because of the large amount of money that the organic designation carries – allowing growers to charge a big premium for items designated as organic – the organizations of soil-based organic growers are going to continue to fight this as much as they can. Organic grower organizations have even fought the potential for an independent “organic hydroponic” designation (see here), as they say, this might be confused with the normal “organic” designation and negatively affect their products.
Not all hydroponic crops are environmentally sound though. Many of them can be incredibly polluting and can make inefficient use of both water and fertilizer resources. For this reason, a designation is required to distinguish those that are sustainable from those that are not. If the USDA organic designation requirements are adjusted to accommodate for the potential for highly sustainable hydroponic crops grown on non-arable land, this would be a huge step in giving customers a clear way to tell products apart.
Hydroponic crops can be sustainable, have a low impact, and produce very high-quality, nutrient-rich food with no pesticides. They can make more efficient use of land, water, and non-synthetic fertilizers than soil-based crops do. However, the fact is that few of them really meet these criteria, because there is no designation they can achieve that would make this worthwhile from a commercial perspective. So while they are not organic at the moment, giving them the possibility to be organic would be a huge step towards a more sustainable future in agriculture. It could motivate hydroponic growers to become more sustainable and embrace a lot of the practices of soil-based organic growers.
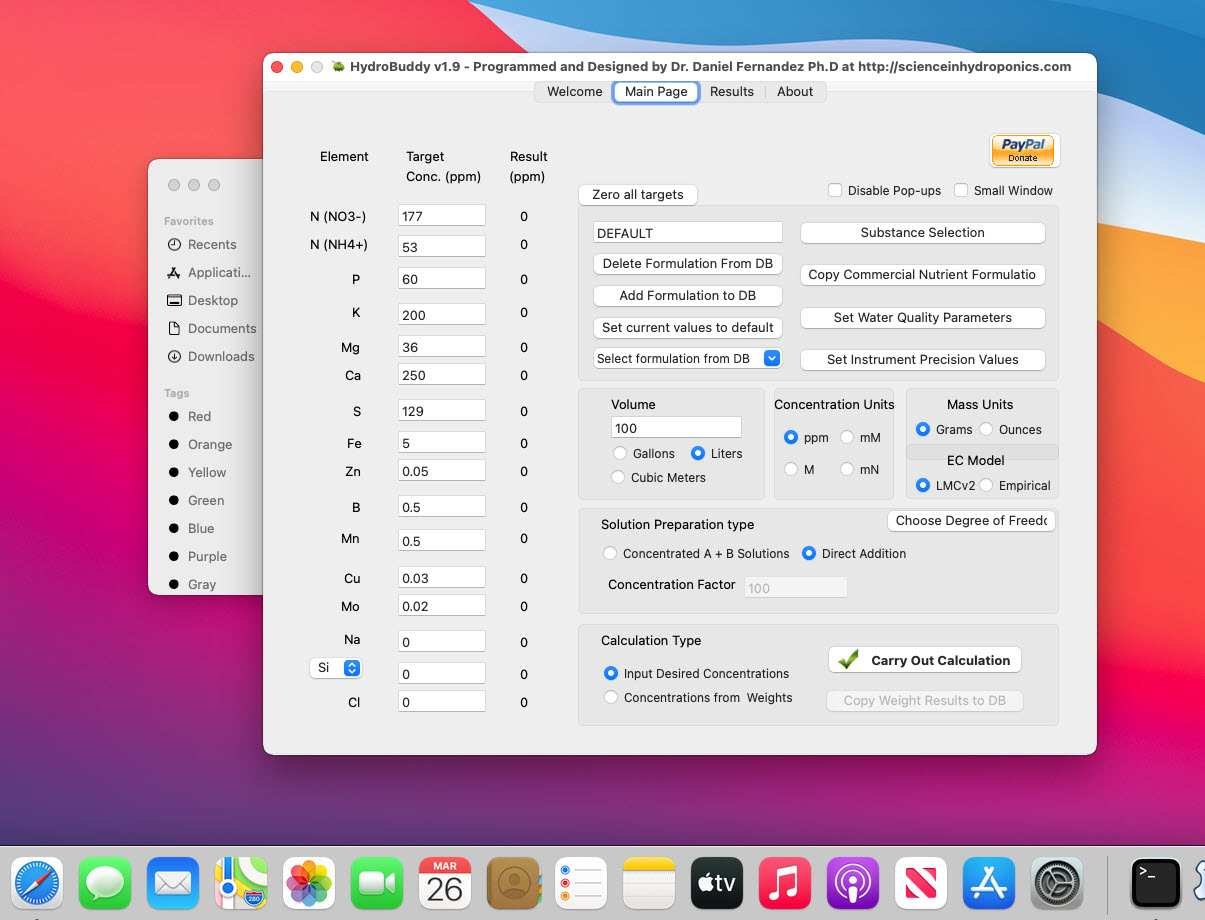
HydroBuddy v1.9, MacOS binary, new EC model, many bug fixes and more!
Today I am releasing a new version of HydroBuddy (v1.9) which contains many suggested and needed improvements from the previous version of the software. In this post I want to discuss the changes within this release and how they will affect the way things are done in the program. Some big changes have been implemented so make sure you go through the list below if you want to use this new version. Thanks to all of you who contributed your suggestions about HydroBuddy and/or reported bugs to me.
One of the biggest changes in this release, the return of precompiled MacOS binaries.
Here is the list of changes in this version:
A MacOS binary compiled in Big Sur 11.0.1 has been released.
Ability to make any formulation the “default” formulation. This selected formulation is loaded when the software is started.
The LMC conductivity model has now been replaced with LMCv2 which is an important improvement. See here to learn more. The LMCv2 model now adjusts conductivity based on each specific ion’s charge and the overall ionic strength of the solution. It now includes no arbitrary terms.
The treatment of liquids/solids in the program has now been changed. Instead of specifying liquid or solid (and the program having to make assumptions) users can now select whether the percentages and substance amounts are going to be either in g and w/w% or in mL and w/v%. This should simplify the interpretation of results and the addition of substances.
An additional column has now been added in the results page to specify the unit of the amount being calculated. When a user wants a substance’s contribution to be calculated in mL, the appropriate unit will be shown here.
When adding a new substance, all fields are reset to null values (previously the program kept the values from previously opened/updated substances).
Density has now been eliminated as a variable used in the program since it is not needed if there is no cross between w/w% and w/v% calculations. It is only kept in the “Copy commercial nutrient formulation” dialogue.
An error where P and K were mixed up in the product comparison window of the “Copy commercial nutrient formulation” function has now been fixed.
The wording of options in the “Substance selection” dialogue has been changed so that the buttons better describe what they do. For example the “Delete” button has now been changed to “Do not use”.
Two buttons have been added next to the EC model prediction in order to allow users to increase or decrease the EC by adjusting all nutrient concentrations by +5%/-5%. This will allow you to see how nutrient concentration changes affect conductivity in a straightforward manner.
The above modifications are now committed to the github repository as well. Feel free to take a look if you’re interested in how any of the above variations were coded into the program.
Improving on HydroBuddy’s theoretical conductivity model, the LMCv2
Hydrobuddy’s theoretical conductivity estimates have never been good. As I discussed in a previous post, the program uses a very simple model based on limiting molar conductivities to calculate the EC. The software knows how much each ion conducts when it’s all by itself, so it adds all these conductivity values multiplied by the concentration and assumes there are no additional effects. The conductivity values resulting from this assumption are very large – because there are effects that significantly reduce the conductivity of ions at larger concentrations – so HydroBuddy just cuts the estimation by 35% hoping to reach more accurate values. This works great for some cases, but very badly for others.
The reason why this happens is that the actual conductivity contribution of some ions decreases more drastically as a function of concentration and due to the presence of other ions compared to others. This means that we need to account for these decreases in conductivity in an ion-specific way. One way to approach this, is to forget about theoretical approximations and just create an empirical model that uses experimental data. This is what I did when I created the empirical model that is present in HydroBuddy from v1.7. This model works really well, provided you are using the exact list of salts that were used to create the model and you stay within the boundaries of concentration values that were used to create it.
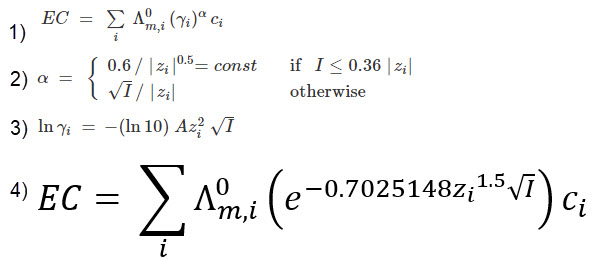
Equations 1-3 were taken from here. I have then used these equations to derive equation 4, which is going to be the new LMCv2 model for HydroBuddy from v1.9. Where Λ0m,i is the limiting molar conductivity of each ion, zi is each ion’s charge, I is the ionic strength of the solution and ci is the molar concentration of each ion..
This experiment-based solution can be great. It is in fact, a technique I’ve used to create custom versions of HydroBuddy for clients who want to have high accuracy in their EC estimations within the salts that they specifically use. The process is however cumbersome and expensive, my wife and I – both of us chemists – do all the experimentation, and it generally requires an entire day, preparing more than 80+ solutions using high accuracy volumetric material, to get all the experimental data. It is also limited in scope, as any salt change usually requires the preparation of a substantial number of additional solutions to take it into consideration.
It would certainly be great if we could create a better, fully theoretical, conductivity model. Diving into the literature and programs used for conductivity-related calculations, I found a program called Aqion that implements a more accurate model compared with HydroBuddy’s LMC model. You can read more about their approach here. They use the limiting molar conductivities but introduce additional terms to make ion-specific corrections that are related to both ionic charge and ionic strength. The ionic charge is the electrical charge of each ion, for example, +1 for K+ and +2 for Fe+2, etc. The ionic strength is the sum of the molar concentration of each ion times its charge.
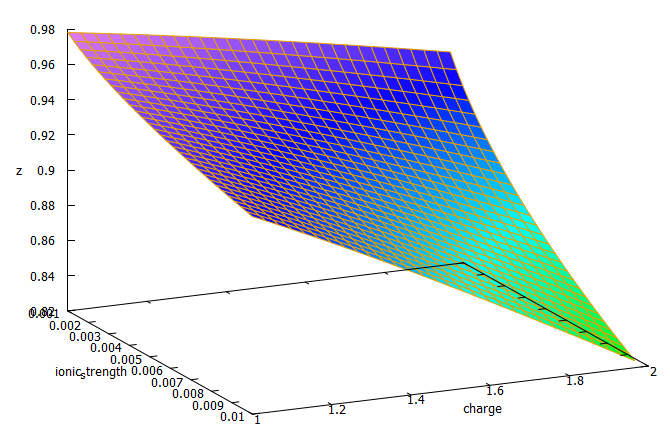
3D plot of equation 4 showing the magnitude of the correction factor (z) as a function of charge and ionic strength.
The plot above shows you how this correction factor affects a solution as the ionic strength and charge of the ions change. As a solution gets more diluted, the equation approaches the sum of the conductivities at infinite dilution. Conversely, as the solution becomes more concentrated or the ion charge becomes higher, the drop in the conductivity becomes more pronounced. These are both phenomena that are in-line with experimental observations and much better reflect how conductivity is supposed to change when different ions interact in solution.
The above equation provides us with a more satisfactory theoretical estimation of conductivity compared to the current HydroBuddy LMC model. The new model is able to implement correction factors on a per-ion basis and also changes the magnitude of these corrections depending on how concentrated the solutions are. This new model will be implemented to replace the current LMC model in HydroBuddy v1.9, which will be released in the near future. This should provide significantly more accurate estimates of conductivity for the preparation of hydroponic solutions.
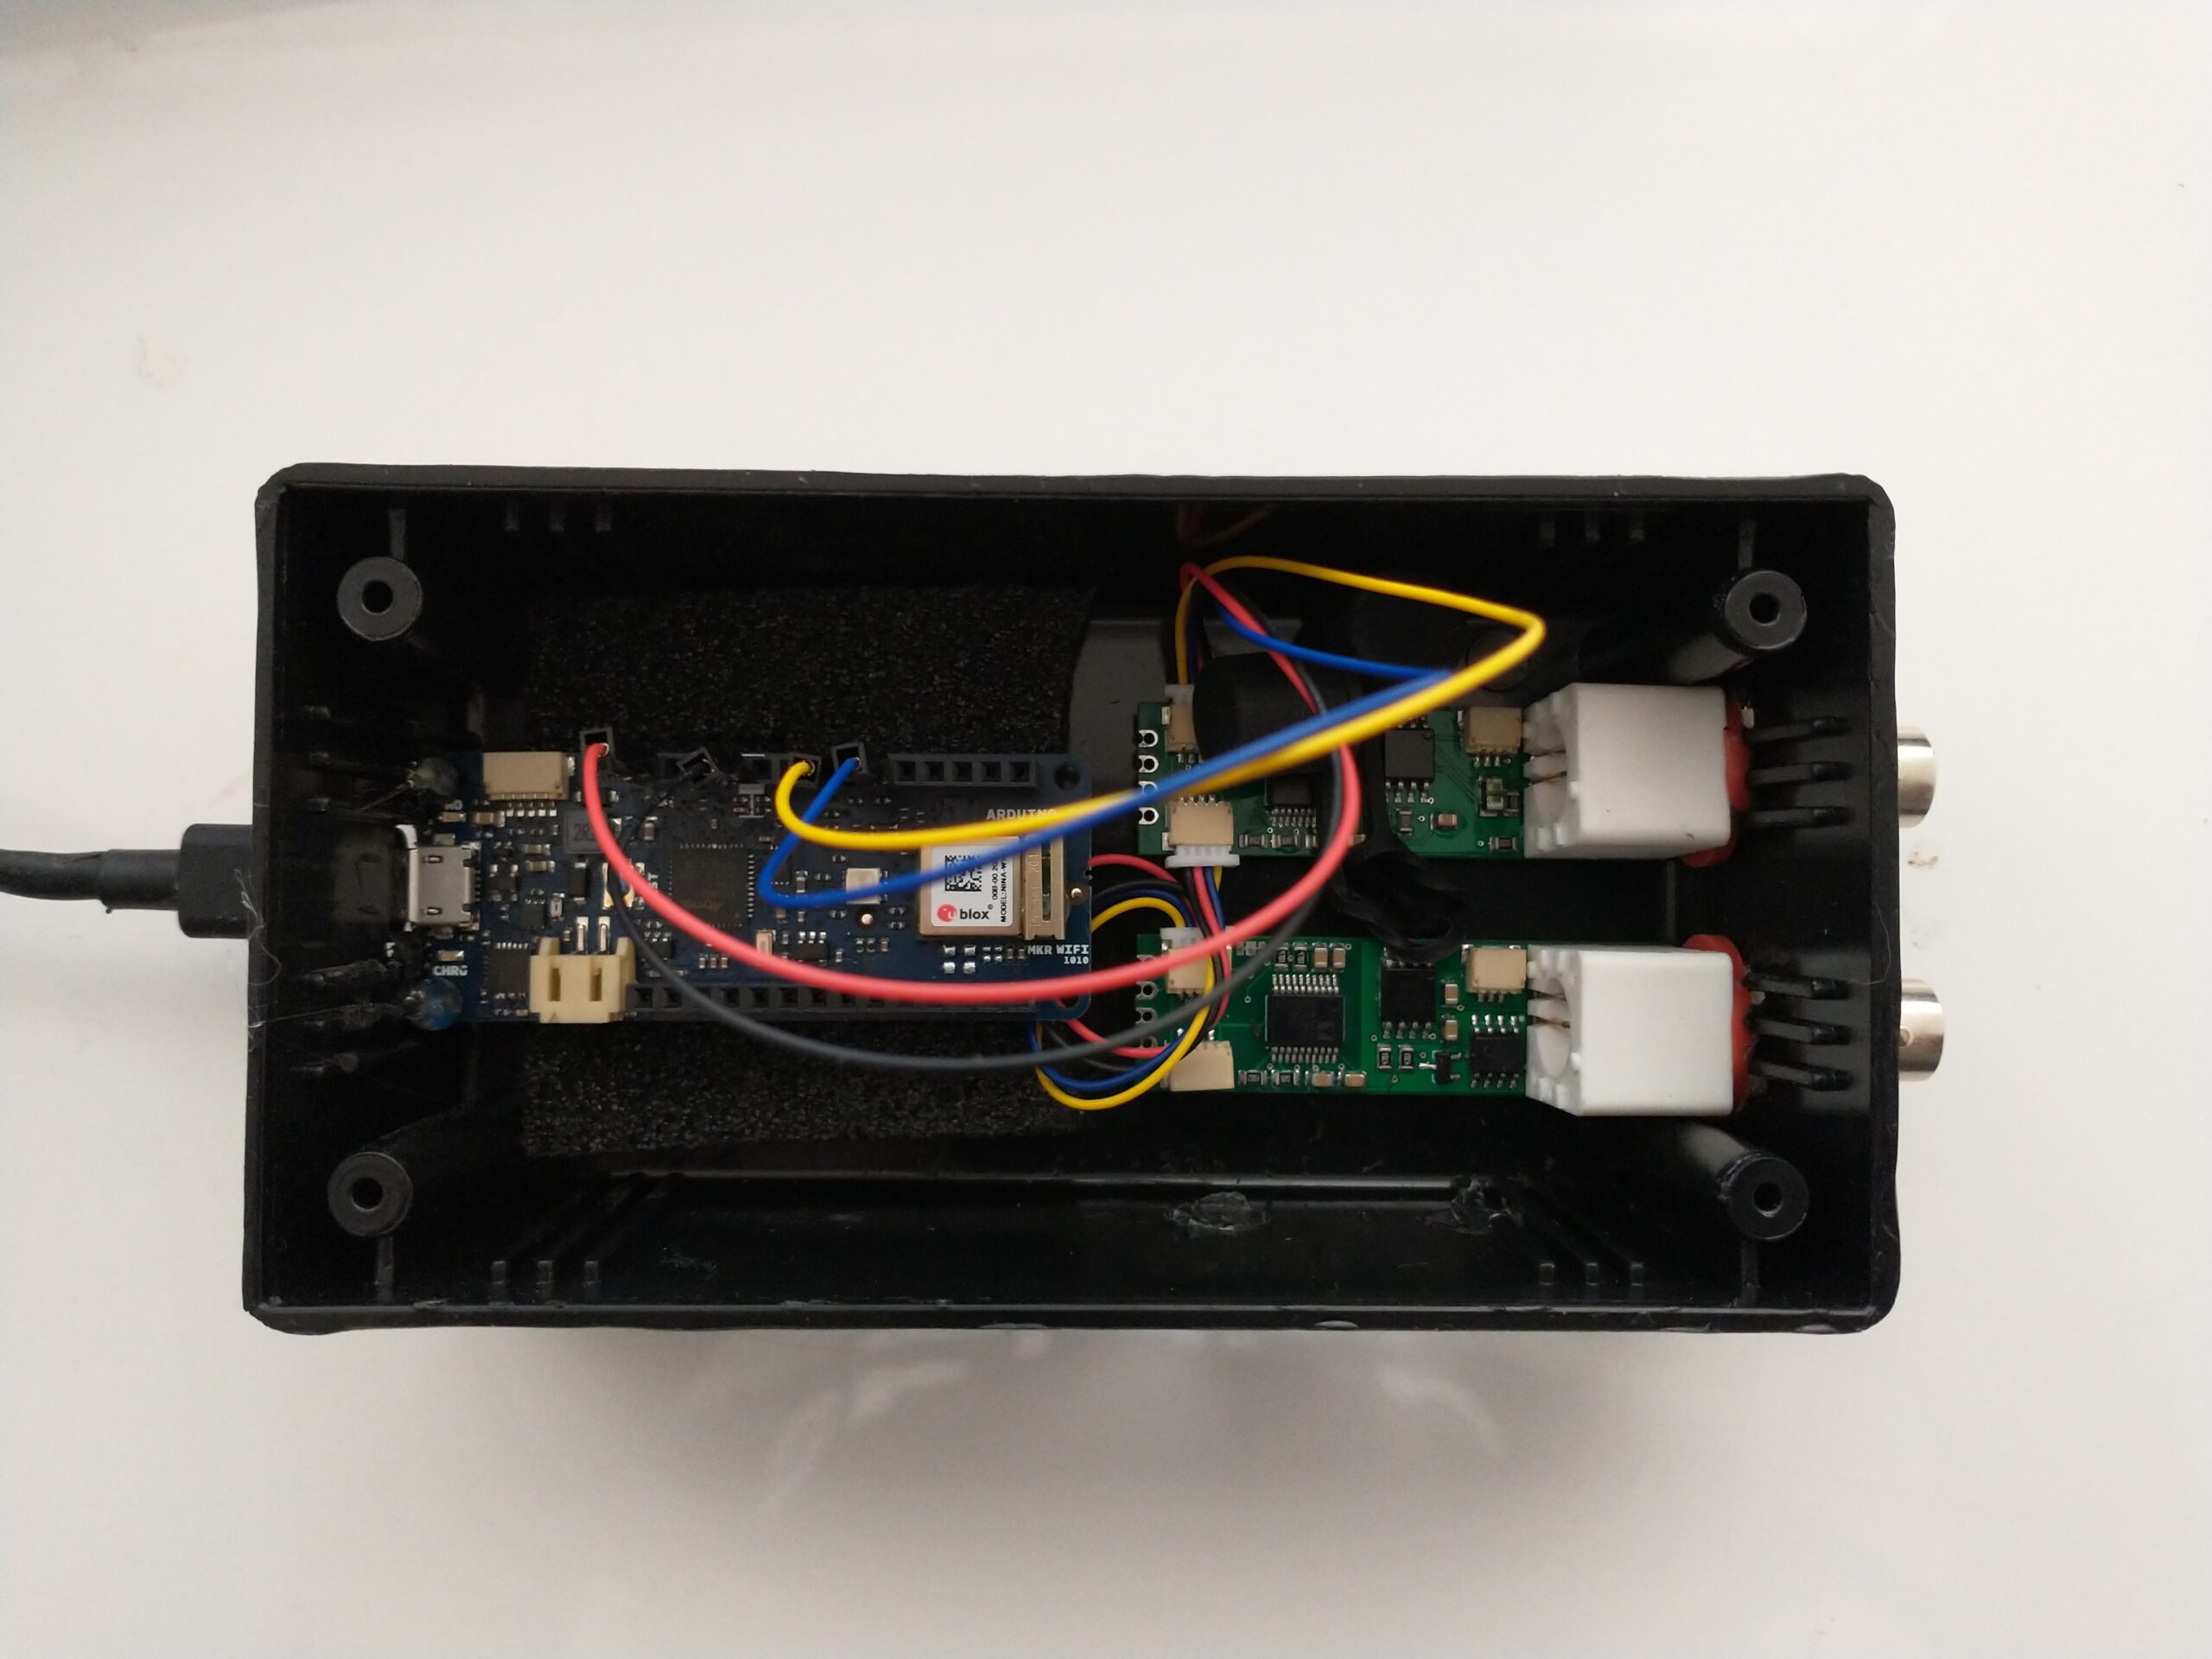
Creating a pH/EC wireless sensing station for MyCodo using an Arduino MKR Wifi 1010
There are multiple open-source projects available online for the creation of pH/EC sensing stations for hydroponics. However, all of the ones I have found use a single Arduino or Raspberry Pi to perform the measurements and store any data, making them unsuitable for applications where more flexibility is needed. For example, a facility using multiple different reservoir tanks for nutrient storage might require multiple pH/EC sensing stations, and single-board wired setups would be unable to accommodate this without a lot of additional development. In this post, I am going to show you a simple pH/EC sensing station I built with an Arduino MKR Wifi 1010 that can communicate with a MyCodo server using the MQTT protocol. Multiple sensing stations could be built and all of them can communicate with the same MyCodo server.
My Arduino MKR wifi 1010 based sensing station, using uFire pH and EC boards in a small project box.
This project makes use of the small pH/EC boards provided by uFire, which have a lower cost compared to those provided by companies like Atlas, but do have adequate electrical isolation to avoid problems in readings when multiple electrodes are put in the same solution. This is a substantial improvement over other low-cost boards where using multiple probes can cause heavy electrical noise and interference. In order to build this project you will require the following materials:
Note, some of the links below are amazon affiliate links. This means that I get a small commission if you purchase through these links at absolutely no extra cost to you. The links to other websites are not affiliate links.
#include <uFire_EC.h>
#include <uFire_pH.h>
#include <WiFiNINA.h>
#include <ArduinoMqttClient.h>

#define SECRET_SSID "ENTER WIFI SSID HERE"
#define SECRET_PASS "ENTER WIFI PASSWORD HERE"

//calibration solutions used
#define PH_HIGH_SOLUTION_PH 7.0
#define PH_LOW_SOLUTION_PH  4.0
#define EC_HIGH_SOLUTION_EC 10.0
#define EC_LOW_SOLUTION_EC  1.0
#define CALIBRATION_TEMP    20.0

// topics for the mqtt sensors
// Make sure all stations have different topics
#define EC_TOPIC       "EC1"
#define PH_TOPIC       "PH1"
#define CALIB_TOPIC    "CALIB1"
#define MQTT_BROKER    "ENTER MQTT SERVER IP HERE"
#define MQTT_PORT      1883

int status = WL_IDLE_STATUS;     // the Wifi radio's status
String message;

uFire_pH ph;
uFire_EC ec;
WiFiClient wifiClient;
MqttClient mqttClient(wifiClient);

void check_connection()
{
  if (!mqttClient.connected()) {
    WiFi.end();
    status = WiFi.begin(SECRET_SSID, SECRET_PASS);
    delay(10000);
    if (!mqttClient.connect(MQTT_BROKER, MQTT_PORT)) {
      Serial.print("MQTT connection failed! Error code = ");
      Serial.println(mqttClient.connectError());
      delay(100);
    }
    mqttClient.subscribe(CALIB_TOPIC);
  }
}

void setup()
{
  Serial.begin(9600);
  while (!Serial);

  // connect to wifi and mqtt broker
  check_connection();

  // coorectly initialize the uFire sensors
  // note the Wire.begin() statement is critical
  Wire.begin();
  ec.begin();
  ph.begin();
}

void loop()
{
  // mqtt keep alive
  mqttClient.poll();

  // read messages
  message = "";
  while (mqttClient.available()) {
      message += (char)mqttClient.read();
    }

  // execute calibration if requested
  Serial.println(message);
  if (message == "EC1_HIGH") ec.calibrateProbeHigh(EC_HIGH_SOLUTION_EC, CALIBRATION_TEMP);
  if (message == "EC1_LOW")  ec.calibrateProbeLow(EC_LOW_SOLUTION_EC, CALIBRATION_TEMP);
  if (message == "PH1_HIGH") ph.calibrateProbeHigh(PH_HIGH_SOLUTION_PH);
  if (message == "PH1_LOW") ph.calibrateProbeLow(PH_LOW_SOLUTION_PH);

  // Measure EC
  ec.measureEC();
  Serial.println((String) "mS/cm: " + ec.mS);

  // Measure pH
  ph.measurepH();
  Serial.println((String) "pH: " + ph.pH);

  // Ensure the wifi and mqtt connections are alive
  check_connection();

  // post EC to MQTT server
  mqttClient.beginMessage(EC_TOPIC);
  mqttClient.print(ec.mS);
  mqttClient.endMessage();

  // post pH to MQTT server
  mqttClient.beginMessage(PH_TOPIC);
  mqttClient.print(ph.pH);
  mqttClient.endMessage();

  // ensure sensors are not probed too frequently
  delay(1000);

}
Once you get all the materials you should first assemble the components. Connect the pH and EC board together using the Qwiic-to-Qwiic connector, then use the Qwiic-to-male connector to hook up one of these boards to the Arduino (doesn’t matter which one). Connect the black cable to ground, red cable to 5V, blue cable to SDA, and yellow cable to SCL. Set up your board according to the instructions in the Arduino MKR wifi 1010 getting started page, modify the code above to properly include information about your wifi network, calibration solutions, and MQTT server, then upload the code. The Arduino will connect to your Wifi and MQTT servers and automatically reconnect when there are connection issues.
The above code will also post the readings of the pH and EC sensors to topics PH1 and EC1 respectively if you add an input in MyCodo to capture these readings you should be able to store them and take control actions using the MyCodo interface. Additionally, the Arduino code will respond to calibration requests published to the topic “CALIB1”. For example, if you want to calibrate your EC sensor with a two-point calibration method with a standard solution with an EC of 10mS/cm, you would put the electrode in the calibration solution, then send the message “EC1_HIGH” to the CALIB1 topic and the Arduino will perform the task as requested. The code assumes you will want to do 2 point calibrations for both EC and pH, with the calibration events triggered by EC1_HIGH, EC1_LOW, PH1_HIGH, and PH1_LOW. Note that the definition of the EC and pH values of the calibration solutions should be changed to the solutions you will be using within the code. The high/low values in the code, as is, are 10mS/cm|1mS/cm for EC and 7|4 for pH.
A simple cheatsheet for macro nutrient additions in hydroponics
In hydroponic growing, we are often faced with the need to adjust the nutrient concentrations of a fertilizer reservoir or foliar spray directly, in order to increase the quantity of some nutrient by a specific amount. Although you can use a program like HydroBuddy in order to quickly calculate these values, it is often the case that these calculations need to be done in the field or in a growing environment, and a computer to calculate things is not at hand. For this reason, I have created a small “cheat sheet” that you can use in order to figure out the amounts of salts that you would need to add to a solution to increase any of the macronutrients by 10 ppm.
Salt Name
ppm
Element
ppm
Element
g/L
g/gal
Calcium nitrate (ag grade)
10
N (NO3-)
13.19
Ca
0.0694
0.2629
MAP
10
N (NH4+)
22.1
P
0.0821
0.3108
Ammonium Sulfate
10
N (NH4+)
11.4
S
0.0472
0.1785
Gypsum
10
Ca
7.99
S
0.0430
0.1626
Calcium Chloride
10
Ca
17.69
Cl
0.0277
0.1048
Magnesium Nitrate Hexahydrate
10
N (NO3-)
8.67
Mg
0.0915
0.3463
Epsom Salt
10
Mg
13.19
S
0.1014
0.3839
Magnesium Chloride
10
Mg
29.16
Cl
0.0392
0.1483
AgSil 16H
10
Si
10.9
K
0.0411
0.1554
MKP
10
P
12.62
K
0.0439
0.1663
Potassium Nitrate
10
N (NO3-)
27.87
K
0.0730
0.2763
Potassium Sulfate
10
K
4.10
S
0.0223
0.0844
Potassium Chloride
10
K
9.067
Cl
0.0191
0.0722
Cheatsheet for macronutrient additions in hydroponics
With the above cheatsheet, you can quickly evaluate some of the most common options you would have to increase all the different macronutrients in a hydroponic or foliar solution by 10 ppm and which secondary elemental contributions you would get from these additions. For example, if you add 0.0694g/L of Calcium Nitrate, this would add 10ppm of Nitrogen as nitrate plus 13.19ppm of Calcium. Careful consideration of secondary contributions need to be taken into account, especially when using salts that contain elements that can be toxic, such as chlorides.