How to choose the best hydroponic bucket system for you
You can use simple buckets to create versatile hydroponic systems. You can create a system to grow a few plants at home or thousands of plants in a commercial facility. However, there are several types of bucket systems to choose from, and making the correct choice is vital to success. In this post, we are going to take a look at the different types of bucket systems. We will examine their pros and cons so that you can better understand them and choose the hydroponic bucket system that best suits your needs.
The Kratky bucket
The simplest system is the Kratky bucket system. In this setup, you have a bucket with one or several holes on the lid. You put plants in net pots with media and then fill the bucket with a nutrient solution so that it is barely touching the bottom of the media. The media initially draws water through capillary action, while the roots reach the nutrient solution. After that, the roots draw nutrients from the water and an air gap is created between the plant and the water as the crop evaporates water. The roots use this air gap to get the oxygen they need for respiration. For this reason, you don’t need any air pumps.

This completely passive system is easy to build and cheap. You only fill the bucket once with nutrient solution, and you don’t need to check the pH, EC, or other variables through the crop cycle. However, this system requires careful determination of the bucket’s volume, the nutrient solution concentrations, and the crops grown. You can read this post I wrote, for more tips to successfully grow using this bucket system.
However, you cannot easily grow large productive flowering plants in this system. This is because large plants consume too much water and nutrients throughout their life, and will require either a very big volume or complete changing of the nutrient solution at several points. For large flowering plants, it is more convenient to use other types of bucket systems that make solution changes easier. If you would like more information and data regarding the culture of large plants using Kratky hydroponics, please read this post.
The Kratky bucket system is ideal if you need a system with no power consumption, your environmental conditions don’t have extremes, and you want to grow leafy greens or other small plants on a small scale. For larger scales, Kratky systems to grow leafy greens on rafts do exist, although large-scale systems do involve pumps, at least to change solution between crop cycles.
The bucket with and air pump
The Kratky system has zero power consumption, but does require the grower to carefully manage the initial nutrient level and is not very tolerant to strong variations in environmental conditions. For this reason, a more robust method to grow is the bucket with an air stone. This is exactly the same as a Kratky system, except that air is constantly pumped into the nutrient solution and the nutrients are generally maintained at a specific level inside the bucket.
Constantly pumping air into the solution creates several advantages. The first is that air oxygenates the solution, which means the solution’s level is not critical. This is because plant roots have access to oxygen, even if more than the ideal percentage of the root mass is submerged in the solution. The second is that air will help regulate the temperature of the nutrient solution. As air bubbles through and evaporates water, it helps keep the solution cool. Kratky systems can suffer from unwanted temperature spikes if the air temperature gets too hot. This is a common reason for disease and failure in Kratky systems.

Systems with an air pump are usually easier for people who are just starting. The low cost and low failure rates are the main reason why this is a very popular choice for first-time hydroponic enthusiasts. However, since water evaporates more, there is a need to at least replenish water through the crop cycle. You are also limited to smaller plants unless you’re willing to fully change the nutrient solution several times per crop cycle, which is inconvenient with a bucket system like this. It is also uncommon to see systems like this on a larger scale, as changing and cleaning hundreds of buckets manually and having hundreds of airlines going into buckets is not practical.
Note that air pumps bring substantial amounts of algae into solutions that will thrive if any light can get into your buckets. For hydroponic systems that use air pumps, make sure you use buckets made of black plastic so that no light gets in. White plastic will allow too much light to get in and algae will proliferate.
You can buy several ready-made hydroponic systems of this type. For example this one or this one for multiple small plants.
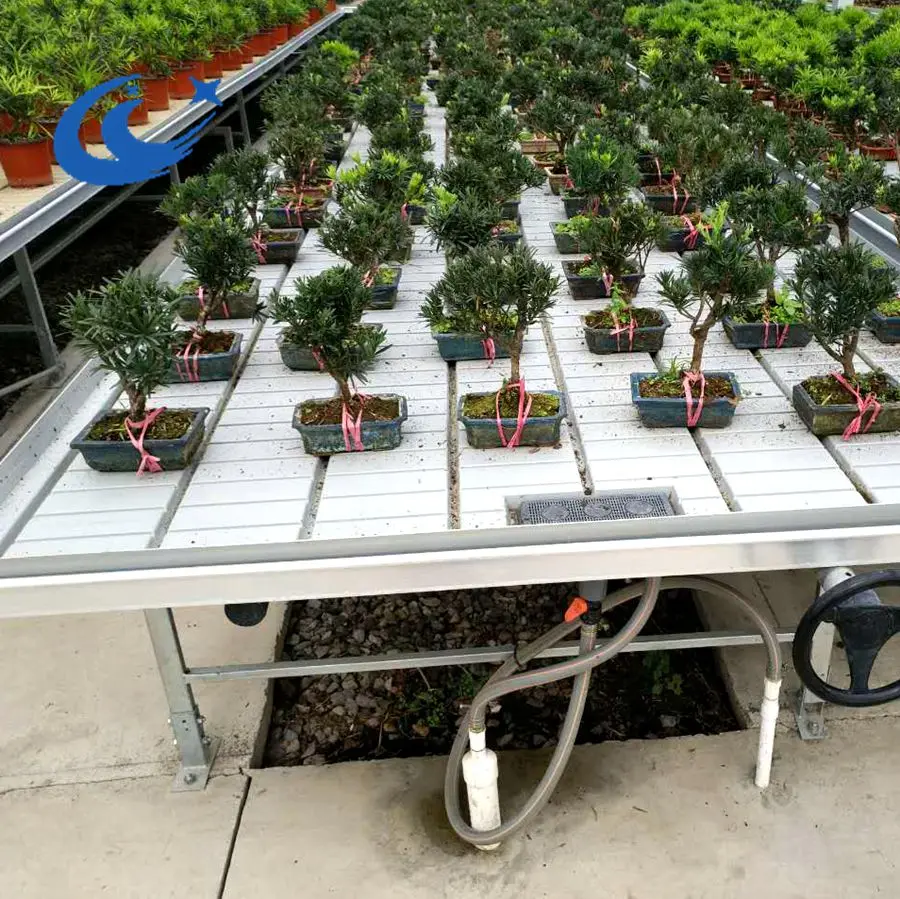
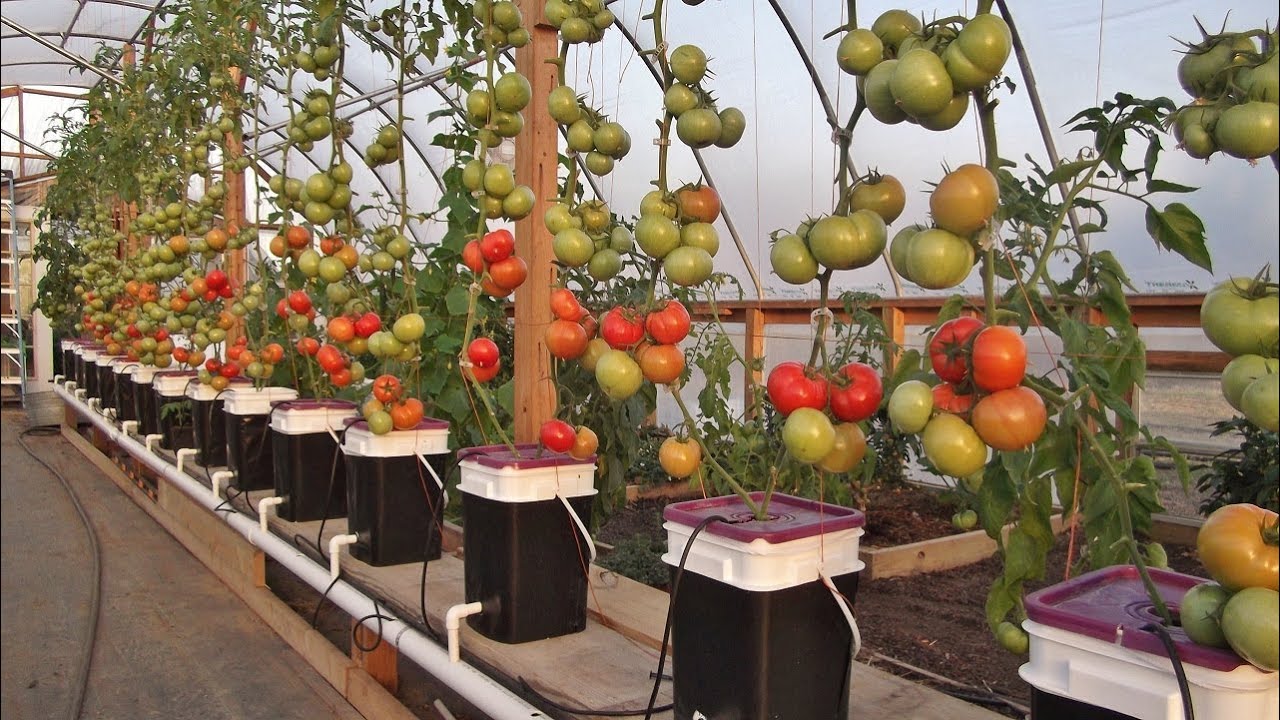
The Dutch bucket system
A Dutch bucket system is great to grow large plants. In this setup, buckets are connected to drain lines at the bottom. This allows you to pump the nutrient solution into the buckets and allow it to drain several times per day. The constant cycling of solution exposes roots to large amounts of oxygen between irrigation cycles, making this a great setup for highly productive crops.
The Dutch bucket system is therefore an active system, requiring water pumps to keep the plants alive. This dramatically increases the energy consumption needs of the crop and makes the pumps and timers fundamental components of the hydroponic system. An active bucket system like this will usually give the grower 12-24 hours, depending on conditions, to fix critical components in case of failure before plants start to suffer irreversible damage. To prevent damage in commercial operations, drains will usually allow for some amount of water to remain at the bottom of the buckets so that large plants have a buffer to survive more prolonged technical issues.
The need to support the plants without water also means you need to use a lot more media, as the bucket themselves need to be filled with it. Since multiple flood and drain cycles are desirable this also means that the media needs to dry back relatively quickly, reason why media like rice husks, perlite or expanded clay, are used. Media costs of Dutch bucket systems are significantly larger than those of other systems because of this. You can run Dutch bucket systems with netpots as well, but this tends to make the system much less robust to pump failure.
Dutch bucket systems are a good choice if you want to grow highly productive large plants. They offer more robustness when compared with NFT systems – which have more critical points of failure – and the large amount of media provides a good temperature buffer and a great anchoring point for large plants. Several small-scale kits to grow using Dutch buckets also exist (see this one for example). However, they take significantly more space than the alternatives we described before. They require access to power and space for pumps, a large nutrient reservoir, and the supporting infrastructure for the plants. They also require nutrient solution management skills.
Conclusion
Bucket systems are very popular in hydroponics. They can be as simple as a bucket with a hole and a net pot or as complex as Dutch bucket systems with interconnected drain systems and full nutrient solution recirculation.
The easiest system to start with is a hydroponic bucket system with an air pump, as this eliminates the need to gauge the container volume and nutrient level precisely and allows for healthier growth, fewer disease issues, and easier temperature control.
A Kratky system can be great to grow small plants at a low cost with no power, but some experimentation with the nutrient level and concentration is usually required to get a satisfactory crop.
For large plants, the Dutch bucket system is a great choice, if you have the space and power availability. Dutch bucket kits for small-scale growers are also readily available.
Have you ever grown using buckets? Which type of system have you used and why? Let us know in the comments below!