Kinetin, a powerful hormone for flowering plants

Kinetin was the first cytokinin ever discovered. Scientists have used it extensively to stimulate cell division in tissue culture, as it is a powerful growth hormone. However, there isn’t a clear understanding of the effects of kinetin in large flowering plants, reason why it hasn’t been widely used as an additive in plant culture. In this post, we are going to take a look into the practical application of kinetin. We are going to look into published research and discuss whether kinetin could be used to enhance plant yields. I will refrain from discussing the history and chemical structure of kinetin, for a basic introduction about kinetin and its history, I suggest reading this paper (1). I will also use some information contained in this review (5).

Tomatoes, peas and cucumbers grown in solutions containing kinetin were significantly shorter. Root and flowering changes were also present. Taken from (2).

The effects of exogenous kinetin

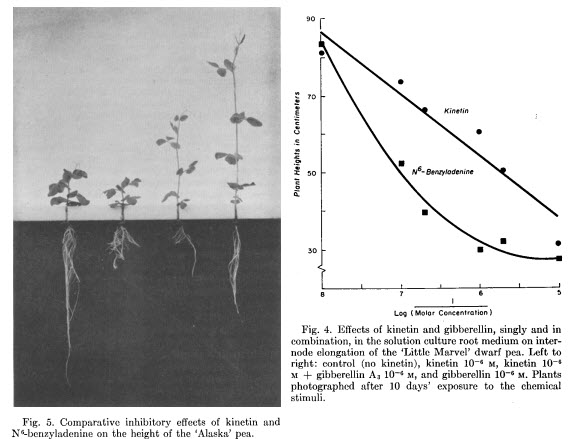
In tissue culture, what kinetin does seems to be clear, it promotes cell division in the presence of auxins. However, for large plants in soilless media, the effect does not seem to be that straightforward. One of the first thorough studies of kinetin in flowering plants was done in the early 1960s (2). In this study, tomatoes, cucumbers, and peats were grown in solutions containing different concentrations of kinetin, going from 10-5 to 10-7 molar. The researchers showed that kinetin in solution behaved like a gibberellin inhibitor, directly suppressing plant height as a function of concentration. The plants developed several root abnormalities and changes in their flowering cycle, with kinetin inhibiting flowering in tomatoes, but accelerating it in peas.

You can see in this study that the effective concentration is quite low. The range of kinetin concentrations tested goes from 0.0215mg/L to 2.15 mg/L. These values are quite small compared to the amounts of other hormones, such as IBA or NAA, generally used in plant culture. The concentration of kinetin plays a key role in its effect. A 2008 study on red goosefoot (3) shows the strong impact kinetin concentration can have. These researchers showed that low concentrations of kinetin increased bud formation and increased the height of the apical meristem, while large concentrations inhibited flowering and made the plants shorter.

The entire literature on exogenous kinetin applications is therefore split between apparently contradictory effects. Some studies show effects that are more in line with a gibberellin inhibitor, with shorter plants, while others show stimulation of shoot growth. What you get is dependent on concentration and plant species, making kinetin a hard hormone to use. Use too much and you might compromise flowering and yields, use too little and you might have undesirable elongation effects or simply no effects at all (4, 6).

Kinetin can also have an effect on the sex determination of plants. For example, kinetin induces female flowers in cannabis and can ameliorate the production of male flowers in female plants (12).

Kinetin foliar sprays

The mode of application makes a big difference as well. While most of the root studies I read using kinetin kept their application rates below 3mg/L, many foliar studies explore kinetin application rates that are significantly higher. In this study (9), for example, they perform kinetin applications at 100 ppm. From the foliar studies I read, I found this study (7) particularly interesting. In it, kinetin applications at 2.5, 5, and 10 mg/L were done using foliar spraying on tomato, cucumber, and pepper plants.

The researchers found that the cucumbers had an excellent response to the 2.5 mg/L treatment, with taller plants, larger leaf area, and bigger yields, while they showed negative responses to the 10ppm treatment, with lower yields. While tomatoes showed a similar response, peppers gave their best results with the 10 ppm kinetin sprays. This again highlights not only that plants will respond negatively to excessive doses of kinetin, but that this response is significantly species-dependent.

Environmental conditions

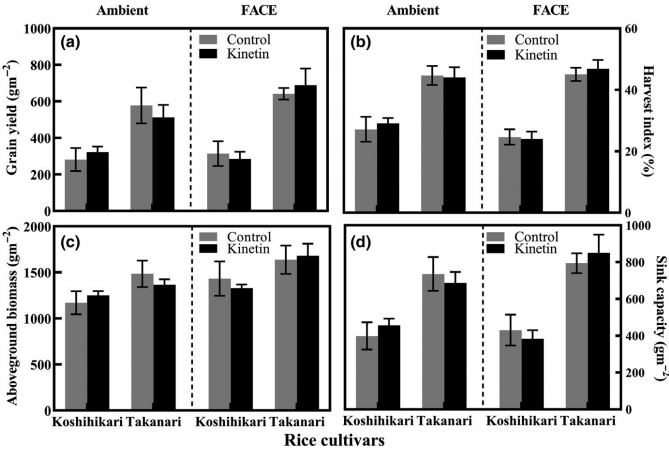
Furthermore, environmental conditions can play a significant role in the effects of kinetin. This study (8) found that kinetin could help rice plants give better yields under carbon dioxide enrichment. However, this worked only for some of the varieties of rice used. For the varieties for which it worked, kinetin applied as a foliar at 10.75 ppm was able to enhance the carbon dioxide fertilization effect.

Effect of kinetin application in several different rice cultivars with or without carbon dioxide enrichment (8)

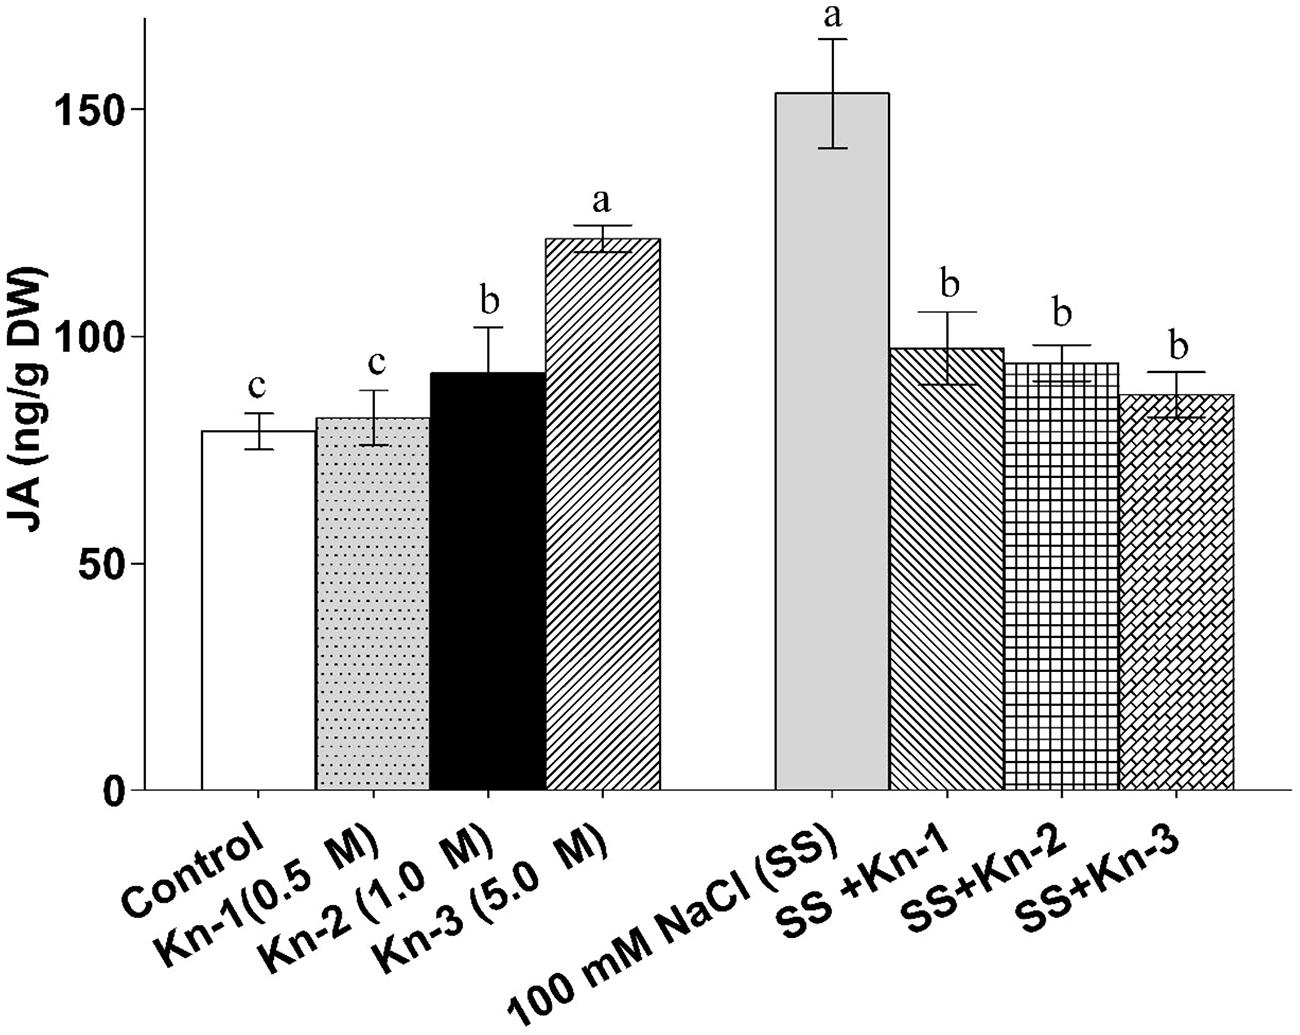
Other environmental conditions, such as salinity stress and oxidative stress, can also play a big role in the effect of kinetin. As a strong antioxidant, kinetin can help plants deal with oxidative stress (10). It has also been tested many times as a way to deal with salinity-induced stress, for example, see this article on kinetin applications in soybeans (11). In this last study, you can see how kinetin upregulates the gibberellin biosynthesis pathway when it was actively suppressed by the high salinity. Some effects, such as the production of jasmonic acid, are actually opposite in the control and in the salinity-induced environments as a function of kinetin concentration.

Changes in jasmonic acid content for soybean plants grown with or without salt stress and treated with kinetin. Kinetin increases JA when no salt stress is present and decreases it otherwise.

Conclusion

Kinetin can be a powerful and versatile hormone in flowering plants. It can be used to achieve a variety of different effects, including making plants shorter, increasing budding sites, increasing yields, or relieving sources of stress. However, the choice of concentration, method, and application time is critical and can lead to completely opposite effects if not done correctly. Low applications tend to increase growth and leaf area, while larger concentrations will show an effect similar to a gibberellin inhibitor. However, the concentrations that work best for a given plant cannot be known before experimentation is done. However, do consider that higher concentrations consistently lead to decreases in yields.

If you want to use kinetin in your crop, start with a foliar dose at around 2ppm and take note of the effects. From there, you will be able to gauge whether you want to have a higher or lower concentration of kinetin. If the dose is too high, you will start to see some negative effects. Also, time your applications so that they are in line with the effects you want to achieve. If you want to feed kinetin through the roots, use an even lower concentration and make sure your applications are properly timed, avoid having permanent exposure of roots to kinetin, as this is likely to be negative.

Have you ever used kinetin in your crops? What concentrations have you used and what effects have you seen? Let us know in the comments below!


A great trick to higher chelate stability in hydroponics

The stability of micronutrients in hydroponic solution has been studied in depth during the last 5 decades (1). The EDTA molecule was the first cheap synthetic ligand that created highly stable chelates that could be used to stabilize heavy metals in solution. After this, efforts to create more stable chelates continued, with the introduction of HEDTA, DTPA, EDDHA, and other synthetic ligands. However, the stability of iron in solution still remains a problem. This is due to the chemistry of heavy metals in solution and the issues that arise as root zone chemical conditions change in a hydroponic crop. In this post we will discuss a simple trick, to increase the stability of the cheaply available iron EDTA chelate, the most commonly used in nutrient solutions. Note, the term “heavy metal” in this post is used to refer to the transition metals used in hydroponics, mainly Fe, Zn, Mn and Cu.

500g EDTA Fe 13% Chelated iron organic fertilizer|fertilizer| - AliExpress
Na2FeEDTA, one of the most commonly used Fe chelates in hydroponics.

Chelate stability

The stability of chelates is dominated by three competing forces. The first is the acid/base equilibrium of the ligand. Ligands like EDTA are only able to chelate Fe when their active sites are not occupied by hydrogen ions. As the pH goes down, these sites become occupied and the EDTA-4 turns into HEDTA-3, then H2EDTA-2, H3EDTA-1, and finally H4EDTA. This process frees the heavy metal ions as the concentration of the active ligand (EDTA-4) drops to near zero values. At very acidic pH values, the Fe2+ will effectively become fully unchelated due to this effect, although this does not happen to a very large extent at the pH values we see in hydroponics.

The second effect has to do with the affinity of the ligand for the heavy metal. This is what we call the “stability” of the chelate. It is measured through the use of the equilibrium constant of the reaction of the metal with the ligand. The larger this value, the bigger the stability of the chelate will be and the less free metal we will have in solution. For more information about this, you can read this previous post, where I share a table with a lot of stability constants for different ligands and heavy metals.

The third is the precipitation of free heavy metal ions by the formation of insoluble solids. This can be quite critical, as several of the solids that can form in hydroponics, mainly hydroxides, and phosphates, have very low solubility values. These can be compared by using the equilibrium constant of the solid with the ions in solution, what we call the Ksp in chemistry. The smaller the Ksp, the more insoluble a substance is. When these solids precipitate they take ions away from the solution and these are regenerated by the chelated heavy metal equilibrium reaction. This depletes the heavy metal slowly from the solution.

Free heavy metal ions

Since free heavy metal ions are the ones that can precipitate and become unavailable, what we desire is to lower the amount of free heavy metal ions in solution and increase the percent of chelated ions. Whenever you put a chelated heavy metal source in solution, like Na2FeEDTA, the chelate goes into equilibrium with its unchelated form and all the acid/base species of the ligand’s equilibrium reactions. This means that a percentage of the Fe becomes effectively unchelated. In a solution where 1ppm of Fe from Na2FeEDTA is added, P is added at 30ppm and the pH is set to 6, around 0.38% of the Fe will be unchelated.

As the pH increases the amount of free Fe actually decreases – as the acid/base equilibrium of the ligand shifts towards the base forms – but the concentration of other ions that can precipitate really insoluble salts, like phosphate or hydroxide, increases dramatically. At pH values above 7, even a small fraction of free Fe can lead to precipitation of some Fe salts. This is why iron EDTA chelates are not considered to be stable in basic pH, not because the chelate itself is unstable, but because there are even more stable Fe solids that can form and precipitate out the Fe.

A simple trick to alleviate the issue

Traditionally, the issue of having unchelated heavy metals has been approached by creating stronger chelates. DTPA, which has much higher stability constants, is able to generate much lower amounts of Fe, which leads to lower precipitation. The equilibrium constant with some isomers of EDDHA is actually so high, that no Fe solids are formed across almost the entire pH window in water. However, these chelates are more expensive, and – in the case of EDDHA – the presence of several different isomers complicates the situation.

Solution always has 1ppm of Fe added as Na2FeEDTA with 30ppm of P. The above was calculated using a system of equations accounting for all the EDTA and phosphate acid/base equilibria, as well as the heavy metal chelation.

A very simple trick to partially solve the problem is to add an excess of chelating agent into the hydroponic solution. If you’re using EDTA, adding Na2H2EDTA on top of the heavy metal chelates can greatly help reduce the amount of free heavy metal in solution. This EDTA will also not remain unbound, as it will quickly chelate Mg and Ca in solution. These Ca and Mg chelates, will act as a reserve of ligand to ensure that almost all heavy metal ions are chelated. A 20% molar excess can generate dramatic results in the case of Fe2+, as shown in the image above. This 20% “reserve” ligand, reduces the amount of free Fe by a factor of 10-100x, depending on the pH. Note that although the above slows down any precipitation reactions – as little free Fe is available – the hydroxide and phosphate ions will still win if the pH increases enough, as the stability constant of the Fe EDTA reaction remains the same.

To give a 20% excess of EDTA in molar terms, add 1.2mg/L of disodium EDTA to the final nutrient solution for every 1ppm of Fe. You can also add a 100% molar excess with no ill effects on plants, which will provide a more pronounced effect.

Conclusion

Adding a chelated heavy metal form to a hydroponic solution does not ensure that the metal will always be chelated. The chemical equilibria that exist with the free form of the heavy metal always happen and will always generate some percentage of free, unchelated metal. By adding an excess of the chelating agent, in this case, Na2H2EDTA, we can strongly displace the equilibrium and reduce the amount of free heavy metal present. The lower amount of heavy metal increases the pH stability window of the chelate and reduces the precipitation issues that happen as a consequence of free heavy metal ions being present in solution.

Do you add excess chelating agent to your nutrient solutions? Let us know about your experience in the comments!


The best hydroponic medium you have never heard of

One of the most important choices in a soilless crop is the medium. Ideally, the media in a hydroponic crop should provide no nutrition but just act as support material for the plant. However, common media choices, such as coco coir and peat moss, are far from inert and their usage requires special modifications to the nutrient solutions in order to account for their specific chemical properties. In this post, I am going to talk about a great hydroponic medium choice that is fairly common in South American countries but rarely used in the United States or Canada.

Rice hulls, a key component of my favorite medium for soilless culture

Issues with existing media

The most commonly used hydroponic media types in the US are perlite, peat moss, coco coir, and rockwool. Peat moss tends to have higher than desirable water retention and acidifies strongly through time. For this reason, it is usually amended with perlite – to increase aeration – and with dolomite/limestone in order to buffer the constant increase in pH within the root zone. To maximize its potential, you need to account for these amendments and the natural evolution of peat moss through time in your nutrient solution or you will tend to have calcium, magnesium, and nitrogen uptake issues. All of which are commonly observed by peat moss growers.

Coco coir has other problems. It contains large amounts of chloride, sodium and potassium. It also decomposes through time and, in doing so, exposes cation exchange sites that strongly bind elements like calcium, magnesium and manganese. For this reason, you often need to either pretreat the coir with calcium containing solutions or adjust your nutrient solution chemistry to account for the evolution of the potassium release and calcium capture through the crop cycle. The concentrations and ratios of heavy metals also need to be changed to account for the affinity of the cation exchange sites for these ions.

Rockwool has better chemical and physical stability but the environmental impact of its production is high (1). It is also hard to reuse and its physical properties are hard to tune since it is hard to mix with other media effectively. Perlite, another rocky medium, is easy to reuse and has low environmental impact, but it dries back too quickly, which increases the need for energy for irrigation and dramatically increases the amount of waste generated in open (drain-to-waste) hydroponic systems.

Rice hulls, the first component of a better medium

Over the past 40 years, rice hull – also known as rice husk – has become a medium of choice in many countries due to its wide availability as an agricultural waste product. It is made primarily of silica structures supported by organic material, decomposes very slowly through time, and has very benign chemical properties. Rice hulls will not change pH through time, will slowly release bio-available silicon, and can be reused several times before they degrade. However, they usually contain insects and some rice, reason why sterilization of the media with hot water is usually required in order to avoid pest propagation and seedling death due to seed fermentation.

Another issue of rice hulls is their incredibly weak moisture retention. Rice husks are even worse than perlite at retaining water, reason why rice husks are commonly used as an amendment to increase aeration. A hydroponic crop using only rice husks as a medium is possible, provided that the crop is constantly irrigated to compensate for the very fast dry back period of the medium. This constant irrigation is achieved through drip systems.

Washed river sand, the perfect compliment

Given that rice hull is primarily made of silica and has excessively fast dry back, it would be ideally paired with a medium with similar chemical properties but opposite physical properties. River sand, which has exactly opposite physical properties and is also made primarily of silica, perfectly fits the bill. River sand has a very slow dry back. It is therefore hard to use on its own in hydroponics due to its tendency to cause waterlogging. However, when used in combination with rice husks, a medium with exceedingly tunable physical properties and very benign chemical properties appears.

Buy SPS River Sand 2kg Online at Low Prices in India - Amazon.in
River sand is chemically inert and provides a perfect compliment to rice hulls poor water retention properties

To prepare this media, mix 50% rice hulls by volume with 50% river sand. Rice hulls can be purchased for a very low cost, a 20 USD bag will be enough to prepare 400L of the medium. River sand is even cheaper and can be bought at around 50 USD per ton retail but can be bought wholesale at much lower prices. The density of river sand is around 1587 kg/m3, meaning that it will take around 317 kg to get 200L of sand. This means that the cost per 400L of final medium will be around 16 USD, taking the total cost of 400L of medium to 46 USD. This can be more cost effective than either peat moss, perlite, rockwool, or coco coir. Especially if you take into account that the media can be reused across several crop cycles.

Treating the medium before use

This medium needs to be treated before use, as rice hulls can contain some amount of rice that can be detrimental to seedlings. To treat it, water it with tap or RO water 3 days before use. This will ferment any of the remaining rice and the increase in temperature caused by this process will help get rid of insects and any pathogens present within the mix. Note that rice hulls are often parboiled, which means they have already been heated in boiling water, which will reduce the issue of pests.

Once this treatment is complete, you are ready to use the medium. You can also adjust the percentage of rice hulls and river sand in order to fit the particular dry back conditions you desire. More river sand will make the medium dry back slower, while more rice hulls will make the media dry back faster. This is similar to what happens when you mix perlite and coco or peat moss, with the advantage that river sand and rice hulls are much more chemically inert than these commonly used media types.

Conclusion

While not common in the US, mixes of rice hulls and river sand have been successfully used in hydroponic settings during the past 50 years in a wide variety of countries, especially South American ones. I have personally used them in both small and commercial-scale projects to grow from leafy greens to large flowering plants, with amazing results. This medium is chemically inert, very easy to tune, and has a low price point.

Had you heard of a mix of rice hulls and river sand as medium? Would this be cheaper than your current media choice? Let us know in the comments below!


How to make an organic hydroponic nutrient solution

Hydroponic nutrients are usually made with synthetic chemicals that come from industrial processes. While these chemicals are usually of a higher purity than those mined or obtained from animal or vegetable resources, it also means that these products contain no microbes or bio-stimulants and their origin implies they cannot be used in organically certified growing operations. Growers who want a more organic approach might still want to use hydroponic solutions, but traditional hydroponic fertilizers cannot be used due to the fact that they lack many of the traits desired in an organic fertilizer. In this post, I will show you how you can create a complete hydroponic solution from scratch using only OMRI-approved raw materials.

This seal is given to products that have been approved by the OMRI organization, which certifies which products can be used in organic culture

OMRI nutrient sources

A complete hydroponic solution should provide all substances that are necessary for plant growth. This means we need to provide nitrogen, phosphorus, potassium, magnesium, calcium, sulfur, iron, zinc, boron, copper, molybdenum, and manganese. Furthermore, we need to ensure that all of these nutrients are provided in forms that are available for the plants. This means we need to find sources that contain all the elements we need and then create a process that makes all of these nutrients adequately bioavailable. The following are the nutrient sources that we will be using, all of them are OMRI listed:

Please note the amazon links below are referral links. This means that I get a small commission when you choose to buy the products through these links, at no extra cost to you.

Mixing the solution

This solution cannot be created in a concentrated form. This means we will be preparing a solution that will be fed directly to plants. However, since many of the inputs contain a lot of insoluble materials – due to their origin – there will need to be a filtration process in the end. This filtration step is necessary if you want to avoid problems dealing with the clogging of irrigation lines, in case you want to feed this into a regular irrigation system. If you want to hand water directly, then you can avoid this filtration step.

Since the solution is not concentrated, the amounts to be weighed can be small for some of the materials. For this reason, I advise you to prepare at least 100 gallons of solution, so that you don’t require to weigh very small amounts of material. This will help keep the errors due to measurements low. To make this preparation you will need the following materials:

To prepare the solution (100 gallons), follow these steps:

  1. Add 50 gallons of water using the flow meter. Ideally use RO water, but you can use tap water as well if that is not possible.
  2. Weigh and add all the ingredients per the table below.
  3. Add another 50 gallons of water using the flow meter.
  4. Place the air pump inside the solution and switch it on.
  5. Maintain constant aeration for at least 15 days. Do not use it before this time has passed.
  6. After 15 days have passed, filter the solution to use in irrigation lines or use directly to hand water. Keep air flowing through the solution even after the 15 days have passed.
  7. The solution might also become basic during this process, if necessary, you can bring the pH of the solution down with citric acid before watering plants.
Bark compost  190
Solubor 0.65
Copper sulfate 0.15
Corn Steep Liquor 330
Ferti-Nitro Plus 220
Iron Sulfate 4
Magnesium sulfate 190
Manganese Sulfate 1
Potassium Sulfate 136
Seabird Guano 265
Zinc Sulfate 0.10
Table of ingredients to weigh. Masses are in grams.

The reason for the long wait

Plants ideally require nitrate in order to grow, the above inputs do not contain nitrate in appreciable amounts but mainly organic nitrogen sources. In this and this previous posts, you can learn more about organic nitrogen and why it is not ideal to use this in an unprocessed manner in a hydroponic crop. When you irrigate with organic nitrogen, most of the nitrogen will go unused and significant time will need to pass in the root zone for it to become available. The organic nitrogen decomposition process can also destabilize the pH of the root zone, making it harder for plants to properly absorb nutrients. By carrying out this process outside of the root zone, we make it easier on the plants, as we feed a pre-digested solution that is rich in available nutrients and microbes. The Seabird Guano and Bark compost, both provide the microbe inoculations necessary for the nitrogen decomposition process to take place. Oxygen, which we continuously pump into the solution, is also key to this process. The CSL and the Ferti-Nitro Plus will provide the organic nitrogen sources that will be decomposed.

This solution also contains a significant amount of amino acids. Although most of these amino acids will be converted into more readily absorbable nitrate through the digestion process, a small amount will be left undigested, which will lock onto the heavy metal ions. This will help prevent precipitation issues and provide the plant with organically derived chelates.

Also note that no specific molybdenum input is included. This is because it is present as an impurity in the corn steep liquor at a high enough concentration, so its explicit addition is not required.

Conclusion

The above solution should fully replace a traditional hydroponic solution, using only OMRI-approved materials. The final concentrations of nutrients should be spot on for the healthy development of most small and large plants. The solution will also contain a lot of microbes and bio-stimulants, which will also help plant growth. Of course, the final character of the solution will depend on the temperature of the digestion, the amount of aeration present, and the nature of the inputs used (as OMRI inputs have a significant amount of variability due to their sourcing). It might take a few tries to adjust this process to your particular conditions. Note that the above solution is intended to be used with soilless media that has not been amended, as it should provide all nutrients required for plant growth.

Did you prepare the above solution? Leave a comment telling us about your experience!


Differences between labels and actual composition values in commercial hydroponic fertilizers

Whenever I am hired to duplicate a company’s fertilizer regime based on commercial products, I always emphasize that I cannot use the labels of the products as a reference because of how misleading these labels can be. A fertilizer company only needs to tell you the minimum amount of each element it guarantees there is in the product, but it does not have to tell you the exact amount. For example, a company might tell you their fertilizer is 2% N, while it is in reality 3%. If you tried to reproduce the formulation by what’s on the label you would end up with substantially less N, which would make your mix perform very differently. This is why lab analysis of the actual bottles is necessary to determine what needs to be done to reproduce the formulations.

Average deviation from the reported composition on the label compared with lab analysis.

How bad is this problem though? Are companies just under-reporting by 1-5% in order to ensure they are always compliant with the minimum guaranteed amount accounting for manufacturing errors or are they underreporting substantially in order to ensure all reverse engineering attempts based on the labels fail miserably? I have a lot of information about this from my experience with customers – which is why I know the problem is pretty bad – but I am not able to publicly share any of it, as these lab tests are under non-disclosure agreements with them. However, I recently found a website from the Oregon government (see here), where they share all the chemical analysis of fertilizers they have done in the past as well as whatever is claimed on labels.

The Oregon database is available in pdf form, reason why I had to develop a couple of custom programming tools to process all the information and put it into a readable database. So far I have only processed the fertilizers that were registered in 2015, but I am going to process all the fertilizers available in their database up until 2018 (the last year when this report was uploaded). However, you can already see patterns emerging for just the 2015 data. That year there were 245 fertilizers tested, from which 213 contained N, P, K, Ca, S or Mg. If we compare the lab results for these elements with the results from the lab analysis, we can calculate the average deviation for them, which you can see above. As you can see, companies will include, on average, 20%+ of what the labels say they contain. This is way more of a deviation than what you would expect to cover manufacturing variations (which are expected to be <10% in a well-designed process) so this is definitely an effort to prevent reverse engineering.

Median divergence between compositions derived from labels and lab analyses.
Boxplot of the divergences between compositions derived from labels and lab analyses.

Furthermore, the deviations are by no means homogeneous in the database. The above graphs showing the box plot and median deviation values, show us that most people will actually be deviated by less than 5% from their label requirements, but others will be very largely deviated, with errors that can be in the 100%+ deviation from their reported concentration. In many cases, companies also have negative deviations, which implies that the variance of their manufacturing process was either unaccounted for or there was a big issue in the manufacturing process (for example they forgot to add the chemical containing the element). These people would be in violation of the guaranteed analysis rules and would be fined and their product registrations could be removed.

With this information, we can say that most people try to report things within what would be considered reasonable if the label is to remain accurate (deviations in the 1-5% range) to account for their manufacturing issues but many companies will choose to drift heavily for this and report values that are completely misleading relative to the labels. These companies are often the ones that are most widely used as they are the ones who want to protect themselves from reverse engineering most aggressively.

Take for example General Hydroponics (GH). Their FloraGro product is registered with an available phosphate of 1%, while the actual value in the product is 1.3%, this is a 30% deviation, far above the median of the industry. They will also not just underreport everything by the same amount – because then your formulation would perfectly match when you matched their target EC – but they will heavily underreport some elements and be accurate for others. In this same Floragro product, the K2O is labeled as 6% and the lab analysis is 5.9%, meaning that they reported the value of K pretty accurately. However, by underreporting some but not others, they guarantee that you will skew your elemental ratios by a big margin if you try to reverse engineer the label, which will make your nutrients work very differently compared to their bottles.

As you can see, you just cannot trust fertilizer labels. Although most of the smaller companies will seek to provide accurate labels within what is possible due to manufacturing differences, big companies will often engineer their reporting to make it as hard as possible for reverse engineering of the labels to be an effective tactic to copy them. If you want to ever copy a commercial nutrient formulation, make sure you perform a lab analysis so that you know what you will be copying and never, ever, rely solely on the labels. I will continue working on this dataset, adding the remaining fertilizers, and I will expand my analyses to include micronutrients, which are covered by Oregon government tests.