Practical aspects of carbon dioxide enrichment in hydroponics
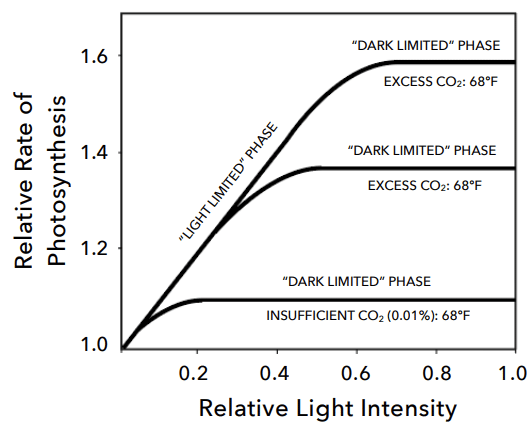
Carbon is one of the most important nutrients a plant consumes as it the largest component of a plant’s dry weight. Plants get this carbon mostly from the atmosphere – in the form of carbon dioxide – and transform it through the process of photosynthesis to create carbohydrates and other carbon-containing molecules. However, carbon dioxide concentrations in the atmosphere are relatively low (350-450 ppm) so plants that are given ample light and root nutrition – such as those in hydroponic setups – will sometimes become limited by the lack of enough carbon dioxide in the atmosphere. Carbon dioxide enrichment seeks to increase this concentration in order to remove this limitation. In today’s post, we’re going to talk about some of the practical aspects of CO2 enrichment in hydroponics setups, such as which concentrations to use, how to do the enrichment, and when to do it.
To dive into the scientific literature about carbon dioxide, I recommend this review from 2018, which not only summarizes a lot of the relevant literature, but contains a wide array of literature resources that can be useful for anybody who wants an in-depth look at the scientific research surrounding CO2 enrichment. A lot of the information contained in this post was taken from this paper or its sources. I will cite specific sources when this is not the case.
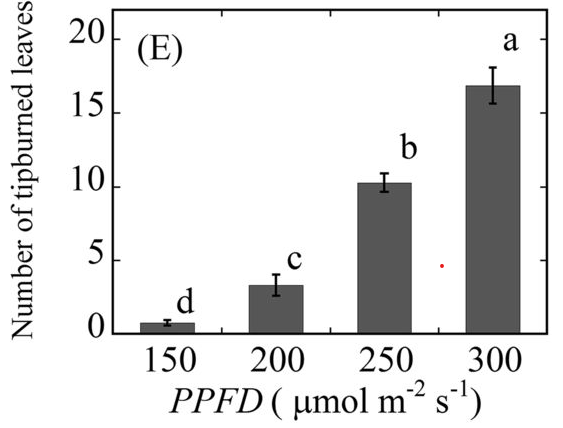
First of all, it is important to realize that carbon dioxide enrichment does not make sense under all circumstances. Plants will tend to be limited by other factors before they are limited by carbon dioxide. The first step before CO2 enrichment is considered, is to make sure that the plants are receiving enough light (>400 μmol/m2/s for flowering plants) and that their tissue analyses show that they are not being limited by a deficiency of any particular mineral nutrient. Plants that are either under lower light, drought stress, or nutritional deficiencies will tend to benefit significantly less from CO2 enrichment than plants that are actually limited only by the CO2 concentration in the greenhouse. Under some of these circumstances, CO2 injections could lead to excessive amounts of CO2 that might lead to actually counter-productive results. Temperature can also be a key factor in determining the success of CO2 enrichment, with temperatures in the upper range of ideal temperatures for a crop often leading to better results as the optimal temperature increases as a function of CO2 enrichment (see here).
The next thing to consider is the source of carbon dioxide. The best source to use are CO2 canisters, which provide pure, on-demand CO2 that can be easily controlled both in terms of its purity and its release into the greenhouse. Lower cost sources are usually preferable though, especially fossil fuel burners that will release CO2 on demand. The issue with these burners is that they will release other gases into the atmosphere, like SO2, CO, and NOx, which might be harmful to plants if the output from the burner is not filtered before use. These can be minimized if natural gas burners are used, as these generate the lowest amount of these side-products. Another problem with “burners” is that they will heat the environment, if this does not coincide with the greenhouse’s heating needs it can lead to increases in temperature or excessive costs in climate control measures. For this reason, the timing of these “burner” cycles is critical to ensure they do not “fight” with climate control systems.
The sensors used to detect the CO2 and their placement will also be very important. There are mainly optical and electrochemical sensors available for CO2 detection. Both of these sensors need to be periodically checked against CO2 free gases and atmospheric CO2 to check their calibration. Optical sensors often require cleaning in order to remain reliable. Because of these potential reliability issues, it is often ideal to have multiple CO2 sensors used for control and to check the values of the sensors against each other to ensure no sensors have stopped working correctly. The CO2 distribution will usually be highest close to the ground and lower at leaf canopy, reason why sensors need to be placed around canopy height, to ensure the actual canopy concentration reaches the desirable level since this is where most CO2 will be used.
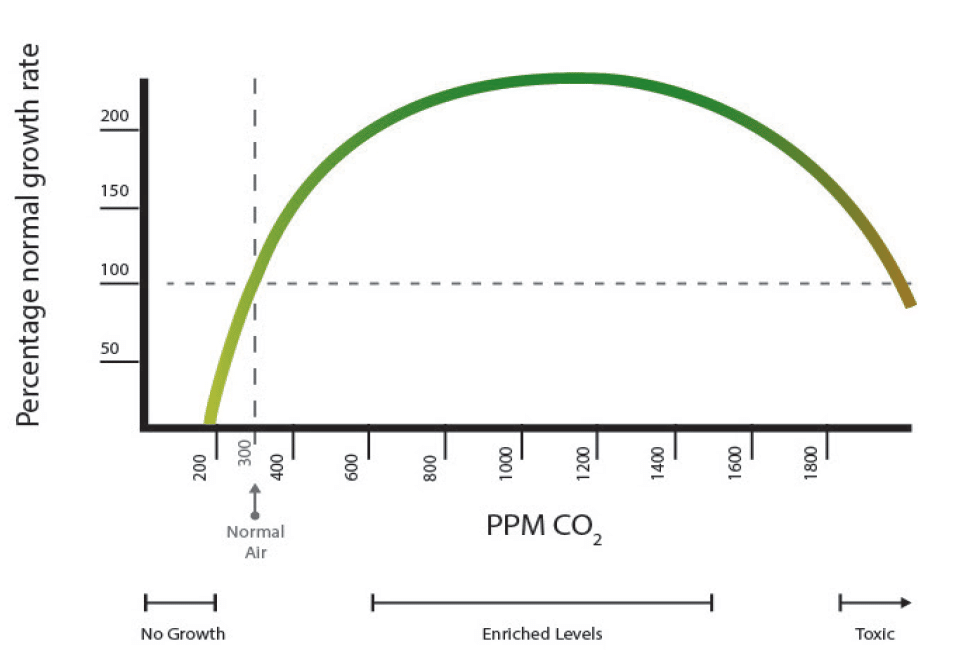
In terms of the concentration that should be held to maximize yields, research has shown that the most benefits – when these are possible – are obtained when the concentration of carbon dioxide is around 1000 ppm. Carbon dioxide is not incorporated into tissue at night and is also expected to negatively affect respiration rates, so common practice dictates that CO2 should be reduced at night to atmospheric levels to counter this problem. A 2020 study on Mulberry attempted to establish the difference between daytime and nighttime supplementation of CO2 and found out that all of the yield increase benefits of the supplementation were obtained when CO2 was supplemented only during the daytime.
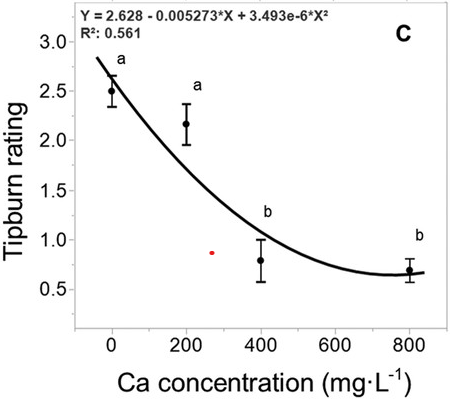
Regarding nutrition, carbon dioxide triggers increased demand for certain nutrients. For example, nitrogen demand increases substantially when CO2 supplementation is used (see here). For this reason, hydroponic crops that are CO2 supplemented will usually need to be fed higher amounts of nitrogen in order to avoid losing the benefits of the CO2 supplementation because of the inorganic nitrogen becoming a limiting factor. The carbon dioxide will increase nitrogen demand but not nitrogen absorption if the concentration is left the same, so we need to compensate for this by increasing the amount of nitrogen within the nutrient solution.
There is clearly a lot of research to be done, as optimal CO2 supplementation involves many variables (including financial, environmental, nutritional, plant species, etc). An initial approach where the atmosphere is enriched to 1000 ppm of CO2 with C3 plants that can take advantage of it, where nutrition, in general, is increased, temperatures are slightly increased as well and CO2 is vented at night is bound to give satisfactory initial results. This is a good starting point for anyone looking to benefit from CO2 enrichment.


/i/4974/products/2020-08-20T11%3A20%3A04.296Z-13671a.jpg?1606306133)