How to use organic fertilizers in Kratky hydroponics

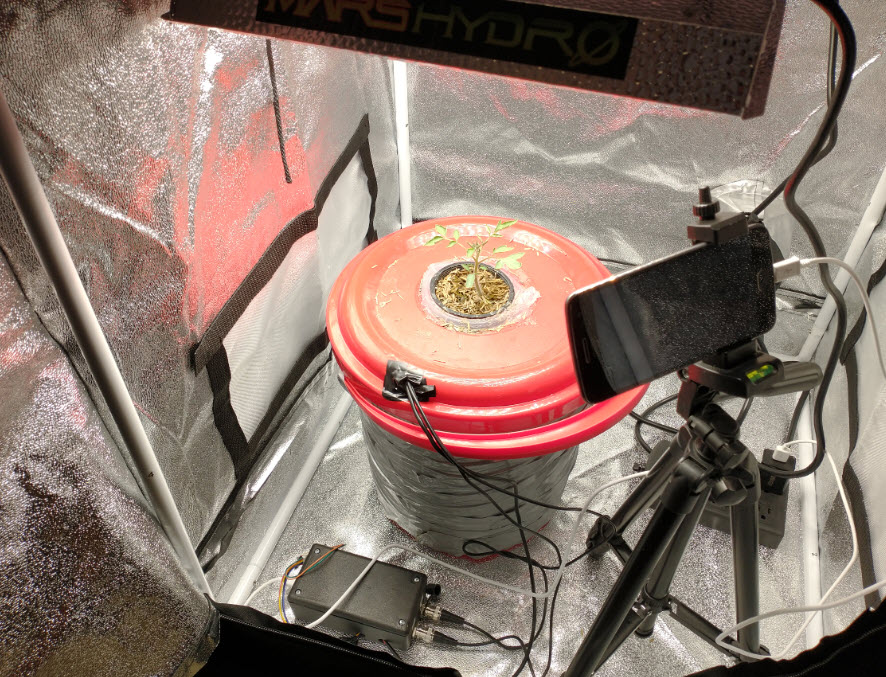
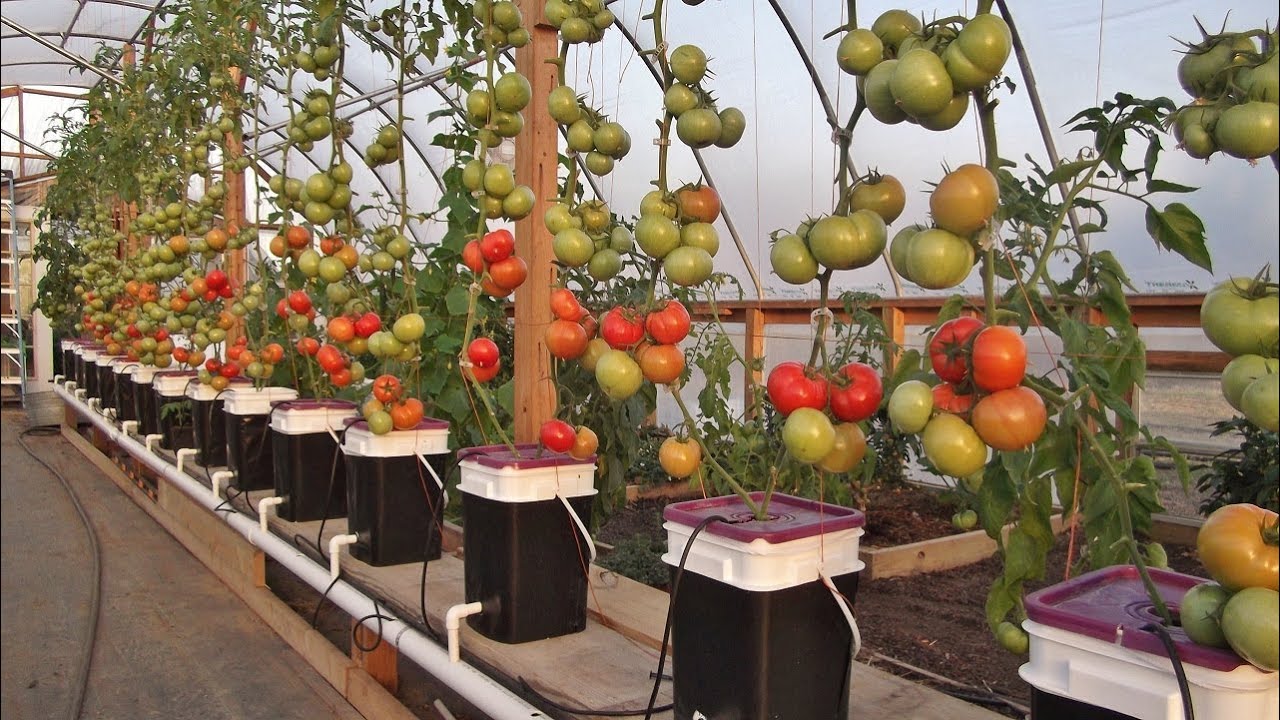
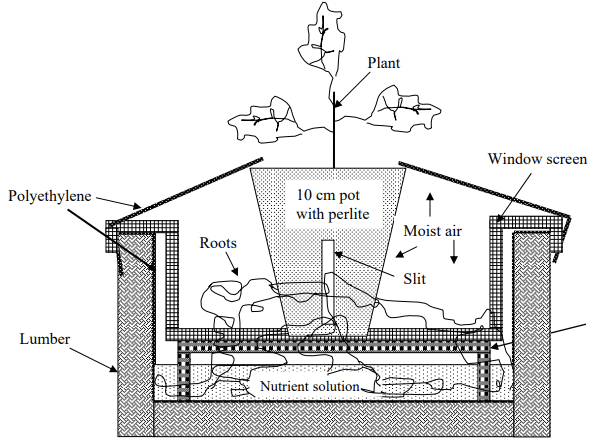
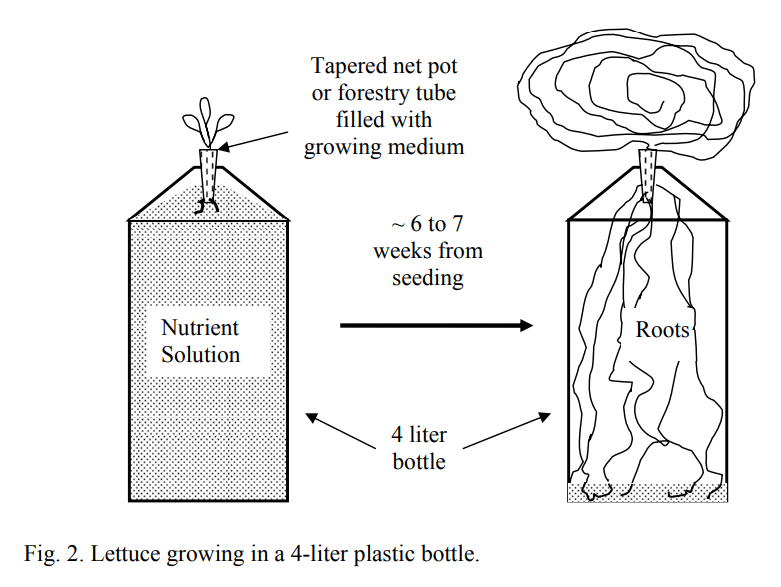
I’ve written several posts in this blog about Kratky hydroponics (for example here and here). In this method, you use a bucket, a net pot, a small amount of media, and some nutrient solution, to grow a plant from start to finish. It requires no power or interventions in the case of leafy greens or small flowering plants. However, one of the requirements of a traditional Kratky setup is the use of regular hydroponic nutrients that are created from synthetic inputs. In this post, we are going to talk about the use of organic fertilizers in Kratky hydroponics, which inputs might work, and which will be problematic.

Plant grown in a traditional Kratky setup using synthetic fertilizers

The types of organic inputs

When people talk about “organic fertilizers”, they usually refer to inputs that can be used in the growing of organically certifiable foods. The easiest way to fit this definition is to look at the inputs that are listed by organizations like OMRI. However, among OMRI-listed products, we have significant differences in where the products come from, and this makes a huge difference in whether or not we could use them in a Kratky setup.

For the purposes of this post, we can divide the OMRI-listed products into three categories. We have mined materials, which are extracted and used in their raw form from the earth. We also have animal or vegetable sourced products, which are byproducts of some animal or vegetable industry, and we have processed products, which involve some postprocessing or mixing of products in the former categories.

In the first category of products, we have things like mined magnesium sulfate, potassium sulfate, rock phosphate, sodium nitrate, or limestone. In the second category, we have things like fish emulsion, kelp extract, blood meal, and bone meal, while in the third category we have products like the Biomin series of transition metal chelates or any liquid or solid organic fertilizer blended products.

Why origin matters

The type of organic input matters, because Kratky hydroponic systems lack one important element. Oxygenation.

Since oxygen is not going to be injected into the nutrient solution, any input we use that requires oxygen for decomposition or absorption, or that requires oxygen for its proper uptake, is not going to work well. If you add any animal or vegetable product to a Kratky setup, the lack of oxygen in the solution is going to give way to the growth of anaerobic organisms that are going to be detrimental to plant growth and will lead to root rot.

Things like blood meal – which would be great amendments in soil with good aeration where oxygen can do its job – turn into foul mixes when put into a Kratky setup. This is because a Kratky setup has a stagnant body of water that is going to turn into a very unfavorable medium for plants as soon as we add anything that creates a heavily reducing environment.

The Kratky Method of Hydroponics - uPONICs, Hydroponics and Aquaponics  Information
A traditional Kratky setup. Note that the solution at the bottom is stagnant and not actively oxygenated in anyway. Only the oxygen that diffuses from the air gets into the water. This is enough to keep the submerged roots alive, provided that the solution itself does not act as a sink for oxygen. In these cases, root rot is quickly experienced.

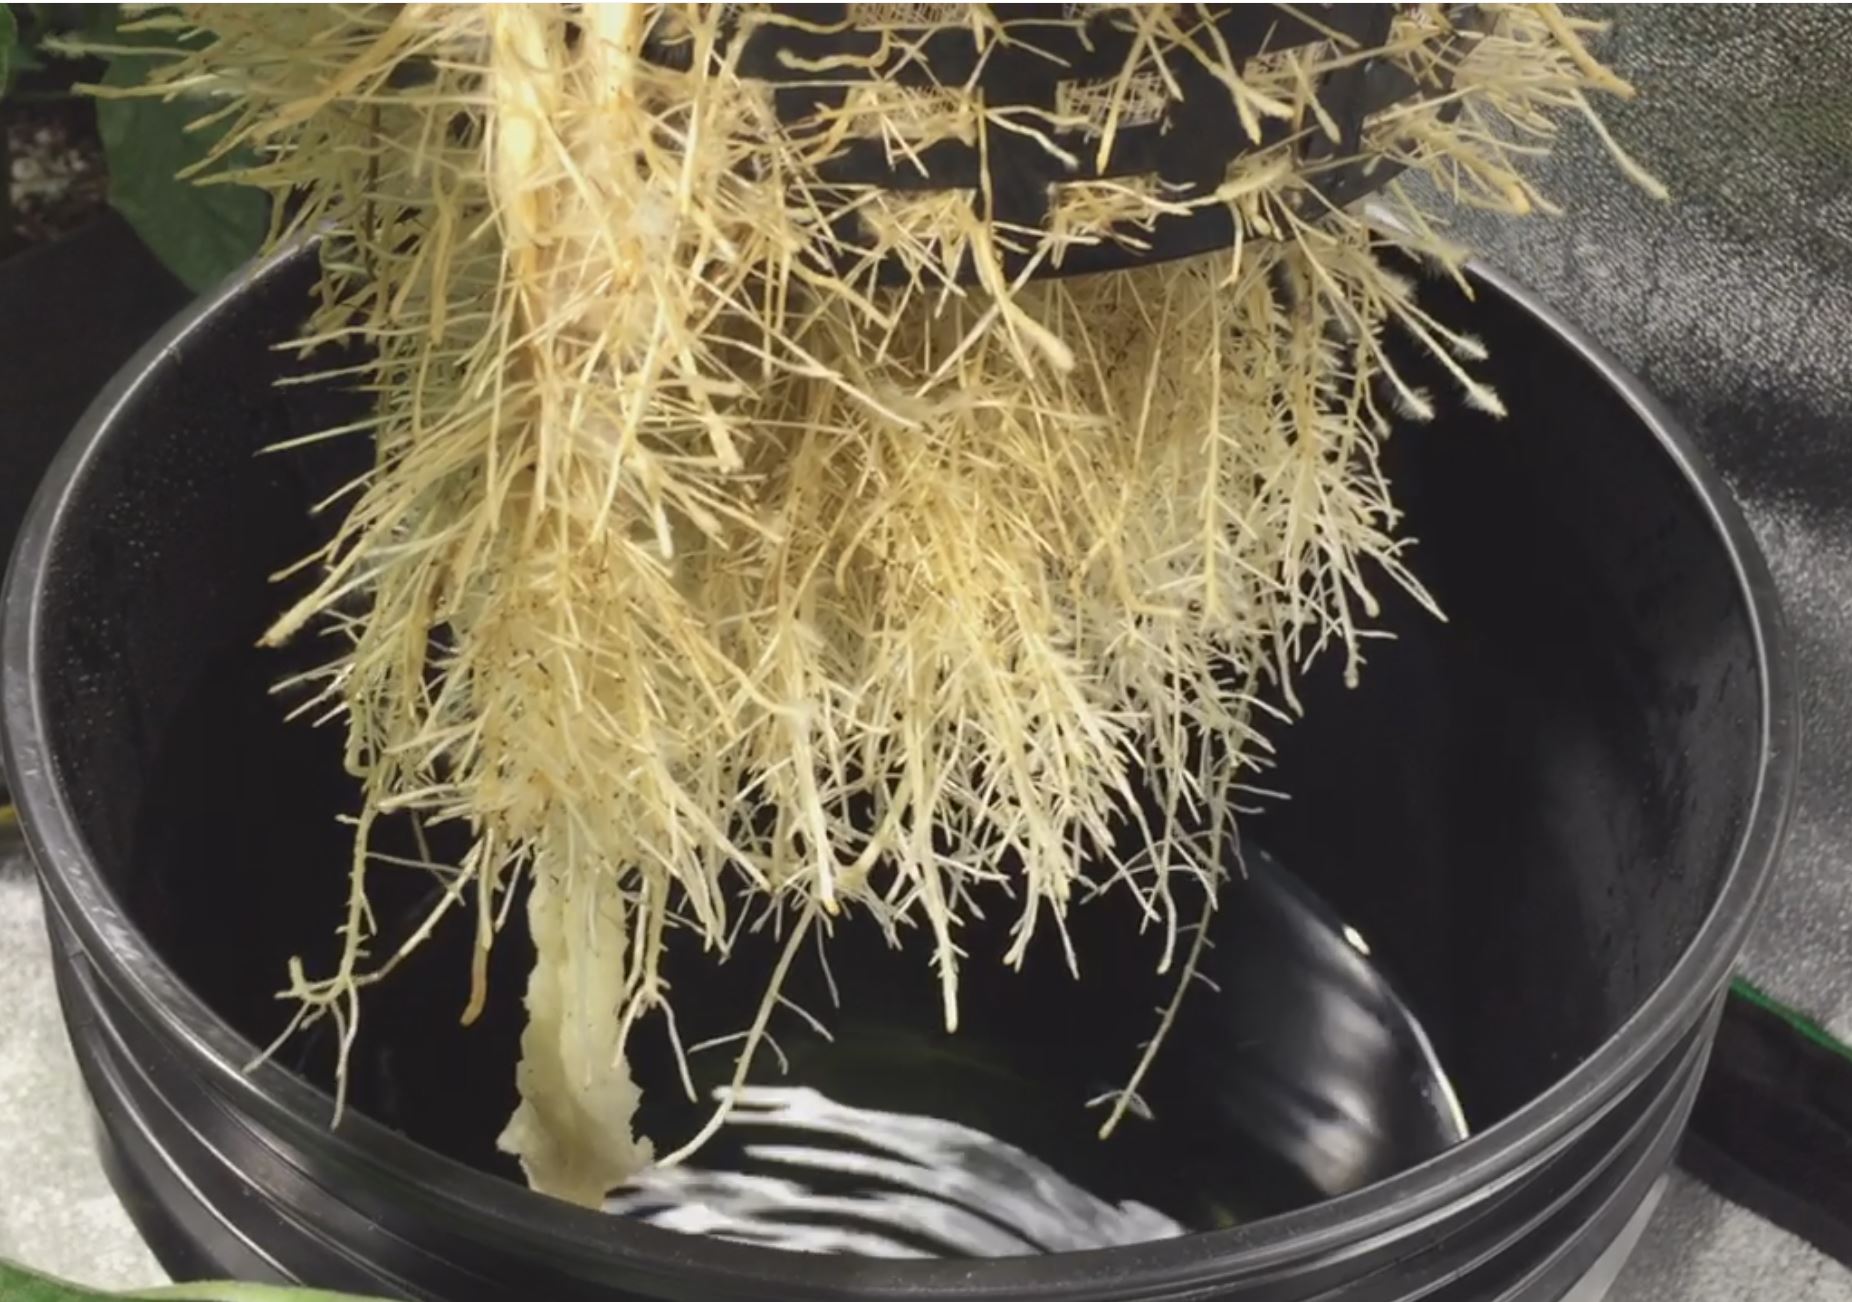
Plant roots can tolerate a relatively oxygen-deprived solution to some extent, provided that enough root mass is above the water to take in oxygen, but they cannot tolerate a solution that is rid of all oxygen by anaerobic microbial activity. This is because oxygen deprivation makes the plant more vulnerable to attack by pathogens and hinders the respiration of plant roots, which is needed for root survival.

Which inputs can you use

In general, any input that heavily removes oxygen cannot be used as-is. This means that anything that contains plant or animal proteins, fats or carbohydrates, is not going to work well. Inputs that are heavily rich in bacteria or fungi, even beneficial ones, are also going to fail. This is because these beneficial microorganisms also require oxygen and, when they are put in a Kratky solution and die, they are digested by anaerobic organisms that can take their place.

Animal or vegetable inputs that are relatively inert in origin, such as bone meal, would not be problematic, but their ability to release nutrients is going to be limited in a Kratky solution. Mined inputs are going to be mostly fine. Soluble ones, like mined magnesium sulfate and potassium sulfate, are ideal replacements, as they are chemically identical to the synthetic ones, except for a higher content of impurities due to their raw origin. However, it will be difficult to provide enough nitrogen in an organic Kratky hydroponic setup using only this type of inputs.

A potential solution

Since the problem is mainly oxygen deprivation, we can use an organic hydroponic solution, as long as it is processed for long enough to completely eliminate the oxygen depriving capacity of the inputs. As an example, you can follow my instructions on preparing an organic hydroponic solution. This requires fermenting of the solution for a significant period of time, in order to ensure most of the oxygen requiring reactions have been carried out.

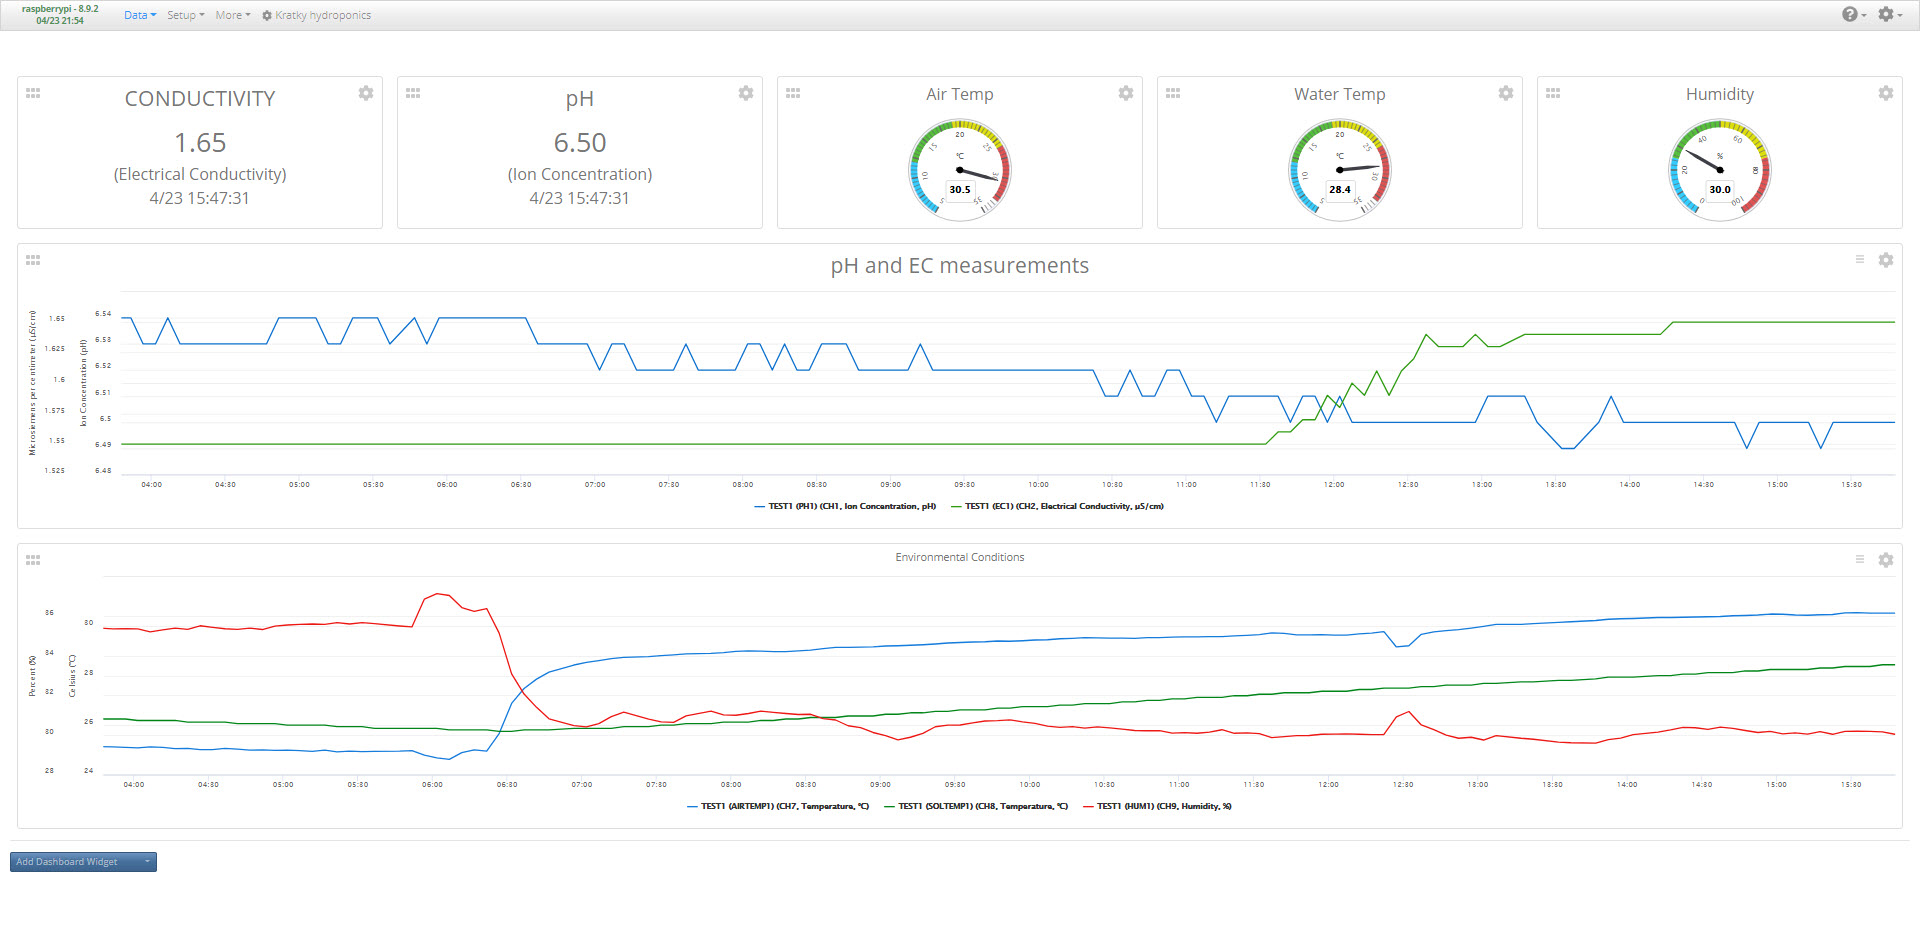
To use this solution in a Kratky setup, we would need to give it a longer period of time. We can verify that the solution is ready for Kratky by using an ORP meter and checking that the solution is at an ORP above 300mV after removing active oxygenation for a day. This means that the solution is able to keep enough dissolved oxygen and that most of the oxygen-hungry processes in the solution are done. This might take substantially longer than the 12-15 days suggested in my original article, probably around 30 days.

Another important step is the removal of bacteria and fungi, which could be very problematic once the solution reaches the stagnant conditions of the Kratky setup. To do this, the easiest solution would be to run the solution through a UV filtering system, in order to make sure all fungi and bacteria are removed from the solution. This might sound counterintuitive, but the Kratky system conditions are not ideal growing conditions for plants and do require us to minimize oxygen sinks in the system.

Conclusion

You can run a Kratky system using an organically derived fertilizer. However, it is not straightforward, as we need to consider that a Kratky system lacks the oxygenation required to carry out a lot of the processes that are taken for granted in organic growing (such as protein decomposition). Without aeration of the solution, we need to provide an organic solution that has already exhausted its hunger for oxygen and can already provide nutrients in a manner that is available to plants. We also need to ensure we add no fungi or bacteria that can work anaerobically and attack roots in the stagnant Kratky solution conditions. We can use tools like long-term fermentation with aeration, ORP meters, and UV systems to achieve this goal.

Have you ever grown in a Kratky setup using organic fertilizers? Let us know about your experience in the comments below!


My Kratky tomato project, tracking a Kratky setup from start to finish

Fully passive, hydroponic setups are now everywhere. However, it seems no one has taken the time to diligently record how the nutrient solution changes through time in these setups and what problems these changes can generate for plant growth. In my Kratky tomato project, I will be closely monitoring a completely passive Kratky setup from start to finish. In this post, I will describe how this project will work, what I will be recording, and what I’m hoping to achieve. Check out the youtube video below for an initial intro to this project.

Introduction video for this Kratky project.

The goals

It is tough to grow large flowering plants using truly passive Kratky setups (read my blog post on the matter). We know this is because of issues related to their increased water uptake and the large nutrient and pH imbalances these plants create in nutrient solutions. However, I haven’t found any data set that shows how these problems develop as a function of time. By measuring different variables in a Kratky setup through an entire crop cycle, I hope to gather data to help us understand what goes wrong, why it goes wrong and when it goes wrong. With this information, we should be able to develop better nutrient solutions and management techniques, for more successful Kratky hydroponic setups for large flowering plants.

The setup

The setup is a 13L bucket wrapped in duct tape – to prevent light from entering the system – with a hole at the top and a net pot containing a tomato plant. The tomato – which I have named Bernard – is an indeterminate cherry tomato that was germinated in the net pot. The net pot contains a medium consisting of 50% rice hulls and 50% river sand. The bucket has been filled with a store-bought generic hydroponic nutrient solution up to the point where it touches the bottom of the net pot. Furthermore, the bucket is placed inside a grow tent and receives 12 hours of light from a Mars Hydro TS 600 Full Spectrum lamp. The light has been initially placed around 10 inches above the plant and will be moved as needed to maintain proper leaf temperature and light coverage of the plant.

The experimental Kratky setup. You can see the project box housing the Arduino and sensor boards at the bottom. Bernard has been growing for 2 weeks and is already showing its second set of true leaves.

The measurements

I will be monitoring as many variables as I can within this experiment. To do this I have set up an Arduino MKR Wifi 1010 that uses self-isolated uFire pH and EC probes, a BME280 sensor to monitor air temperature and humidity, and a DS18B20 sensor to monitor the temperature of the solution. I will also be using Horiba probes to track the Nitrate, Potassium, and Calcium concentrations once per day. All the Arduino’s readings are being sent via Wifi to a MyCodo server in a Raspberry Pi, using the MQTT messaging protocol. The data is then recorded into the MyCodo’s database and also displayed in a custom dashboard. The ISE measurements are manually recorded on a spreadsheet.

The dashboard of my MyCodo server, showing the measurements of the system as a function of time. All readings are also recorded in the MyCodo database for future reference and processing.

Furthermore, I am also taking photographs every 15 minutes – when the lights are on – using a smartphone. This will allow me to create a time-lapse showing the growth of the plant from the very early seedling to late fruiting stages.

Conclusion

I have started a new project where I will fully record the complete development process of a large flowering plant in a Kratky setup. We will have information about the EC and pH changes of the solution, as well as information about how different nutrient concentrations (N, K and Ca) change through the life of the plant. With this information, we should be able to figure out how to modify the nutrient solution to grow large flowering plants more successfully, and what interventions might be critical in case fully passive growth is not possible.

I will continue to share updates of this project in both my blog and YouTube channel.

What do you think about this project? Do you think Bernard will make it? Let us know in the comments below!


How to choose the best hydroponic bucket system for you

You can use simple buckets to create versatile hydroponic systems. You can create a system to grow a few plants at home or thousands of plants in a commercial facility. However, there are several types of bucket systems to choose from, and making the correct choice is vital to success. In this post, we are going to take a look at the different types of bucket systems. We will examine their pros and cons so that you can better understand them and choose the hydroponic bucket system that best suits your needs.

The Kratky bucket

The simplest system is the Kratky bucket system. In this setup, you have a bucket with one or several holes on the lid. You put plants in net pots with media and then fill the bucket with a nutrient solution so that it is barely touching the bottom of the media. The media initially draws water through capillary action, while the roots reach the nutrient solution. After that, the roots draw nutrients from the water and an air gap is created between the plant and the water as the crop evaporates water. The roots use this air gap to get the oxygen they need for respiration. For this reason, you don’t need any air pumps.

6 pasos para aplicar el método Kratky | Hidroponía España I Cultivos  Hidropónicos - Tienda Oficial
Kratky system using mason jars. I would advice to avoid transparent containers to reduce algae growth.

This completely passive system is easy to build and cheap. You only fill the bucket once with nutrient solution, and you don’t need to check the pH, EC, or other variables through the crop cycle. However, this system requires careful determination of the bucket’s volume, the nutrient solution concentrations, and the crops grown. You can read this post I wrote, for more tips to successfully grow using this bucket system.

However, you cannot easily grow large productive flowering plants in this system. This is because large plants consume too much water and nutrients throughout their life, and will require either a very big volume or complete changing of the nutrient solution at several points. For large flowering plants, it is more convenient to use other types of bucket systems that make solution changes easier. If you would like more information and data regarding the culture of large plants using Kratky hydroponics, please read this post.

The Kratky bucket system is ideal if you need a system with no power consumption, your environmental conditions don’t have extremes, and you want to grow leafy greens or other small plants on a small scale. For larger scales, Kratky systems to grow leafy greens on rafts do exist, although large-scale systems do involve pumps, at least to change solution between crop cycles.

The bucket with and air pump

The Kratky system has zero power consumption, but does require the grower to carefully manage the initial nutrient level and is not very tolerant to strong variations in environmental conditions. For this reason, a more robust method to grow is the bucket with an air stone. This is exactly the same as a Kratky system, except that air is constantly pumped into the nutrient solution and the nutrients are generally maintained at a specific level inside the bucket.

Constantly pumping air into the solution creates several advantages. The first is that air oxygenates the solution, which means the solution’s level is not critical. This is because plant roots have access to oxygen, even if more than the ideal percentage of the root mass is submerged in the solution. The second is that air will help regulate the temperature of the nutrient solution. As air bubbles through and evaporates water, it helps keep the solution cool. Kratky systems can suffer from unwanted temperature spikes if the air temperature gets too hot. This is a common reason for disease and failure in Kratky systems.

Complete DWC Hydroponics Kit - 5 Gallon Bucket, Air Pump, Airstone –  SavvyGrow
A typical air-pump bucket system growing kit

Systems with an air pump are usually easier for people who are just starting. The low cost and low failure rates are the main reason why this is a very popular choice for first-time hydroponic enthusiasts. However, since water evaporates more, there is a need to at least replenish water through the crop cycle. You are also limited to smaller plants unless you’re willing to fully change the nutrient solution several times per crop cycle, which is inconvenient with a bucket system like this. It is also uncommon to see systems like this on a larger scale, as changing and cleaning hundreds of buckets manually and having hundreds of airlines going into buckets is not practical.

Note that air pumps bring substantial amounts of algae into solutions that will thrive if any light can get into your buckets. For hydroponic systems that use air pumps, make sure you use buckets made of black plastic so that no light gets in. White plastic will allow too much light to get in and algae will proliferate.

You can buy several ready-made hydroponic systems of this type. For example this one or this one for multiple small plants.

The Dutch bucket system

A Dutch bucket system is great to grow large plants. In this setup, buckets are connected to drain lines at the bottom. This allows you to pump the nutrient solution into the buckets and allow it to drain several times per day. The constant cycling of solution exposes roots to large amounts of oxygen between irrigation cycles, making this a great setup for highly productive crops.

The Dutch bucket system is therefore an active system, requiring water pumps to keep the plants alive. This dramatically increases the energy consumption needs of the crop and makes the pumps and timers fundamental components of the hydroponic system. An active bucket system like this will usually give the grower 12-24 hours, depending on conditions, to fix critical components in case of failure before plants start to suffer irreversible damage. To prevent damage in commercial operations, drains will usually allow for some amount of water to remain at the bottom of the buckets so that large plants have a buffer to survive more prolonged technical issues.

Dutch Bucket Hydroponics - Tips & Expanding the Reservoir - YouTube
A commercial Dutch bucket hydroponic system

The need to support the plants without water also means you need to use a lot more media, as the bucket themselves need to be filled with it. Since multiple flood and drain cycles are desirable this also means that the media needs to dry back relatively quickly, reason why media like rice husks, perlite or expanded clay, are used. Media costs of Dutch bucket systems are significantly larger than those of other systems because of this. You can run Dutch bucket systems with netpots as well, but this tends to make the system much less robust to pump failure.

Dutch bucket systems are a good choice if you want to grow highly productive large plants. They offer more robustness when compared with NFT systems – which have more critical points of failure – and the large amount of media provides a good temperature buffer and a great anchoring point for large plants. Several small-scale kits to grow using Dutch buckets also exist (see this one for example). However, they take significantly more space than the alternatives we described before. They require access to power and space for pumps, a large nutrient reservoir, and the supporting infrastructure for the plants. They also require nutrient solution management skills.

Conclusion

Bucket systems are very popular in hydroponics. They can be as simple as a bucket with a hole and a net pot or as complex as Dutch bucket systems with interconnected drain systems and full nutrient solution recirculation.

The easiest system to start with is a hydroponic bucket system with an air pump, as this eliminates the need to gauge the container volume and nutrient level precisely and allows for healthier growth, fewer disease issues, and easier temperature control.

A Kratky system can be great to grow small plants at a low cost with no power, but some experimentation with the nutrient level and concentration is usually required to get a satisfactory crop.

For large plants, the Dutch bucket system is a great choice, if you have the space and power availability. Dutch bucket kits for small-scale growers are also readily available.

Have you ever grown using buckets? Which type of system have you used and why? Let us know in the comments below!


Can you grow large flowering plants like tomatoes using the Kratky method? (passive hydroponics)

I have previously shared some tips on how to grow successfully with the Kratky method in my blog before (1). This growing system, which was developed in the early 2000s, uses completely passive setups to grow plants, completely eliminating the need for any recirculation and – for smaller plants – even eliminating the need to replenish nutrient solution. However, the traditional set-and-forget methods used to grow small plants, runs into heavy limitations when confronted with the growing of larger flowering plants, like tomatoes. In this post we’re going to look into these issues, some of the scientific literature on the matter and some setups that can actually be used for the growing of large flowering plants under commercial growing conditions.

In the Kratky method you place a seedling in a cup with a small amount of media on top of a large container filled with solution up to the point where the solution slightly touched the cup. The plant feeds from the nutrient solution, lowering its level and opening up an “air gap” that the plant’s roots can use to get the oxygen they require. Small plants – most prominently lettuce – can be grown like this, because the crop cycle is short enough so that the amount of water in a reasonably size container can last for the entirety of the plant’s life. The effect of the plants on the solution is also milder – due to their smaller size – so nutrient imbalances created in the solution by plant absorption and plant exudates are limited.

Taken from the 2005 Kratky paper on growing tomatoes passively.

With bigger plants, it’s an entirely different deal. A healthy, heavy producing tomato plant will go through 20-30 gallons of water in its entire cycle, so a simple container-based Kratky method would need to have a huge container in order to grow a plant equivalent to a plant grown in traditional hydroponic methods (think a 55 gallon drum). Trying to do this in smaller containers leads to poor results due to the changes that the tomato plant causes in the nutrient solution. Extreme changes in pH – often reaching 9-10 – and great imbalances, will hinder nutrient absorption and lead to quite extreme nutrient deficiencies and problems within the plants. In the best cases the plants will be stunted, limited in production and will yield lower quality produce while in the worst cases they will die and fail to produce any useful harvest.

It is therefore impractical to have a fully passive hydroponic system to grow tomatoes or other large flowering plants – especially if we want to rival the production potential of other hydroponics methods – but this doesn’t mean we cannot try to get close. Kratky published a paper in 2005 that tries to create such a system (see image above). In these systems tomatoes are not grown in containers that are perpetually left alone but they are suspended above beds where the nutrient solution rests. Nutrients are only added once – at the start of the crop – and the solution level is maintained at a desired point using fresh water. Since the volume of solution in these beds is much larger than in single containers, the tomatoes generally do much better. The tomatoes also have access to the solution that is used by many other plants, so imbalances also tend to be smaller than those of single container setups. The beds made of lumber and plastic lining are also cheap to build and provide a potentially viable way to do this commercially, although the non-recirculated solution does provide a nasty breeding ground for mosquitoes, a huge problem for this type of setup at a larger scale.

Image taken from this article.

Can you get commercially viable yields without having a 55 gallon drum per tomato plant? If you’re careful! At around the same time Kratky was experimenting with his lumber beds, a group in Pakistan was trying to grow tomatoes in 13L containers using different hydroponic solutions (published here). They initially filled the container with nutrient solution but it is unclear from the paper how the solution was replenished. Since the published volumes of solution used were much higher than the container volumes, it can be assumed that water was added, but it is unclear whether this water contained nutrients or not. Since they say that the pH/EC were observed/adjusted it is reasonable to think that they maintained a certain level within the containers and measured the pH/EC trying to correct these variables with water, nutrients or pH up/down additions with time. They obtained good results with the Cooper solution but the fact that constant monitoring and adjusting was necessary shows that this technique is likely not viable for large scale commercial production as individual monitoring of plants would be a nightmare.

There is a significant lack of research after 2005 in this area, most probably because it has been established that you need to compromise pretty heavily with large flowering plants if you want to grow them without nutrient recirculation or loss of nutrient solution. Systems absolutely need to have very large solution volumes – so large growing beds are probably one of the only viable commercial choices – just because of the water/mineral demand coming from the plants. Additionally the amount of minerals drawn from the water will be large and the imbalances created by their uptake will be large as well. Furthermore, problems with large volumes of stagnant solutions are not small, accumulation of larval pests will be quite substantial and might require the addition of chemical treatments or a lot of additional mesh/netting to alleviate the problem.

If the system is not very large in volume then it becomes inescapable to deal with the toxicity of the solution, which means to adjust it accordingly. At the very least, measuring pH and EC and adjusting them accordingly is the minimum threshold to achieve results that would be acceptable at a commercial level. It is however not viable to do this at a larger scale, as the plants are heavy and having to open the containers, measure and move the plants is likely to cause damage and be very expensive in terms of labor costs.

If you don’t care about volume of production or quality that much and you just want to grow some tomato plants, then doing the Kratky method for tomatoes in 5 gallon containers with a properly formulated hydroponic solution for this purpose might yield some harvest, but the results will be very inferior to those that you could get with either a recirculating system or even a simple drain-to-waste system where the plant is just watered with nutrients with proper monitoring of the EC/pH of the run-off.


Five tips to succeed when doing Kratky hydroponics

Passive hydroponic growing has become very popular during the past 10 years as it has a very low starting cost and uses no electricity. However, growing without active nutrient circulation, aeration and solution monitoring can cause significant problems, many of which can lead to crop failure. In this post I want to give you five tips that should help you with your passive growing experience and should allow you to go through your first Kratky crop with hopefully less problems.

1. It’s all about height and volume per plant. In a Kratky system, successfully growing plants requires the level of the solution to go down with time to allow the roots to develop structures to obtain oxygen from the air as the solution level drops. Have too much volume per plant and this does not happen quickly enough and the plant dies from water logging, have too little volume and the solution goes down too fast and the plant dies. The exact volume per plant and container dimensions depend on the environmental conditions – which determine the plant’s demand for water – but some rules of thumb have been established. For your first experience, a 4 liter bottle can be used to successfully grow a head of lettuce through its entire lifetime. You can check this and more suggestions for more complex setups in Kratky’s 2008 paper.

Figure taken from Kratky’s 2008 paper, cited above.

2. Be careful about the starting level. Another critical issue for a Kratky system is to make sure that the water level just barely touches the bottom of the receptacle where the seedling is placed or germinated. If the pot where the seedling resides is soaked with nutrient solution then the roots will never have access to enough oxygen and the seedlings will die. It is fundamental to allow the media where the plant is placed to wick water but to allow enough air space for the seedling at this stage.

3. Start with a lower nutrient dosage. Since the passive system will concentrate the nutrient solution as a function of time, the strength of the nutrients will go up a lot which will fit nicely with the ability of the plant to deal with more concentrated solutions. Starting with a nutrient solution that is too strong can cause the solution to become unbearable for the plant as the solution becomes more and more concentrated. This is why it is necessary to start at a lower strength. In general, starting with a solution with an EC of around 0.6-0.8mS/cm is good since the solution will become around 4-5 times more concentrated by the end of the growth cycle.

4. Starting at a lower pH can be better. Plants like lettuce will generally want to try to increase the pH of a solution as a function of time, as they will absorb nitrates more aggressively, causing the nutrient solution to become more and more basic. Lettuce can be grown at lower pH levels with fewer problems than at higher pH levels, reason why it can be beneficial to start the solution at a pH of 4.5-5.0 so that it can increase gradually and reach 7-7.5 by the end of the growing cycle.

ronmauer.net » Food – Off Grid Hydroponics (Kratky Method)
Example of Kratky lettuce, taken from this blog.

5. Disinfect the water before preparing nutrients. The Kratky method is very vulnerable to plant pathogens due to the fact that the solution remains unchanged through the entire growing period. If the solution contains any bacteria or fungal spores, these can prosper aggressively within the growing cycle. If you’re aiming for a purely hydroponic experience with no bacteria or fungal content, you can alleviate this problem by disinfecting the solution before preparing your nutrients. This can be done by adding a couple of drops of household bleach per liter – allowing the solution to rest for a day after that before preparing nutrients – or by running the water through a UV treatment. Inline UV treatment filters for aquariums are cheaply available online, you only need to pass the solution through them once. Boiling the water is not something I would recommend, as this also removes all the dissolved oxygen from it, which can be hard to recover without a lot of aeration, which can reintroduce pathogens into the water.

There are many more things to consider to run a successful Kratky setup but I hope the above tips do help you avoid some common pitfalls and establish your first completely passive, hydroponic growing method. All the above mentioned issues can get substantially harder when growing larger plants, so starting with smaller plants that are easier to handle – such as lettuce – is always a sure way to increase your chances of success.