How to reuse your coco coir in soilless growing

Why reuse media

Buying new media and spending labor to mix, expand, and even amend it can be a costly process for growing facilities. Dumping media also involves going through a composting process, wasting nutrients that are already present in that media when it is thrown away. However, media in hydroponics serves a mostly structural role and there are no fundamental reasons why media like coco cannot be recycled and used in multiple crop cycles.

Coco coir commonly used as a substrate in soilless agriculture.

By reusing media, a grower can substantially reduce operational costs. This is because the media itself often contains an important amount of surplus nutrition and the roots and other organic components left behind by previous plants can also be used by new crops to sustain their growth. These added decomposing root structures also reduce channeling in the media and help improve its water retention as a function of time. After a media like coco is reused several times, the coco also degrades and becomes finer, further improving water retention.

Why media is often not reused

Reusing media is not without peril. When media is pristine, it is more predictable. You know its basic composition and you can feed it the same set of nutrients and hope to obtain very similar results. Nonetheless, after media goes through a growing cycle, its chemical composition changes and the starting point becomes much more variable. This means that a grower needs to somehow adjust nutrition to the changes in composition, which can often make it difficult for the crop to achieve consistent results.

If a grower reuses media but tries to feed as if the media was new, then problems with overaccumulation of nutrients in the media will happen and it will be hard for the grower to obtain reliable results. Reusing media requires a different approach to crop nutrition which scares people away because it strays from what nutrient companies and normal growing practices require. However we will now learn how media is chemically affected by cultivation and how we can take steps to reduce these effects and then successfully reuse it.

Media composition after a normal crop

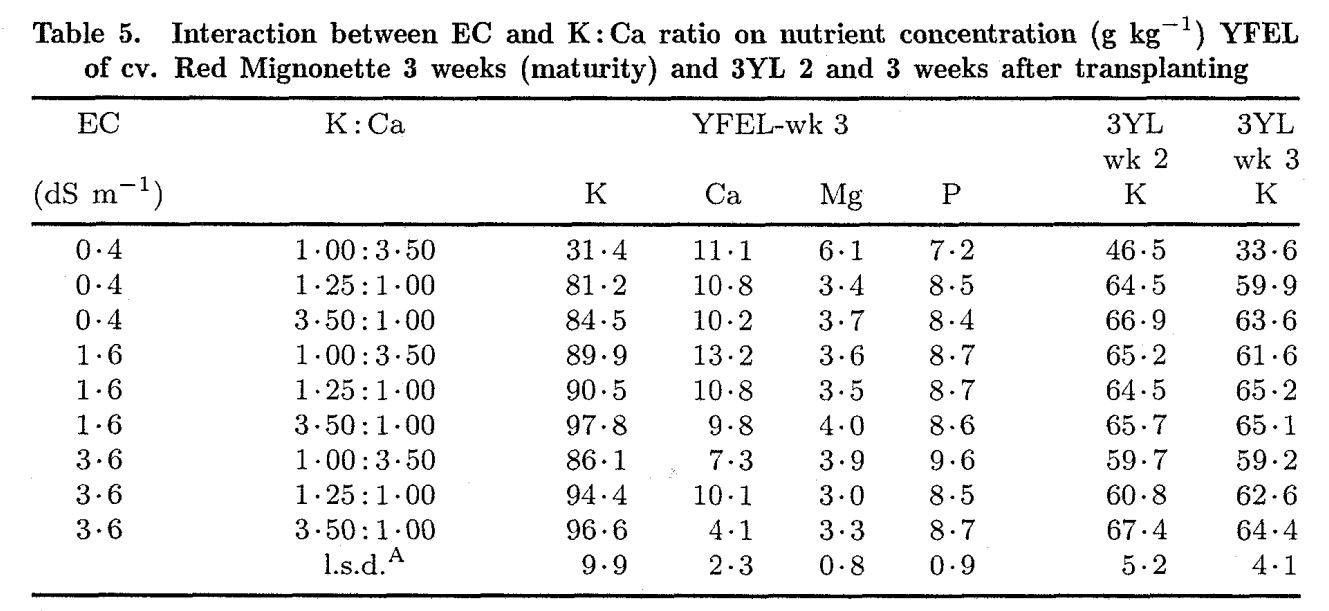
In traditional coco growing, fertilizer regimes will tend to add a lot of nutrients to the coco through the growing cycle. From these nutrients, sulfates, phosphates, calcium and magnesium will tend to aggressively accumulate in the media while nutrients that are more soluble like nitrate and potassium will tend to accumulate to a lesser extent or be easier to remove.

Analysis of used coco from a tomato crop. This analysis uses a DTAP + ammonium acetate process to extract all nutrients from the media. This media had a runoff pH of 6 with an EC of 3.0 mS/cm.

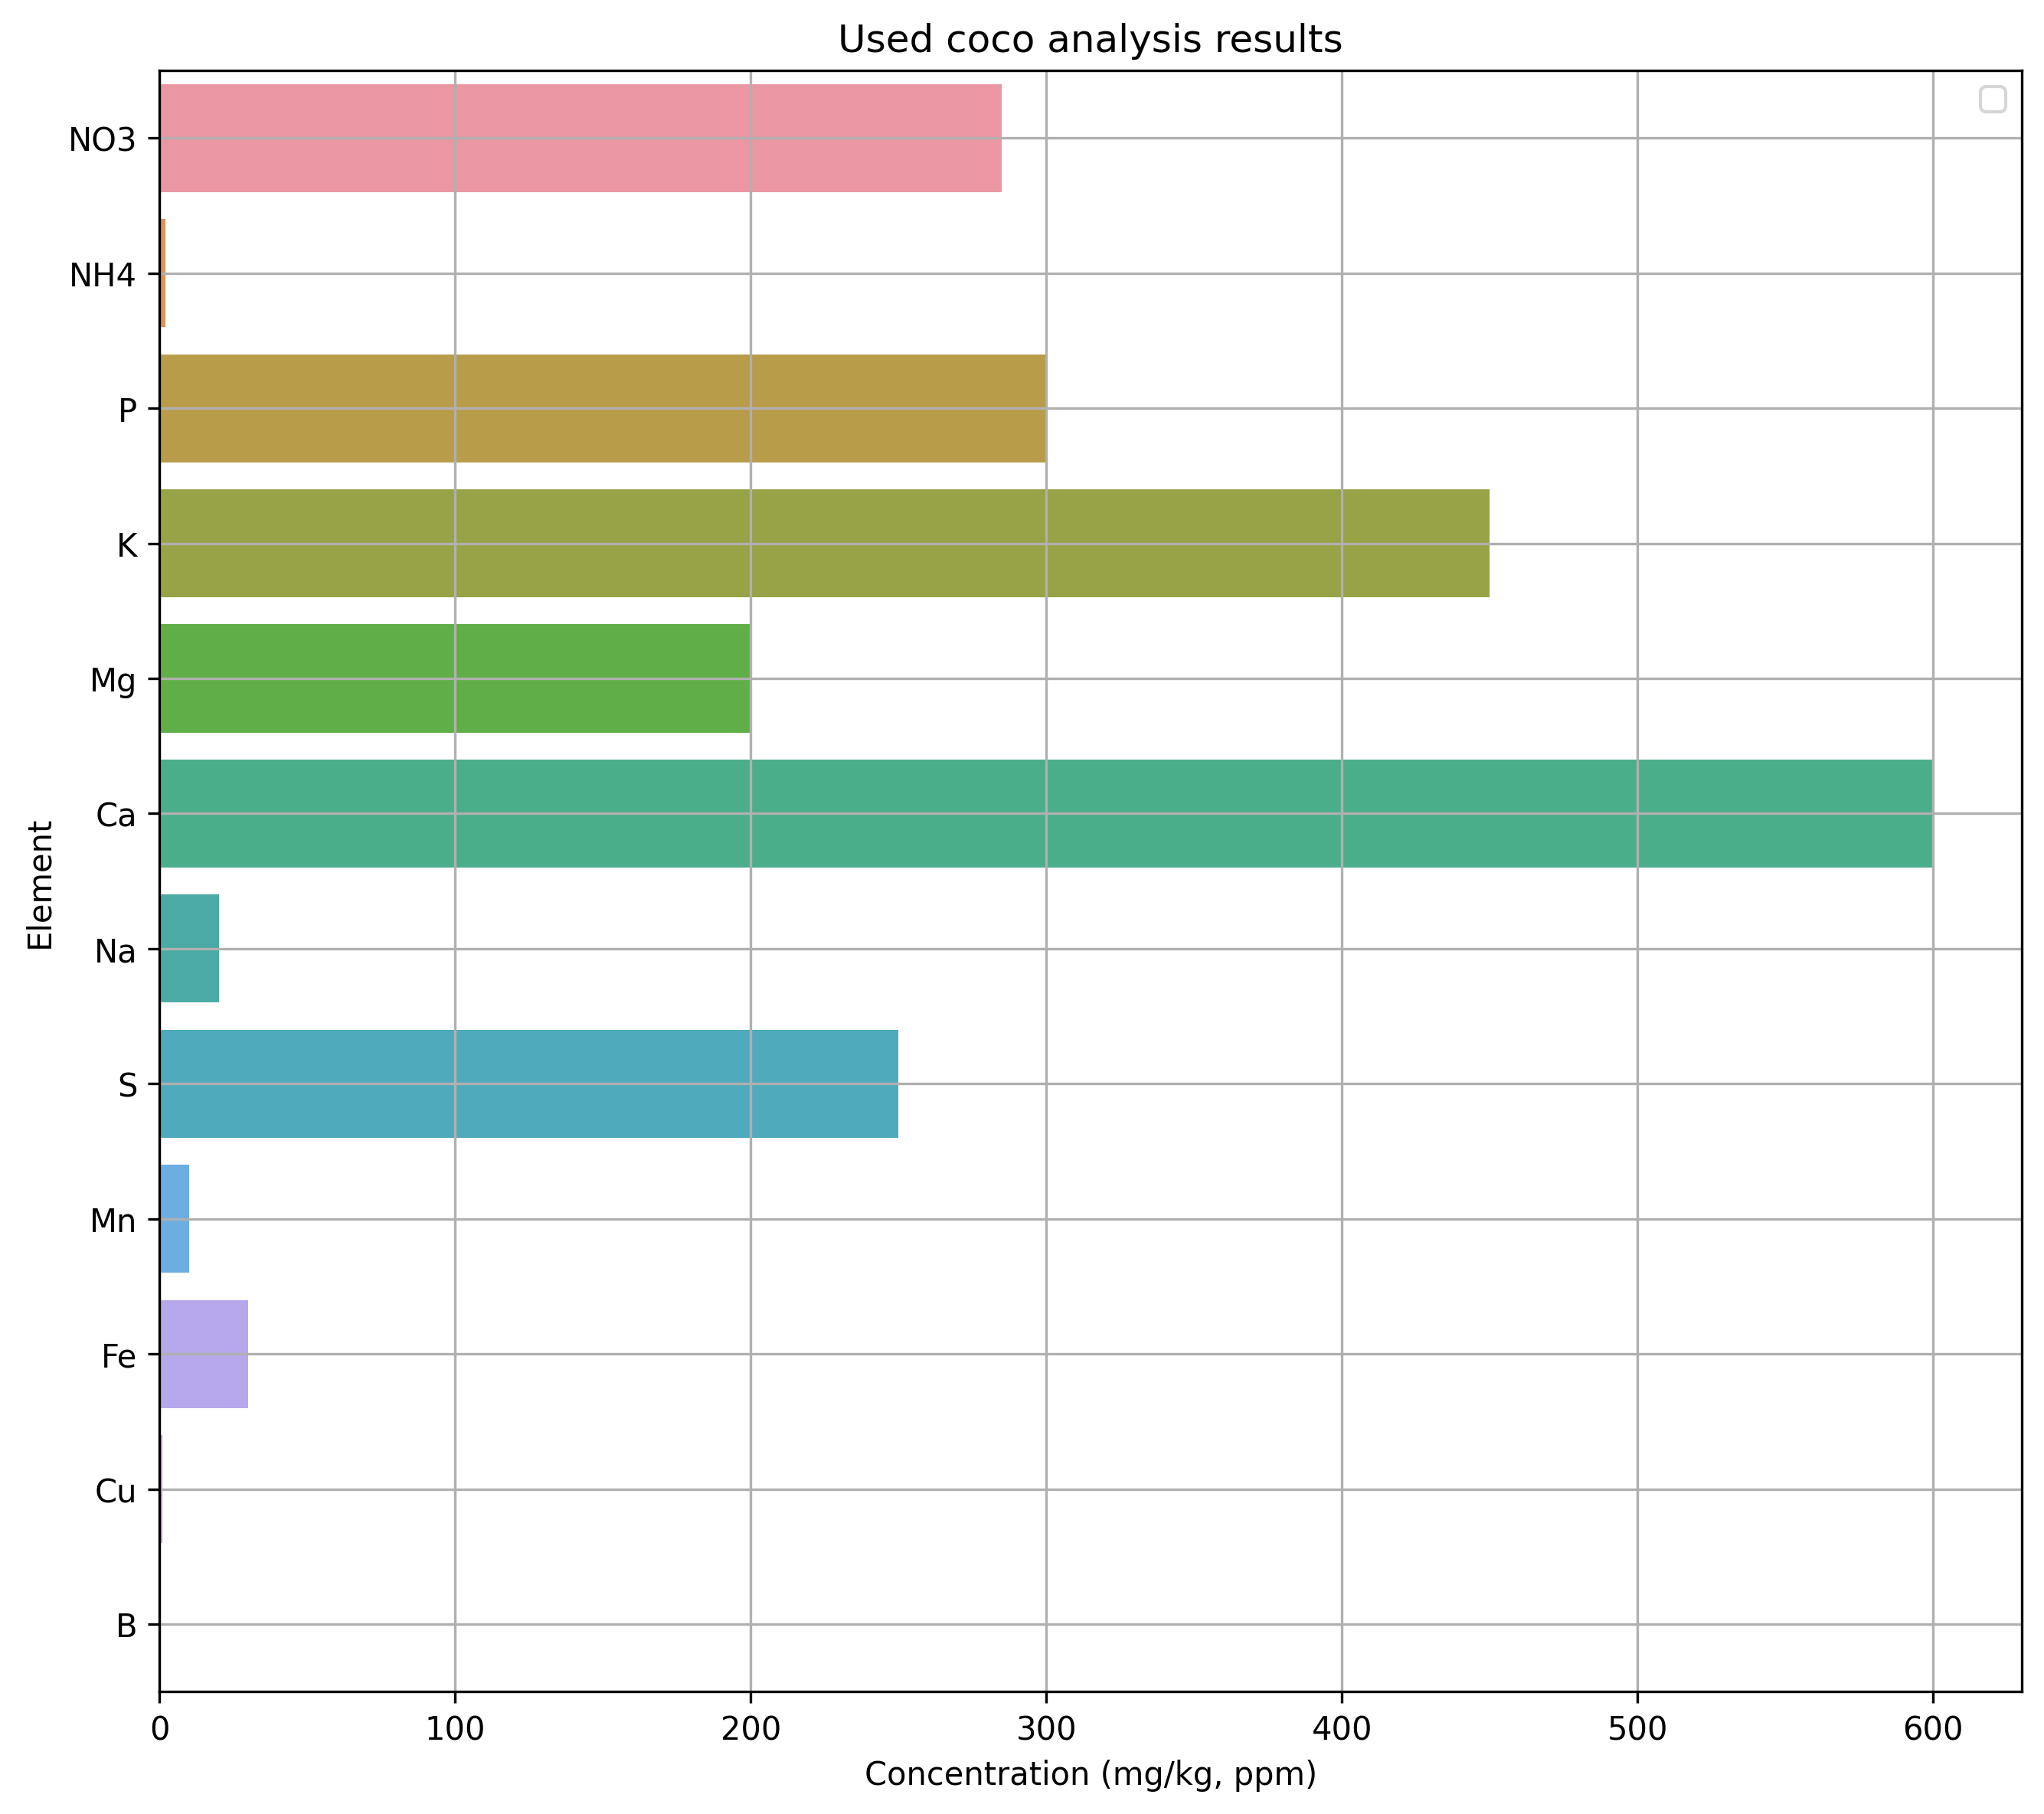
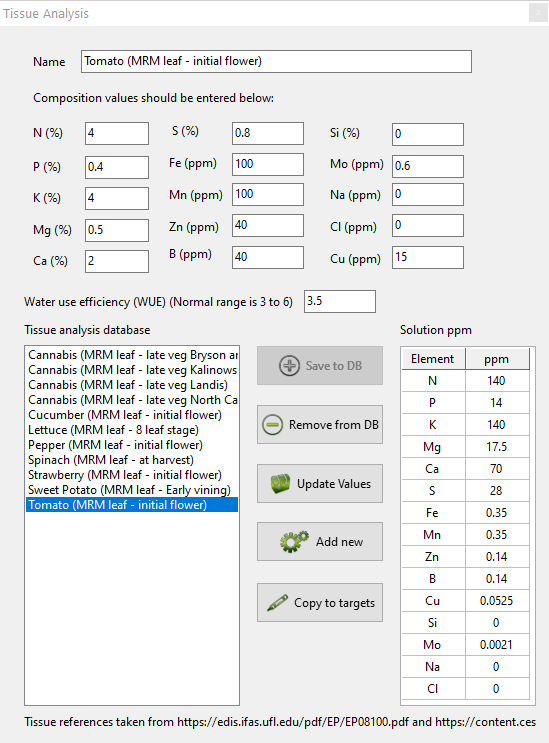
The above image shows you the analysis results of a coco sample that was used to grow a tomato crop. In this analysis, the media is extracted exhaustively using a chelating agent, to ensure that we can get a good idea of all the cations that are present in the media. The chelating agent overcomes the cation exchange capacity of the media, forcing all the cations out – fundamentally exchanging them for sodium or ammonium – and showing you the limits of what could be extracted from the media by the plant.

In this case, the amount of Ca is so high, that it can fundamentally provide most of the Ca required by a plant through its next growing period. Since most of this Ca is going to be present as calcium sulfate and phosphate, it will only be removed quite slowly from the root zone by leachate. The amount of potassium is also quite high, but this potassium is going to go out of the media quite easily and is only likely to last for a short period of time.

In addition to the above mineral content, coco that is reused will often contain a lot of plant material, roots that remained from the previous crop, so the subsequent reuse of the media needs to incorporate adequate enzymatic treatments to help breakdown these organics and ensure that pathogens are not going to be able to use these sources of carbon as an anchor point to attack our plants.

Steps before the crop ends

Because of the above, one of the first steps we need to carry out if we want to reuse media is to ensure that the media is flushed during the last week of crop usage with plain water, such that we can get most of the highly soluble nutrients out of the media so that we don’t need to deal with those nutrients in our calculations. This will remove most of the nitrogen and potassium from the above analysis, giving us media that is easier to use in our next crop.

In addition to this, we will also be preparing our media for the digestion of the root material. Before the last week of cultivation, we will add pondzyme to our plain water flushing at a rate of 0.1g/gal, such that we can get a good amount of enzymes into our media. We should also add some beneficial microbes, like these probiotics, at 0.25g/gal, so that we can get some microbial life into the media that will help us decompose the roots after the plants that are currently in the media will be removed.

How to manage the new crop

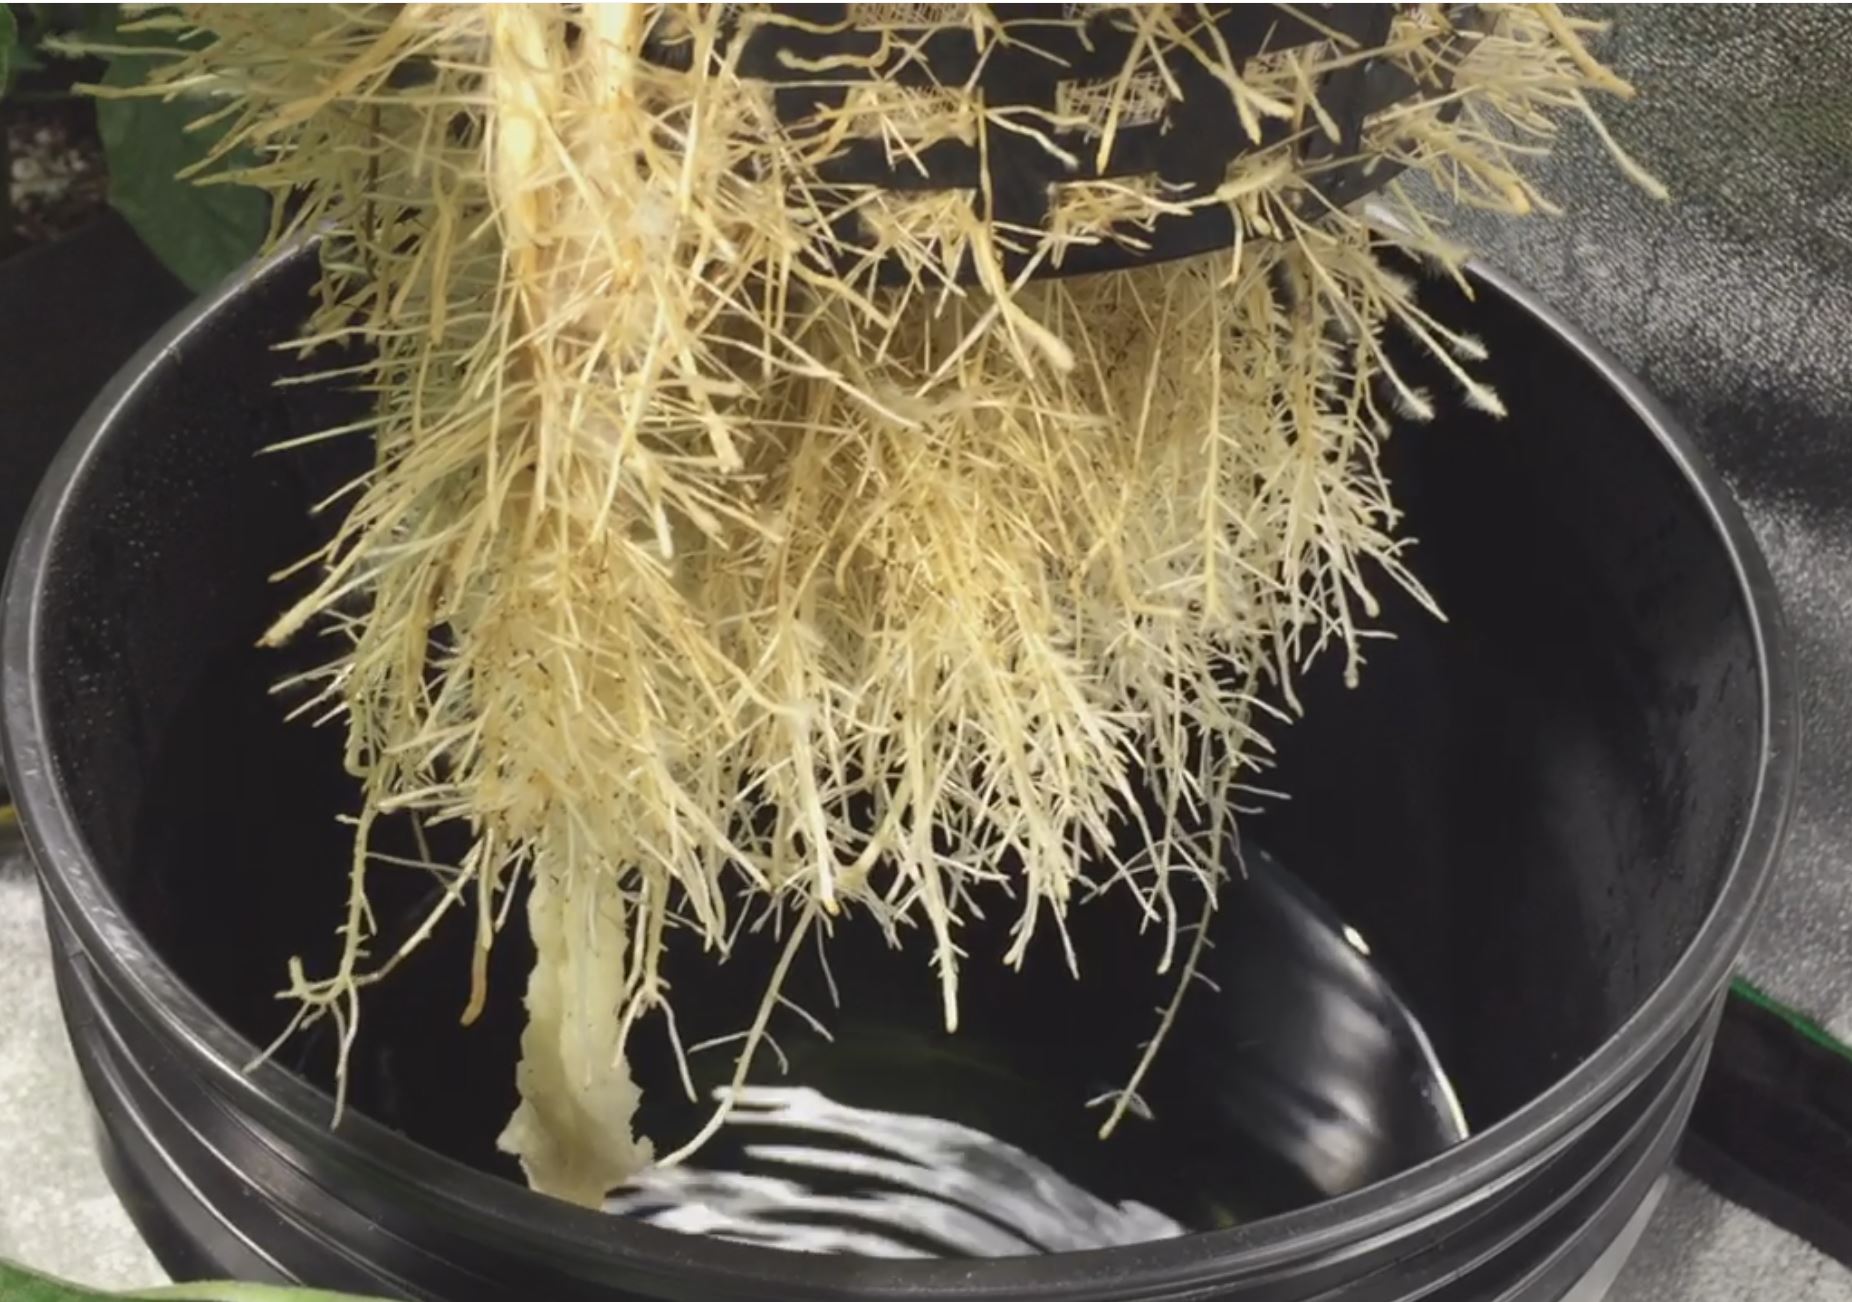
Once the crop ends, we will remove the main root ball from the media. There is no need to make an effort to remove all plant material as this would add a lot of labor costs to media reuse. The media should then be allowed to dry, such that the roots that are left behind can then be easily broken up before new plants are placed in the media. Machines to breakup any roots are ideal, although this can also be done manually and easily once all the root material in the media is dead and the roots lose their capacity to hold their structure together.

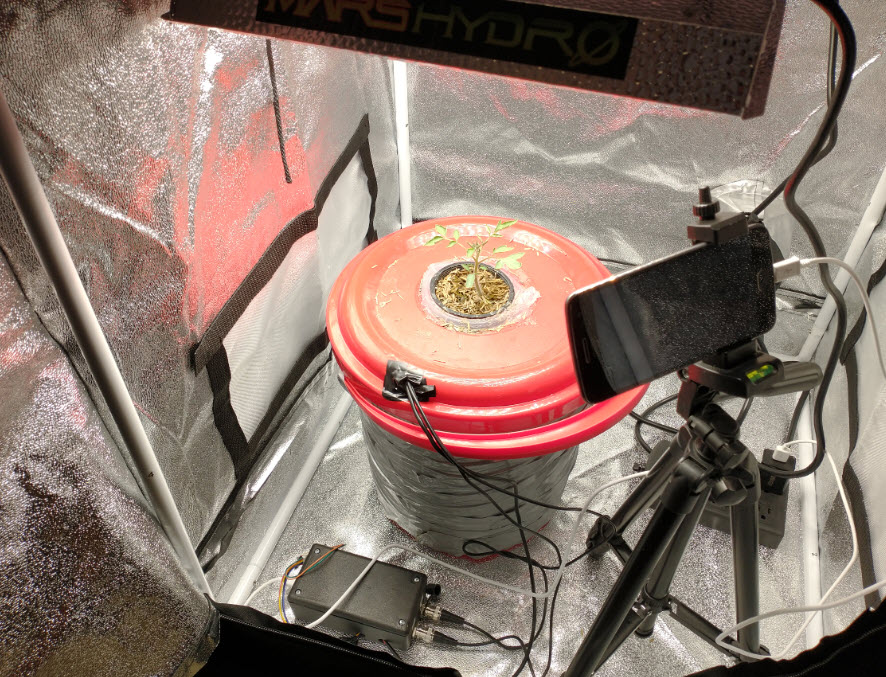
Once we have dry coco with the root structures broken up, we can then fill up new bags to reuse this media for our next crop. After doing a lot of media analysis and working with several people reusing media, I have found this method works well. If we performed the flushing steps as instructed before, then we can use the media runoff EC as a way to evaluate the type of nutrition needed.

While the runoff EC remains above 1.5mS/cm, we feed a solution containing only potassium nitrate and micronutrients (no phosphorus, sulfates, calcium or magnesium) at 2g/gal of KNO3 + micros. After the runoff EC drops below 1.5mS/cm we return to feeding our normal regime. The idea here is that while the media is above 1.5mS/cm the plant can take all the nutrients it needs from the media, but once the media EC drops below 1.5mS/cm, the media is deprived from these nutrients and we need to provide them again for the plant.

Bear in mind that while the nitrogen content of the above feed seems low (just 73 ppm of N from NO3) there is additional nitrogen that is coming from the decomposition of the organic materials left in the media, which can supplement the nitrogen needs of the plants. Despite the flushing on the last week, there is always some nitrate left from the previous crop. I have found that this is enough to support the plant until the runoff drops below our 1.5mS/cm threshold. After this point, the plant can be grown with its normal nutrition.

Simple is better

Although you would ideally want to find exactly which nutrients are missing or present after each batch of media and adjust your nutrition such that you can get your plants the ideal nutrient composition every time, this is not cost effective or required in practice to obtain healthy plant growth. A media like coco possesses a good degree of nutrient buffering capacity (due to it’s high cation exchange capacity and how much nutrition is accumulated after a crop cycle), so it can provide the plants the nutrition of certain nutrients that they need as long as the nutrients that are most easily leached (K and N) are provided to some degree.

The above strategy is simple and can achieve good results for most large crops that are grown using ample nutrients within their normal nutrient formulations. It is true that this might not work for absolutely all cases (or might need some adjustments depending on media volumes) but I’ve found out it is a great strategy that avoids high analysis costs and the need to create very custom nutrient solutions.

Do you reuse your coco? Let us know which strategy you use and what you think about my strategy!


Are Iron chelates of humic/fulvic acids better or worse than synthetics?

Why Fe nutrition is problematic

Plants need substantial amounts of iron to thrive. However, iron is a finicky element, and will react with many substances to form solids that are unavailable for plant uptake. This is a specially common process under high pH, where iron can form insoluble carbonates, hydroxides, oxides, phosphates and even silicates. For this reason, plant scientists have – for the better part of the last 100 years – looked for ways to make Fe more available to plants, while preventing the need for strategies that aim to lower the pH of the soil, which can be very costly when large amounts of soil need to be amended.

The image above is taken from this paper on Fe deficiencies.

In hydroponics, the situation is not much better. While we can add as much Fe as we want to the hydroponic solution, the above processes still happen and the use of simple Fe salts (such as iron nitrate or iron sulfate) can lead to Fe deficiencies as the iron falls out of solution. This can happen quickly in root zones where plants aggressively increase the pH of solutions through heavy nitrate uptake.

For a better understanding of the basics of soil interactions with microbes, plants and the overall Fe cycle, I suggest reading this review (6).

Synthetic chelates to the rescue

The above problems were alleviated by the introduction of synthetic iron chelates in the mid 20th century. The chelating agents are organic moieties that can wrap around the naked metal ions, binding to their coordination sites. This kills their reactivity and ensures that they do not react with any of the substances that would cause them to become unavailable to plants. Plants can directly uptake the chelates, take the iron and push the chelate back into solution, or they can destroy the chelate and use its carbon within their metabolism.

Chelates can bind Fe very strongly though, and this is not desirable for some plants that do not have the enzymatic machinery required to open these “molecular cages”. Studies with monocots (1) – which are grasses – have often found that these plants respond poorly to Fe supplementation with molecules like Fe(EDDHA), a very powerful chelate. So powerful in fact, that not even the plants can get the Fe out. For these plants, weaker chelates often offer better results, even at higher pH values.

Another problem is that many of the synthetic chelates are not very good at high pH values. When the pH reaches values higher than 7.5, chelates like EDTA and DTPA can have problems competing with the much more strongly insoluble salts that form at these pH values. The chelated forms are always in equilibrium with the non-chelated forms and the minuscule amount of the non-chelated form drops so quickly out of solution that the entire chelate population can be depleted quite quickly. (2)

Chelates that respond well to high pH values, like EDDHA, are often much more expensive. In the case of EDDHA, the presence of a lot of isomers of the EDDHA molecule that are weaker chelates, also creates problems with quality control and with the overall strength of each particular EDDHA source. The EDDHA is only as good as its purification process, which makes good sources even more expensive (3, 4).

An additional concern is the oxidation state of the Fe. While Fe chelates are usually prepared using ferrous iron (Fe2+), these iron chelates are quickly oxidized in solution to their ferric iron (Fe3+) counterparts, especially when the solution is aerated to maintain high levels of oxygen. Since Fe3+ is both more tightly bound to chelates and more reactive when free – so more toxic when taken up without reduction – plants can have an even harder time mining Fe3+ out of chelates (5, 7).

Then there are naturally occurring chelates

There are many organic molecules that can form bonds with the coordination sites of Fe ions. Some of the reviews cited before go into some depth on the different groups of organic molecules that are excreted by both plants and microorganisms as a repose to Fe deficiency that can lead to improved Fe transport into plants. Some of these compounds are also reductive in nature, such that they can not only transport the Fe, but reduce it to its ferrous form such that it can be handled more easily by plants.

Among the organic compounds that can be used for Fe chelation, humic and fulvic acids have attracted attention, as they can be obtained at significantly low costs and are approved for organic usage under several regulations. You can read more about these substances in some of my previous posts about them (8, 9). In particular, humic acids are more abundant and are formed by larger and more complex molecules compared to fulvic acids.

The ability of these substances to chelate Fe is much weaker than that of synthetic chelates. The pKb shows us the strength of the binding equilibrium of the chelate with the free metal ion (you can see the values for many metals and chelating agents here). The value for EDTA is 21.5 while that of most humic and fulvic acids is in the 4-6 range (10). This is a logarithmic scale, so the difference in binding strength is enormous. To put things into perspective, this difference in binding strength is of the same magnitude as the difference between the mass of a grain of sand and a cruise ship.

Comparing synthetic and fulvic/humic acid chelates

There aren’t many studies comparing synthetic and humic/fulvic acid chelates. One of the most explicit ones (11) compares solutions of Fe sulfate (which we can consider unchelated) and Fe(EDDHA) after additions of fulvic or humic acids in the growth of Pistachio plants. At pH values close to those generally used in hydroponics (6.5) there is hardly any difference between any of the treatments while at higher pH values we have substantially better uptake of Fe in both the EDDHA and unchelated iron treatments when supplemented with either fulvic acid or humic acid.

Images at pH 8.5 of Fe in shoots from the Pistachio study (11)

The idea of using humic acids as a compliment of traditional chelate based fertilization to alleviate high fertilization costs has also been studied in citrus (13). This study confirms some of the findings of the previous one, where additions of humic acids to solutions already containing Fe(EDDHA) provided a more beneficial role than simply the use of the pure humic acid substances or pure Fe(EDDHA) fertilization. Another study on citrus (14) showed that humic acid applications could in fact provide Fe supplementation in calcareous soils (these are soils with high pH values). This shows how humic acid fertilization can rival Fe-EDDHA fertilization.

In another study of leonardite iron humate sources and EDDHA in soybean roots (12) it is apparent that accumulation of Fe in shoots and roots is much worse under the humic acid treatments. In the conclusions of the paper, it is highlighted that the high molecular mass of the leonardite constituents might block the roots of the soybean plants, therefore making it difficult for the plant to transport Fe. However, this study does show that the accumulation of these humic acids in the root zone does promote a decrease in the expression of genes that create Fe transporters and Fe reducing enzymes, pointing that the plant is indeed under less Fe deficiency stress. Another important point is that cycling the humic acid application promotes the absorption of accumulated humic acids, cleaning the roots and allowing for better transport of the Fe in the roots.

In a separate study with humic acid + FeSO4 applications compared to Fe(EDDHA) in sweet cherry (13) it was found that the humic acid, when supplemented with unchelated iron, increased Fe tissue as much as the Fe(EDDHA) applications. This was consistent across two separate years, with the second year showing a statistically significant increase of the humic acid treatment over the Fe(EDDHA).

How does this work

An interesting point – as I mentioned before – is that humic/fulvic acids are incredibly weak chelating agents. This means that they should release their Fe to the bulk of the solution, which should lead to Fe depletion and deficiencies, as the Fe precipitating mechanisms are thermodynamically much more stable. However this is not what we consistently observe in the studies of Fe nutrition that try to use humic/fulvic acids, either with or without the presence of additional synthetic chelates.

The reason seems to be related with the kinetics of Fe release from these substances. While the stability constants of the chelates are weak – therefore they will release and precipitate in the long term – the bulkiness of the ligands and the complex structures surrounding the metals, makes it hard for the metal to actually escape from the chelate structures around it. However, the fact that the bonding is thermodynamically weak, ensures that the metal can be easily transported once it leaves the organic chelate structure.

Another point is that humic/fulvic substances are reductive in nature, which means that they will protect Fe2+ from oxidation by either microbes or oxygen dissolved in solution. They are also sometimes able to reduce Fe3+ present in solution back to Fe2+, which can help with the uptake of this Fe by the plant’s root system.

The nature of the above structures and their reductive power depends fundamentally on the actual humic/fulvic acid used, so – as with all cases pertaining to fulvic/humic substances – the source you use will play a big role in determining the final outcome you get.

What chelates are the best?

Current research shows that Fe(EDDHA) and similar chelates, despite their high stability constants, are not perfect. While they can provide ample iron for dicots and can cure Fe deficiencies in the large majority of cases for these plants, these strong chelates are often very expensive and their use as sole Fe sources might be impractical for many cases in traditional agriculture and hydroponics/soilless growing.

The use of humic/fulvic acids complimented with either unchelated Fe or with some lower proportion of stronger iron chelates, seems to be a better overall choice in terms of both plant uptake and economic expense. As shown by several studies mentioned in this post, the effect of humic/fulvic acids and synthetic chelates might actually be synergistic, with both providing different advantages that can be complimentary in hydroponic solutions. These humic/fulvic acid solutions might also be much more favorable for monocot species, where the use of highly stable Fe(EDDHA) chelating agents does not cure deficiency symptoms.

The take away here is that chemical chelate strength is not the only thing to consider. The kinetics of the chelate dissociations, as well as how the chelates interact with the root system, for example how the plant can actually take the Fe outside of the chelating system, are all very important to establish whether the Fe is effectively absorbed and transported by the plants.

Please note that the topic of Fe nutrition is extremely extensive and while the above is intended to be a short introduction to the topic of humic/fulvic acids and how they compare to synthetic chelates, it is by no means an exhaustive literature review.

Are you using fulvic or humic acids for Fe nutrition? Let us know what your experience is in the comments below.


A guide to different pH up options in hydroponics

When is pH up needed?

The control of pH in hydroponics is critical. Most commonly, we need to decrease the pH of our solutions as most nutrients will initially be at a higher than desired pH. This is especially true when tap water or silicates are used, as both of these inputs will increase the overall pH of hydroponic nutrients after they are prepared. In recirculating systems, pH will also tend to drift up due to the charge imbalance created by the high active uptake of nitrate ions carried out by most plant species. For a discussion on pH down options, please read my previous post on this topic.

However, there are certain circumstances where the pH of hydroponic solutions needs to be increased. This can happen when tap water or silicates are not used or when plants decrease pH due to an aggressive uptake of some cations. Plants like tomatoes can do this when grown in solutions with high potassium contributions, as they will actively uptake these nutrients to the point of changing pH balance. Excess ammonium can be another common cause for pH decreases in hydroponic solutions that require the use of pH up solutions.

Potassium hydroxide pellets, the most powerful pH up option available to growers

With this in mind, let’s discuss the pH up options that are available in hydroponics. I only considered substances that are soluble enough to create concentrated solutions, such that they can be used with injector systems.

pH up options

Sodium or potassium hydroxide (NaOH, KOH)

These are the strongest. They are low cost, can be used to prepare highly concentrated solutions and will increase the pH most effectively. They are however unstable as a function of time because they react with carbon dioxide from the air to form sodium or potassium carbonates. This means that their concentrated solutions need to be kept in airtight containers and that their basic power will decrease with time if this is not the case. Additionally, these hydroxides are extremely corrosive and their powder is an important health hazard. Dissolving them in water also generates very large amounts of heat – sometimes even boiling the water – which makes their usage more dangerous. Although desirable when basic power is the most important short term concern, I recommend to avoid them giving their PPE requirements and the lack of long term stability.

When these hydroxides are used, potassium hydroxide is the recommended form, as potassium hydroxide is both more basic and a plant nutrient, while excess sodium can cause problems with plant development. However, sodium hydroxide might be more desirable if it can be obtained at a particularly low price and small additions of sodium are not a concern.

Potassium silicate

This is a soluble form of silicon that is stable at high pH values. While solutions of potassium silicate by itself can be prepared and used as a pH up option, it is usually stabilized with a small addition of potassium hydroxide to take the pH of solutions to the 11-12 range. Potassium silicate contributes both potassium and silicon to hydroponic solutions – both important nutrients – and its use can be more beneficial than the use of pure potassium hydroxide. While silicates are less basic and more mass is required for the same pH buffering effect, the preparation and handling can often be much simpler than those of potassium hydroxide.

Note that potassium silicate solutions are also unstable when left in open air, as they will also react with atmospheric carbon dioxide to generate potassium carbonate. It is also worth noting that not all potassium silicates are the same, when looking for a highly soluble potassium silicate for hydroponics, make sure you get potassium silicates that have higher K/Si ratios. Usually ratios of at least 1.05 are required (make sure you convert both K and Si to their elemental forms, as most of these products report K as K2O and Si as SiO2).

Potassium carbonate (K2CO3)

This basic salt is stable in air, has less demanding PPE requirements and can also be used to prepare concentrated solutions (more than 1g of potassium carbonate can be dissolved per mL of water). Because of its lower basicity compared to potassium hydroxide, more of it also needs to be used to increase the pH of a hydroponic solution. However, solutions of it are stable, so there is no concern for their stability or changes to its basic power.

Another advantage given by potassium carbonate is that – contrary to the previous two examples – it does increase the buffering capacity of the solution against pH increases, due to the addition of carbonate to the solution. As carbon dioxide is lost to the air at the pH used in hydroponics, the pH of the solutions tends to drift up, this means that the carbonate addition makes the pH more stable in solutions where the pH is being constantly pushed down. This is all part of the carbonic acid/bicarbonate equilibrium, which also helps chemically buffer the solutions at the pH used in hydroponics.

Overall potassium carbonate is one of my favorite choices when there is a downward drift of pH in recirculating solutions.

Potassium phosphate (K3PO4)

Another weak base, potassium phosphate, can be used to prepare concentrated solutions and increase the pH in hydroponic solutions. While its solubility and basicity are lower than that of potassium carbonate, it does provide additional phosphorus that can buffer the pH of the solution. This happens because mono and dibasic phosphate ions are anions that be taken up by plants, therefore decreasing the pH. While phosphates can help chemically buffer the hydroponic solution against pH increases, for decreases the phosphate buffer is ineffective as the pKa of the relevant equilibrium is 7.2.

An issue with potassium phosphate is that it provides large contributions of K to solution. These potassium additions can be quite counter productive if the cause of the pH drift towards the downside is related to potassium uptake.

Potassium Citrate/Lactate/Acetate

Basic organic salts of potassium can also be used to increase the pH. These are all much weaker than even the carbonate and phosphate bases mentioned above and relatively large additions are required for even a moderate immediate effect in pH. However, since these anions are actively taken up by microbes, the microbial metabolism of these ions will create a longer term effect on pH. A moderate addition of potassium citrate can only cause a small increase of pH in the short term, with a larger increase happening during the following 24 hours.

A disadvantage is that these anions can also lead to explosions in bad microbe populations if the environment does not have an adequate microbial population. When these salts are used, adequate microbial inoculations need to be carried out to ensure that the microbes that will proliferate will not be pathogenic in nature.

Protein Hydrolysates

While hydrolysates themselves can have an acidic pH when put in solution, their microbial metabolism aggressively increases the pH of solutions in the medium term. This means that these hydrolysates should not be used for immediate pH adjusting, as they will tend to decrease pH further in the very short term, but they can be used as a more long term management option.

As with the above organic salts, their use also requires the presence of adequate microbial life. If you neglect to properly inoculate the media before their addition, then pathogens can also make use of these amino acids to proliferate.

Combinations are also possible

As with the case of pH down options, some of the best solutions for a problem come when several of the above solutions are combined. For example the use of potassium rich pH up solutions in microbe containing soilless media can often cause pH drift issues related with potassium to worsen. For this reason, it can be desirable in these cases to prepare pH up solutions that include protein. This means that you reduce the pH fast but then you have a residual effect from protein metabolism that helps you fight the pH increase as a function of time.

However not all pH up drifts are caused by potassium, as in the case of plants where pH up drift happens due to low nitrate uptake (for example some flowering plants that stop producing a lot of additional leaves during their flowering stage). In these cases potassium based pH up solutions cause no additional issues and combinations of potassium carbonate and potassium phosphate might be best.

Choose according to your goals

As in most cases, the best solution will depend on your circumstances. Think about whether you’re just adjusting the pH of your initial solutions or whether you need to compensate for a constant drift, whether microbial life is present and whether you’re concerned with the accumulation of any substances in a recirculating solution. Once you consider these factors and review the above solutions, you should be able to find the pH up solution that is better suited to your particular needs.

Are you using a pH up? Let us know why and which one you’re using in the comments below!


How to make a stabilized ortho-silicic acid solution with only 3 inputs

In a previous post, which you can read here, I gave a procedure for the preparation of a stabilized mono-silicic acid using from potassium silicate. The procedure called for the usage of several stabilizing agents, including carnitine and propylene glycol, with phosphoric acid being used as the acidifying agent.

After trying this synthesis myself and talking with other people who tried this process, it seemed clear that the success rate was low and that the process was just too complicated and imprecise for most people to carry out (especially for the patience needed for the addition of the solid potassium silicate). There is a detailed discussion about this procedure, as well as mono-silicic acid synthesis in this forum thread.

Stabilized mono-silicic acid solution created using the procedure below. Note that mono-silicic acid and ortho-silicic acid are the exact same thing, they are two names for the same molecule (H4SiO4). Another molecule with the same nomenclature is ortho-phosphoric acid (H3PO4), which is also called mono-phosphoric acid.

Given these issues, I decided to look for a potentially easier synthesis starting from cheaper, more readily available materials, avoiding the use of Propylene Glycol (which concerned some people) and trying to simplify the steps involved.

The procedure I came up with simplifies the process by relying on the interaction of silicic acid with sorbitol as a stabilizing agent. This stabilization process is well documented in the literature (see here) and is caused by the formation of highly stable polyolate complexes between mono-silicic acid and molecules like sorbitol. These complexes form because molecules like sorbitol have adjacent hydroxy groups in what we call a threo configuration. These do not exist in sugars like glucose or sucrose, reason why these do not work for this process.

The raw inputs you will need are as followed

  1. A potassium silicate with a high K/Si ratio, such as AgSil 16H. You can also use a liquid potassium silicate, such as Grotek Pro-silicate.
  2. Sulfuric Acid (>90%)
  3. Sorbitol
  4. Distilled water.

If using AgSil16H follow this process first. In a 1000mL beaker, add 70g of AgSil16H and 450mL of distilled water. Stir – ideally with magnetic stirring – until the silicate has all dissolved. This will be the silicate solution.

This is now the procedure to prepare the stabilized ortho-silicic acid solution (700mL):

  1. In a 1000mL beaker, add 500mL of distilled water and a magnetic stirrer.
  2. Weigh 200g of Sorbitol and add them to the water.
  3. Start the magnetic stirring.
  4. After the sorbitol has completely dissolved, during a period of 30 seconds add 100mL of the silicate solution (either as prepared above or a commercial silicate equivalent to the Grotek suggestions above (around 7.5% Si as SiO2)).
  5. Stir the silicate and sorbitol solution for 10 minutes.
  6. Add 10mL of >90% sulfuric acid and stir for 5 minutes. The pH should now be lower than 2.
  7. The solution can now be stored.

The above process creates a stable mono-silicic acid solution that has an Si concentration of around 1% of Si as SiO2 and around 0.6% K as K2O. Used at 8mL gal it should provide around 20ppm of Si As SiO2 and 10 ppm of K.

A previous version of this procedure used 50mL of 80-85% phosphoric acid. However, phosphoric acid seems to generate solutions that are unstable after 1-2 weeks of preparation. Solutions prepared per the above process have been confirmed to be stable for at least 1 month.

Did you try it? How were your results? Let us know in the comments below!


A one-part hydroponic nutrient formulation for very hard water

What is water hardness?

There are many parameters that determine the quality of a water source. Water that has a composition closer to distilled water is considered of a higher quality, while water with many dissolved solids or high turbidity is considered low quality. Calcium carbonate, magnesium carbonate, calcium sulfate and calcium silicate are some of the most common minerals that get dissolved into water as it runs through river beds and underground aquifers. The carbonates and silicates will make water more basic, will increase the water’s buffering capacity and will also increase the amount of magnesium and calcium present in the water.

Water hardness is determined experimentally by measuring the amount of Calcium and Magnesium in solution using a colorimetric titration with EDTA. Although both Calcium hardness (specific amount of Ca) and Magnesium hardness (specific amount of Mg) are measured, total water hardness (the sum of both) is the usually reported value. The result is often expressed as mg/L of CaCO3, telling us how much CaCO3 we would require to get a solution that gave the same result in the EDTA titration.

The Calcium and Magnesium present in water sources with high hardness is fully available to plants – once the pH is reduced to the pH used in hydroponics – and it is therefore critical to take these into account when formulating nutrients using these water sources. It is a common myth that these Ca and Mg are unavailable, this is not true.

What about alkalinity?

Water alkalinity tells us the equivalent amount of calcium carbonate we would need to add to distilled water, to get water that has the same pH and buffering capacity. An alkalinity value of 100 mg/L of CaCO3 does not mean that the water has this amount of carbonate, but it means that the water behaves with some of the chemical properties of a solution containing 100mg/L of CaCO3. In this particular case, it means that the water requires the same amount of acid to be titrated as a solution that has 100mg/L of CaCO3.

Water sources with high hardness will also tend to have high alkalinity as the main salts that dissolve in the water are magnesium and calcium carbonates. Since these carbonates need to be neutralized to create a hydroponic solution suitable to plants, the anion contribution of the acid that we will use to perform the neutralization needs to be accounted for by the nutrient formulation.

An example using Valencia, Spain

Valencia, in the Mediterranean Spanish coast (my current home), has particularly bad water. Its water has both high alkalinity and high hardness, complicating its use in hydroponics. You can see some of the characteristics of the water below (taken from this analysis):

Name Value Unit
Calcium 136 ppm
Magnesium 42 ppm
Chloride 103 ppm
Sulfur 89 ppm
pH 7.6
Alkalinity 240 mg/L of CaCO3
Typical water quality values for water in Valencia, Spain.

Hard water creates several problems. Since Calcium nitrate is one of the most common sources of Nitrogen used in hydroponics, how can we avoid using Ca nitrate? Since we have more than enough. Also, how can we neutralize the input water so that we can make effective use of all the nutrients in it without overly increasing any nutrient, like P, N or S, by using too much of some mineral acids?

Creating a one-part solution for very hard water

HydroBuddy allows us to input the characteristics of the input water into the program so that we can work around them while designing nutrient solutions. To get around the above mentioned problems – but still ensure I could easily buy all the required chemicals – I decided to use a list of commonly available fertilizers. I used Calcium Nitrate, Magnesium Nitrate, Potassium Nitrate, Phosphoric acid (85%) and a micro nutrient mix called Force Mix Eco (to simplify the mixing process). This micronutrient mix is only available to people in the EU.

HydroBuddy results to create 1 gallon of 1:100 nutrient solution for Valencia’s very hard water.

Note that we use absolutely no phosphates or sulfates, since the solution already contains more than enough sulfur (89 ppm) and we need to add all the Phosphorus as phosphoric acid to be able to lower the alkalinity. I determined the amount of P to add by setting P to zero, then using the “Adjust Alkalinity” to remove half of the alkalinity of the water using phosphoric acid. This is more than enough P to be sufficient for higher plants. The above nutrient ratios should be adequate for the growth of a large variety of plants, although they are a compromise and not ideal for any particular type of plant.

Since we are adding no sulfates and the pH of the solution is going to be very low (because of the phosphoric acid), we can add all of these chemicals to the same solution (no need to make A and B solutions). The values in the image above are for the preparation of 1 gallon of concentrated solution. This solution is then added to the water at 38mL/gal of tap water to create the final hydroponic solution.

Does it work?

I have experimentally prepared the above concentrated solution – which yields a completely transparent solution – and have created hydroponic solutions I am now using to feed my home garden plants. After adding to my tap water – initial pH of 7.6 – I end up with a solution at a pH of 5.6-5.8 with around 1.5-1.8mS/cm of electrical conductivity. The plants I’m currently growing – basil, rosemary, chives, mint, malabar spinach and spear mint – all seem to thrive with the above solution. I am yet to try it on any fruiting crops, that might be something to try next year!

Are you growing using hard water, have you prepared a similar one-part for your hard-water needs? Let us know what you think in the comments below!


New tissue analysis feature in HydroBuddy v1.99

Tissue Analysis

To grow great plants, we need to grow plants that have a healthy mineral composition. Although there are no theoretically established values for what the mineral composition of a plant should look like, we have grown healthy plants and have established, through analysis of their tissue, what this mineral composition should empirically be. By sampling the leaf tissue from your plants and sending it to a lab for analysis, you can know what the composition of your tissue is and how it compares to healthy plants grown by others.

The question is, can we create a nutrient formulation just from the tissue composition we want to get?

Nutrient solution targets from tissue analysis

Turns out, you can figure out the elemental concentrations that are required in solution to get to certain concentrations in tissue. My colleague and friend – Bruce Bugbee – proposed in this paper about nutrient management in 2004 how this could be done. To achieve this, we make the assumption that all elements taken up by the plant will be deposited as minerals upon transpiration – because minerals cannot leave the plant as gases – so knowing the amount of water that will transpired per amount of tissue grown, we can figure out how much of that element needs to be in the water.

The volume of water required to grow a certain mass of tissue is called Water Use Efficiency (WUE). It is expressed as gram of tissue per liter of water transpired and has values from 3.0 to 6.0. Higher WUE values imply the plant is growing more efficiently, requires less water to grow the same mass of tissue, while a lower WUE implies the plant is less efficient and needs to transpire more to grow. Conditions that increase growing efficiency and decrease transpiration, such as carbon dioxide enrichment and high humidity, tend to increase WUE, while conditions that create inefficient growing – like low humidity with high temperature – tend to decrease it.

If we grow plants with a solution where we determine the nutrients according to the WUE and the concentrations in tissue we want, we can create very effective solutions that lower the probability of over accumulation of nutrients in the root zone and the solution. This allows for solutions that require no dumping and create very healthy plants in recirculating systems (for which Deep Water Culture, DWC, is the most common example).

Doing this process in HydroBuddy

From v1.99, HydroBuddy now includes a “Tissue Analysis” dialogue that allows you to use target tissue concentrations and a certain WUE value, to figure out what the required nutrient concentrations in a hydroponic solution would be like. The program also includes a small Database with tissue targets for certain plants and certain stages of development. There are also a couple of links that point you to resources where you can find a wide variety of different plant species and development stages if the ones that interest you are not included in the software’s default DB configuration.

The image below shows you an example where I determined the target solution concentrations required to grow a tomato plant that has the composition expected for a tomato plant in early flower.

Nutrient solution targets for a hydroponic solution to grow tomatoes with a leaf tissue composition equal to that expected for tomatoes under initial flower (MRM = most recent mature leaf). This assumes the WUE is 3.5 g/L.

How do I figure out the WUE?

As you can see, the above process requires you to input the WUE. This ranges from 3 to 6. It is not easy to measure in the environment, so the best practical solution is to assume your WUE is about 3.5 (the default value), prepare solutions with those concentrations and then observe how the EC of the solution changes as a function of time.

A solution that is prepared with a concentration that would be appropriate for the exact WUE of the plants will have an initial decrease in EC – as nutrients that are taken actively are rapidly taken up – followed by more stable to slightly decreasing EC conditions as uptake changes to be mostly passive. This cycle is repeated when solution is replenished to recover the initial volume in a recirculating system. A solution that is prepared too concentrated will have an increasing EC while a solution that is prepared too diluted will show a consistently decreasing EC. If your EC decreases more sharply with time then you need to assume a higher WUE, if your EC increases then you need to lower your WUE assumption.

Limits of the approach

While this approach can be very useful to create long lasting solutions, especially in recirculating systems, it suffers from some important limitations.

The first is that it doesn’t account for changes in uptake due to changes in pH or availability in solution. This is the reason why the recommendations for elements like Fe and Mn, might be significantly lower than what you commonly see in nutrient solutions. In the above example, the solution requires only around 0.35ppm of Fe, but this means we need 0.35ppm of fully available Fe for the plant, which in reality might mean having 1.5ppm of Fe or more of added Fe, depending on the chemical form of Fe and the pH of the solution.

The above implies that values should not be used without considering the context and that this context might be much more important for some nutrients, for example micro nutrients, than for other elements, for example K and Ca, for which the availability windows and plant uptake are much more straightforward. The plant characteristics should also be taken into account. While a leaf tissue derived approach might only require 50 ppm of Ca in a lettuce crop, we know we need to feed more due to the poor water transport of this plant into new leaves.

Second, the approach assumes that all we care about is leaf composition. This is a perfectly fine if we are growing leafy greens, but if you’re growing a tomato plant, the composition will be heavily split between leaves and fruits as soon as flower pollination ends. For this reason, the nutritional needs of other important tissues – such as sink organs – should be considered very carefully when following this approach. In the case of tomatoes, this might mean feeding substantially higher levels of K, as this element has a much higher concentration in fruits than it has in leaves.

Crops that have changing nutritional needs due to changes in the composition of the tissue formed, require different nutrient solutions as a function of time, as we need to match the overall expected composition of the entire plant, not just the leaves.

Conclusions

Nutrient formulations do not need to be just trial and error. Up until now, besides a formulation database, HydroBuddy had no feature to help growers create formulations with any scientific basis. This new feature, introduces the ability to use target leaf tissue composition and WUE as a way to guide the initial formulation of nutrient solutions. While you still need experience to figure out when to overrule these values and increase or decrease concentrations, it does provide basic blue prints to build from. An analysis of how a formulation derived from tissue compares with your current formulation might also give you some insights into whether you are over or under feeding any elements.

Have you use the HydroBuddy’s leaf tissue analysis feature? Leave us some comments below!


The Potassium to Calcium ratio in hydroponics

To have a healthy hydroponic crop, you need to supply plants with all the nutrients they need. One of the most important variables that determine proper nutrient absorption, is the ratio of Potassium to Calcium in the nutrient solution. These two elements compete between themselves and have different absorption profiles depending on the environment, and the plant species you are growing. For this reason, it is important to pay close attention to this ratio, and how it changes with time, in your nutrient solution. In this post, we are going to examine peer-reviewed research about this ratio and how changing it affects the growth, quality, and yield of different plant species.

Two vital elements that compete against each other. Their ratio is fundamental to maximize yields and changes depending on the plant species, environmental conditions and absolute concentrations used

Two ions with very different properties

Potassium and Calcium are very different. Potassium ions have only one positive charge and do not form any insoluble salts with any common anions. On the other hand, calcium ions have two positive charges and form insoluble substances with a large array of anions. This creates several differences in the way plants transport and use these two nutrients.

While potassium is transported easily and in high concentrations through the inside of cells, Calcium needs to be transported in the space between cells and its intracellular concentration needs to be very closely regulated. Calcium can also only be transported up the plant – from roots to shoots – while potassium can be transported up and down as it pleases.

Calcium transport – happening around cells – is heavily dependent on transpiration, which is what causes water to flow through this space. Potassium transport is not so closely related to transpiration, as it can move directly through the inside of cells in large amounts, which means it can be actively transported through the plant in an effective manner.

Note that the above is a broad over-simplification of Potassium and Calcium transport. If you would like to learn more about this topic, I suggest reading these reviews (1,2).

Competition between K and Ca

Potassium and Calcium are both positively charged, so they do compete to a certain extent. The competition is both because they compete for anions – which they need to be paired with for transport – and for the use of electrochemical potential, which they take advantage of to get transported across membranes. However, they do not have the same transport mechanisms, so the competition is limited.

Table taken from this article (3)

The table above illustrates this point. This study (3) looked into different K:Ca ratios in the growing of lettuce and the effect these ratios had on yield, tip burn, and nutrient concentrations in tissue. You can see that at low total concentrations (0.4 mS/cm EC) the K in tissue is very low when the amount of Ca is high relative to K, while at higher EC values (1.6 mS/cm EC), the K concentration remains basically unaffected, even if the Ca concentration is 3.5 times the K concentration. While Ca competes effectively with K when the absolute concentration of both is low, this competition of Ca becomes quite weak as the concentration of K and Ca increase. At very high concentrations (3.6 mS/cm EC), the potassium does start to heavily outcompete the Ca, especially when the K:Ca ratio is high (3.5x).

The above is also not common to all plants. For some plants, the competition of Ca and K actually reverses compared to the results shown above. However, it is typical for low and high absolute concentration behaviors to be different, and for the influence of K or Ca to become much lower in one of the two cases.

Optimal K:Ca ratios

The K:Ca ratio has been studied for many of the most popularly grown plants in hydroponics. The table below shows you some of these results. It is worth noting, that the results that maximized yields, often did so at a significant compromise. For example, the highest yield for lettuce came at the cost of a significantly higher incidence of inner leaf tip burn. In a similar vein, the highest yields in tomatoes, at a 3:1 ratio, came at the cost of additional blossom end rot problems. This is to say that, although these ratios maximized yields, they often did so with consequences that wouldn’t be acceptable in a commercial setup. For lettuce, 1.25:1 proved to be much more commercially viable, while still giving high yields.

Ref Plant Specie Optimal K:Ca
4 Rose  1.5:1
5 Tomato 3:1
6 Tomato 1.7:1
7 Marjoram 0.5:1
8 Strawberry 1.4:1
9 Cucumber 1:1
10 Lettuce 3.5:1
Optimal K:Ca – in terms of yields per plant – found for different plant species

You can see in the above results, that fairly high K:Ca ratios are typically required to increase yields. For most of the commercially grown flowering plants studied, it seems that a ratio of 1.5-2.0:1 will maximize yields without generating substantial problems in terms of Ca uptake. As mentioned above, higher K:Ca often push yields further, but with the presence of some Ca transport issues. A notable exception might be cucumber, for which the publication I cited achieved the maximum yield at a ratio of 1:1. However, good results were still achieved for 1.5:1.

Another important point about the ratio is that it is not independent of absolute concentration. As we saw in the previous section, the nature of the competition between K and Ca can change substantially depending on the absolute ion concentrations, so the above ratios must be taken within the context of their absolute concentration. The above ratios are generally given for relatively high EC solutions (1.5-3mS/cm).

Conclusion

The K:Ca ratio is a key property of hydroponic nutrient solutions. While the optimal ratio for a given plant species cannot be known apriori, it is reasonable to assume that the optimal ratio will be between 1:1 and 1:2 for most large fruiting crops and flowering plants that are popularly grown in soilless culture. This is especially the case if the hydroponic solution does not have a low EC. An optimal value below 1:1 is unlikely for most plants, although exceptions do exist in certain plant families that have peculiar Ca metabolisms.

To obtain the largest benefit, it would be advisable to run trials to optimize the K:Ca ratio for your particular crop, by changing the K:Ca ratio between 1:1, 1.5:1, and 2:1. You will likely see important differences when you carry out these trials, which will be useful to determine the highest yielding configuration for your setup. To perform these variations, it is usually easiest to change the ratio of potassium to calcium nitrate used in the nutrient solution.

Have you tried different K:Ca ratios? What do you grow and what has worked for you? Share with us in the comments below!


How to use organic fertilizers in Kratky hydroponics

I’ve written several posts in this blog about Kratky hydroponics (for example here and here). In this method, you use a bucket, a net pot, a small amount of media, and some nutrient solution, to grow a plant from start to finish. It requires no power or interventions in the case of leafy greens or small flowering plants. However, one of the requirements of a traditional Kratky setup is the use of regular hydroponic nutrients that are created from synthetic inputs. In this post, we are going to talk about the use of organic fertilizers in Kratky hydroponics, which inputs might work, and which will be problematic.

Plant grown in a traditional Kratky setup using synthetic fertilizers

The types of organic inputs

When people talk about “organic fertilizers”, they usually refer to inputs that can be used in the growing of organically certifiable foods. The easiest way to fit this definition is to look at the inputs that are listed by organizations like OMRI. However, among OMRI-listed products, we have significant differences in where the products come from, and this makes a huge difference in whether or not we could use them in a Kratky setup.

For the purposes of this post, we can divide the OMRI-listed products into three categories. We have mined materials, which are extracted and used in their raw form from the earth. We also have animal or vegetable sourced products, which are byproducts of some animal or vegetable industry, and we have processed products, which involve some postprocessing or mixing of products in the former categories.

In the first category of products, we have things like mined magnesium sulfate, potassium sulfate, rock phosphate, sodium nitrate, or limestone. In the second category, we have things like fish emulsion, kelp extract, blood meal, and bone meal, while in the third category we have products like the Biomin series of transition metal chelates or any liquid or solid organic fertilizer blended products.

Why origin matters

The type of organic input matters, because Kratky hydroponic systems lack one important element. Oxygenation.

Since oxygen is not going to be injected into the nutrient solution, any input we use that requires oxygen for decomposition or absorption, or that requires oxygen for its proper uptake, is not going to work well. If you add any animal or vegetable product to a Kratky setup, the lack of oxygen in the solution is going to give way to the growth of anaerobic organisms that are going to be detrimental to plant growth and will lead to root rot.

Things like blood meal – which would be great amendments in soil with good aeration where oxygen can do its job – turn into foul mixes when put into a Kratky setup. This is because a Kratky setup has a stagnant body of water that is going to turn into a very unfavorable medium for plants as soon as we add anything that creates a heavily reducing environment.

The Kratky Method of Hydroponics - uPONICs, Hydroponics and Aquaponics  Information
A traditional Kratky setup. Note that the solution at the bottom is stagnant and not actively oxygenated in anyway. Only the oxygen that diffuses from the air gets into the water. This is enough to keep the submerged roots alive, provided that the solution itself does not act as a sink for oxygen. In these cases, root rot is quickly experienced.

Plant roots can tolerate a relatively oxygen-deprived solution to some extent, provided that enough root mass is above the water to take in oxygen, but they cannot tolerate a solution that is rid of all oxygen by anaerobic microbial activity. This is because oxygen deprivation makes the plant more vulnerable to attack by pathogens and hinders the respiration of plant roots, which is needed for root survival.

Which inputs can you use

In general, any input that heavily removes oxygen cannot be used as-is. This means that anything that contains plant or animal proteins, fats or carbohydrates, is not going to work well. Inputs that are heavily rich in bacteria or fungi, even beneficial ones, are also going to fail. This is because these beneficial microorganisms also require oxygen and, when they are put in a Kratky solution and die, they are digested by anaerobic organisms that can take their place.

Animal or vegetable inputs that are relatively inert in origin, such as bone meal, would not be problematic, but their ability to release nutrients is going to be limited in a Kratky solution. Mined inputs are going to be mostly fine. Soluble ones, like mined magnesium sulfate and potassium sulfate, are ideal replacements, as they are chemically identical to the synthetic ones, except for a higher content of impurities due to their raw origin. However, it will be difficult to provide enough nitrogen in an organic Kratky hydroponic setup using only this type of inputs.

A potential solution

Since the problem is mainly oxygen deprivation, we can use an organic hydroponic solution, as long as it is processed for long enough to completely eliminate the oxygen depriving capacity of the inputs. As an example, you can follow my instructions on preparing an organic hydroponic solution. This requires fermenting of the solution for a significant period of time, in order to ensure most of the oxygen requiring reactions have been carried out.

To use this solution in a Kratky setup, we would need to give it a longer period of time. We can verify that the solution is ready for Kratky by using an ORP meter and checking that the solution is at an ORP above 300mV after removing active oxygenation for a day. This means that the solution is able to keep enough dissolved oxygen and that most of the oxygen-hungry processes in the solution are done. This might take substantially longer than the 12-15 days suggested in my original article, probably around 30 days.

Another important step is the removal of bacteria and fungi, which could be very problematic once the solution reaches the stagnant conditions of the Kratky setup. To do this, the easiest solution would be to run the solution through a UV filtering system, in order to make sure all fungi and bacteria are removed from the solution. This might sound counterintuitive, but the Kratky system conditions are not ideal growing conditions for plants and do require us to minimize oxygen sinks in the system.

Conclusion

You can run a Kratky system using an organically derived fertilizer. However, it is not straightforward, as we need to consider that a Kratky system lacks the oxygenation required to carry out a lot of the processes that are taken for granted in organic growing (such as protein decomposition). Without aeration of the solution, we need to provide an organic solution that has already exhausted its hunger for oxygen and can already provide nutrients in a manner that is available to plants. We also need to ensure we add no fungi or bacteria that can work anaerobically and attack roots in the stagnant Kratky solution conditions. We can use tools like long-term fermentation with aeration, ORP meters, and UV systems to achieve this goal.

Have you ever grown in a Kratky setup using organic fertilizers? Let us know about your experience in the comments below!


The importance of accuracy in hydroponic nutrient preparation

When you prepare your own concentrated hydroponic nutrients, you need to carry out a significant number of measurements. As a consequence, you will deviate from your intended preparation by the errors inherent to these operations. Plants tolerate a significant array of conditions, so these errors – even though sometimes quite big – are often not big enough to kill plants and are therefore ignored by growers. These errors will, however, greatly hinder your ability to optimize and evolve your crop nutrition to a higher standard. In this post, we will talk about these errors, why and how they happen, when they are important, and how you can minimize them in order to obtain more reproducible results.

The Brushman | 5-Gallon Plastic Pail w/Handle & Graduated Markings | PAIL-5  GAL-W-GR
The markings in buckets can carry high systematic and random errors.

Types of error

Systematic Error

There are two types of errors that happen when anything is measured. The first is systematic error, which is the error inherent to calibration problems of the instrument. For example, you might be using a 1 gallon jug to prepare concentrated nutrients and always filling the jug to a mark you made on it. This mark is not going to be 1 gallon, but probably significantly over or under it. As long as you always use the same jug and fill to the same mark, this large deviation from 1 gallon will always be the same. As long as the measuring instrument is unchanged – meaning not recalibrated – the systematic error always remains the same in sign and magnitude.

Random Error

The second type of error relates to the randomness of the measuring process. Imagine that you used a sharpie to make the mark on the above-mentioned one-gallon jug, and you always try to measure to the same mark. The mark has some width, sometimes you will fill your jug up to the bottom of the mark, sometimes up to the top. Sometimes the surface where you place the jug where you measure will not be perfectly leveled, so the mark will be off because it will be higher at one side of the jug vs the other, etc. This error changes randomly, every time you measure. One time you might be +1%, the other -4%, etc.

Where the biggest errors happen

When you make your own hydroponic nutrients, you will be measuring two things: volume and mass. These two measurements will both carry systematic and random errors. The errors in scales are more obvious, so growers will always make an effort to get scales that are accurate enough for the measurements they want to make. For small growers, this means getting scales that can measure +/-0.01g with a decent capacity, normally 500g is fine. Buying weights to properly calibrate these scales is also recommended, in order to reduce systematic errors as much as possible.

However, always make sure you read at least 3 significant digits when making a weight measurement. This means if you need to measure 1.673485g, you need a scale that measures at least 2 digits, so that you can measure 1.67 +/- 0.01g. This will keep your error below the 1% mark. This is why it is often common to also get a +/-0.001g scale, to measure things like sodium molybdate. You can also go around this problem by preparing more concentrated solution, as your weights become larger, with larger volumes.

Volumes however are where the largest errors are accrued. Most growers will use non-calibrated receptacles to measure volume. The fact that something has a line drawn on it with a volume marking, does not mean that this line is accurate. The systematic errors in these receptacles are usually very large because these were never intended for accurate measurements of volume. Things like buckets, beakers, tanks, and jugs, should not be used to measure volumes. Wide containers, like buckets and tanks, also enhance errors that relate to parallax – your ability to judge whether a level of water is at a line – so the random component of your error will be quite large.

Consequences in nutrient values

In the best cases – for jugs, buckets, and tanks – the systematic error is around 10% with a random error of +/- 5% (3 sigma). If you are preparing a concentrated solution where the final expected concentration after dilution is 200 ppm of K, then this means that your actual K value in solution will start by being 10% over or under it – depending on which way the systematic error of your volume measurement goes – and then deviate +/-5% from there. This means that you are expected to get values all the way from 170 to 230 ppm in the final solution.

This is fine as far as keeping plants alive goes. A solution with 170 ppm will keep plants alive as well as a 230ppm solution would. This is the reason why most growers don’t see an immediate need to reduce these errors. If you’re growing healthy plants and you have less or more than what you intended, what is the problem?

How inaccuracy affects your process

There are three ways in which having inaccurately prepared solutions can affect your process. The first is that it makes you very vulnerable to changes. The second is that it makes it difficult for you to effectively optimize your setup, and the third is that it prevents others from being able to reproduce your results.

Changes in your setup can affect you deeply

Let’s say you optimized your nutrients with time and found that the optimal is 200ppm of K. In reality you have a bucket that always measures 10% less volume and you randomly deviate +/- 5% from that as well. This means that your final solutions are majorly in the 210-230 ppm range. Your trusty plastic bucket then cracks and you need to go and buy another one, you suddenly find that you’re not getting the same results. Now you have a bucket that just by chance, happens to measure the volume more accurately. You are now feeding 190-210ppm, substantially less K. You never knew that, you’re confused, you’re preparing everything the same way.

Your ability to optimize is hindered

The second problem is similar. Let’s say you prepared a batch of concentrated solution to compare feeding K at 180 ppm and K at 200 ppm. You prepare a single-stock solution to carry out the test. This bucket has a systematic error of +10% and a random error of +/-5%. For this batch, the solution happens to be 6% more concentrated than intended (+10% systematic, -4% random), so you end up with 190.8ppm and 212ppm. You find out that the 200 ppm preparation works better, so you decide to use it.

However, you run out of the stock solution you prepared for the experiment, so you prepare it again. However, you incur a different random error in this preparation – remember random errors are different every time you measure – and you end up being with a +1% random error, so a +11% total error. Your results are not as good as before, you don’t know why. The reason, you’re feeding 222ppm while in your previous experiment you had fed 212ppm. All while thinking you were feeding 200 ppm.

It becomes hard to share

Systematic and random errors can make effective sharing of results impractical. Imagine you have optimized your setup to the point where you’re sure that the solution you prepare is the best one for a given plant under some given conditions. Then, you want to share this with another grower and tell him how to mix your formulation. This person tries it and tells you that your solution doesn’t actually work the way you think. You might both be aiming for the same targets but hitting completely different numbers in reality. When sharing, it is important to share the numbers you aim for, as well as the error related to these values.

How to reduce errors

Prepare highly accurate small scale solutions

The easiest way to reduce errors when preparing hydroponic solutions is to base all preparations on small-scale experiments where the preparation can be done much more accurately, using calibrated volumetric material. Watch my videos on preparing hydroponic solutions, how to correctly prepare dilutions and how to characterize stock solutions, to learn more about how this is done.

Volumetric Flask Class A pennyhead Stopper 250ml Pack of 6: Amazon.in:  Industrial & Scientific
Volumetric flasks can be used for highly accurate small scale preparations

The idea is that these small-scale preparations can tell you things such as: the amount of water you need to add for a given volume of stock solution, the expected conductivity of dilutions, and the expected density of the stock solution. Remember that salts take up volume, so to prepare 1 gallon of a concentrated stock solution you will need much less than 1 gallon of water. With this information, you can then prepare larger amounts of stock solutions, since you know the exact amount of water to add for a final volume, which you can accurately measure with a flow meter instead of having to use markings of any kind. You can then use the density measurement to check the accuracy of the preparation.

Perform fewer measurements

Every measurement you make incurs an additional error. It is better to prepare 2 concentrated nutrient solutions than to have 10 solutions with the salts being separated because you need to make 8 fewer volume measurements. If you minimize the number of measurements that you need to do to arrive at the nutrient solution that is fed to plants, you will also minimize the error incurred in these measurements. Minimize measurements from instruments with high errors. If your volumes have much more inaccuracy than your weights, prioritize lowering the number of times you measure volume vs weights.

Conclusion

Accuracy is something to strive for. It closes no doors, only opens them. It is not about being overly fuzzy or obsessive about it, it’s about using it to help you get better. Better practices, lower errors, more reproducibility, more learning. It’s a virtuous cycle. Errors are always there, whether you’re aware of them or not. Ignore them at your own peril.

If you have a process that is inaccurate that generates significant variations in your nutrient solution makeup, then these will be a problem, one way or another. You might be unable to judge whether changes in your crop are due to errors or due to changes, you might be unable to reproduce results and you might find yourself unable to meaningfully share results and explore with others. High accuracy is often not substantially expensive in hydroponics – instruments for accurate small-scale preparation are generally below the 200 USD mark total – and they can dramatically enhance the quality of your solutions and the conclusions you can make from experiments.

Do you prepare your own nutrient solutions? Do you know what your systematic and random errors are? Share with us in the comments below!


My Kratky tomato project, tracking a Kratky setup from start to finish

Fully passive, hydroponic setups are now everywhere. However, it seems no one has taken the time to diligently record how the nutrient solution changes through time in these setups and what problems these changes can generate for plant growth. In my Kratky tomato project, I will be closely monitoring a completely passive Kratky setup from start to finish. In this post, I will describe how this project will work, what I will be recording, and what I’m hoping to achieve. Check out the youtube video below for an initial intro to this project.

Introduction video for this Kratky project.

The goals

It is tough to grow large flowering plants using truly passive Kratky setups (read my blog post on the matter). We know this is because of issues related to their increased water uptake and the large nutrient and pH imbalances these plants create in nutrient solutions. However, I haven’t found any data set that shows how these problems develop as a function of time. By measuring different variables in a Kratky setup through an entire crop cycle, I hope to gather data to help us understand what goes wrong, why it goes wrong and when it goes wrong. With this information, we should be able to develop better nutrient solutions and management techniques, for more successful Kratky hydroponic setups for large flowering plants.

The setup

The setup is a 13L bucket wrapped in duct tape – to prevent light from entering the system – with a hole at the top and a net pot containing a tomato plant. The tomato – which I have named Bernard – is an indeterminate cherry tomato that was germinated in the net pot. The net pot contains a medium consisting of 50% rice hulls and 50% river sand. The bucket has been filled with a store-bought generic hydroponic nutrient solution up to the point where it touches the bottom of the net pot. Furthermore, the bucket is placed inside a grow tent and receives 12 hours of light from a Mars Hydro TS 600 Full Spectrum lamp. The light has been initially placed around 10 inches above the plant and will be moved as needed to maintain proper leaf temperature and light coverage of the plant.

The experimental Kratky setup. You can see the project box housing the Arduino and sensor boards at the bottom. Bernard has been growing for 2 weeks and is already showing its second set of true leaves.

The measurements

I will be monitoring as many variables as I can within this experiment. To do this I have set up an Arduino MKR Wifi 1010 that uses self-isolated uFire pH and EC probes, a BME280 sensor to monitor air temperature and humidity, and a DS18B20 sensor to monitor the temperature of the solution. I will also be using Horiba probes to track the Nitrate, Potassium, and Calcium concentrations once per day. All the Arduino’s readings are being sent via Wifi to a MyCodo server in a Raspberry Pi, using the MQTT messaging protocol. The data is then recorded into the MyCodo’s database and also displayed in a custom dashboard. The ISE measurements are manually recorded on a spreadsheet.

The dashboard of my MyCodo server, showing the measurements of the system as a function of time. All readings are also recorded in the MyCodo database for future reference and processing.

Furthermore, I am also taking photographs every 15 minutes – when the lights are on – using a smartphone. This will allow me to create a time-lapse showing the growth of the plant from the very early seedling to late fruiting stages.

Conclusion

I have started a new project where I will fully record the complete development process of a large flowering plant in a Kratky setup. We will have information about the EC and pH changes of the solution, as well as information about how different nutrient concentrations (N, K and Ca) change through the life of the plant. With this information, we should be able to figure out how to modify the nutrient solution to grow large flowering plants more successfully, and what interventions might be critical in case fully passive growth is not possible.

I will continue to share updates of this project in both my blog and YouTube channel.

What do you think about this project? Do you think Bernard will make it? Let us know in the comments below!