Never fail with ebb and flow hydroponic systems

Ebb and flow or “flood and drain” systems, are some of the most popular systems built in hydroponics. These are low cost, can host a large number of plants, and can generate good results, reason why they are a preferred choice for both new and experienced hydroponic growers. However, there are a substantial number of issues that can come up in these systems, both due to the different ways they can be built and because of failures in their management. In this post, I am going to give you some tips on the construction and management of ebb and flow systems so that you can minimize the chances of failure when building your own hydroponic setup of this kind. For some basics of how an ebb and flow system is set up, I advise you to watch this video.

Ensure full drainage

A common mistake when building a flood and drain system is to have incomplete drainage of the nutrient solution. Make sure you have a setup that allows for complete drainage of the solution as soon as a certain level is reached, and always stop pumps as soon as the return of the solution starts. It is quite important to also ensure that as little solution as possible remains at the bottom of your flood and drain trays or buckets, as plants sitting in puddles of water can be a recipe for disease and a very good environment for pests to develop. A very simple system I built in 2010 had the problem of never being able to efficiently drain, which caused substantial issues with the plants as root oxygenation was never as good as it should have been.

Rolling Tables Ebb And Flow Hydroponic Systems - Buy Bandejas De Plástico  De Flujo Y Flujo,Sistema Hidropónico,Sistemas De Cultivo Hidropónico  Product on Alibaba.com
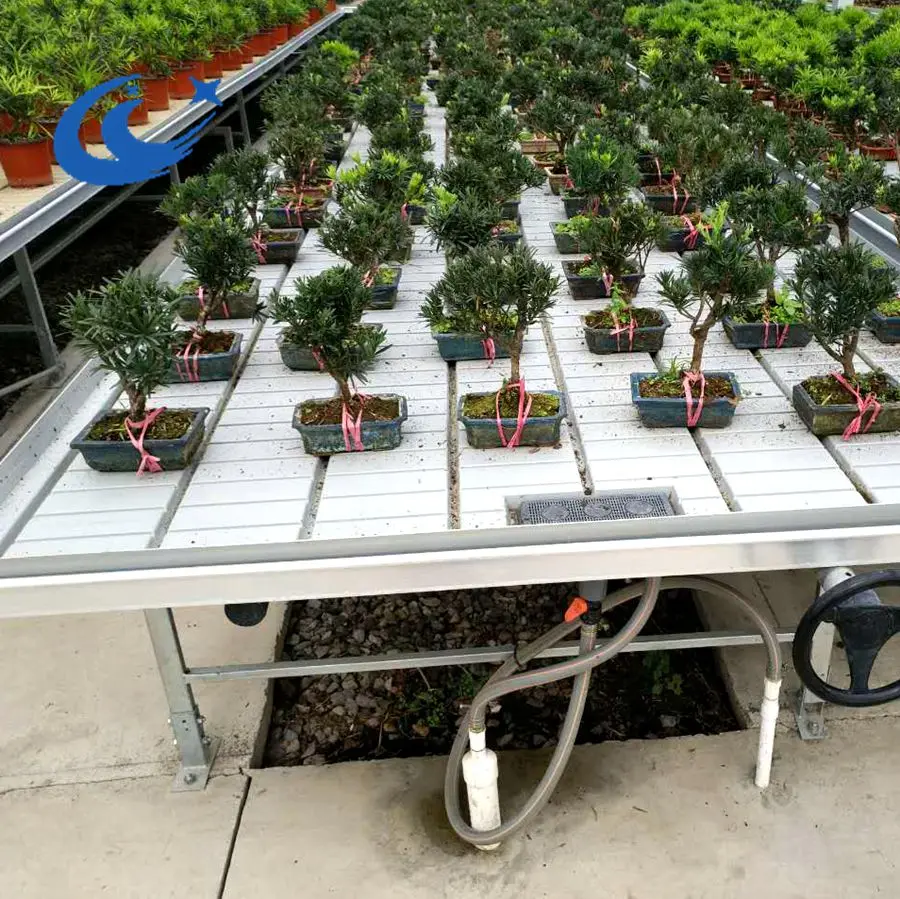
Typical flood and drain table with plants in media on top of the table.

Fast cycle speed

Ideally, you would want the flood and drain cycle of an ebb and flow system to be as fast as possible. Also, the cycles should not take more than 15 minutes, from starting to flood the growing table to completely draining the system. For this, you need to have an adequately sized pump for the volume of your table that needs to be filled (total volume minus volume taken up by plants and media). If you want to use a smaller pump, you can always add some rocks to the table in order to take up volume and ensure you require to add less volume to fully flood the reservoir. Time your cycles and make sure these are as short as possible, adequately saturate the media and completely drain, as mentioned above.

The right media

A common reason why flood and drain systems are less productive is because of a suboptimal choice of media. Ebb and flow systems periodically flood the media with nutrient solution, completely saturating it with water, so media that retains too much moisture will require infrequent cycles and will be harder to time. Media like peat moss and coco are often inadequate for ebb and flow systems due to this fact, as over-saturation of the media will lead to periods of low oxygen availability for the plants. Media that drain fast generally do much better, choices such as rockwool or perlite can give much better results when compared with media that have much higher moisture retention. Since this is a recirculating setup, perlite and rockwool also have the advantage of being more chemically inert. I however do not like media that drain too fast, such as clay pellets, as these can require too frequent cycling.

China Greenhouse Ebb and Flow Rolling Benches Movable Seedbed for Sale -  China Rolling Bench, Ebb and Flow Rolling Bench
Another typical ebb and flow table setup

Time irrigations with water content sensors

Your flood and drain system requires good timing of irrigation cycles in order to have optimal results. If you irrigate based on a timer, you will over irrigate your plants when they are small and will under irrigate them when they are big. Overwatering can be a big problem in these systems and it can be completely solved by both choosing the right media – as mentioned above – and using capacitive water content sensors for the timing of your irrigations. If you’re interested in doing this, check out this post I wrote about how to create and calibrate your own simple setup for using a capacitive water content sensor using an Arduino. This will allow you to flood your table only when it is needed and not risk over watering just because of a timed event happening.

Oversize the reservoir

The nutrient reservoir contains all the nutrition that is used by the plants, this means the bigger this is relative to the number of plants you have, the lower the impact of the plants per irrigation event will be. Having a reservoir that has around 5-10 gallons per plant – if you’re growing large flowering plants – or 1-3 gallon per plant, for leafy greens, will give you enough of a concentration buffer so that problems that develop do so slowly and are easier to fix. A large reservoir can fight the effects of plants more effectively and make everything easier to control.

Add inline UV sterilization

Disease propagation is one of the biggest problems of this type of system. Since recirculation continuously redistributes any fungal or bacterial spores among all the plants, it is important to ensure you have a defense against this problem. A UV filter can help you maintain your reservoir clean. You can run the solution through the inline UV filter on every irrigation event, ensuring that all the solution that reaches the plants will be as clean as possible. Make sure you use a UV filter that is rated for the gallons per hour (GPH) requirements of your particular flood and drain system. Also read my post about getting read of algae, to learn more about what you can do to reduce the presence of algae in a system like this.

Typical UV in-line filter used to sterilize a nutrient solution in a hydroponic setup. These are sold in aquarium shops as well.

Run at constant nutrient EC, not reservoir volume

One of the easiest ways to manage a recirculating system, especially with an oversized reservoir, is to keep it at constant EC instead of constant volume. This means you will only top it off with water in order to bring the EC back to its starting value, but you will never add nutrients to the reservoir. This will cause your total volume to drop with time as you will be adding less volume each time to get back to the original EC. When the volume drops to the point where you have less than 50% of the original volume, completely replace your reservoir with new nutrients. This gives you a better idea of how “used up” your solution really is and how close to bad imbalances in the nutrient solution you might be. A large flowering plant will normally uptake 1-2L/day, meaning that with a reservoir sized at around 5 gallons per plant, it will take you around 2-3 weeks to replace the water.

Note that more efficient and complicated ways to manage a nutrient reservoir exist, but the above is a very safe way to do so without the possibility of toxic over accumulations of nutrients from attempts to run at constant volume by attempting to add nutrients at a reduced strength to compensate for plant uptake. Topping off with nutrients without regard for the changes in the nutrient solution chemistry can often lead to bad problems. The above approach is simple and gives good results without toxicity problems.

Change your pH according to the return pH values

Instead of watering at the normal 5.8-6.2 range, check the pH of the return on a drain cycle to figure out where you should feed. Since a flood and drain system is not a constantly recirculating system, the solution conditions do not necessarily match the root zone conditions and trying to keep the solution at 5.8-6.2 might actually lead to more basic or acidic conditions than desired in the root zone. Instead, check for the return pH to be 5.8-6.2, if it is not, then you need to adjust your reservoir so that it waters at a higher or lower pH (always staying in the 5-7 range) in order to compensate for how the root zone pH might be drifting. This can take some practice, but you can get significantly better results if you base your pH value on what the return pH of your solution is, rather than by attempting to set the ideal pH at the reservoir. You will often see that you will be feeding at a consistently lower pH 5.5-5.6, in order to accommodate nutrient absorption.

Finally

The above are some simple, yet I believe critical things to consider if you want to succeed with an ebb and flow system. The above should make it much easier to successfully run a setup of this kind and grow healthy and very productive plants. Let me know what you think in the comments below!


Understanding Calcium deficiency issues in plants

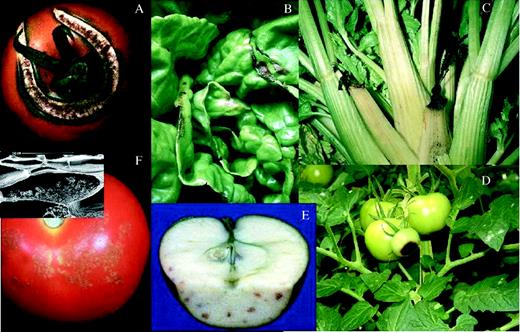
Calcium is one of the most difficult elements to properly supply to plants as its absorption is tightly linked to both chemical and environmental factors. It is very easy for growers to suffer from calcium-related problems, especially those who are growing under highly productive conditions. Issues such as bitter pit in apples, black heart in celery, blossom end rot in tomato, and inner leaf tip burn in lettuce, have all been associated with low levels of calcium in the affected tissues. In this post, we are going to discuss why this happens, how it is different for different plants, and which strategies we can use to fix the issue and get all the calcium needed into our plants’ tissue. Most of the information on this post is based on these two published reviews (1, 2, 3).

Problems with Ca absorption rarely happen because there is not enough Calcium available to a plant’s root system. In hydroponic crops, these issues happen when ample Ca is available to plant root systems and can present themselves even when apparently excess Ca is present in the nutrient solution. Concentrations of 120-200 ppm of Ca are typically found in hydroponic solutions and we can still see cases where nutrient Ca-related problems emerge. This is because issues with Ca are mostly linked to the transport of this element from roots to tissues, which is an issue that is rarely caused by the concentration of Ca available to the plants. Most commonly these problems are caused by a plant that is growing under conditions that are very favorable and Ca transport fails to keep up with other, more mobile elements. As the plant fails to get enough Ca to a specific growing point, that tissue will face a strong localized Ca deficiency and will die.

Calcium issues in different plants. Taken from this review.

When looking into a Ca problem and how to fix it, we first need to understand which plant organ is lacking proper Calcium uptake. In tomato plants, for example, blossom end rot (BER) appears when Ca fails to reach a sink organ – the fruit – while in lettuce, inner tip burn develops because Ca is unable to reach a fast-growing yet photosynthetically active part of the plant. Since Calcium transport can be increased by increasing transpiration, we might think that decreasing the relative humidity (RH) might reduce BER but this in fact increases it, because transpiration increases faster in leaves, than it does in the fruit. In this case, solving the problem involves balancing Ca transport so that it reaches the fruit instead of the leaves. Pruning of excessive leaf tissue, lowering N to reduce vegetative growth, and increasing RH – especially at night – can in fact help under these circumstances, where Ca deficiency develops in sink organs. Reducing ammonium as much as possible can also help, as ammonium can also antagonize calcium absorption due to its cationic nature.

In plants like cabbages and lettuce, a different picture emerges. In this case, increasing the RH leads to worse tip burn symptoms, and decreasing it significantly reduces tip burn, as Ca transport is increased by the increased leaf transpiration. This can be a viable strategy if the temperature is not too high. Under high temperatures, reducing RH leads to too much water stress, which causes other problems for the plants. In these cases, a preferred technique to reduce tip burn is to increase air circulation, which decreases both the RH around leaf tissue and the temperature of the plant due to the wind-chilling effect, this can increase transpiration rates without overly stressing plants.

Taken from this review.

Since in most cases these Ca issues are associated with fast growth, most measures that reduce growth will tend to reduce the severity of the Ca symptoms. Reducing the EC of solutions, reducing temperatures, and decreasing light intensity are some of the most popular mechanisms to reduce Ca problems by reducing plant productivity. These might be the most economical solutions – for example, if artificial lights are used – but it might not be favored by many growers due to the fact that it requires a sacrifice in potential yields. A potential way to attack Ca issues through growth control without reducing yields is to use growth regulators in order to suppress vegetative growth. Synthetic and natural gibberellin inhibitors are both effective at this task.

A common strategy to tackle these Ca issues is to perform foliar sprays to correct the deficiency. Weekly, calcium nitrate or calcium chloride foliar sprays can help alleviate symptoms of tip burn and black heart. Spraying plants from a young age, to ensure they always have Ca in their growing tips, is key. When performing these sprays, primordially make sure all growing tips are fully covered, as Ca sprayed on old tissue won’t really help the plant, as Ca cannot be transported from old to young leaves.


Optimal air speed in a hydroponic crop

Wind speed is a particularly important, yet often overlooked variable in hydroponic crops. While growers in greenhouses will pay close attention to overall gas exchange characteristics (how much air exits and enters a greenhouse) the speed of air around plant canopy is commonly not measured or optimized to maximize plant growth. In this post we will talk about why air speed is so important, why it needs to be measured around the canopy, and what you should be aiming to achieve within your hydroponic greenhouse or grow room.

Plants at higher wind speeds

The airflow around a plant will completely change the plant’s environment. As air flows around the plant it will carry away oxygen and water and will replenish carbon dioxide. Besides this, the moving air will also dramatically increase heat transfer due to convection, effectively cooling the plant substantially (this is known as wind-chill) (1). Without any air movement, the plant will saturate the air immediately around it with oxygen and water and deplete it of carbon dioxide during the day, relying solely on diffusion across this depleted layer in order to get additional carbon dioxide. This will heavily limit the plant’s ability to photosynthesize and will generally cause plants to be stunted and with a higher propensity for fungal/bacterial disease (since there is a very high relative humidity layer adjacent to the leaves).

As airflow increases, so will the plant’s metabolism. This will happen up to a point where the effects of wind chill or mechanical stress due to the air movement become too high. At low relative humidity values, high wind speeds will also pressure the plant to increase water transpiration substantially as the flowing dry air will strip the plant of humidity more efficiently. Due to this reason, optimal relative humidity will tend to be higher as airspeeds at the canopy increase. It is often quite common that to achieve optimal VPD – which often requires high humidity values at high temperatures – airspeed around plants needs to be increased to avoid fungal issues.

The airspeed around the canopy can be bad even if the in/out exchange characteristics of a room are optimal. This is because the flow of air into or out of a room says nothing about how the air is circulating through that room. Since air is a gas, it will go through paths of least resistance and will try to avoid the canopy – a very prominent obstacle – if it is allowed to. For this reason, intake/outtake structures that force air to go through the canopy and fan setups that direct air straight at the canopy structure are going to be significantly more effective at generating proper airflow. Since airspeeds around the canopy are going to be quite low (0-1m/s), it is not possible to measure these speeds accurately with regular fan-base anemometers, a hot wire anemometer will be required to make these readings. These devices will allow you to measure wind speeds that are quite low, with an accuracy of +/-0.1m/s.

A hot wire anemometer that can be used to accurately measure wind speeds around plant canopy

So what is the optimal airspeed you should be aiming for at plant canopy? The higher the airspeed, the higher your plant metabolism will tend to be and the more pressure the plant will feel to adapt to these environmental conditions. At some point, the plant is unable to benefit from increases in airspeeds due to the increased transpiration and wind-chill caused by the increased air-movement. The results of a study on tomato plants with different leaf area index (LAI) values in wind tunnels are shown below. As you can see, crops with lower LAI values will tend to do be photosynthetically more efficient, probably because these low LAI values are more adapted to higher airflow conditions. However, this does show that a limit to increases in photosynthetic rate based on airflow does exist.

To reach optimal photosynthetic rates, the wind speed around the canopy should be at least 0.3m/s, as this is around the point where flowering plants like tomatoes start reaching a plateau of photosynthetic production. Having a higher rate will provide little additional benefits under normal conditions, although aiming for 0.5-0.6m/s might provide a buffer to ensure that all regions of the canopy are above the critical 0.3/s threshold. Aim to have a homogeneous flow across the canopy in the entire room/greenhouse as you would have in a wind-tunnel. Higher airspeeds might be desirable if CO2 enrichment is being done, although care must be taken to ensure that the relative humidity is high enough to account for the additional wind chill that the plants are going to be subjected to. Also, aim to have these airflow conditions through the entire life of the plant, as early adaptations to the airflow regime will tend to limit what can be achieved by trying to increase airflow at a later time.

Photosynthetic rate as a function of windspeed, LAI stands for (Leaf Area Index). Taken from this article.

When possible, make sure you compare the LAI values of the different plants you have available. Low LAI values are going to be more suited to high density crops as their efficiency per leaf area unit will be significantly higher and it will be easier to maintain high airflow speeds within the canopy, while crops with high LAI values will make it more difficult for air to move through the canopy plus their photosynthetic efficiency per leaf area unit will be substantially lower.


Keeping plants short: Natural gibberellin inhibitors

In this series of posts, we have discussed the different techniques and synthetic chemical substances that can be used to keep plants short. We discussed why keeping plants short is important, how this can be done with synthetic gibberellin inhibitors and how this can also be achieved using day/night temperature differentials. However, there are also a lot of natural substances that can be used to inhibit gibberellins, which can be used to help us achieve this same objective. In this post, we will be talking about the research around natural gibberellin inhibitors, the plant extracts that have shown this activity and what we have discovered these plant extracts contain.

Image result for carob plant
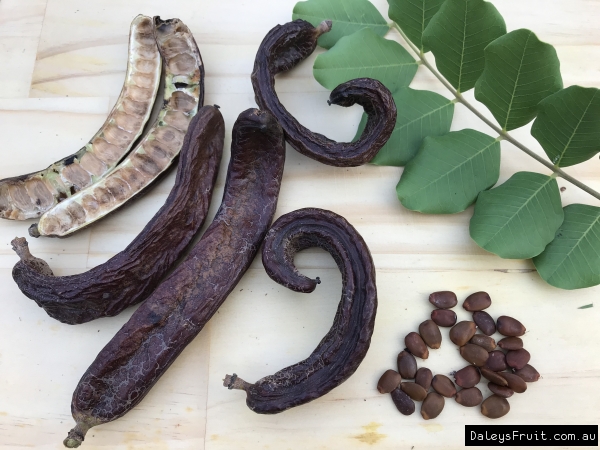
Dried seeds and fruits of the carob plant

Research around plant extracts that could inhibit gibberellins started in the late 1960s. Many different plant extracts were tested for inhibitory activity. The tests were simple, a control plant was not sprayed, a second gibberellin control plant was sprayed with gibberellins and a third plant was sprayed with a mixture of gibberellins and the tested plant extract. Whenever inhibitory activity was present, the third plant would show very similar characteristics to the control while the gibberellin sprayed plant would usually stretch significantly. You usually see graphs like the one showed below, where the plant sprayed with the pure gibberellins is the control while the extract contains both the gibberellins and the plant extract. When an extract inhibits the gibberellins the plant grows less under the same gibberellin concentration although as the gibberellin concentration is increased the inhibitory effect of the extract is surpassed and the plants reach similar points.

When doing this research, one of the plants that showed the most promise was the carob plant. Cold-pressed extracts of green carob fruits were studied quite extensively and showed this effect repeatedly (1, 2, 3). Different fractions extracted showed the effect and researchers sought to find the specific substances responsible for the inhibition. Eventually, researchers found that the culprit was abscisic acid (4), also known as ABA. Other plant extracts that had gibberellin inhibitory effects, such as lima beans, also proved to contain significant amounts of ABA (5). So why are we not using ABA as a safe and environmentally friendly gibberellin inhibitor?

Sample graph showing the gibberelin inhibitory effect of a natural extract obtained from carob (taken from here)

It boils down to the chemistry of ABA, which is quite complicated. First of all, ABA contains a chiral center (1′ in the image below), making it the first chiral plant hormone to be discovered. This means that its mirror images are not equivalent – like your right hand is not equivalent to your left hand – which means that these two chemical forms will behave differently in biological systems. This complicates the synthesis of the molecule substantially. Furthermore, ABA contains several double bonds, which, depending on their configuration, can make the molecule completely inactive. Unfortunately, ABA goes through a double bond rearrangement under UV light that causes the molecule to deactivate, making it unstable for everyday use. So while ABA was great on paper, in practice it was never used widely. Several chemical analogs of ABA were developed and a lot of chemistry surrounding ABA and the proteins it binds to have been explored (you can read more in this book).

Phenolic compounds were also of great interest in the 1970s since many of the plant extracts that showed inhibitory activity also contained many of these molecules. These belong to a family of compounds called “tannins” and were then explored in pure form as potential gibberellin inhibitors, with many of them showing substantial activity (6, 7, 8). This showed that extracts coming from fruits like carob had an inhibitory activity that was independent of the activity they got from ABA, although the phenolic compounds were significantly less active compared to the pure plant hormone.

Image result for ABA molecule
Labeled diagram of the active form of ABA

In the late 1970s, the research into these natural gibberellin inhibitors stopped as the first successful synthetic gibberellin synthesis inhibitors started to surface. These were much more effective since they did not deal with the gibberellin once produced but mostly attacked the paths that were used to form the chemical within the plants. Substances such as Chloromequat and Paclobutrazol made most of this research into naturally source inhibitors irrelevant, as these were cheap to produce in mass quantities and much more effective.

With the return towards safer and more natural alternatives and advances in chemical synthesis, the direct use of ABA or phenolic substances in order to inhibit gibberellins to prevent shoot elongation starts to become attractive. If you’re interested in this path, looking at past research from the 1970s to come up with test formulations for foliar spray or root drench products would be a good initial approach. If you want to avoid the use of pure substances and all chemical synthesis, using direct extracts from plants like lima beans and carob is also a potential approach, although care needs to be taken to ensure the conditions of the extraction processes and extract storage do not destroy their active properties.


Practical aspects of carbon dioxide enrichment in hydroponics

Carbon is one of the most important nutrients a plant consumes as it the largest component of a plant’s dry weight. Plants get this carbon mostly from the atmosphere – in the form of carbon dioxide – and transform it through the process of photosynthesis to create carbohydrates and other carbon-containing molecules. However, carbon dioxide concentrations in the atmosphere are relatively low (350-450 ppm) so plants that are given ample light and root nutrition – such as those in hydroponic setups – will sometimes become limited by the lack of enough carbon dioxide in the atmosphere. Carbon dioxide enrichment seeks to increase this concentration in order to remove this limitation. In today’s post, we’re going to talk about some of the practical aspects of CO2 enrichment in hydroponics setups, such as which concentrations to use, how to do the enrichment, and when to do it.

To dive into the scientific literature about carbon dioxide, I recommend this review from 2018, which not only summarizes a lot of the relevant literature, but contains a wide array of literature resources that can be useful for anybody who wants an in-depth look at the scientific research surrounding CO2 enrichment. A lot of the information contained in this post was taken from this paper or its sources. I will cite specific sources when this is not the case.

Taken from the Oklahoma State University website on carbon dioxide supplementation which contains some great resources on the matter.

First of all, it is important to realize that carbon dioxide enrichment does not make sense under all circumstances. Plants will tend to be limited by other factors before they are limited by carbon dioxide. The first step before CO2 enrichment is considered, is to make sure that the plants are receiving enough light (>400 μmol/m2/s for flowering plants) and that their tissue analyses show that they are not being limited by a deficiency of any particular mineral nutrient. Plants that are either under lower light, drought stress, or nutritional deficiencies will tend to benefit significantly less from CO2 enrichment than plants that are actually limited only by the CO2 concentration in the greenhouse. Under some of these circumstances, CO2 injections could lead to excessive amounts of CO2 that might lead to actually counter-productive results. Temperature can also be a key factor in determining the success of CO2 enrichment, with temperatures in the upper range of ideal temperatures for a crop often leading to better results as the optimal temperature increases as a function of CO2 enrichment (see here).

The next thing to consider is the source of carbon dioxide. The best source to use are CO2 canisters, which provide pure, on-demand CO2 that can be easily controlled both in terms of its purity and its release into the greenhouse. Lower cost sources are usually preferable though, especially fossil fuel burners that will release CO2 on demand. The issue with these burners is that they will release other gases into the atmosphere, like SO2, CO, and NOx, which might be harmful to plants if the output from the burner is not filtered before use. These can be minimized if natural gas burners are used, as these generate the lowest amount of these side-products. Another problem with “burners” is that they will heat the environment, if this does not coincide with the greenhouse’s heating needs it can lead to increases in temperature or excessive costs in climate control measures. For this reason, the timing of these “burner” cycles is critical to ensure they do not “fight” with climate control systems.

Image result for CO2 ppm plant yield
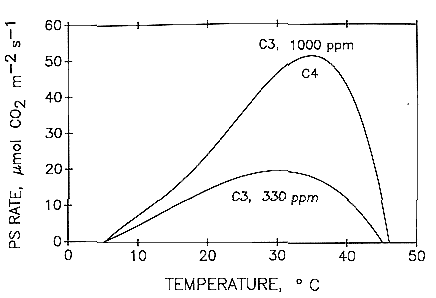
Illustration of gas exchange rate for different temperatures for C3 plants at 330 ppm (atmospheric) and 1000 ppm (around the max that improves the PS Rate). Taken from here.

The sensors used to detect the CO2 and their placement will also be very important. There are mainly optical and electrochemical sensors available for CO2 detection. Both of these sensors need to be periodically checked against CO2 free gases and atmospheric CO2 to check their calibration. Optical sensors often require cleaning in order to remain reliable. Because of these potential reliability issues, it is often ideal to have multiple CO2 sensors used for control and to check the values of the sensors against each other to ensure no sensors have stopped working correctly. The CO2 distribution will usually be highest close to the ground and lower at leaf canopy, reason why sensors need to be placed around canopy height, to ensure the actual canopy concentration reaches the desirable level since this is where most CO2 will be used.

In terms of the concentration that should be held to maximize yields, research has shown that the most benefits – when these are possible – are obtained when the concentration of carbon dioxide is around 1000 ppm. Carbon dioxide is not incorporated into tissue at night and is also expected to negatively affect respiration rates, so common practice dictates that CO2 should be reduced at night to atmospheric levels to counter this problem. A 2020 study on Mulberry attempted to establish the difference between daytime and nighttime supplementation of CO2 and found out that all of the yield increase benefits of the supplementation were obtained when CO2 was supplemented only during the daytime.

This image illustrates the dependence of photosynthesis on light at different levels of CO2 enrichment. was taken from here

Regarding nutrition, carbon dioxide triggers increased demand for certain nutrients. For example, nitrogen demand increases substantially when CO2 supplementation is used (see here). For this reason, hydroponic crops that are CO2 supplemented will usually need to be fed higher amounts of nitrogen in order to avoid losing the benefits of the CO2 supplementation because of the inorganic nitrogen becoming a limiting factor. The carbon dioxide will increase nitrogen demand but not nitrogen absorption if the concentration is left the same, so we need to compensate for this by increasing the amount of nitrogen within the nutrient solution.

There is clearly a lot of research to be done, as optimal CO2 supplementation involves many variables (including financial, environmental, nutritional, plant species, etc). An initial approach where the atmosphere is enriched to 1000 ppm of CO2 with C3 plants that can take advantage of it, where nutrition, in general, is increased, temperatures are slightly increased as well and CO2 is vented at night is bound to give satisfactory initial results. This is a good starting point for anyone looking to benefit from CO2 enrichment.


Keeping plants short: Using day/night temperature differences (DIF)

In this article series about “keeping plants short”, we have explored the reasons why short plants are desirable and how this can be achieved using gibberellin inhibitors. However this is not the only effective way to control plant height and several other ways – some using no chemical means – can be used to keep plants short. In this article I will be talking about the use of day/night temperature differences in order to control plant height, what the research about this says and how it can be effectively applied by growers to achieve shorter plants.

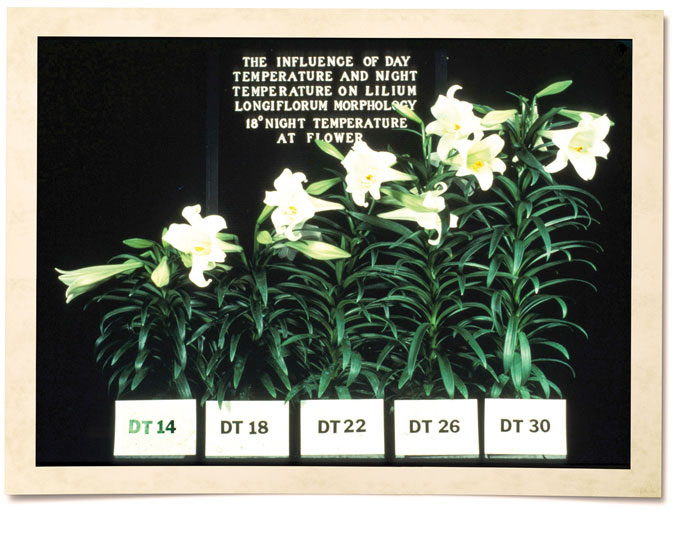
The idea of using day/night temperature differences to control plant height can be traced back to the late eighties and some research done by people at Michigan State University (1). This research in easter lilies showed how plants grown at a constant night temperature (68F, 20C) but subjected to even lower day temperatures or simply drops in early morning temperature could grow drastically shorter. The results surprisingly showed that a 14F temperature drop during the beginning of the day – first two hours – could actually cause the plants to receive the same effect as if the day temperature was lower during the entire day, yet the plants remained highly productive. This technique of reducing temperature during a few hours during the way was referred from this point on as “DIF”.

Taken from this 1986 article.

Experimenters then began testing across other plant species and found the results to be mixed. In this paper (2) chrysanthemum, poinsettia, begonia and kalanchoe were all tested in a -6 C DIF experiment and while chrysanthemum and begonia both responded in the expected manner, the kalanchoe actually responded in the opposite way and showed stronger elongation of the flower stems. In all of these cases the use of growth regulators – gibberellin inhibitors – was still needed to ensure plants stayed at the required height. This was one of the first studies that pointed to the fact that the DIF technique is tremendously crop dependent.

During the nineties it was established that DIF did work for several common crops, for example cucumber and tomatoes showed to be sensitive to the DIF effect, particularly when the first two hours of the day showed a temperature drop. In this case the effect reduced both the inter-node distance and was directly proportional to the difference in temperature. It was also established that some plants prefer pulses of cold temperature during the end of the day, while others might prefer this pulses even in the middle of the night. It was also showed that strong negative DIF treatments caused negative effect related with a reduction in chlorophyll production, resulting sometimes in even plants showing signs of chlorosis. Plants grown in negative DIF were also shown to have lower total dry weights although depending on the magnitude of the DIF, limited or sometimes even positive effects on weight and yields could be seen. You can read more about the above in this review from the late nineties which also contains a lot of literature references for early DIF research (3).

Stem elongation effects of DIF in peas, taken from this article

More recent research from 2013 on tomatoes, eggplant and sweet pepper (4) has shown that a variety of different day/night temperature treatments can be effective in minimizing vegetative growth while having a limited effect on yields. In this case the strongest effect was seen for a 15C/25C day/night temperature cycle. This paper also looked at nutrient absorption and noticed that Ca/Mg/K concentrations were actually highest in the 15C/25C temperature treatment, which suggests that changing the day/night temperature did not adversely affect nutrient absorption. The conclusions of this research were then reproduced and matched when looking at cucumber, melon and watermelon (5). However other research using positive as well as negative differences in temperatures has shown that for tomatoes, the ideal day/night temperature difference is positive and in the order of +6C if yields and plant growth are given the highest priority (6).

The DIF method has shown to be a reliable way to control the height and vegetative growth of many different plant species, although for some it does not work very well. In general the researchers who apply negative DIF methods for reducing stretch tend to have the most success with a -10C (-18F) increase in night over day temperatures. If testing on a new plant the recommendation would be to start with a 2 hour temperature drop in the day temperature of this magnitude for the first 2 hours of light – starting the drop 30 minutes before sunrise – and see which results you can get. This is likely going to be the cheapest in terms of both climate control and potential disruptions in yields caused by this technique.


Six things you need to know before using plant hormones

Plant hormones are small molecules with no nutritional value that are used as chemical signaler within plants. A hormone will trigger a chemical signaling cascade that will cause the plant to carry out certain specific behavior. This fact has made them one of the most useful tools to manipulate plant growth and improve the yields and quality of many crops, especially flowering plants. This has also made them a key target for hype, with many products promising significant gains without much talk about interactions with other hormones or other fundamental aspects. In this post I want to talk about six things you should know about plant hormones, both to use them more effectively and to adequately manage your expectations when you use them. Note that although plant hormones are considered plant growth regulators (PGRs), this broad class includes other molecules – such as gibberellin synthesis inhibitors – that are not being considered in this post.

Know specifically what you want. A hormone will affect a plant in a very specific way, to achieve a specific purpose. Hormones can help you manipulate plant growth but which one you use depends fundamentally on what you want to achieve. Do you want the plant to be bigger or shorter? Do you want to have more water content in your product? More solid content? More terpenes? Do you want to fight drought conditions? Excess salinity? Insects? The specifics of what you want will guide you into choosing an appropriate hormone for your specific needs.

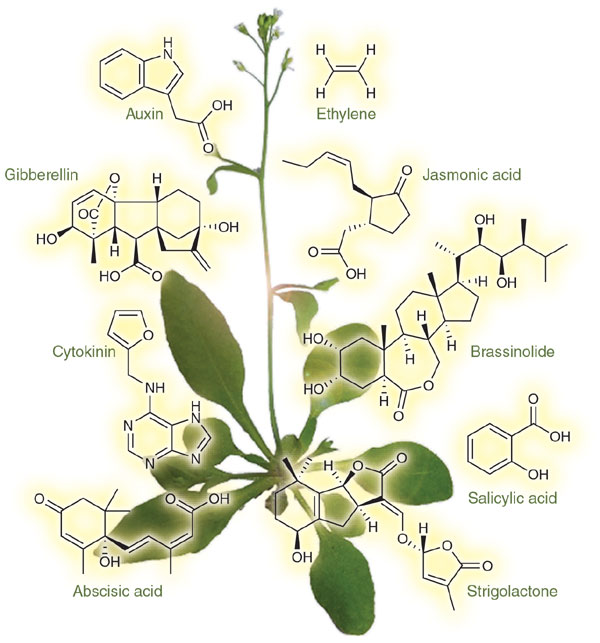
Examples of widely used plant hormones

Plan your hormone applications strategically. Different hormones can stimulate different processes that are needed at different points of a plant’s life. If you plan the use of hormones carefully you can stimulate root growth when plants are transplanted, then stimulate flowering or other behavior when you want the plant to express that behavior more strongly. Plants take some time to steer, they react to their environment, hormone applications at the right times can give a plant a strong signal that it should follow certain behavior and you – as a grower – can ensure that the environmental conditions are perfect for the processes the plant will be carrying out next. Hormones are the flares telling the plant where to go, you should ensure you make that a smooth ride.

There is no free lunch. Plant hormones act to cause a certain behavior to happen, but this behavior comes at a specific cost. A plant that is stimulated to produce more flowers will often grow smaller fruits, a plant that is stimulated to produce more terpenes might produce lower yields because of the additional energy spent in these molecules, a plant that grows more roots, grows less shoots while it’s doing that, etc. A plant does not magically get access to more energy because it has been stimulated with a hormone, it simply chooses to act differently with the energy it is receiving.

Hormones interact with each other. A given hormone can behave in a way when it’s applied and in a very different way when it’s applied with another hormone. As different hormones signal different paths, the net effect is often related with how these different paths are activated. Some are synergistic, the total is more than the sum of the parts, while others are antagonistic, meaning you get less than the sum of the parts. Growers interested in hormones will often make the mistake of applying a lot of things at the same time, but they have no idea what the net effects are going to be like. When dealing with hormones introduce them one at a time and make sure you’re getting a measurable positive effect before you venture into using another one with it. Incremental gains is the name of the game not “apply every hormone under the sun that has a peer reviewed paper published where it increases yields in a plant”.

Concentration is everything. To make things even more complicated, a hormone might activate one signaling path when it’s present at a given concentration but a different one when it’s present at a much larger concentration. Using the wrong concentration for the hormone might end up causing a completely different effect or an effect so pronounced that it’s negative side effects are going to out-do the positive effects. Furthermore, this can also be genetic dependent, so when using hormones on new varieties or species it is always advisable to do a concentration trial across 2-3 orders of magnitude to see where the “sweet spot” for the desired effect is. Sometimes hormones are most effective at surprisingly low concentrations – even 0.1 to 1 ppm – while other times they need to be applied in very significant amounts (100-300 ppm).

The application route and vehicle is very important. A hormone might be very effective when applied in a foliar spray, while completely ineffective when applied in a root drench. Sometimes the hormone requires specific additives or solvents to be used in order to ensure its absorption and others it needs to be applied at a very specific pH range or even just by itself. Knowing the particular application conditions of the hormone you want to use is also important to achieve the expected results.

These are some simple guidelines to consider when using plant hormones in your crop. Hormones are no miracle but they can certainly provide amazing improvements in yields and quality if used appropriately. Formulating a good hormonal regime, with adequately formulated foliar/root drenches, applied at the right times, with the right hormones, can provide amazing results. This however requires a lot of testing, a lot of effort and a lot of understanding about the plant being grown and its crop cycle. Every crop has its own genetic and environmental conditions and requires significant experimentation to achieve the best possible results.


Keeping plants short: Synthetic gibberellin inhibitors

Plants grow both vertically and horizontally. A plant will develop branches along its stem – expanding horizontally – and the stem will grow towards the sun, making the plant taller. This vertical growth is almost always an undesirable quality, both in extensive and intensive crops, which creates an opportunity to improve plant cultures by attempting to reduce the height of plants. You can read more about why making short plants is important in this post. Although there are many potential ways to achieve this – which I will discuss in detail in future posts – this post will deal with the most powerful tools that have been developed for this purpose, a class of plant growth regulators (PGRs) known as gibberellin inhibitors or more commonly as “growth retardants”.

This figure was taken from this article.

Making a plant grow shorter is no trivial task. This is because we do not want to make the plant less productive, but we want the same productivity of a tall plant in a much bushier and compact package. We therefore need to inhibit vegetative growth without affecting the flowering stages of our plant. Scientists figured out around 30 years ago that a set of plant hormones called gibberellins played a critical role in the vegetative growth of plants – especially the elongation of a plant -so these became a prime target to stop growth. If you can disrupt the gibberellin creation pathway right when the plant is supposed to stretch, then the plant will stop growing vertically without the flowering development of the plant being affected at all.

We have found several different types of compounds that can do this. The figure above shows you the gibberellin synthesis path and the steps where different molecules have been shown to disrupt it. Among the most powerful and commonly used were the ones that disrupted the conversion of kaurene to kaurenoic acid, with the most famous one being paclobutrazol. In the other groups the most commonly used ones were chlormequat and daminozide. These molecules are all part of the first generation of gibberellin inhibitors and they did exactly what they were supposed to, proving to be extremely powerful growth retardants that were able to keep plants compact and strongly increased yields in several different crops.

However it soon became evident that their toxicity and retention in plant tissue is significant. Paclobutrazol has been shown to be toxic, having developmental and reproductive effects in rats (1) although it has been shown not to be carcinogenic in humans but still very toxic to aquatic life (2). The use of paclobutrazol on food crops is therefore not recommended, but whether or not it’s actually allowed or not depends on the legislation of the country where you’re in. Some countries will allow paclobutrazol to be used as long as enough time is given between application and the development of the edible parts of the crop and then again this usually only applies to a limited number of crops where the time between use and harvest can be guaranteed to be long enough. Chlormequat and daminozide follow similar stories, although in the case of daminozide it was discovered that it was carcinogenic and its use in edible crops was completely banned world wide in the late 1980s.

Table taken from here, these are substances banned for use in cannabis by the state of Oregon. You can see how several of the above mentioned growth retardants are present.

The above developments caused chemical companies to search for and develop new gibberellin synthesis inhibitors with lower toxicities and lower accumulation in plants that could be approved for use in edible crops. This led to the development of Prohexadione-Ca and Trinexapac-ethyl, which are two of the most commonly used growth retardants right now. These two have considerably lower toxicities and lower half-lives in the environment. For this reason trinexapac-ethyl has been approved for general use in places like New York (3). In this document the toxicity for mammals and aquatic life is discussed and trinexapac-ethyl is not found to be a threat to humans or animals at the maximum suggested application rate. This is mainly due to the fact that it’s quickly bio degraded in the environment. A risk assessment made by the EFSA also reached similar conclusions (4). Another EFSA risk assessment for prohexadione-Ca also points in the same direction (5). Prohexadione-Ca is currently approved by the EPA for use in apples, grass grown for seed, peanuts, pears, strawberries, sweet cherry, turf, watercress, alfalfa and corn (6).

Optimal results with these new growth retardants also require careful consideration of the application formulation, the application time and adequate pairing of the PGR with the plant being grown . For example in apple trees much larger doses of Trinexapac-ethyl are required compared to Prohexadione-Ca to achieve the same results and trees that have been treated with Trinexapac-ethyl can have important reductions of flowers in subsequent crops (7).

With the development of less toxic and still highly active growth retardants, it might seem like a no-brainer to use these in crops to prevent elongation and increase yields. However the introduction of inhibitors in the gibberellin pathway is not without further consequence as this path is also important to guide the production of important phytonutrients and essential oils. When using these growth retardants it’s important to evaluate their effect in the quality of the product, as they can also lead to a change in the properties of the end product. For example in apples these PGRs can induce the production of luteoforol, a flavonoid they normally do not produce (8).


Average yields per acre of hydroponic crops

I constantly talk about yield in hydroponics and how a variety of different techniques, additives and methodologies can be used to make plants more productive. However, what is the average yield you can expect in a hydroponic crop for a given plant specie? Where have these yields been measured and what can you expect your crop to yield? On this blog post I will discuss the literature around average yields in hydroponics, the problems with the expectation of average yield per acre and some of the things you need to consider when trying to consider a hypothetical growing situation. You will see that getting an expectation of how much your crop will produce is not simple and depends on a complicated mixture of variables.

1 -Soiled and Hydroponic Yields (Source: Resh, 1998) 
Average yields per acre in hydroponic versus soil according to Howard Resh (1998, “Hydroponics food production”). I could not determine the actual source of hydroponic crop data used to get the above values or their veracity.

There are multiple literature sources of expected yields in hydroponics, many of them coming from outside the peer reviewed literature. The above table shows you one example from a book published in 1998 by Howard Resh. However if you look at the seventh edition of this book (published in 2013), you will not find the table above anywhere within it. I do not know why this table was removed from the book, but it might be related with problems with the data used to obtain the above yields, or those yields not being realistic expectations for average hydroponic setups. This does not mean in any way that the book is bad – I consider it an excellent introduction to hydroponic growing – but it does show that reducing yield expectations to simple tables can be problematic.

Below you can see another table – taken from a review article written in 2012 – which took it from an article published in the proceedings of a conference that was held in India in 2012. These proceedings are practically impossible to find online – at least I couldn’t despite my best efforts – so it is extremely hard to know where the data actually comes from. However we can see that there are large similarities between these and the numbers published by Howard Resh in the 1998 book, suggesting that these two tables actually have the same source. This table seems to have become widely used as a way to show how superior hydroponics can be when compared to soil, but the original source I can trace it to – the Howard Resh book – actually got rid of it, and people who use it in the scientific literature now quote either the reviews that quote the Indian conference proceedings or the proceedings directly. This makes me very suspicious of these values as the actual data where these values was drawn from seems impossible to get to.This can happen in scientific literature, where some widely quoted values become almost “memes”, where circular references are created and the original source of the data becomes extremely hard to actually find.

Taken from this review article. The data source for these values is also not known.

So what are some actual yields in tons per acre per year for crops, as per current scientific literature that shows where the actual data came from? The answer is not very simple! Let’s consider the case of tomatoes. The best information I could find on the subject was gathered in 2002 – almost 20 years ago – from greenhouse hydroponic growers in the United States at both small and large scales (1, 2). The yields for highly sophisticated large scale greenhouses that can do tomato growing during the entire year is 235-308 tons per acre per year, while for growers that can only do one crop a year – due to proper lack of climate/light control – the average yield per acre per year is around 50-60% of that. Here we can already see how technology can introduce a difference of around 2x in the results, just because of the amount that is expected to be produced. More recent data from Pakistan in 2018 (3) puts the average yield for hydroponic greenhouse tomatoes at 65.5 tons per acre, vs around 4.07 in the open field. This is a difference of around 5x with the reported yields in the US in 2002, just because of fundamental differences in growing practices and technology. I have in fact personally been at lower technology hydroponic crops that have achieved only slightly better yields than soil, with yields in the 12-15 ton per acre per year range.

For other plants accurate yield per acre per year information is even harder to find. I couldn’t find scientific literature showing values – with data from actual crops – for the yields of other common hydroponic crops such as lettuce, strawberries and cucumbers. The reason might be related with the high variance in the results obtained by different growers under different circumstances. As we saw in the case of tomato producers above, things like the actual variety being grown, the climate control technology available and the actual location of the crops can play a big role in determining what the actual yields will look like.

The above implies a very substantial risk for people who want to develop hydroponic crops under unknown conditions. Creating a business plan can be very hard if you do not know how much product the business will yield. If you’re in this position then I advice you do not use any of the values commonly thrown around the internet as guidance, most of the time these are highly inflated and reflect the potential results of the most ideal hydroponic setups, rather than the average. The best guide for yields will be to look at growers that are harvesting the same crop under similar conditions in your area. If this is unavailable then the cheapest way to get this information is to actually carry out a small scale trial to see how much product you can expect.

If you are pressed to do some worst-case estimates then use the values from soil in the area where you’re in as a base expectation. A hydroponic crop is always likely to do significantly better than soil, but working with soil-like production values will allow you to control your costs in a much tighter fashion if realistic expectations cannot be created either through the experience of other hydroponic growers under similar conditions or small scale experimental setups.


Maximizing essential oil yields: A look into nutrient concentrations

Essential oils are the main reason why several plant species are currently cultivated. These oils have a wide variety of uses either in the food industry or as precursors to more complex products in the chemical industry. Modifying nutrient solutions to maximize oil yields in hydroponic setups is therefore an important task. However, there are sadly no clear guidelines about how this can be achieved. In today’s post I wanted to create a small literature review of different research papers that have been published around the modification of nutrient solutions to maximize essential oil production and see if we can draw some conclusions that should apply to plants that produce them.

The variety of plants that produce essential oils is nothing but amazing. From plants where mainly the leaves are harvested – such as mint and basil – to plants where the flowers are used – such as roses – to plants where the seeds are used, like coriander. The wide variety of oil sources and plant species implies that the universe of potential research is immense, with every potential nutrient modification in every plant giving a potentially different optimal measurement. However, plants share some important characteristics – like photosynthesis and root absorption of nutrients – plus essential oils within different plants can share components produced using similar chemical pathways. For this reason, a look into the research universe of nutrient solution optimization for essential oil production is likely to serve as a base to guide us in the optimization of a solution for a particular plant.

Plant Optimal (ppm) Link to reference
Mint 195-225 N , 178-218 K https://www.actahort.org/books/853/853_18.htm
Sweet Basil 180 Ca https://www.cabdirect.org/cabdirect/abstract/20013048426
Costmary 200 N, 200 K https://pubag.nal.usda.gov/catalog/732179
Mint <= 276 K http://www.scielo.br/scielo.php?pid=s0103-84782007000400006&script=sci_arttext
Chrysanthemum 159 Ca https://pdfs.semanticscholar.org/13ea/999605458e65d9023dadbabca48464a5fa70.pdf
Chrysanthemum 43 N (NH4) https://tinyurl.com/vqupwvf
Lavender 300 K https://scielo.conicyt.cl/scielo.php?pid=S0718-95162017005000023&script=sci_arttext&tlng=en
Rose Geranium 207 K http://ir.cut.ac.za/handle/11462/189
Rose Geranium 110 S, >= 68 P https://www.tandfonline.com/doi/full/10.1080/02571862.2012.744108
Spearmint 200 N https://www.sciencedirect.com/science/article/abs/pii/S2214786117300633
Lavender 200 N, 50 P https://www.sciencedirect.com/science/article/abs/pii/S0926669015306567
Mint 414 K https://sistemas.uft.edu.br/periodicos/index.php/JBB/article/view/601
Spearmint 50-70 P https://www.sciencedirect.com/science/article/pii/S0308814618317862
Marjoram >= 36 Mg https://www.actahort.org/books/548/548_57.htm
Salvia 150 N https://pubs.acs.org/doi/abs/10.1021/jf030308k
Dill 300 N https://www.actahort.org/books/936/936_22.htm
Summary of different papers addressing essential oil yield optimization in hydroponic setups by varying one or several nutrient concentration values.

In the table above I summarize the research I found concerning the optimization of some mineral nutrient in the hydroponic production of a plant, specifically to maximize the essential oil yield. All of these studies optimized the nutrient within a given range and a >= or <= sign is used whenever the optimal value found is at the top or bottom of the range respectively. When more than one nutrient was optimized in the paper, I give you the values for both nutrients so that you can glimpse the optimal. Whenever the researchers suggest an optimal range instead of a value within their research this is also included as a range. I tried to find papers representing all macro nutrients but studies optimizing some elements were hard to find (Mg for example). Although I tried to include as many species as possible some species are just more commonly studied, as they are commercially more relevant (like mint and basil).

From these research results we can immediately see some clear trends. From all the studies there is no result where optimal total nitrogen concentration is below 150 ppm and 3 out of the 4 studies I found, agree that the optimal N concentration is at 200 ppm. In the case of K all studies agree that K should be at least 200 ppm, but I did find a study on mint that got a value of 414 ppm, far larger than the value found in other studies for the same specie. This is not an uncommon discrepancy in hydroponics – optimal yields being mixed in a wide range above 200 ppm of K – which can be caused by other issues that can affect K absorption, such as the concentration of other important cations (like Ca and Mg) in the studies.

I was only able to find two studies that focused on Ca and both agree about optimal values between 150 and 180 ppm, although they address two completely different plant species (basil and chrysanthemum). In the case of Mg I found only one study and its conclusion was mainly that you want to have more than 36 ppm of Mg in solution. This is not surprising as Mg is rarely a growth limiting element in hydroponics and usually growth will not be limited to it unless its supply is very low compared to the supply of other nutrients (which is very rarely the case).

In the case of P, it’s not surprising that most papers that addressed this nutrient studied plants where the essential oils are mainly in the flowers (rose and lavender), as phosphorous is a nutrient commonly associated with flowering. In the case of rose the best value in the study was sadly the upper limit and in the case of lavender the optimal value reached was 50 ppm. In this case we can therefore probably only say that both studies share having an optimal result of >= 50 ppm but it’s hard to provide an upper bound for this. A study addressing P in spearmint also finds optimal P to be within exactly this range at 50-70 ppm.

Element ppm
N 200
P 60
K 200
Ca 160
Mg 45
A base “guess’ formulation for a plant producing essential oils

With these results in mind, we can sketch a base solution for a plant where essential oil production is being targeted.. An obvious guess would be to start with a solution with the concentration profile showed above. In this case we target N and K at 200 with an N:K ratio of 1 and we keep Ca at 160, making the K:Ca 1.25 (which is surprisingly close to the optimal value discussed in my Ca post). We leave P at 60 – the middle of the 50-70 range – and we keep Mg at 45, which is > 38 and is a value commonly used in regular hydroponic solutions. The above will certainly not be the best solution for any single plant a priori, but it might provide a good base to start optimizing from if the objective is essential oil production.